Overview
Posting detailed shipped orders to QuickBooks will create an individual invoice for each order.
However, there are settings to create a generic customer for each channel. Ensure that your Quickbridge settings are configured to your requirements.
If you only want to post order totals for profit and loss, use the Post General Journal Entries feature. It is recommended to reconcile payments from the Sellercloud interim account to your actual bank account into which payments are entered.
Post Orders to QuickBooks
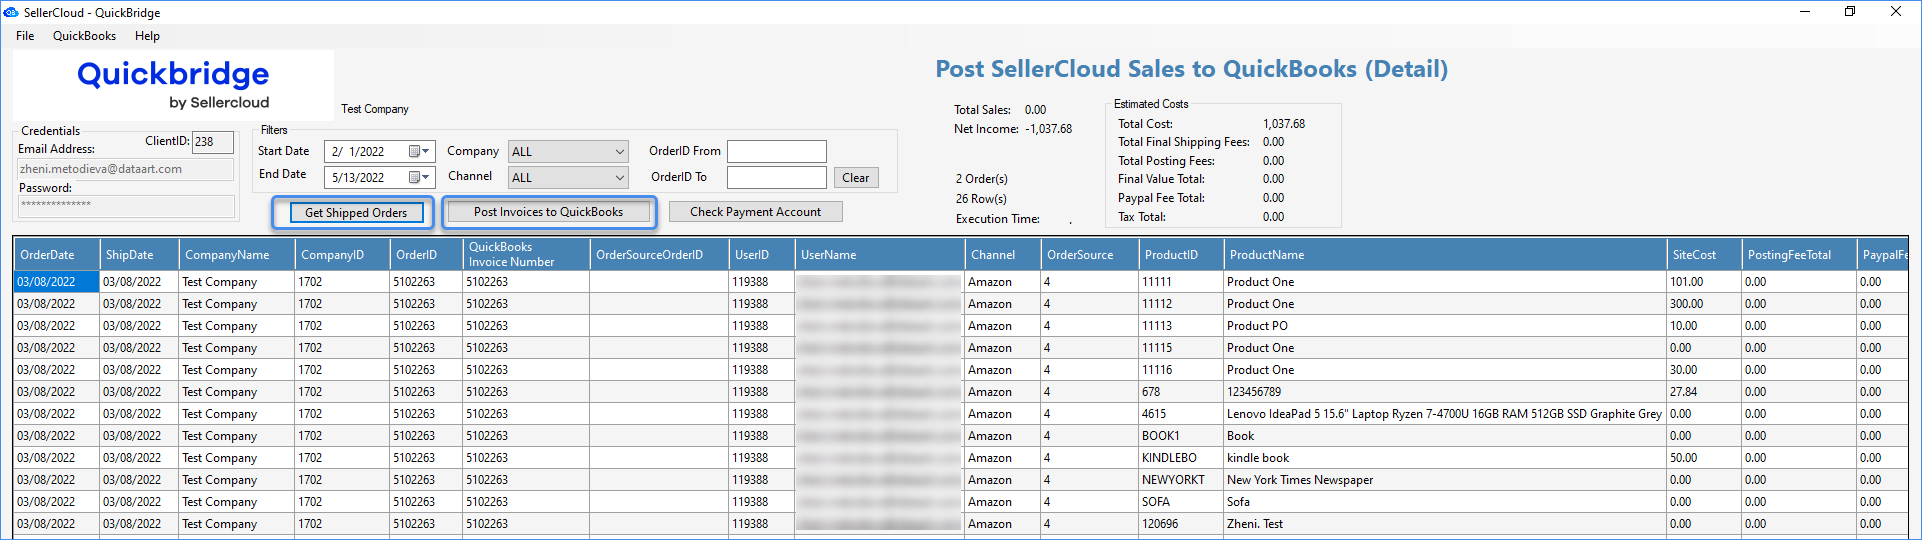
- Open QuickBooks on the same computer as Quickbridge.
- In Quickbridge, click Quickbooks > Post Detailed Shipped Orders.
- Choose the appropriate dates and other filters.
Note: Channel filter options appear only when orders from that channel exist in the specified date range. - Click Get Shipped Orders. The grid will populate with orders that have not yet been exported to Quickbooks.
- Click Post Invoices to Quickbooks and await the pop-up confirmation.
- In Quickbridge – Orders will be removed from the grid.
- In Sellercloud – Order Status will show as Quickbooks Exported.
- If you need to update an exported order, change the status to Mark as Not Exported to Quickbook from Sellercloud > Orders > Manage Orders > Select the order(s) > Action menu > Exported to Quickbook Status. The invoice will reappear in Quickbridge.
Exported Order Data in QuickBooks
- Customers – New accounts are created for each new customer, and returning customers have orders placed in their existing accounts. Channel orders can be set to a generic customer (QuickBooks > File > Options > Main tab > Use Generic Customer Name box); otherwise, the customer name in QuickBooks is populated with the order number.
- In Sellercloud, if you click Customers and open one, you can see the Business Name field. This can be mapped to a QuickBooks Customer for Wholesale, Local Store, Magento, and Groupon Channel orders.
- Payments – Based on the Mark Orders Paid setting, found in the File > Options > Main tab. When the relevant setting to post payments is enabled, a payment is posted to the corresponding Bank Account in QuickBooks. For channel orders, Payments are by default placed into interim accounts created by Quickbridge (Amazon Interim Account, eBay Interim Account, etc.) and the invoices in QuickBooks will be marked as paid, thereby moving the invoice balance from the A/R account to the Bank Account. Payments can also mapped to existing bank accounts, instead of using the default accounts created by Quickbridge for each channel, by enabling the setting Use Custom Bank Account Mappings to apply Invoice payments found in the File > Options > Sales Orders Tab in the Post Detailed Shipped Orders section.
- Products – All new products are entered into Items and Services and can be viewed in the Item List in QuickBooks
- Shipping costs and commission fees – These costs are exported to Accounts Payable as bills to a vendor, like the various carriers and channels. Note that vendor accounts are created as orders are imported, e.g., PayPal Fees, Commission Fee. You can prevent certain fees from posting by enabling their corresponding settings in the File > Options > Sales Orders Tab in the Post Fees to Quickbooks section. For the full list of options, see the Configure Quickbridge article.
Post Orders in Foreign Currency
By default, orders in a foreign currency will post to QuickBooks in USD using the conversion rate saved on the order. As of Version 1.0.9.8, you can post orders in the foreign currency using QuickBooks’ multi-currency feature.
Before using this feature, please read these key points (also shown below):
- Only use this option if the Multi-Currency feature is enabled in QuickBooks.
- You can only assign one currency per customer profile in QuickBooks. Therefore, you would need to create separate customer profiles in Sellercloud for customers with multiple currency orders
- All orders for existing QuickBooks customers will use the existing currency code. For orders where the customer doesn’t exist in QuickBooks, Quickbridge will create the customer with the orders currency. code. All future orders for that customer will use that currency code.
- If a customer already exists in QuickBooks using an unwanted currency code, alter the existing customer name slightly and Quickbridge will re-create the customer with the subsequent orders currency code.
Edit an Exported Order
You can easily edit any order that was already exported by first changing its status to Unexported, and then updating it. Here’s how:
- In Sellercloud, go to Orders > Manage Orders.
- In Default filters > Order # filter, enter the order and click Search.
- Select the order > click Action menu > Mark Quickbooks Unexported.
- Edit the order as needed.
- When done, you have two choices:
- Export the order to QuickBooks again, but first ensure the original order has been deleted to avoid duplicates.
- Edit the order manually in QuickBooks, and then mark the Sellercloud order as exported by selecting it as described above > Click Action menu > Mark Quickbooks Exported.
Custom Invoice Numbers
If you use QuickBridge v.1.1.2.4 or higher, you can set custom invoice numbers for your orders. Contact Sellercloud Support and ask them to create a Custom Column for Orders with the following details:
- Column Name: QUICKBOOKS_INVOICE_NUMBER
- Display Name: QuickBooks Invoice #
- Data Type: String
- String Length: 11
Once the column is created, in QuickBridge, go to File > Options > Sales Orders and enable Use the SellerCloud Order Custom Column.

At this point, you can update each order’s QuickBooks Invoice # Custom Column. Orders that don’t use the Custom Column will import the Sellercloud order number as the invoice number.
To optimize the process of updating the column for multiple orders in bulk, check with Support for options or plugin creation specific to your needs.