Overview
Fulfillment Latency represents the time dedicated to preparing, processing, and dispatching an item to the buyer. It is the end-to-end duration from the initial order placement to the product being ready for shipment.
The Fulfillment Latency indicates an extended shipping duration beyond the carrier’s delivery time and is regularly updated within the inventory feed. For example, setting the latency to 5 days for a product will prompt Amazon to feature a corresponding message: Orders from this seller require an additional processing time of 4 to 5 days.
Configure Fulfillment Latency
You can configure fulfillment latency either individually or in bulk.
Individually
To set fulfillment latency for a single product:
- Navigate to Catalog > Manage Catalog > Open a product.
- Access the Toolbox > Amazon Properties.
- Click Edit.
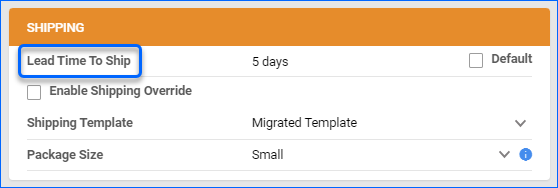
- Go to the Shipping Panel and Uncheck the Default checkbox next to Lead Time To Ship.
- Enter the number of days next to the Lead Time To Ship and click Save.
In Bulk
To set fulfillment latency for multiple products:
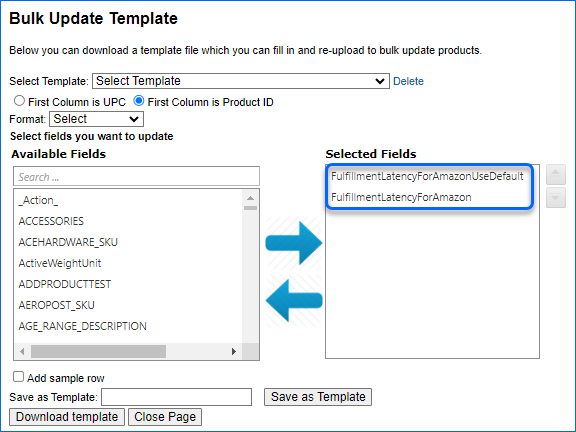
- Navigate to Catalog > Tools > Import Product Info > Bulk Product Update.
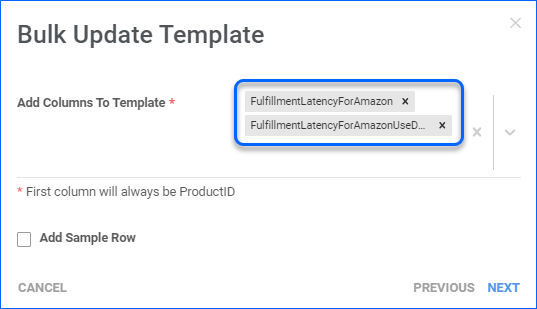
- Click on Generate Template > Create New Template > Choose your desired format.
- Select FulfillmentLatencyForAmazon and FulfillmentLatencyForAmazonUseDefault Column Headers.
- If you want to use unique values and not the default company latency, populate it with values between 0 and 30 and set FulfillmentLatencyForAmazonUseDefault to FALSE.
- Click Next and download the template.
- Populate the file with the required information and go back to Sellercloud to import it.
Alternatively, navigate to Catalog > Manage Catalog > Select your products > Action Menu > Update Inventory on Channel and choose Amazon from the available channels to update products in bulk.
Upon the next Amazon automatic inventory update, the value will refresh as it is included in the inventory feed.
Global Fulfillment Latency
You can temporarily override the product-level lead time for shipping. For instance, if you’re planning to be away on vacation and don’t want to activate a Vacation Mode for your account, you can utilize the global setting to temporarily prolong the lead time for shipping.
This enables customers to continue making purchases with the understanding that there will be a delay in shipping.
To enable fulfillment latency on a global level:
- Navigate to Settings > Companies > Manage Companies > Open a company.
- Access the Toolbox > Channels > Amazon Settings > General Settings.
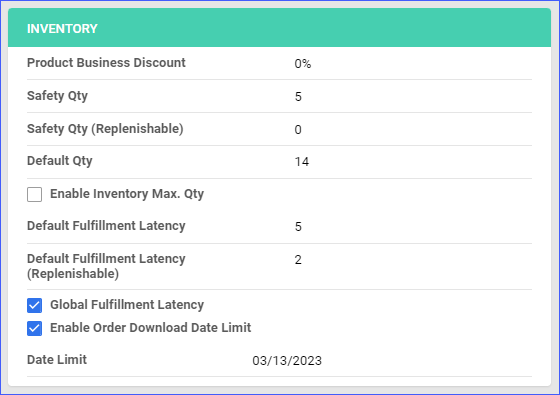
- In the Inventory tab, set the Default Fulfillment Latency and enable the Global Fulfillment Latency checkbox.
- The system will set the lead time for all products based on the longest available period.
Related Client Settings
To see the related Client Settings, navigate to Settings > Client Settings > General Client Settings. The following settings are available:
- Enable Custom Fulfillment Latency For Amazon -This setting lets you set different processing times for each product on Amazon. Instead of using a utilized latency period, you can customize how quickly each product is fulfilled, giving you more control over order processing.
Overview
Fulfillment Latency represents the time dedicated to preparing, processing, and dispatching an item to the buyer. It is the end-to-end duration from the initial order placement to the product being ready for shipment.
The Fulfillment Latency indicates an extended shipping duration beyond the carrier’s delivery time and is regularly updated within the inventory feed. For example, setting the latency to 5 days for a product will prompt Amazon to feature a corresponding message: Orders from this seller require an additional processing time of 4 to 5 days.
Configure Fulfillment Latency
You can configure fulfillment latency either individually or in bulk.
Individually
To set fulfillment latency for a single product:
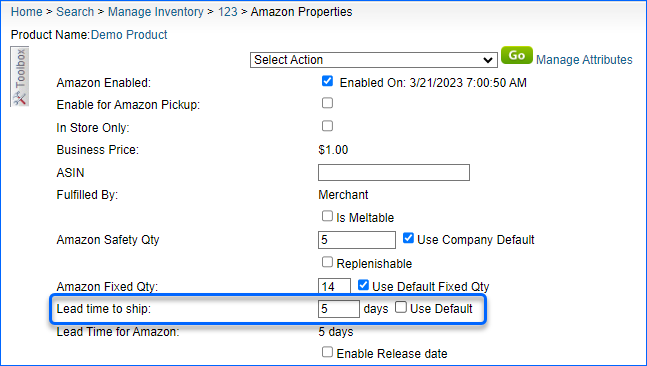
- Navigate to Inventory > Open a product.
- Access the Toolbox > Amazon Properties.
- Uncheck the Default checkbox next to Lead Time To Ship.
- Enter the number of days next to the Lead Time To Ship and click Save.
- The system will set the lead time for all products based on the longest available period.
In Bulk
To set fulfillment latency for multiple products:
- Navigate to Inventory > Bulk Update Products.
- Click on Get Template File.
- Select FulfillmentLatencyForAmazon and FulfillmentLatencyForAmazonUseDefault Column Headers.
- If you want to use unique values and not the default company latency, populate it with values between 1 and 30 and set FulfillmentLatencyForAmazonUseDefault to FALSE.
- Download the template, populate the file with the required information, and go back to Sellercloud to import it.
Alternatively, navigate to Inventory > Select your products > Action Menu > Update Inventory on Channel > Go, and choose Amazon from the available channels to update products in bulk.
Upon the next Amazon automatic inventory update, the value will refresh as it is included in the inventory feed.
Global Fulfillment Latency
You can temporarily override the product-level lead time for shipping. For instance, if you’re planning to be away on vacation and don’t want to activate a Vacation Mode for your account, you can utilize the global setting to temporarily prolong the lead time for shipping.
This enables customers to continue making purchases with the understanding that there will be a delay in shipping.
To enable fulfillment latency on a global level:
- Navigate to Settings > Open a company.
- Access the Toolbox > Amazon Settings > General Settings.
- Set the Default Fulfillment Latency and enable the Global Fulfillment Latency checkbox.
- The system will set the lead time for all products based on the longest available period.

Related Client Settings
To see the related Client Settings, navigate to Settings > Client Settings > General Client Settings. The following settings are available:
- Enable Custom Fulfillment Latency For Amazon -This setting lets you set different processing times for each product on Amazon. Instead of using a utilized latency period, you can customize how quickly each product is fulfilled, giving you more control over order processing.