Overview
You can create Channel invoices as a second step of Sellercloud’s Channel Invoice Workflow, to record your sales and revenue for each of your integrated channels, so that you can add and apply channel invoice payments.
Create a Channel Invoice
With Sellercloud you create a Channel Invoice for a Channel Customer based on a date range for shipped orders, so you can validate the statement against Sellercloud data and apply channel’s payment to it.
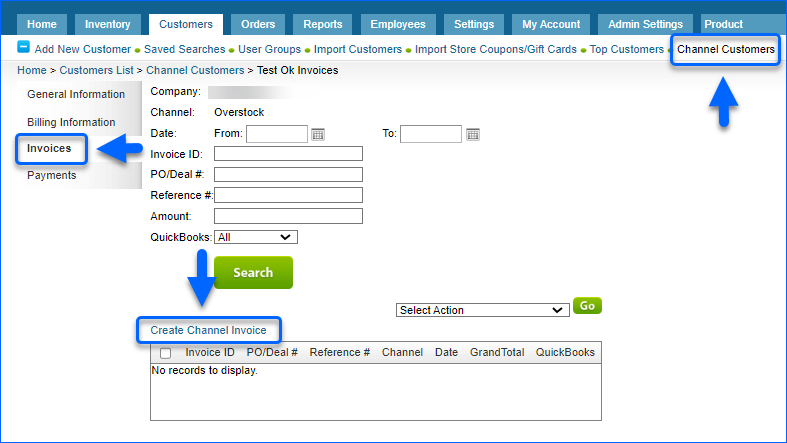
- Go to Customers > Channel Customers and click the channel customer’s Display Name.

- Navigate to Invoices and click Create Channel Invoice.
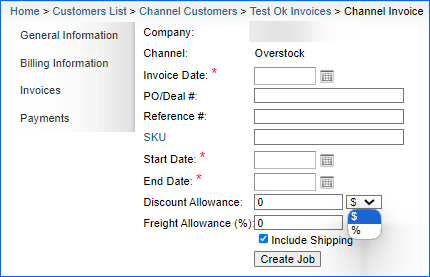
- Review and fill in the following Channel Invoice fields:
- Company – Displays the chosen company.
- Channel – Displays the channel customer.
- Invoice Date – Choose a date for the invoice.
- PO/Deal # – Purchase Order ID or Deal number associated with the channel invoice, if applicable.
- Reference # – Enter an optional number to cross-reference this invoice with your own internal invoicing system, or leave blank to have it auto-populated, if your QuickBridge setting Update Reference # with QuickBooks Invoice # is enabled.
- SKU – If the Channel Customer invoices you by Product ID, you can create their invoice by item SKU. You can either type in comma-separated SKUs or click the SKU hyperlink. In the Search Products pop-up, enter your SKU list in the textbox (one Product ID per line) or use the filters. Tick the checkboxes of the items from the results grid and click Select.
- Start Date – Select a start date of the range for shipped orders, to be included in the invoice.
- End Date – Select the end date of the range for shipped orders, to be included in the invoice.
- Discount Allowance – Defaults to the Discount Allowance set in the Channel Customer’s General Information. You have the option to update the discount per invoice. Enter the amount ($) or percentage (%) to deducts from the invoiced amount.
- Freight Allowance – Defaults to the Freight Allowance set in the Channel Customer’s General Information. You have the option to update the allowance per invoice. Enter the percentage the channel deducts from the shipping charges.
- Include Shipping – Select to add a Shipping Total line to the channel invoice, to represent the total order shipping amount. This setting does not apply to Groupon.
- Click Create Job. A Queued job of the type ChannelInvoiceSettlement is generated to create an invoice from all orders that shipped during your chosen date range.
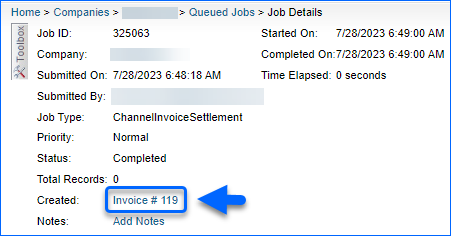
- Click the Job # to monitor the queued job and click the completed job’s Invoice # to open the new invoice.
Invoice Details and Grid
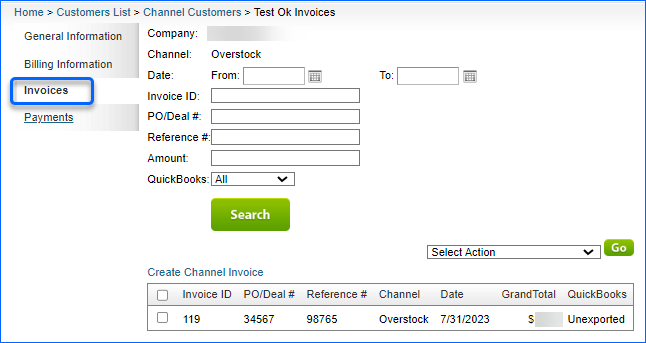
To see all channel invoices, navigate to the Channel Customer page and click Invoices.
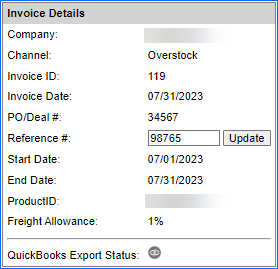
Invoice Details
Each Channel Customer Invoices has an Invoice Details panel.
In this panel you can find the following information:
- Company – Displays the channel customer company.
- Channel – Displays the channel customer.
- Invoice ID – Sellercloud’s auto-generated number for the channel invoice.
- Invoice Date – Invoice statement date.
- PO/Deal # – PO or Deal # associated with a channel invoice.
- Reference # – Optional internal invoicing system number. Use the Update button to enter or change the Reference number.
- Start and End Dates – Displays the invoiced period.
- ProductID – Shows the ID of the ordered item.
- Freight Allowance – Displays the percentage the channel deducts from the shipping charges.
- QuickBooks status – Status of the invoice’s export to QuickBooks. Only applicable if Enable QuickBooks Workflow is selected in the Client Settings.
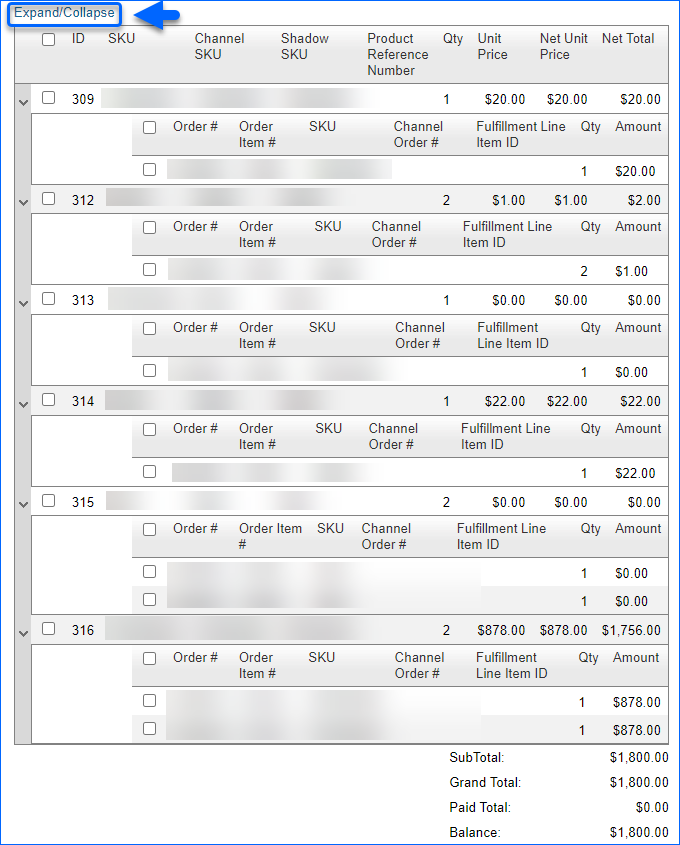
Invoice Grid
The Invoice Grid shows one line for every order item. Click Expand/Collapse to reveal/conceal each item’s order details.
| COLUMN | DESCRIPTION |
| ID | The identification number of the ordered SKU, for this invoice only. |
| SKU | Sellercloud Product SKU. |
| Channel SKU | Merchant SKU. |
| Shadow SKU | Populated for Shadow SKUs. |
| Product Reference Number | Item’s unique reference number from the channel. |
| Qty | Total quantity of all items in the order. |
| Unit Price | Product’s price prior to the application of any discount. |
| Net Unit Price | Product’s price after Freight Allowance and Discount Allowance are applied. |
| Net Total | Total price for the purchased quantity of items, after applicable discounts. |
| Order # | Unique order identification number in Sellercloud. |
| Order Item # | Sellercloud’s unique identification number for each item. This number originates from the order. |
| SKU | Product SKU. |
| Channel Order # | Unique order number from the channel. |
| Fulfillment Line Item ID | Unique reference number for each item ID, primarily for Groupon. |
| Qty | Total quantity units of this SKU for this order. |
| Amount | Price of an ordered item. |
| SubTotal | The Net Price of all orders in the invoice, excluding Shipping fees. |
| Grand Total | Invoice Total amount to be paid, after all discounts, taxes and fees are applied.
If the Include Shipping setting is not selected during invoice creation, the SubTotal will be the same as Grand Total. |
| Paid Total | Amount of the channel payment that has been collected for this invoice. |
| Balance | Remaining invoice amount to be paid (Grand Total – Paid Total). |
Invoice Actions
You can perform Invoice Actions either Individually or In Bulk.
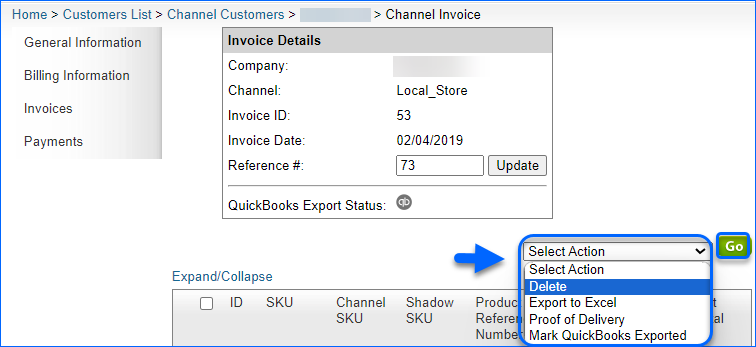
Individual Actions
To perform Individual Invoice Actions:
- Open your Invoice and navigate to its Action menu.
- From the dropdown, select:
- Delete – Check an Order # and select this Action, to delete it from your invoice.
- Export to Excel – Use this Action, to export your Invoice as an Excel file.
- Proof of Delivery – Select an Order #, to export a Proof of Delivery as Excel file with tracking numbers for each item in the selected order. To export all orders, do not specify an Order #.
- Mark QuickBooks Exported – This Action will mark the invoice as Exported to QuickBooks, if the Client Setting Enable QuickBooks WorkFlow is set to true.
- Click Go.
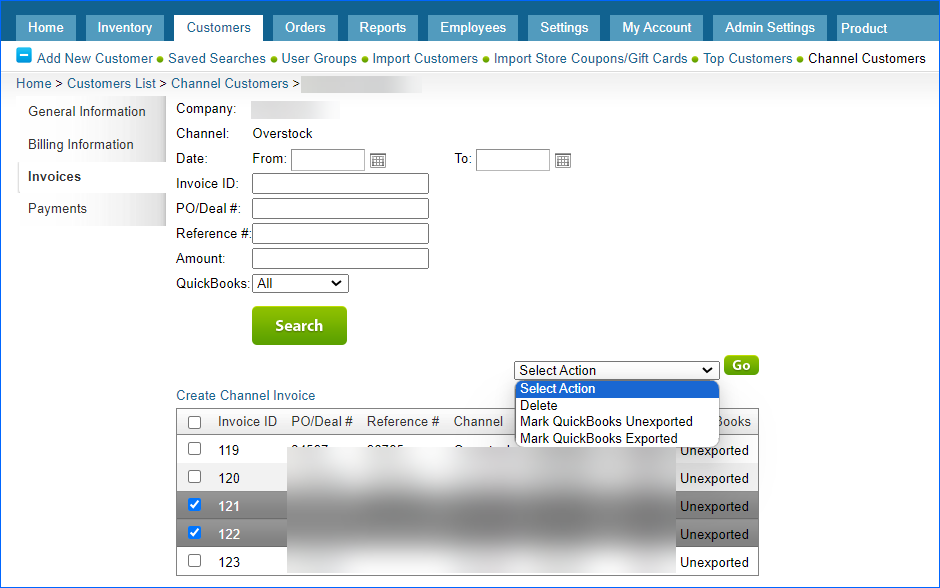
In Bulk Actions
To manage Channel Customer Invoices In Bulk:
- Navigate to Customer > Channel Customer > Invoices.
- Check the required invoices and Select Action from the dropdown menu:
- Delete – To delete the chosen invoice.
- Mark QuickBooks Unexported – Use to mark the invoice as QuickBooks Unexported.
- Mark QuickBooks Exported – Use to mark the invoice as QuickBooks Exported.
- Click Go.
