Overview
When you integrate your Sellercloud account with FullBeauty, you can configure various product attributes, view inventory, define prices, and update products on FullBeauty. The FullBeauty (OneStopPlus) Product Properties page enables you to manage your FullBeauty listings details.
This article describes the available FullBeauty Product Properties in Sellercloud and includes links to related articles for more information. To explore other relevant topics, refer to our FullBeauty Category.
FullBeauty (OneStopPlus) Product Properties
To access FullBeauty (OneStopPlus) Product Properties page:
- Navigate to Catalog > Manage Catalog and select a product.
- From the Toolbox, choose OneStopPlus.
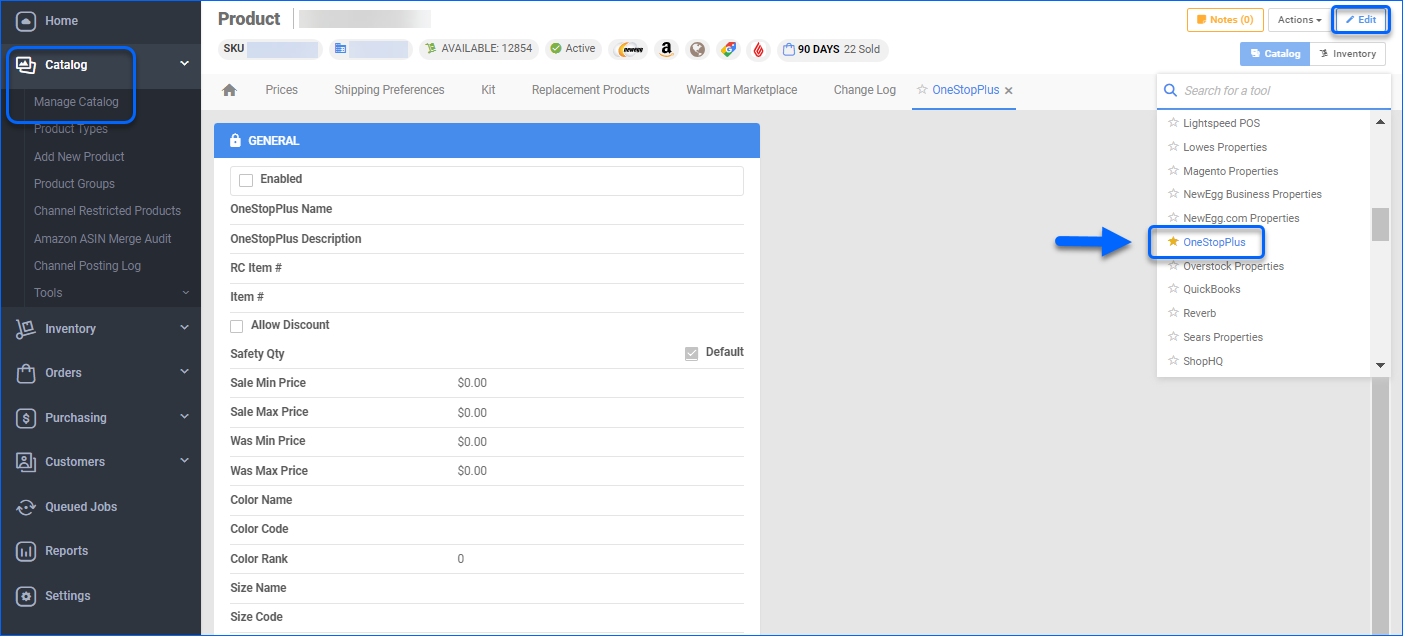
General Panel
| Field | Description |
| Enabled | By enabling the selected product, you allow Sellercloud to send automatic inventory and price updates to OneStopPlus/FullBeauty. |
| OneStopPlus Name | The product title that will appear on the FullBeauty website. |
| OneStopPlus Description | The product description that appears in the FullBeauty listing. This description will override the product’s default description. |
| RC Item # | Do not populate this field. The RC Item # is generated by FullBeauty (OneStopPlus). |
| Item # | This is your FullBeauty (OneStopPlus) product identifier. The item number should be unique for each product. If you create a SKU in Sellercloud with an active FullBeauty listing, ensure that the value in this field matches the Item #. |
| Allow Discount | Enable this setting to activate a discount based on the appointed Sale Min Price. |
| Safety Qty | A quantity to subtract from the Available Qty to prevent overselling. This amount won’t be included in the inventory feed. Check Default to use the Safety Qty from your Company’s FullBeauty (OneStopPlus) settings. |
| Sale Min Price | Specify the minimum total price you are willing to sell your item. |
| Sale Max Price | Indicate the product’s maximum selling price. |
| Was Min Price | Optional field. If provided, the value will be displayed alongside the Sale Min Price to indicate the original price of the product. |
| Was Max Price | Optional field. If provided, this value will be displayed alongside the Sale Max Price to indicate the original price of the product. |
| Color Name | Specify the item’s color. |
| Color Code | Contains color code or color identifier in its abbreviated form. |
| Color Rank | Numeric value (starts with 1) that specifies the order of colors to display in your listing. |
| Size Name | Indicate the item’s size. |
| Size Code | Specifies a size code that needs to be consistent across all SKUs. For example:
Size Code: SM Size Name: SMALL |
| Size Rank | Numeric value (starts with 1) that specifies the order of sizes to display in your listing. |
| Swatch Image URL | An optional field that allows you to insert the web address (URL) leading to an image file of a specific color swatch in your listing. Files larger than 10K will be rejected. |
| Color Image URL | An optional field. Insert the web address (URL) that links to an image of your product in a specific color. The image should be greater than 500 and less than 2000 width pixels. |
| Tax Classification | Select the appropriate tax category from the dropdown menu:
|
| Classification Category | Choose the appropriate product classification:
|
| Clothing Type | Once you select a Classification Category, you can specify the clothing details. This information will be sent to FullBeauty as a Clothing Type. |
Inventory Panel
| Replenishable | Enable for SKUs that are consistently restocked or tend to restock quickly. It keeps your listings active and prevents you from missing out on potential sales. |
To modify multiple products simultaneously, use the Bulk Update tool.
Actions
Sellercloud provides you with two types of actions to manage your FullBeauty listings – Individual and Bulk. The Individual Actions enable you to manage your listings at the product level, while the Bulk Actions allow you to manage multiple listings at once.
Individual Actions
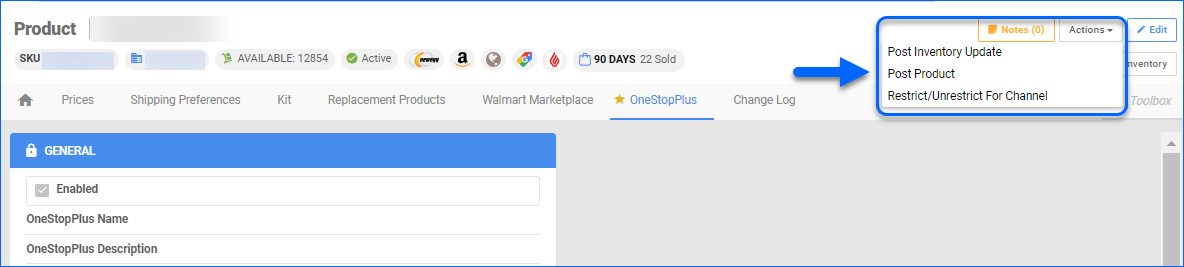
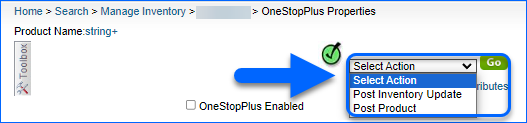
To access the product’s Action menu, go to Manage Catalog > Open a Product > Toolbox > OneStopPlus Properties > Actions.
- Navigate to Catalog > Manage Catalog and open a product.
- From the Actions menu, you can select:
- Post Inventory Update – Sends inventory updates to FullBeauty.
- Post Product – Creates the product listing. You can use this action to update posted listings fully.
- Restrict/Unrestrict For Channel – This action temporarily restricts any information for that product from being sent to FullBeauty. This includes automatic updates or even posting to FullBeauty (OneStopPlus).
Bulk Actions
Some of the FullBeauty (OneStopPlus)-related product Actions can also be performed in bulk:
- Navigate to Catalog > Manage Catalog and select your products.
- From the Action menu, choose the desired action.
- Once done, Sellercloud will send information for the selected products to FullBeauty (OneStopPlus).
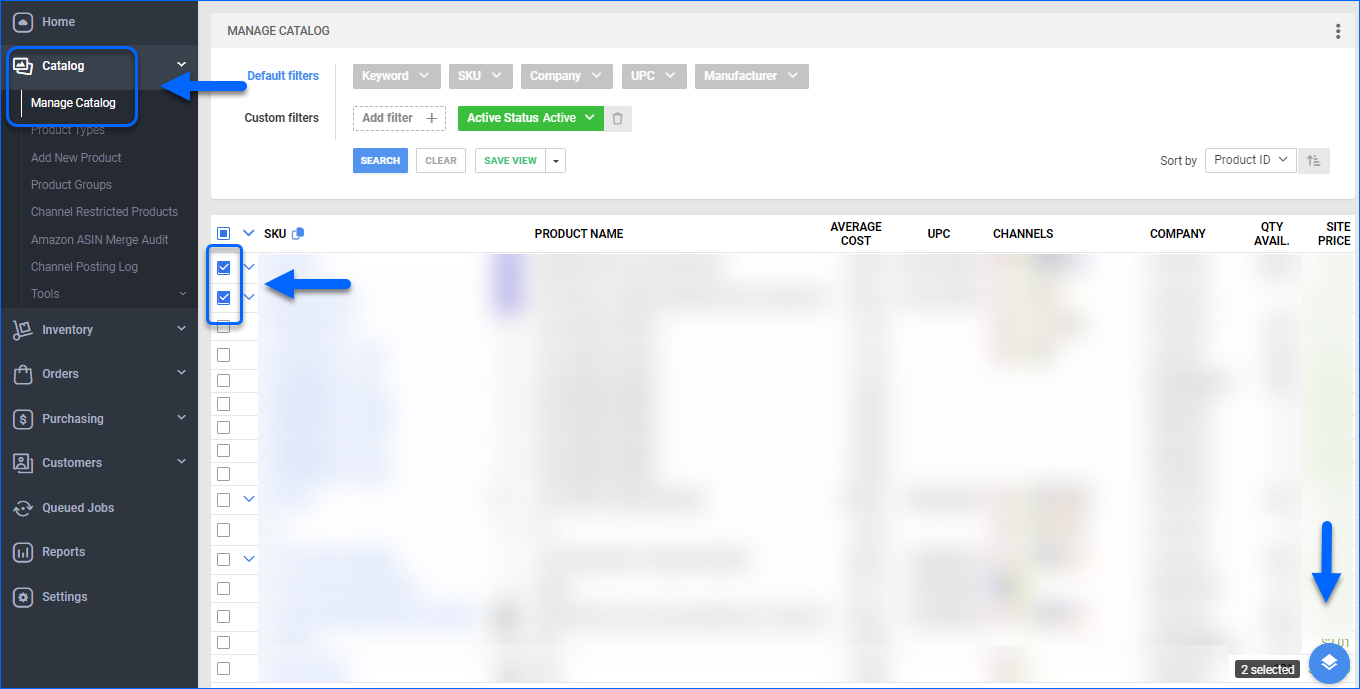
Some of the available Bulk Actions are:
- Launch on Channel..
- Enable/Disable For Channel…
- Update Inventory on Channel
- Restrict/Unrestrict For Channel
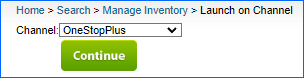
Once you choose any of the above-mentioned actions, a pop-up window will appear, where you will have to choose Full Beauty.

Overview
When you integrate your Sellercloud account with FullBeauty, you can configure various product attributes, view inventory, define prices, and update products on FullBeauty. The FullBeauty (OneStopPlus) Product Properties page enables you to manage the displayed information on your FullBeauty listings and prepare your products for posting.
This article describes the available FullBeauty Product Properties in Sellercloud and includes links to related articles for more information. To explore other relevant topics, refer to our FullBeauty Category.
FullBeauty (OneStopPlus) Product Properties
To access FullBeauty (OneStopPlus) Product Properties page:
- Navigate to Inventory > Manage Inventory and select a product.
- From the Toolbox, choose OneStopPlus.
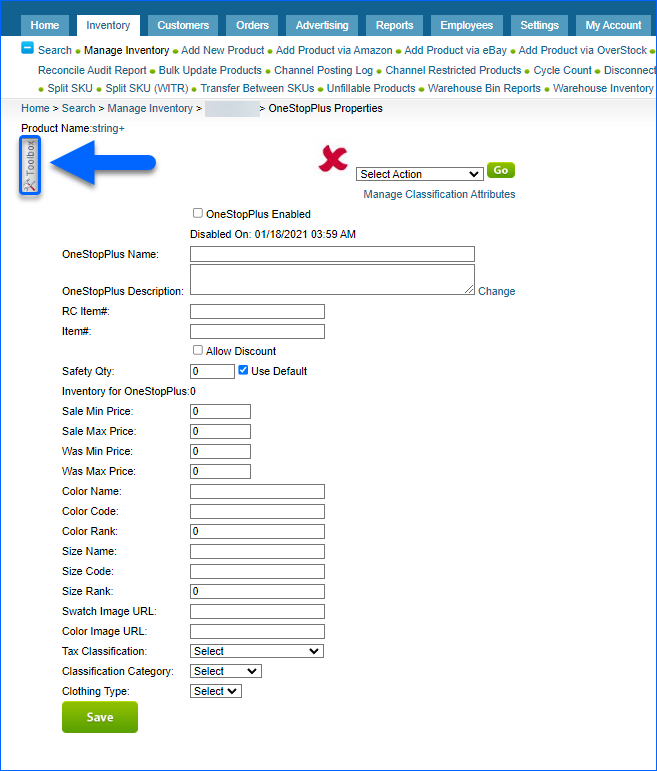
Refer to the table below for detailed information on the available product properties.
| Field | Description |
| OneStopPlus Enabled | By enabling the selected product, you allow Sellercloud to send inventory and price updates to OneStopPlus/FullBeauty. |
| OneStopPlus Name | The product title that will appear on the FullBeauty website. |
| OneStopPlus Description | The product description that appears in the FullBeauty listing. This description will override the product’s default description. |
| RC Item # | Do not populate this field – it is generated by FullBeauty (OneStopPlus). |
| Item # | This is your FullBeauty (OneStopPlus) product identifier. The item number should be unique per product. If you create a SKU in Sellercloud with an active FullBeauty listing, ensure that the value in this field matches the Item #. |
| Allow Discount | Enable this setting to activate a discount based on the appointed Sale Min Price. |
| Safety Qty | A quantity to subtract from the Available Qty to prevent overselling. This amount won’t be included in the inventory feed. Check Use Default to utilize the Safety Qty from your Company’s FullBeauty (OneStopPlus) settings. |
| Sale Min Price | Specify the minimum total price at which you are willing to sell your item once a discount is applied. |
| Sale Max Price | Indicate product’s total sale price. |
| Was Min Price | An optional field. If provided, the value will be displayed alongside the Sale Min Price, to indicate the original price of the product. |
| Was Max Price | An optional field. If provided, this value will be displayed alongside the Sale Max Price, to indicate the original price of the product. |
| Color Name | Specify the item’s color. |
| Color Code | Contains color code or color identifier in its abbreviated form. |
| Color Rank | Numeric value (starts with 1) that specifies the order of colors to display in your listing. |
| Size Name | Specify the item’s size. |
| Size Code | Specifies a size code that needs to be consistent across all SKUs. For example:
Size Code: SM Size Name: SMALL |
| Size Rank | Numeric value (starts with 1) that specifies the order of sizes to display in your listing. |
| Swatch Image URL | This is an optional field. In it, insert the web address (URL) leading to an image file of a specific color swatch in your listing. Files larger than 10K will be rejected. |
| Color Image URL | Optional field. Insert the web address (URL) that links to an image of your product in a specific color. The image should be greater than 500 and less than 2000 width pixels. |
| Tax Classification | Select the appropriate tax category from the dropdown menu:
|
| Classification Category | Choose the appropriate product classification:
|
| Clothing Type | Once you select a Classification Category, you can click Manage Classification Attributes and specify the clothing details, if desired. This information will be sent to FullBeauty as a Clothing Type. |
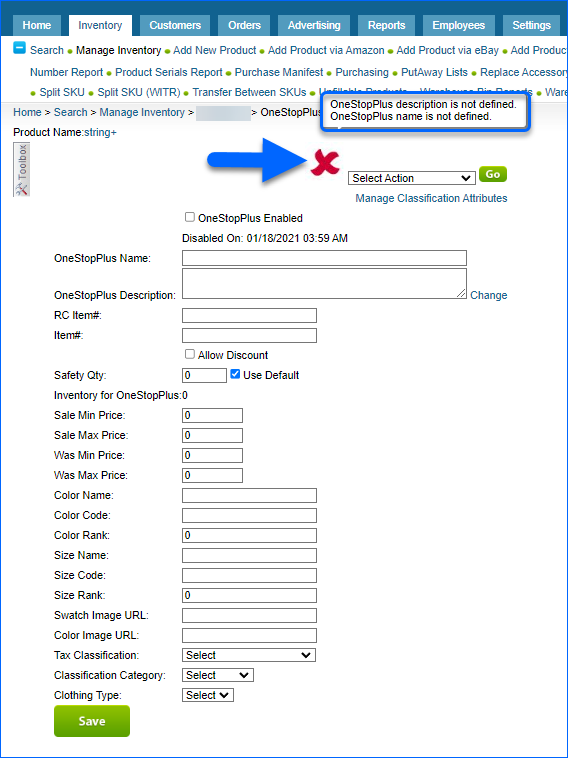
Ready To Post
Sellercloud’s Ready to Post functionality allows you to easily visualize if a product is ready for listing on FullBeauty – products that are not ready will display a red X. Hover over the X to reveal missing attributes.
Manage FullBeauty (OneStopPlus) Product Fields
You can configure the FullBeauty (OneStopPlus) Properties of your products Individually or In bulk.
Individually
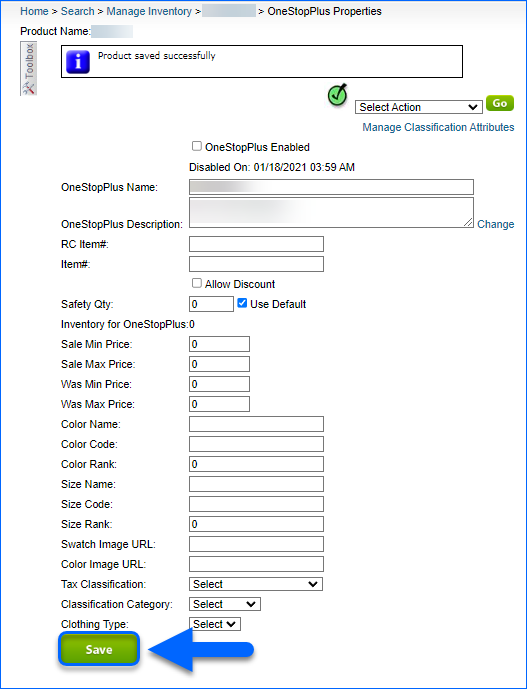
To update product properties individually:
- Navigate to Inventory > Manage Inventory and open a product.
- From the Toolbox, choose OneStopPlus.
- Once done with your changes, click Save.
In Bulk
To bulk update FullBeauty (OneStopPlus) product properties:
- Navigate to Inventory > Bulk Update Products.
- Click Get Template file.
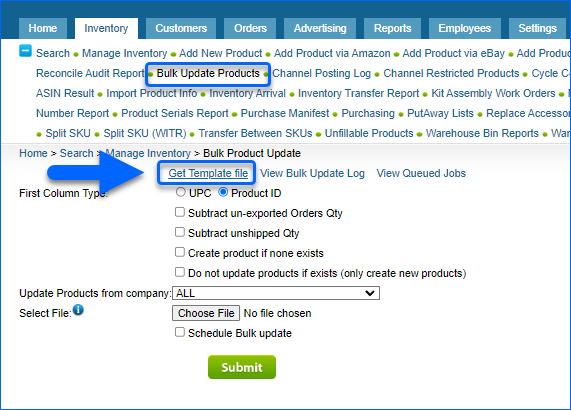
- Choose your desired Format (either CSV, Tab Delimited, or Excel) and use the arrows to select the desired Fields. If required, check Add Sample Row and appoint the sample SKU.
- To keep the template for future uses, name it and click Save as Template.
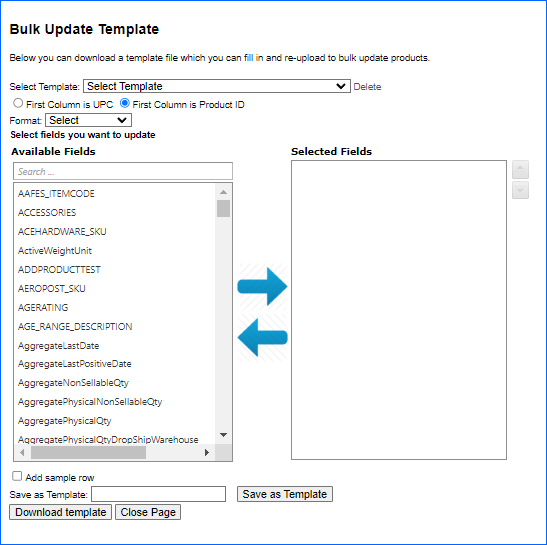
- Click Download template.
- Populate the newly downloaded file.
- Once done, return to Sellercloud and upload your template via the Select File button.
- To select a specific update time, check Schedule Bulk Update and point out the date and time.
- Click Submit.
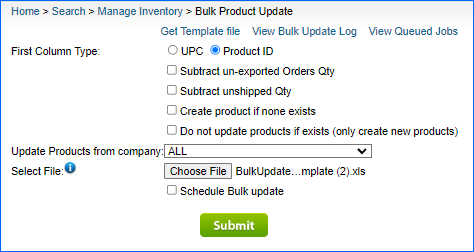
A Product Bulk Update Queued job will be created, from which you can monitor the status of your task. After a successful job completion, the bulk update has been processed in Sellercloud and the changes will be reflected on FullBeauty (OneStopPlus) with the next inventory update.
Actions
You can perform a few product Actions individually from the respective dropdown menu:
- Navigate to Inventory > Manage Inventory and open a product.
- From the Actions menu, you can select:
- Post Inventory Update – Sends inventory updates to FullBeauty.
- Post Product – Creates the product’s listing. You can use this action to update posted listings fully.
Bulk Actions
Some of the FullBeauty (OneStopPlus)-related product Actions can also be performed in bulk:
- Navigate to Inventory and select your products.
- From the Action menu, choose the desired action and click Go.
- Once done, Sellercloud will send information for the selected products to FullBeauty (OneStopPlus).
Some of the available Bulk Actions are:
- Launch on Channel
- Enable/Disable For Channel
- Update Inventory on Channel
- Restrict/Unrestrict For Channel
Once you choose any of the above-mentioned actions, you will be prompted to select a channel – pick OneStopPlus from the dropdown menu and click Continue.