Check out this short tour on mapping accounts and names imported from QuickBooks!
The Post General Journal Entries feature lets you post the sum totals of orders’ transactions to their specified accounts in QuickBooks. Totals are summed up by mapped journal entry (JE) types.
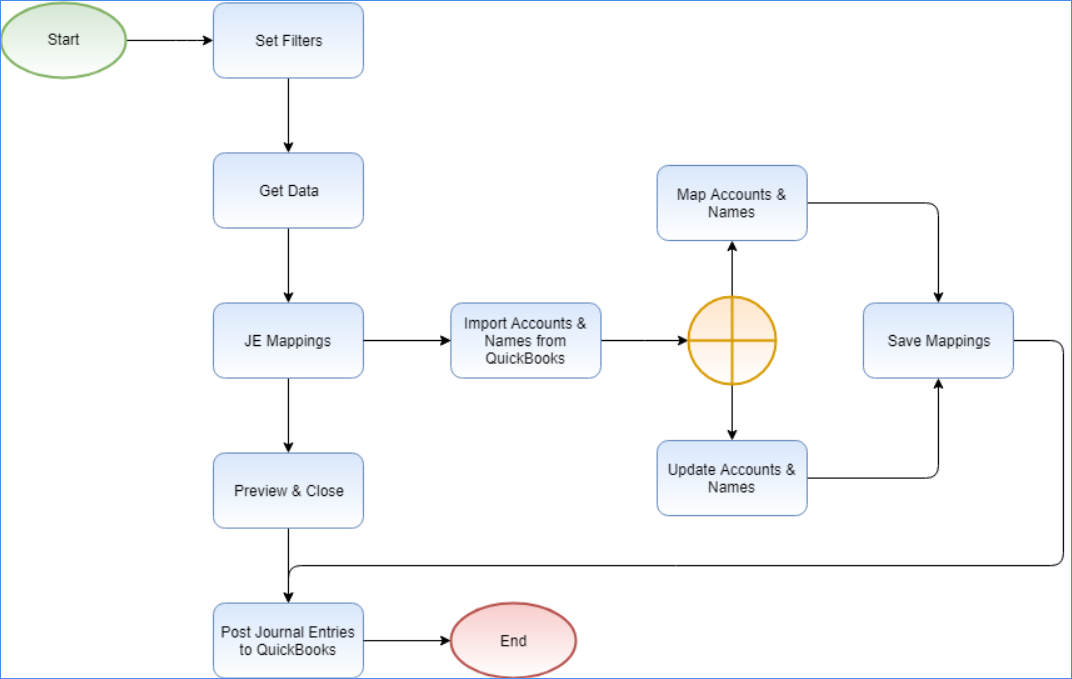
Mapping and posting workflow
The mapping-and-posting workflow in QuickBridge has 3 sequential parts:
- First, configure your QuickBridge Settings. This is required before mapping and posting entries, below.
- Next, map the journal entry (JE) types. You can map to an account or to an account’s sub-account. Mapping requires setup by a competent accounting professional.
- Third, post the general journal entries to QuickBooks.
The flow diagram illustrates the mapping- and-posting parts of the workflow. Note: The diagram also shows the update of existing mappings.
Mapping and posting entries
Prerequisites:
A) Ensure that QuickBooks is open and running on the same computer as QuickBridge.
B) If this is the first time that QuickBridge is connecting with QuickBooks, QuickBridge will prompt you to give QuickBooks permission: In QuickBooks > click Edit > Preferences > Integrated Applications > Company Preferences tab > click Allow Access to Sellercloud.
To map JE types and post entries to QuickBooks:
- In QuickBridge, click QuickBooks Posting Options > Post General Journal Entries. The Post General Journal Entries to QuickBooks window appears, below:
 Clicking View JE Mappings (in yellow, above) opens Sellercloud’s Journal Entry Mappings page, which is another way to view and edit your existing mappings per company, across all channels. While this is convenient for viewing/editing, it is not recommended for your initial mappings; it can lead to mapping irrelevant journal entry types for relevant channels or even for irrelevant channels.
 - Enter the Trans Start Date and Trans End Date, and choose a Company and Channel.
- Optional: To post transactions by Settlement ID, enter the ID to see all transactions associated with it. Currently, this is relevant for Amazon, FBA, eBay, Walmart Marketplace, and Newegg. If you enter a settlement ID, clicking Get Data will change the Trans Start Date and Trans End Date to the start-and-end dates of that settlement, and will also change the Transaction Date to the settlement’s end date.
- Transaction Date – If you are not filtering by settlement ID, enter the preferred date for the journal entry. If you do not enter a date, the field will populate with today’s date.
- You can filter Trans Type by Order or Non-Order fees. Currently, this is only relevant for Amazon and FBA. This may be useful for bringing in non-order related fees when using Post Detailed Shipped Orders to QuickBooks.
- Click Get Data. The grid loads with a list of individual transactions, as shown in the two images below. Note, however, that when you actually post the journal entries to QuickBooks, only the journal entry types’ totals will post. Notice that each transaction in the grid has a checkbox; the top box selects/unselects all transactions (default is all selected). This is useful to map one journal entry type to two different QuickBooks accounts, by separating the transactions and making a second posting with the specified mappings. The Posting Amounts section (highlighted in yellow in the images below) shows totals for display only; these do not reflect the exact breakdown of the journal entry types with specific amounts. To preview the exact breakdown of the actual posting amounts, click JE Mappings.
Order transaction types:
Non-order transaction types:
The Posting Amounts section (in yellow, above) shows totals for display only; these do not reflect the exact breakdown of the journal entry types with specific amounts. To preview the exact breakdown of the actual posting amounts, click JE Mappings.
- Under the Posting Information section, click JE Mappings to open the account mapping and totals to post to each account. Below are 2 sample grid results.
Order transaction types:

Non-order transaction types:

- Proceed as follows:
- If you have mapped: Close the Account & Name Mappings window by clicking Close, and go right to Step #11.
- If you have not mapped: Click the Import Accounts & Names from QuickBooks button to import your QuickBooks’ accounts and names so you can:
- Map the journal entry types initially; or
- Revise the existing mappings, if any
- Click in each of these 4 columns to map them, based on the accounts and names you imported from QuickBooks’ Chart of Accounts:
- Debit Account – Map to a Chart of Accounts account
- Associated Debit Name – Map to a vendor or customer, based on the Chart of Accounts
- Credit Account – Map to a Chart of Accounts account
- Associated Credit Name – Map to a vendor or customer, based on the Chart of Accounts
- To save the new values to Sellercloud, click Save Mappings.
- Export the general journal entries to QuickBooks by clicking Post Journal Entries to QuickBooks.
- Repeat these mappings for all journal entry types for a channel, and repeat for each channel.
Related QuickBridge settings
There are several QuickBridge settings to configure for the Post General Journal Entries feature:
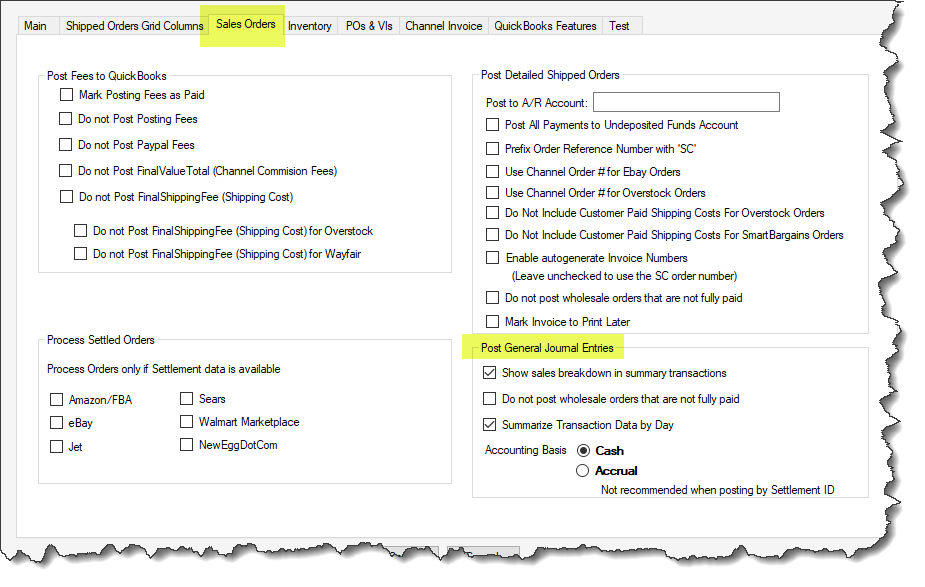
- Show sales breakdown in summary transactions (File > Options > Sales Orders tab) – This will impact the Sales journal entry type.
- If unchecked (default) – Sales will be the Grand Total of the order
- If checked – Sales will be separated into the following journal entry types:
- SubTotal
- Discount
- ShippingDiscount
- SalesTax
- ShippingTotal
- Handling
- Insurance
- GiftWrapCharge
- Summarize Transaction Data by Day – Each date with transactions will have its own journal entry instead of one journal entry for all dates with transactions within your selected date range. Use this setting to see your sales activity in QuickBooks by its actual transaction date, not by your posting date.