Create and Manage Vendors


Overview

In this article, you will learn how to create and manage vendor profiles in Sellercloud. You can use these profiles to create Purchase Orders, dropship orders, and apply Vendor Promotions and discounts to products.


Create Vendors

If the vendor is client-wide (the vendor applies to all companies of a client), you don’t need to specify the company. However, to create a company-wide vendor (vendor applies to only one company), you should specify the company. Learn more about client-wide and company-wide vendors.

Individually

To create a vendor:
  1. Go to the New Vendor page and add a New Vendor. There are two ways to add a vendor:
    1. Go to Purchasing > Vendors > Create New Vendor.
    2. Go to Purchasing > Vendors > Manage Vendors, then select the Add Vendor action.
  2. Fill in the Vendor Info, Address, and Products.create new vendor
  3. After you create the new vendor, the Vendor page will open.vendor page On this page, you can edit the vendor info, adjust Dropship Preferences, and add Products from the Toolbox.

Bulk

To create new vendors in bulk:

  1. Go to the Import Vendors page:
    1. Purchasing > Tools > Import Purchase Info > Import Vendors.
    2. Purchasing > Vendors > Manage Vendors > Actions > Import.
    3. Settings > Companies > Manage Companies > Company > Toolbox > Vendors > Import.
  2. Click the Download icon and choose a format to download the template.
  3. Refer to the tables below for details and fill out the template:
    1. The following columns are required:
      REQUIRED COLUMN DESCRIPTION
      Vendor The vendor’s name.
      Email The vendor’s contact email address.
      Account No Your account number with the vendor.
      BillingContactFirstName The first name of the person responsible for billing purposes for the vendor.
      BillingContactLastName The last name of the person responsible for billing purposes for the vendor.
      BillingAddress 1 The first line of the street address for the vendor’s billing contact.
      BillingAddress 2 The second line of the street address for the vendor’s billing contact (if applicable).
      BillingCity The city where the vendor’s billing contact is located.
      BillingState The state where the vendor’s billing contact is located.
      BillingZipCode The zip code of the vendor’s billing contact.
      BillingPhone The phone number of the vendor’s billing contact.
      BillingFax The fax number of the vendor’s billing contact.
    2. The following columns are optional:
      OPTIONAL COLUMN DESCRIPTION
      IsDefault True or False. Enter True to set a default vendor.
      ShippingContactFirstName The first name of the primary contact for shipments.
      ShippingContactLastName The last name of the primary contact for shipments.
      ShippingAddress 1 The first line of the street address where shipments will originate from.
      ShippingAddress 2 The second line of the street address where shipments will originate from (if applicable).
      ShippingCity The city where shipments will originate from.
      ShippingState The state where shipments will originate from.
      ShippingZipCode The zip code of the location where shipments will originate from.
      ShippingPhone The phone number of the person or department responsible for shipping.
      ShippingFax The fax number for the person or department responsible for shipping.
      DefaultWarehouseID The ID of the vendor’s default Ship From Warehouse.
      POMultiDiscountTreatAsDiscount True or False. Set to True to show Multi-Discounts applied as the Multi Discount Total in the Purchase Orders’ Total panel.
      VendorAlias Another name for the same vendor.
      EmailAddressCC When emailing the vendor, you will CC this email address.
      PaymentTerm Add any Payment Terms that reflect the agreements between you and your vendor for when payments are due.
      DefaultPurchaser The ID or username of the Sellercloud employee who is the default purchaser from the vendor.
      PredictivePastDays The number of days with data that will be analyzed for predictive purposes.
      PredictiveFutureDays The number of days in the future that predictions are being made for.
      FreeShippingAmount The minimum order amount that qualifies for free shipping.
      SmallOrderAmount The maximum order amount that is considered a small order.
      SmallOrderFee The fee charged for small orders that fall below the small order amount threshold.
      LeadTimeToShipFromSite The number of days it takes for products to be shipped from your warehouse or site to your customers.
      LeadTimeToShipFromVendor The number of days it takes for products to be shipped from the vendor’s warehouse or site. Used in Predictive Purchasing.
      EnableSendMultiplePOInOneEmail True or False. Set to True to allow multiple POs to be sent via one email.
      DisplayPOOnProductDashBoardPanel True or False. If you set this column to True, Purchase Orders from this vendor will show up on products’ Toolbox > Purchasing.
      DonotCountInventoryForDropShipPO True or False. Whether to count inventory for dropship purchase orders or not. Enable it to ensure your inventory count isn’t impacted or adjusted for pending or actual drop shipped orders.
      POExportFormat The format in which you export Purchase Orders. You can select from a few choices and even click Custom and use plugins here.
  4. Save your file and import it by clicking the Import button.
  5. To access your queued job, click the notification or access Queued Jobs from the main menu.
You can also bulk import vendors by going to Purchasing > Tools > Import Purchase Info > Import Vendor Price. By default, you will create any vendor included in the import if they don’t exist in Sellercloud yet. The setting Do Not Create Vendor If Not Exists is there to prevent vendor creation.

Manage Existing Vendors

You can configure Dropship Preferences and view existing Purchase Orders and Products related to the selected vendor by navigating to Purchasing > Vendors > Manage Vendors > Toolbox.

From the Toolbox, you can also access additional options like Invoices, Payments, and Receive Sessions if you use the Vendor Invoices workflow.

configure Dropship Preferences, view Products, Purchase Orders

To edit existing vendors using the Import Vendors action:

  1. Go to the Import Vendors page (see above for instructions on accessing this page).
  2. Choose a template format and download the template by clicking the Download icon.
  3. Fill in the required columns with updated information. The Vendor column must match the existing Vendor Name.
  4. Save your file and import it by clicking the Import button.

Merge Vendors

If you have duplicate vendor listings, you can merge them. Duplicate versions of the same information can lead to confusion and errors, causing you to select the wrong vendor. By merging duplicate vendors, you can ensure all information is consolidated and up-to-date.

This action is not reversible. It will delete vendors from the system and update all their records (Products, POs, and more) with the Merge To Vendor.

To merge vendors:

  1. Go to Purchasing > Vendors > Manage Vendors.
  2. Find and select the vendors to merge.
  3. Click the Actions icon.
  4. Select a Merge To Vendor and click Continue.
  5. A warning message appears. Click Yes to continue.

Vendor Defaults

To set default information and actions for vendors:

  1. Go to Purchasing > Vendors > Vendor Defaults.
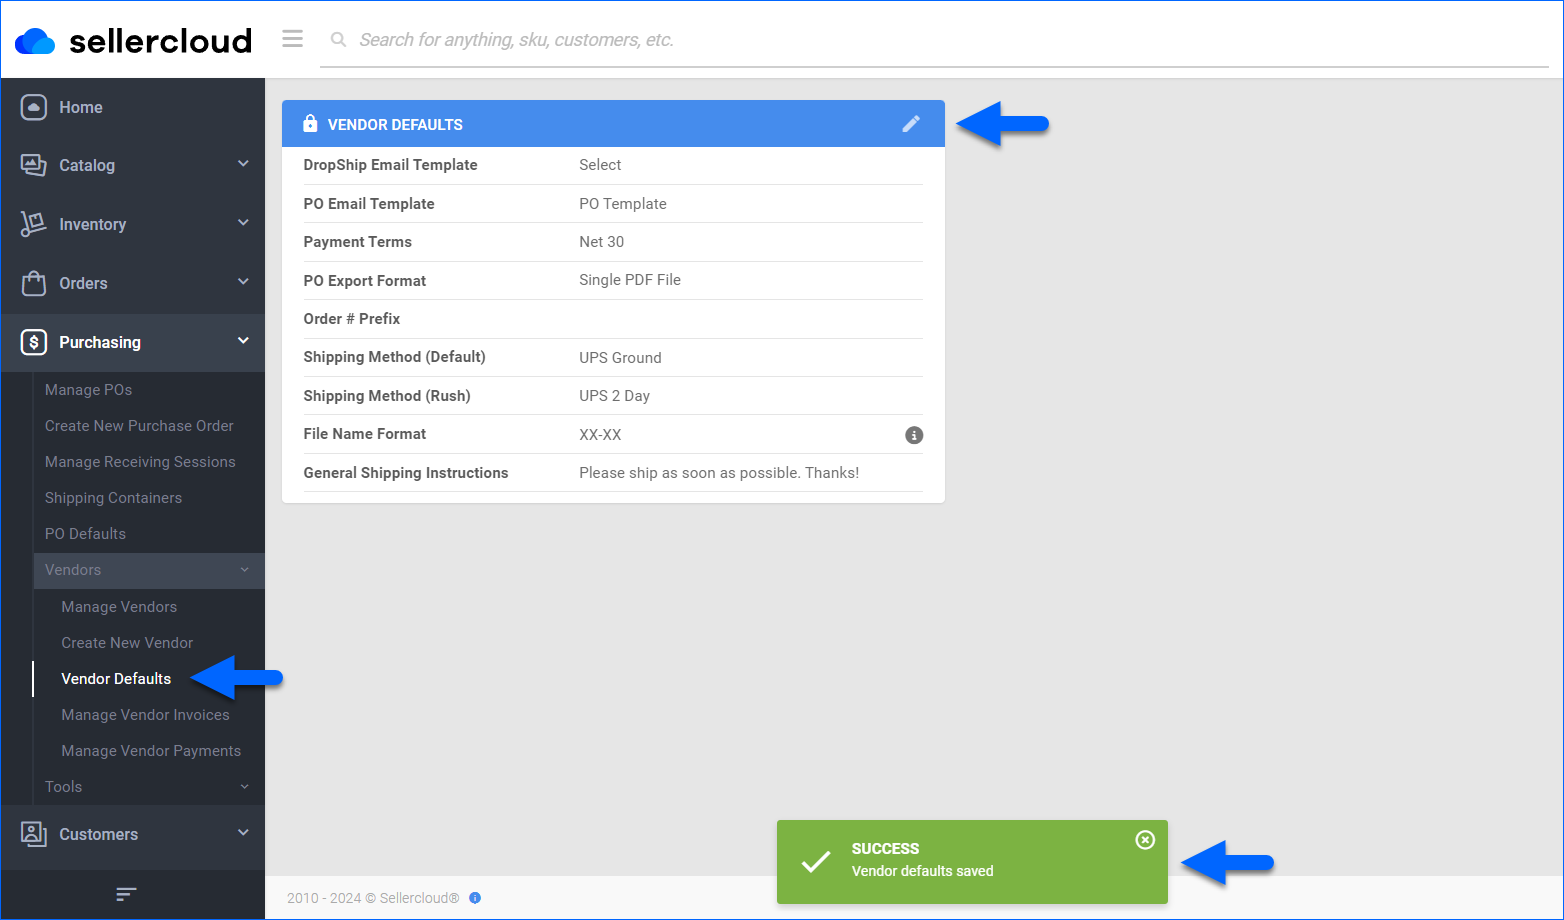
  2. Click the Edit icon and update the following options:
  • DropShip Email TemplateSet a pre-defined email template for your dropship orders.
  • Payment Terms – Set the default payment terms for when you create a new vendor.
  • PO Export Format – Set the default purchase order export file format used when you export a PO to a vendor.
  • Order # Prefix – Add a prefix to all purchase orders to any vendor.
  • Shipping Method (Default) – The default preferred shipping method.
  • Shipping Method (Rush) – The default preferred rush method.
  • File Name Format Entering poid populates the filename with the PO#. Use yyyy-MM-dd to populate the filename with the date of file creation. For example, enter the filename as follows: poid-yyyy-MM-dd. 
  • General Shipping Instructions – The default shipping instructions the vendor sees when you send a purchase order.


Overview

Creating vendor accounts in SellerCloud will enable you to create purchase orders, dropship orders, and apply vendor promotions and discounts to products.
To learn more about vendors, see these related topics:


Create Vendors Manually

If the vendor is client-wide (the vendor applies to all companies of a client), you don’t need to specify the company. However, to create a company-wide vendor (vendor applies to only one company), you should specify the company. Learn more about client-wide and company-wide vendors.
To create a vendor:
  1. Settings > Company Settings > Toolbox > Vendors. Vendors can be available across all companies. Read more here.
  2. Click Add New Vendor or click Edit to edit the existing vendor
  3. Enter the vendor’s general and contact information. You can select a default company to associate with the order from that vendor.
  4. You can use the QuickBooks Vendor Name field if you need to map a vendor to a vendor with a different name in QuickBooks. For example, if you have to separate a vendor into two vendors in SellerCloud, one for dropship and one for wholesale, you can map them to a single vendor in QuickBooks. QuickBridge will use this field when exporting to QuickBooks.
    QuickBook Vendor Name field will only display when the Client Setting Enable QuickBooks WorkFlow is enabled.
  5. If applicable, set a small order amount and fee. As shown in the image below, a fee of $4 will be added to a purchase order total when a single PO from this vendor subtotals to 50$ or less. The small order fee will be added as a line item on the PO total.
  6. Open the Toolbox to view Products and Purchase Orders associated with the vendor.
  7. Configure PO Email Templates and Dropship Preferences for the vendor.
  8. Configure Vendor Promotions and Multi Discounts.
  9. View outgoing email to the vendor.

Create Vendors in Bulk

To bulk import vendors:

  1. Go to Settings > Vendors.
  2. Click Import Vendors List.
  3. Refer to the table below for details and fill out the template. The following columns are required:
    REQUIRED COLUMN DESCRIPTION
    Vendor* The vendor’s name.
    Email* The vendor’s contact email address.
    Account No* Your account number with the vendor.
    BillingContactFirstName* The first name of the person responsible for billing purposes for the vendor.
    BillingContactLastName* The last name of the person responsible for billing purposes for the vendor.
    BillingAddress 1* The first line of the street address for the vendor’s billing contact.
    BillingAddress 2 The second line of the street address for the vendor’s billing contact (if applicable).
    BillingCity* The city where the vendor’s billing contact is located.
    BillingState* The state where the vendor’s billing contact is located.
    BillingZipCode* The zip code of the vendor’s billing contact.
    BillingPhone* The phone number of the vendor’s billing contact.
    BillingFax* The fax number of the vendor’s billing contact.

    The following table lists and defines the additional optional columns:

    OPTIONAL COLUMN DESCRIPTION
    IsDefault True or False. Enter True to set a default vendor.
    ShippingContactFirstName The first name of the primary contact for shipments.
    ShippingContactLastName The last name of the primary contact for shipments.
    ShippingAddress 1 The first line of the street address where shipments will originate from.
    ShippingAddress 2 The second line of the street address where shipments will originate from (if applicable).
    ShippingCity The city where shipments will originate from.
    ShippingState The state where shipments will originate from.
    ShippingZipCode The zip code of the location where shipments will originate from.
    ShippingPhone The phone number of the person or department responsible for shipping.
    ShippingFax The fax number for the person or department responsible for shipping.
    DefaultWarehouseID The ID of the vendor’s default Ship From Warehouse.
    POMultiDiscountTreatAsDiscount True or False. Set to True to show Multi-Discounts applied as the Multi Discount Total in the Purchase Orders’ Total panel.
    VendorAlias Another name for the same vendor.
    EmailAddressCC When emailing the vendor, you will CC this email address.
    PaymentTerm Add any Payment Terms that reflect the agreements between you and your vendor for when payments are due.
    DefaultPurchaser The ID or username of the Sellercloud employee who is the default purchaser from the vendor.
    PredictivePastDays The number of days with data that will be analyzed for predictive purposes.
    PredictiveFutureDays The number of days in the future that predictions are being made for.
    FreeShippingAmount The minimum order amount that qualifies for free shipping.
    SmallOrderAmount The maximum order amount that is considered a small order.
    SmallOrderFee The fee charged for small orders that fall below the small order amount threshold.
    LeadTimeToShipFromSite The number of days it takes for products to be shipped from your warehouse or site to your customers.
    LeadTimeToShipFromVendor The number of days it takes for products to be shipped from the vendor’s warehouse or site. Used in Predictive Purchasing.
    EnableSendMultiplePOInOneEmail True or False. Set to True to allow multiple POs to be sent via one email.
    DisplayPOOnProductDashBoardPanel True or False. If you set this column to True, Purchase Orders from this vendor will show up on products’ Toolbox > Purchasing.
    DonotCountInventoryForDropShipPO True or False. Whether to count inventory for dropship purchase orders or not. Enable it to ensure your inventory count isn’t impacted or adjusted for pending or actual drop shipped orders.
    POExportFormat The format in which you export Purchase Orders. You can select from a few choices and even click Custom and use plugins here.
  4. Save the file.
  5. Choose File and click Import Vendors List.

Merge Vendors

If you have duplicate vendor listings, you can merge them. Duplicate versions of the same information can lead to confusion and errors, causing you to select the wrong vendor. By merging duplicate vendors, you can ensure all information is consolidated and up-to-date.

Note that this action is not reversible. It will delete vendors from the system and update all their records (Products, POs, and more) with the Merge To Vendor. 

To merge vendors:

  1. Go to Settings > Vendors.
  2. Find and select the vendors to merge.
  3. Click Select Action and select Merge Vendors.
  4. Select a Merge To Vendor and click Continue.
  5. A warning message appears. Click OK to continue.


Was this article helpful?

Related Articles

Need Support?
Can't find the answer you're looking for?
Contact Support