Overview
Dropshipping is when a seller transfers customer order and shipment details to a manufacturer rather than stocking their own goods. This takes away the need for picking, packing, shipping, and maintaining your inventory.
Prerequisites
Learn how to create Vendors, assign a Default Vendor, and enable your products for Dropship in bulk.
Dropship on a Case-by-Case Basis
The Client Setting Auto create PO when dropship requested is required for this workflow. This setting allows you to create a PO for the vendor upon requesting a dropship. Note that it will not send the PO to the vendor.
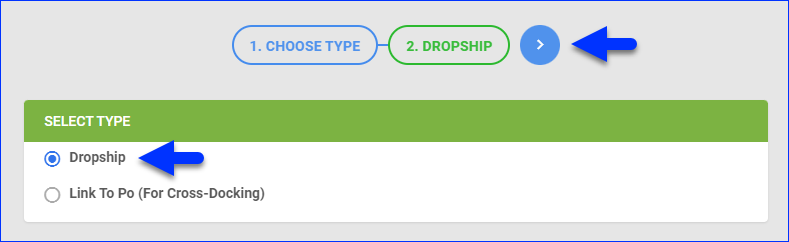
To create a dropship PO:
- Go to the Order Details Page.
- Click Actions and select Manage Dropship.
- Select Dropship and click Next.
- Select the Company and Vendor. Optionally, enter a PO Description.
- Populate the details in the Dropship Details panel.
- Click Finish.
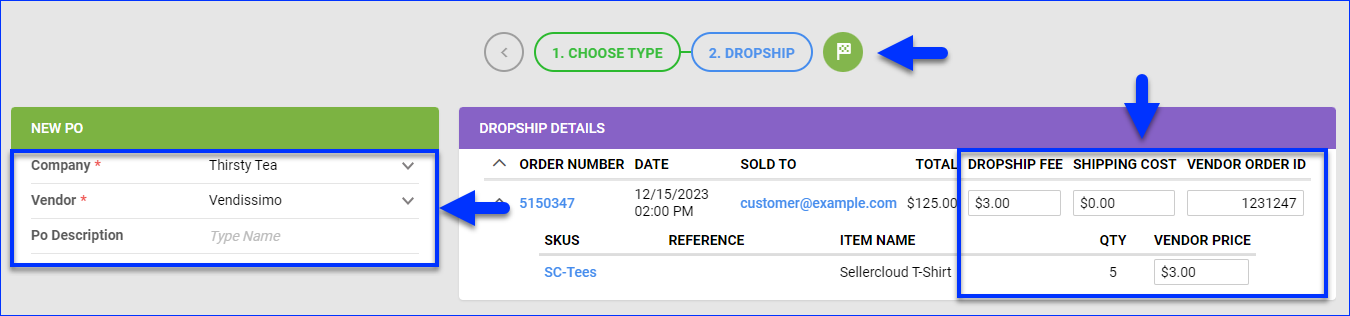
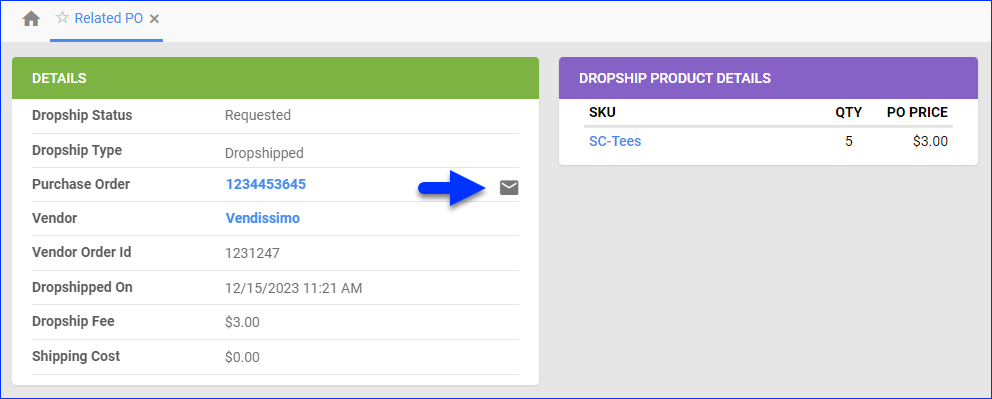
- A dropship PO is created. Click the Email PO to Vendor icon to send the PO to your vendor.
- After the vendor sends confirmation, update the order’s status to reflect the order’s current dropship status.
- When the status is updated to Processed, enter the tracking number and shipping data. The order’s status at the order source (Amazon, eBay, etc.) will update and the tracking number will be posted.
Dropship Multiple Orders
To dropship multiple orders at once:
- Go to Orders > Manage Orders and select orders to dropship.
- Click the blue Actions icon and select Dropship.
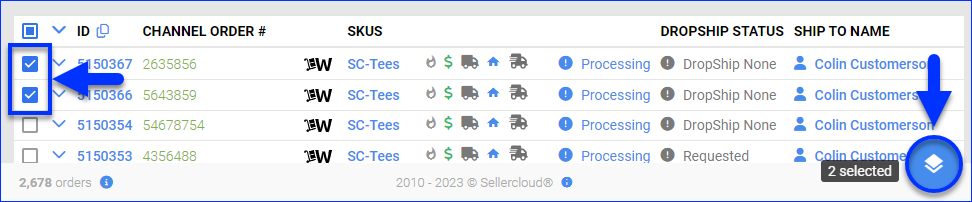
- Choose the Company and Vendor.
- Select the orders.
- Enter the Vendor Order ID and other details.
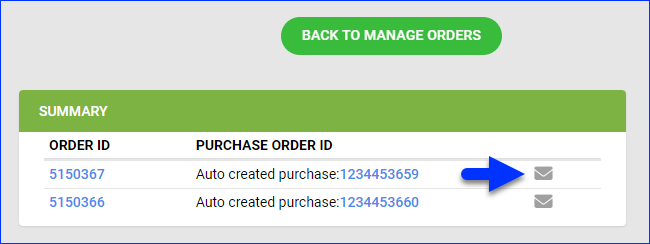
- Click Dropship to create a linked PO for each order.
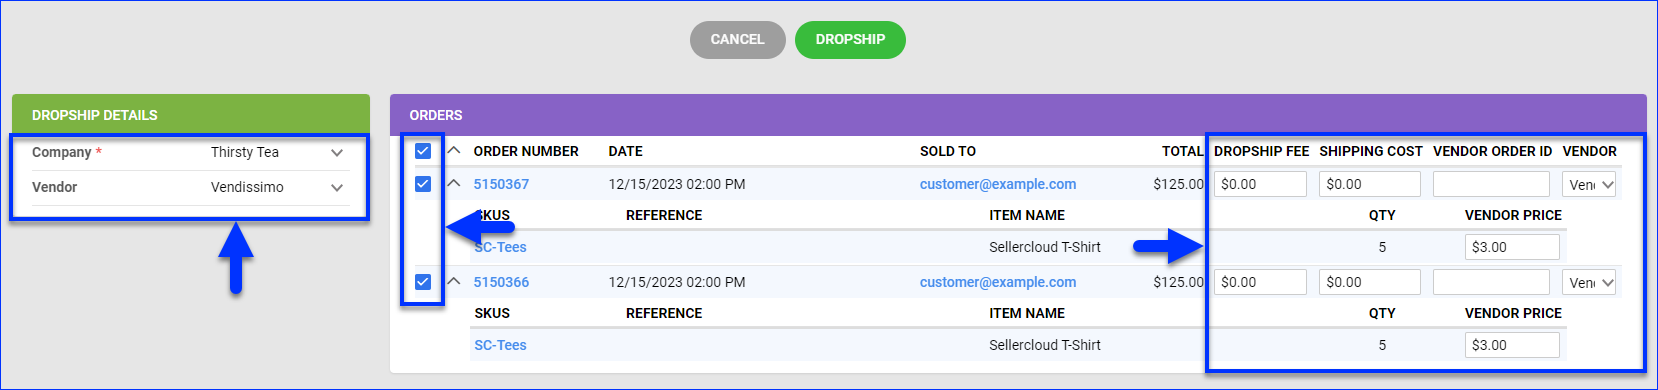
- Click the Send Email icons to email the POs to the vendor.
Delete a Dropship PO
Following the steps outlined above to dropship an order, deleting a dropship PO might involve additional steps and configurations. By default, any attempt to delete the dropship PO will trigger an error message showing the related order number. There are two ways to delete such PO’s.
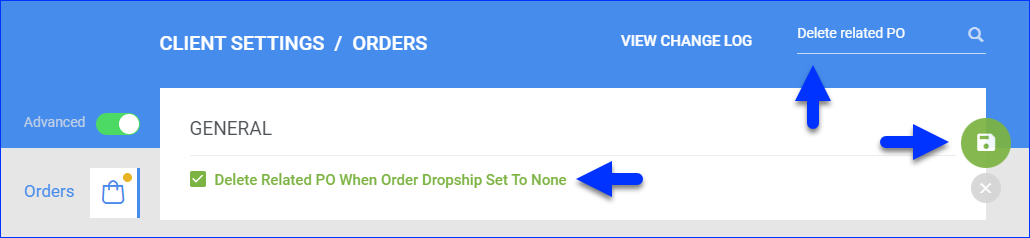
The first way is an automatic deletion when the order’s dropship status is changed to None. To do that:
- Enable Client Setting Delete Related PO When Order Dropship Set To None.
- If the PO’s Status is set to Ordered, you won’t be able to proceed with the next steps. Make sure to go to the PO Details Page and update the Status to Saved or Pending.
- Go to the Order Details Page.
- Click Toolbox and select Related PO.

- Click Edit.
- Set the Dropship Status to DropShip None.

- Click Save. The linked PO gets deleted automatically.
The second way is to cancel the PO, which removes the link:
- Go to the PO Details Page.
- Click Actions and select Cancel PO.
- Note the warning message. Click Cancel PO to confirm the cancellation.
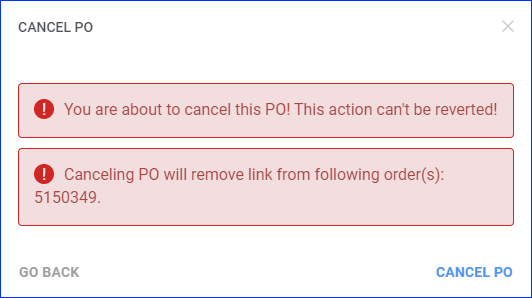
- Now you can delete the PO.
Dropship with a File Upload
Select a file export type from the dropdown menu in the Preferences Panel on the Vendor Details page (see Dropship Configuration for more information). Contact Sellercloud Support to confirm which file meets your requirements. If none is available, Sellercloud developers can create an export format for you.
Dropship from a Feed-based Vendor
Different import options can be set via plugins or with the inventory import mapping tool. Sellercloud can customize the platform to accept your vendor format and update inventory accordingly.
A feed-based vendor is a vendor whose quantity is fed into your inventory. When dropshipping from this type of vendor, you should disable inventory for their dropshipped POs. This ensures your inventory count isn’t impacted or adjusted for pending or actual dropshipped orders. To do this, enable the setting Do Not Count Inventory For DropShip PO.
- Go to Purchasing > Vendors > Manage Vendors.
- Select your Vendor > Toolbox > Dropship Preferences.
- Click Edit > Do Not Count Inventory For Dropship Orders.
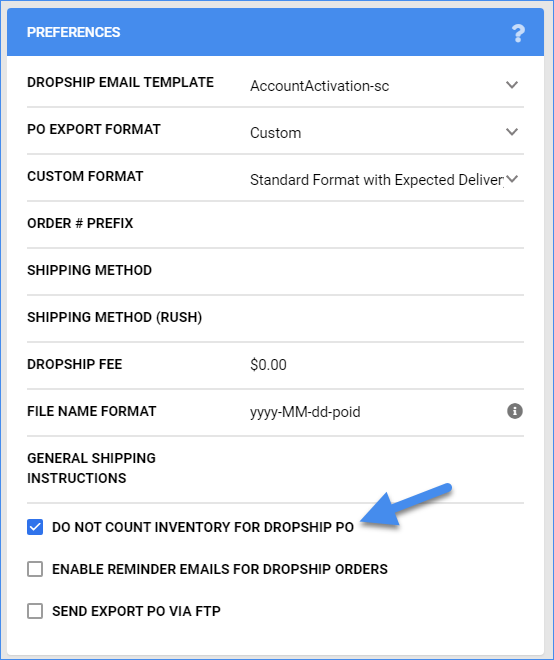
Enabling the above setting disables the inventory count for all dropship POs associated with the specified vendor.
Automatically Mark Products and Orders as Pending Dropship
- Catalog > Manage Catalog > Select product > Toolbox > Shipping Preferences.
- Click Edit > Go to Method > Dropship Mode > Ship from Vendor or Ship from Manufacturer.
The order and purchase order are linked to show a relationship and to track order fulfillment. The order and purchase order can be printed out together by clicking Actions > Print Invoices to PDF with PO on the order or PO details page.
Mark Dropship Orders as Shipped
There are a few ways to make sure the fulfilled Dropship orders are marked as Fully Shipped and Completed.
You can add tracking to individual orders manually by going to the Order Details Page > Actions > Ship Order > follow the steps in the Shipping Wizard.
You can also Mark Orders Shipped in Bulk from the Action menu on the Manage Orders page.
There are also a couple of ways to Import Tracking Information with a File. You can use Sellercloud’s template or create an Import Mapping Profile. If your vendor is able to regularly send you tracking information, you can set up a Scheduled Task, which will automatically add tracking to your Orders and mark them as Shipped and Colmpleted.
Print Labels for Dropshipped Orders
When orders are fulfilled by a third party – either dropship vendor or 3PL (third-party logistics) – you may be asked to forward actual labels to the fulfillment center.
Orders with a valid Dropship status (“Pending”) and an associated Dropship PO will have an option in the Action Menu to Print Shipping Labels.
- Go to Orders > Manage Orders > Open an order.
- From the Actions menu, select Print Shipping Label.

- Fill in the fields and click Generate Label. A PDF will be generated for printing or emailing to the appropriate party.

- After generating the label, the order will be updated to Shipped and the dropshipped PO will be updated to Received.