Overview
Amazon offers a number of services that are available to you. This article will guide you through the Amazon Buy Shipping service for individual orders as it relates to Shipbridge and Sellercloud.
Amazon Services: Amazon Buy Shipping
The Amazon Buy Shipping Service lets you purchase carrier labels through Amazon. If you ship an order using a label purchased from Amazon Buy Shipping on Seller Central, and the buyer claims they did not receive their order and proceeds to file a claim on an A to Z claim, then Amazon will protect your account and pay for A-to-Z claims related to delivery issues or Item Not Received (INR). You will not receive a notification about the claim because Amazon will take care of it. Furthermore, your Order Defect Rate will not be affected.
To be eligible for A-to-Z Guarantee claims, you must comply with all 3 of the following:
- Purchase the shipping label on Amazon Buy Shipping.
- Ship on time: considered at the moment of the carrier’s 1st scan, not when you confirm shipment.
- Respond to any customer inquiry in Buyer-Seller Messages within 48 hours.
Before you start using the Amazon Buy Shipping service, you must review and accept Amazon’s Terms and Conditions, as well as the Terms and Conditions of the carriers you would want to buy shipping from.
If the terms and conditions for a particular carrier have not been accepted, the shipping services for that carrier will not be available to you via the Selling Partner API or visible in Shipbridge.
To review and accept the terms and conditions:
- In your Seller Central account, navigate to Manage Shipping Services.
- Read and accept Amazon’s terms and conditions for this service and the terms and conditions of each carrier.
Enable Amazon Services in Shipbridge
There are three steps that must be completed before you can head to Shipbridge:
- Enable Amazon services in Seller Central.
- In Sellercloud, go to Settings > Client Settings > Enable Enable Generate Shipping Labels via Amazon.
- Get a Selling Partner API token in Sellercloud.
After you have completed the above steps, you can proceed with the configuration in Shipbridge:
- In Shipbridge: Click Menu > Options > Carriers > Amazon.
- Enable the Use Amazon to Buy Shipping checkbox.
- Select the correct company from the dropdown and fill in your Seller ID. Then click Aquire Token from SC to update your token. Note: You must first get a Selling Partner API token in Sellercloud.
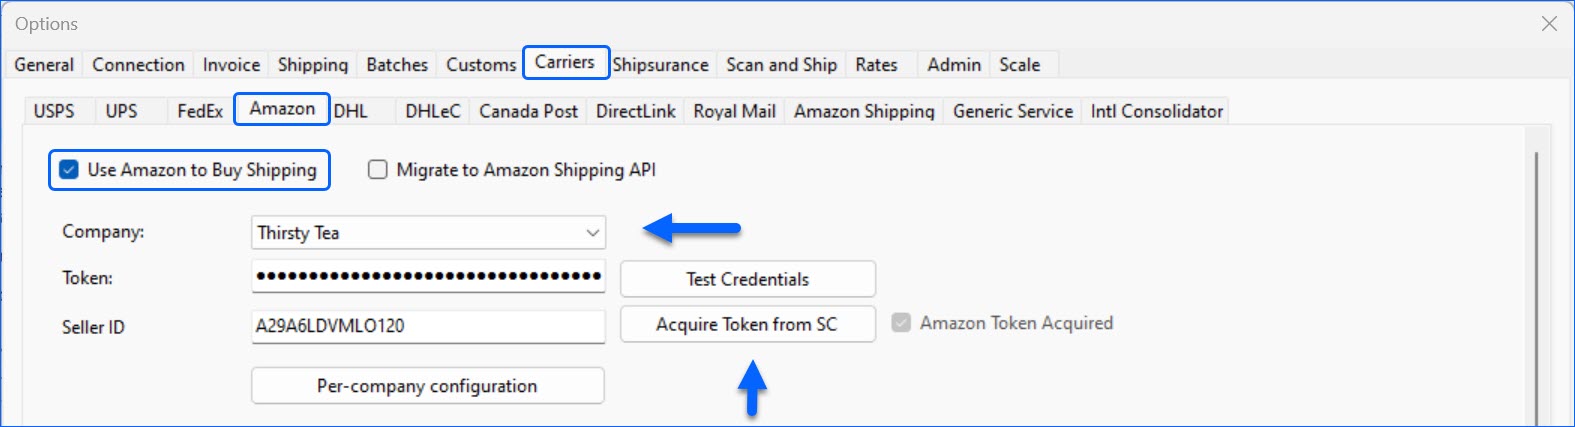
- Select the default Delivery Experience from the dropdown menu.
- Select a printer and check if that printer is thermal.
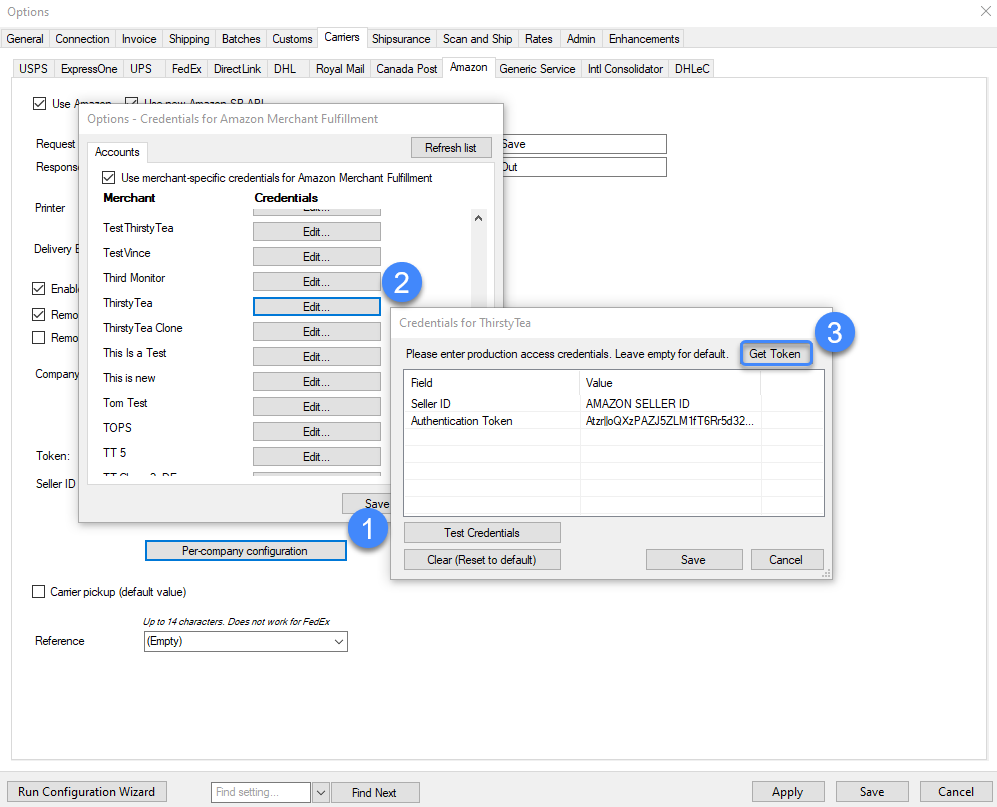
- If you have multiple companies with different Amazon accounts, use the Per-company Configuration.
- Click Save.
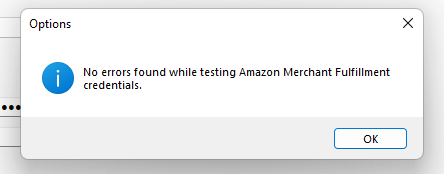
- Test Credentials to verify that the connection is successful. You should see no errors.
You also have the option to enable the setting Enable Amazon Buy Shipping for All Amazon Orders. When this is checked, Shipbridge will enforce Amazon Buy Shipping on all Amazon orders. The cheapest available rate will be applied, regardless of what is pre-set on the order. You can find the setting in Menu > Options > Carriers > Amazon.
When the above-mentioned setting is enabled, Shipbridge will also consider the value of Only allow splitting packages of kit parent items, which is enabled by default. This is done in order to comply with Amazon’s requirement to not split the components of one kit into several packages. If your workflow requires you to do so, we recommend purchasing labels from the Carrier directly.
Amazon Buy Shipping Service in Shipbridge
To ship an order with Amazon Buy Shipping:
- Select your order in Shipbridge.
- Right-click > Calculate Rates. This is the equivalent of Get Eligible Services when shipping through Seller Central or Sellercloud.
- In the Rate Calculator, services available for purchase from Amazon will be indicated in the Provider column.
- Additionally, if the service is flagged as Claims Protected or OTDR Protected this will also be indicated in the Calculator.
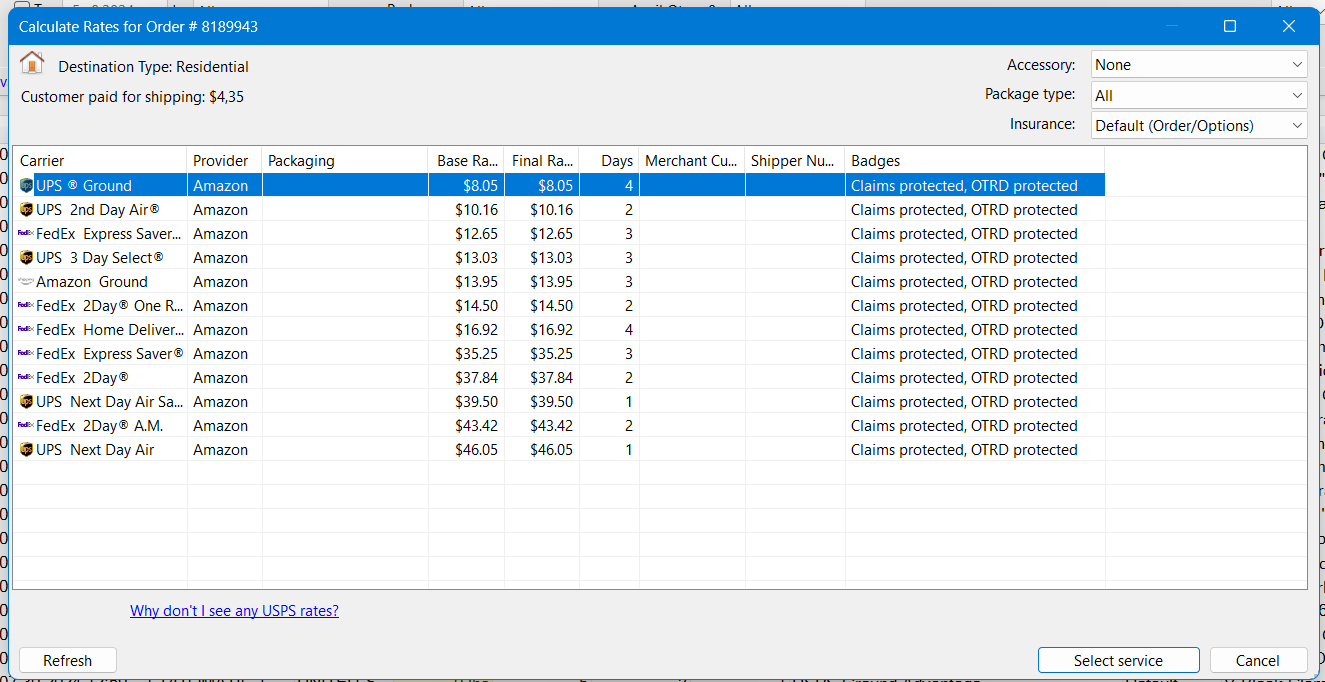
- Search for the service you want > Select service.
- If applicable, you can modify the delivery experience by editing the order details. Right-click an order > Edit Order > Order Details.

- Ship the order. This will buy the label from Amazon and return a valid shipping label.
- You can also cancel a label. However, this will not mark the order as canceled/refunded/unshipped on Amazon. It will only void the shipping label. You must generate a new shipping label. Canceling a label will set the order as unshipped only in Sellercloud.
The order will still have a shipped status in Seller Central because there are downstream dependencies that Amazon does not want to break by changing the status to unshipped.
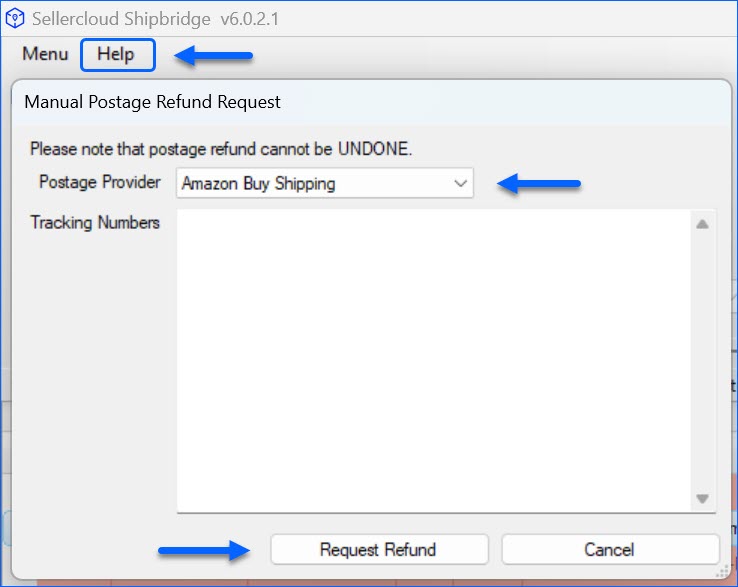
Manual Postage Refund Request
You can manually request a refund from Amazon for labels purchased via the Buy Shipping Service:
- Open Shipbridge and click Help.
- From the dropdown, select Manual Postage Refund Request.
- For Postage Provider, choose Amazon Buy Shipping.
- In the Tracking Numbers field, fill in the Shipment IDs of the orders you wish to unship.
- In case there was an issue while shipping and you do not have valid Shipment IDs, you can use the Order IDs.
- Click Request Refund.
Remove Duplicate Amazon Services in Shipbridge
You can remove duplicate Amazon services in ShipBridge. This is helpful if you only want Amazon rates to appear without any personal USPS, UPS, and FedEx account settings. Please note that enabling this setting in ShipBridge will only affect regular Amazon orders because this setting is already enabled for Amazon Prime orders.
- Click Menu > Options > Carriers > Amazon.
- Check Remove Duplicate Amazon Services.
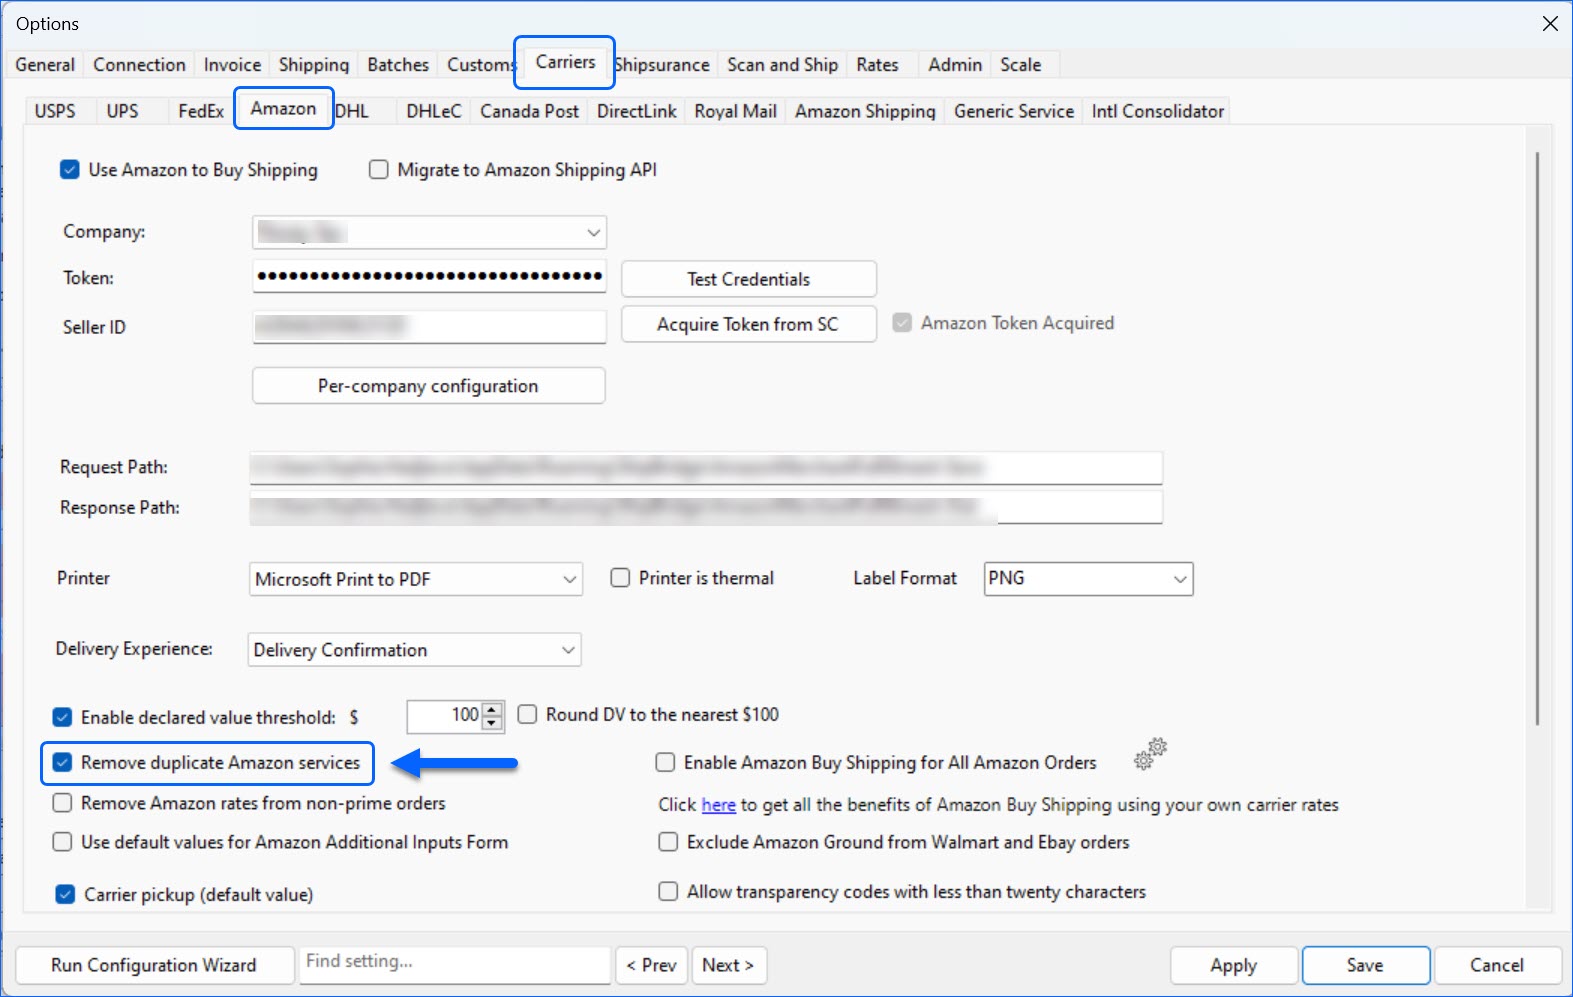
- Save.
Amazon Buy Shipping Service in Sellercloud
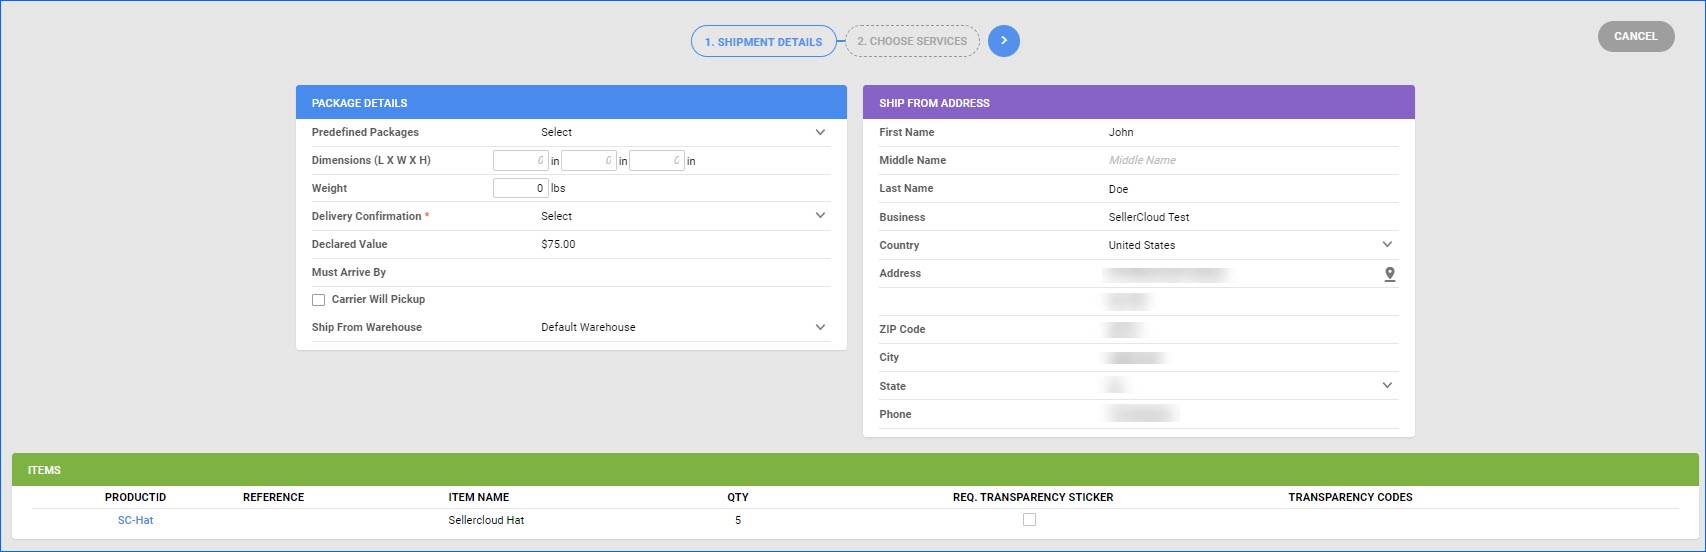
- Go to Orders > Manage Orders > Open an order.
- Go to Actions > Select Buy/Cancel Shipping From Amazon.

- On the next page, complete the request form. Package Dimensions, Package Weight, Delivery Confirmation, and Ship From address, default to a company address, are required.
- Click Next.
- On the next page, select a shipping method. The Amazon rate charges are displayed in the right column. Note: If you configured Stamps.com in Seller Central, those services will be available for purchase.
- Click Buy Shipping. The order will be updated with a Shipped status and with tracking in Sellercloud and Seller Central.
- On the next page, download the shipping label.
- You also have the option to cancel a label. However, this will not mark the order as canceled/refunded/unshipped on Amazon. It will only void the shipping label, so you must generate a new shipping label. Canceling a label will set the order as unshipped only in Sellercloud.