Overview
To enhance security and maintain control over your employees’ activities, you can enable IP filtering for their accounts. This feature allows you to restrict access to designated IP locations for specific employees, providing an extra layer of protection for your organization’s data.
Configure IP Address Filters
To restrict an employee’s access to specific IP locations, navigate to:
- Settings > Employees > Manage Employees.
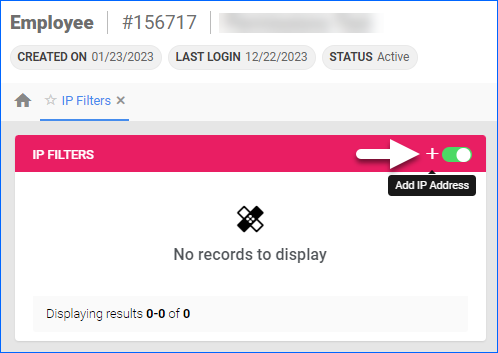
- Open the employee account you want to restrict > Toolbox > IP Filters.
- Enable the Toggle button in the IP Filters panel.
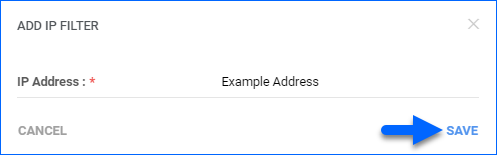
- Click on the + icon to add addresses.
- Click Save.
Additional Security Settings
Sellercloud lets you control the functionalities that can be accessed or performed by specific users through various Security Settings. Learn more about that in our Employee Permissions and Roles article.
Overview
To enhance security and maintain control over your employees’ activities, you can enable IP filtering for their accounts. This feature allows you to restrict access to designated IP locations for specific employees, providing an extra layer of protection for your organization’s data.
Configure IP Address Filters
To restrict an employee’s access to specific IP locations, navigate to:
- Go to Settings > Client Settings and check Enable IP address filter for employees. Press Save. Enabling the option does not trigger any restrictions; it only allows you to set them per user.
- Go to the Employees tab, select a user, and on the newly opened page, press the IP filters option.
- Add the allowed IP address and enable the filtering option on the top of the page – IP-based filters are disabled. Click to enable.

- Only when the IP-based filters are disabled. Click to Enable option is enabled, the restrictions take effect. Note that the option will change to IP-based filters are enabled. Click to disable.
Additional Security Settings
Sellercloud lets you control the functionalities that can be accessed or performed by specific users through various Security settings.
- To restrict specific employees’ access, go to Settings > Companies > Company Name > Toolbox > Security. The grid shows each user’s access to the Sellercloud tabs. Checking a box will give users access to the selected tab. This only allows access to the selected company.
- You can accomplish the same security settings by going to a specific employee (Employees > Employee Name > Toolbox > Security) to apply security settings across multiple companies.
- To restrict an employee from a specific functionality, go to Employees > Employee Name > Toolbox > Security > Roles and assign the appropriate roles. While this doesn’t restrict the employee’s access, it does prevent them from performing any actions outside their assigned roles. Learn more about how to do that in our Employee Permissions and Roles article.
- To restrict certain webpages within the tabs, go to Employees > Employee Name > Toolbox > Security > Webpage Access.
- To manage users’ access to various tabs, certain web pages, and specific functionalities across multiple companies, configure the settings on Employees > Manage Employees > Employee Name > Toolbox > Permissions.
- To hide all costs related to purchasing products from your employees without Admin Access, go to Settings > Client Settings and enable Hide Costs From Employees.