Overview
Memaila lets your customer service team manage support requests from multiple channels in one place. It provides a unified team inbox for multiple team members with built-in productivity tools. The team inbox can be connected to your existing customer care email address or use a Memaila-hosted email address. Customer support requests come into the team inbox as threads and are assigned to team members. Each support thread can be assigned to a single team member at a time.
Connecting Memaila to Sellercloud allows you to import customer emails about orders from any channel as support threads, as long as you have their sending email address on a Customer in Sellercloud. Recent related information, such as orders, RMAs, and other details, will also be imported into the thread. If your team email is set up for customer inquiries and direct messaging on Amazon and eBay’s messaging systems, such notifications will also be imported into Memaila as threads.
As a Memaila administrator, you have various settings and tools to ensure efficient assignment and processing of customer inquiries. For example, you can create custom workflows to automate tasks based on certain conditions. Moreover, Memaila’s reporting features provide transparency into the team’s productivity and performance.
This article explores Memaila’s key features and provides a step-by-step guide to help you get started.
Key Features
Memaila’s key features are:
Email Handling
With Memaila, your team can manage and handle customer care communications from multiple platforms in one place:
- Team Inbox – Memaila provides a unified inbox for your customer care team. You can also create multiple inboxes and invite members to each team inbox.
- Email Hosting – Get a Memaila-hosted team email address @memaila.co.
- Thread Management – Process threads and assign them to customer care agents manually or automatically with Workflows or a Round Robin configuration.
- Labels and Tags – Sort messages in the team inbox with labels and tags for neat organization and precise filtering.
Integrations
Memaila supports various integrations:
- Email Host Integrations – Connect any email address using IMAP and SMTP and use your existing customer care email as the team inbox’s email address.
- Cross-Platform Messaging – Receive and respond to customer messages from Amazon, eBay, and Walmart directly from Memaila.
- Slack: Respond to customer queries from Slack channels.
Productivity Tools
Memaila equips users with tools to boost productivity and simplify customer interactions:
- Workflows – Execute certain actions automatically based on specific conditions, process threads faster, and reduce manual effort.
- Auto Response Queue – Manage delayed auto-responses effectively, ensuring timely communication with customers.
- Canned Responses – Save time and maintain consistency with pre-written responses for common queries.
- Note Templates – Speed up internal note-taking by inserting custom note templates.
- Productivity Insights – Track your customer care team’s productivity and performance with various dashboards and reporting features.
Additional Features
Memaila offers a range of additional features:
- Alert Settings – Stay informed about the status of your integration to make sure it runs smoothly.
- Email Settings – Configure various email settings, such as an autoresponder, email forwarding, redirection, and more.
- Time Zone Management – Ensure accurate timestamps and enable auto-responses based on business hours.
- Mobile Apps – Access Memaila on the go with the Android and iOS applications.
Sign up for Memaila
To sign up for Memaila:
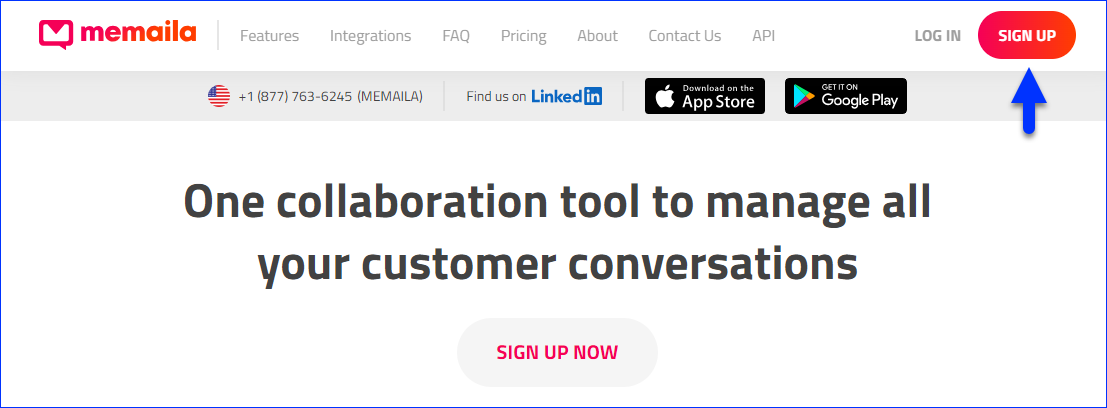
- Go to Memaila.com and click Sign Up.
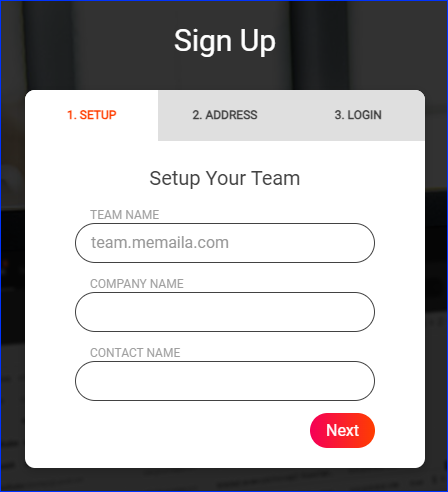
- Under 1. Setup, enter your Team Name, Company Name, and Contact Name.
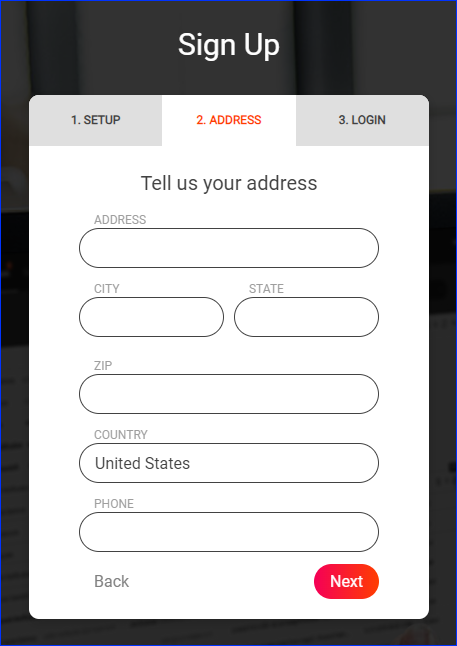
- Under 2. Address, enter your company address.
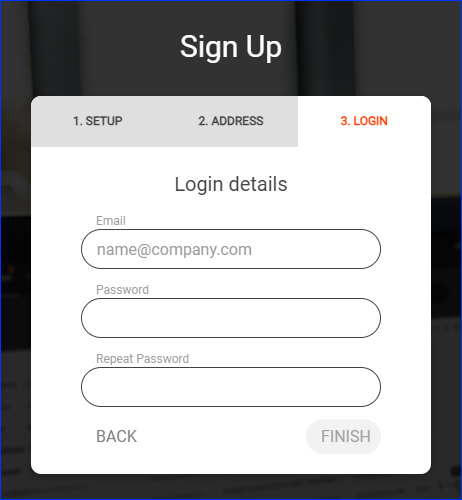
- Under 3. Login, enter your login credentials and click Finish.
Your password must have 8+ characters, one lowercase and one uppercase letter, a special character, and a number.
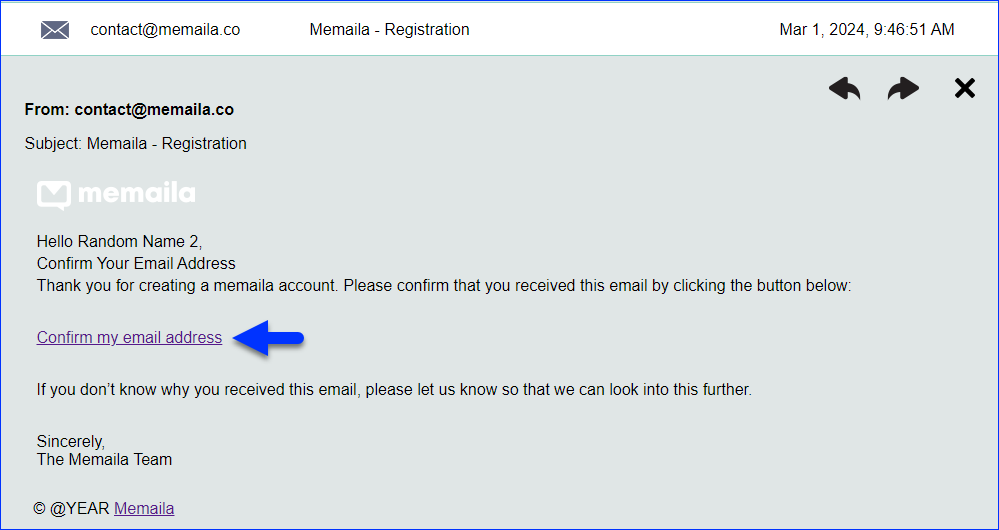
- Open the Welcome email in your inbox and click Confirm my email address.
- Log in with your team name and user credentials.
- You will be prompted to add a team email – click Add.
If you close this message now instead of adding the team email, you can complete the setup later. See Set up Memaila for more information.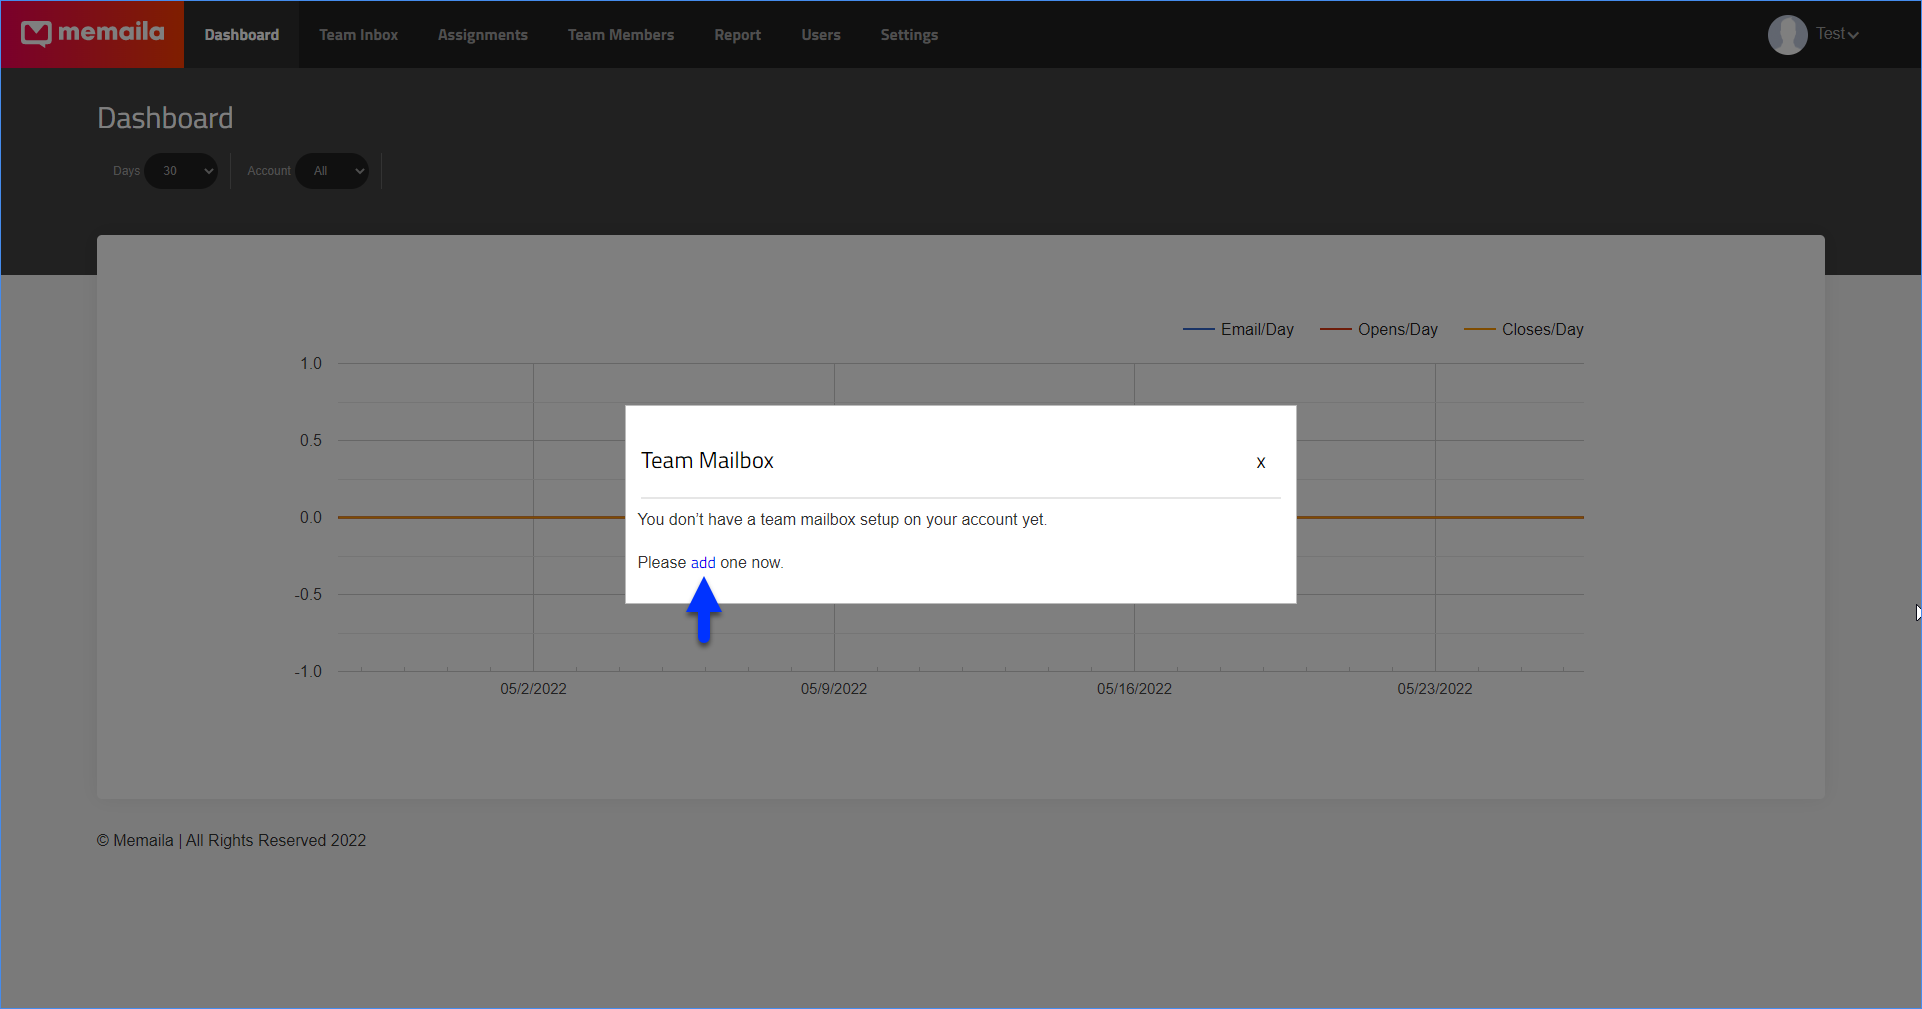
Set up Memaila
To complete your account setup:
- Log in to Memaila and select Settings from the menu on top.
- Click the Add button.

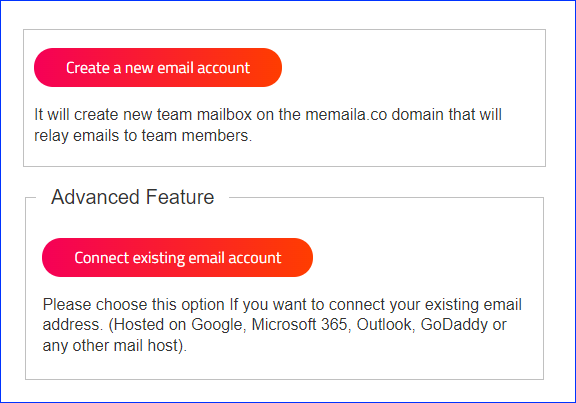
- Depending on what customer care email address you want to use in Memaila:
- To create a new @memaila.co email address, click Create a new email account and continue with these steps.
- To connect an existing email account to Memaila, click Advanced Feature, then click Connect existing email account and continue with these steps.
Create a New Email
If you’ve chosen to Create a new email account, follow these steps next:
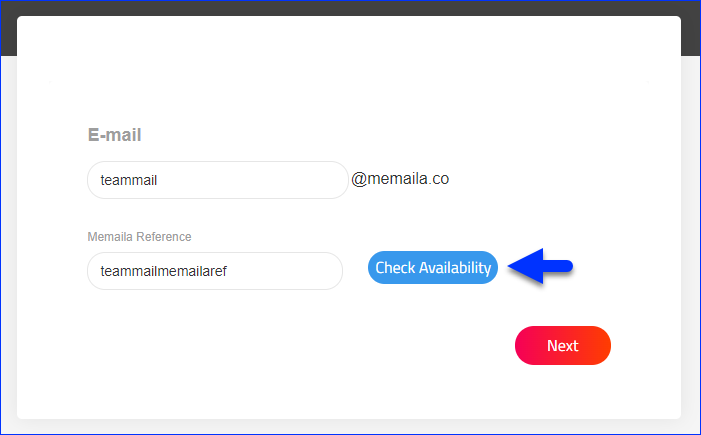
- Enter the first part of your @memaila.co email address.
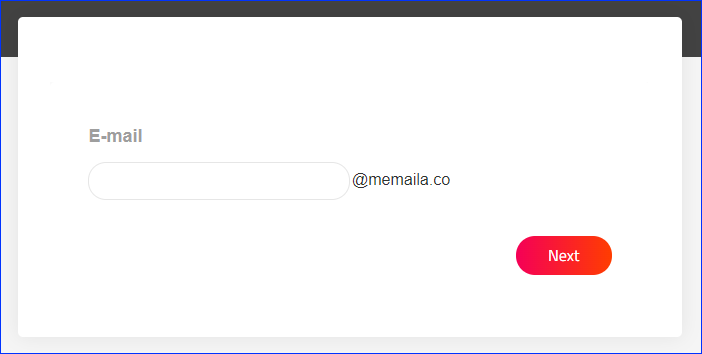
- Click Check Availability to see if the email you selected is free. If it is, click Next.
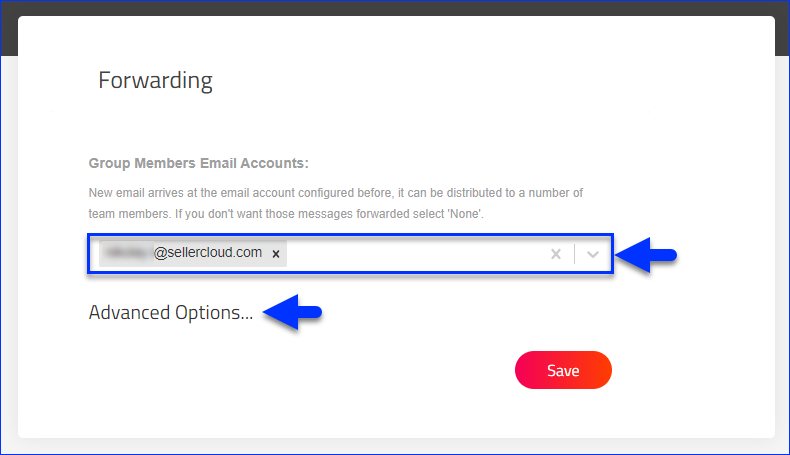
- To forward messages sent to the team @memaila.co address to specific team members, select them under Group Members Email Accounts. Alternatively, select None to disable forwarding to individual team members’ personal mailboxes.
Click Advanced Options.
- Next, under Integration, select Sellercloud or Amazon. You can also select None now and configure this later.
The integrations are used to bring in customer communication from emails and online marketplace messaging systems. Since Sellercloud typically has the most complete Customer List, with customers from multiple channels, it’s also the best integration option to select here. If you select Amazon, your Team Inbox will only get messages from Amazon customers.- If you selected Sellercloud, you must fill out these fields:
- Team Name – Your Sellercloud team name.
- User Name – Your Sellercloud username.
- Password – Your Sellercloud password.
- Post Full Message Body in Sellercloud – posts the entire conversation with the customer to the Customer Instructions tab in the Order Notes in SC
- Cancel order on Cancellation email – This feature ensures that orders will be placed on hold, preventing them from being shipped if the customer has submitted a cancellation request.
- Cancel Picked order on Cancellation email – Place orders on hold regardless of their Picking status; even Fully Picked orders can be placed on hold.
- Customer Email (to test integration) – Enter a customer email address to see if the details you entered above are valid, then click Test Integration.
- Sync from a specific date – Enter a specific date from which to start syncing the integration.
- Team Name – Your Sellercloud team name.
- If you selected Amazon:
- Authorize Now – Click this button to log in to your Amazon account and authorize Memaila to connect.
- Customer Email (to test integration) – Enter a customer email address to see if the details you entered above are valid, then click Test Integration.
- If you selected Sellercloud, you must fill out these fields:
- Click Save after you’re done entering your integration details.
- Your Team Inbox is being created. You can send a test email message to verify that it works.

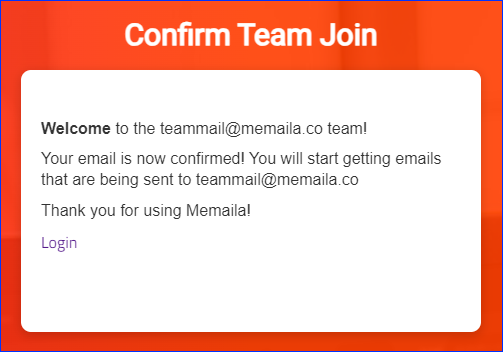
- If you added forwarding during step 3, any email addresses you added will receive a confirmation message. Click the link there to confirm your email address.

- You will see this page confirming that the forwarding has been enabled.
Connect an Existing Email
If you’ve chosen to Connect existing email account, follow these steps next:
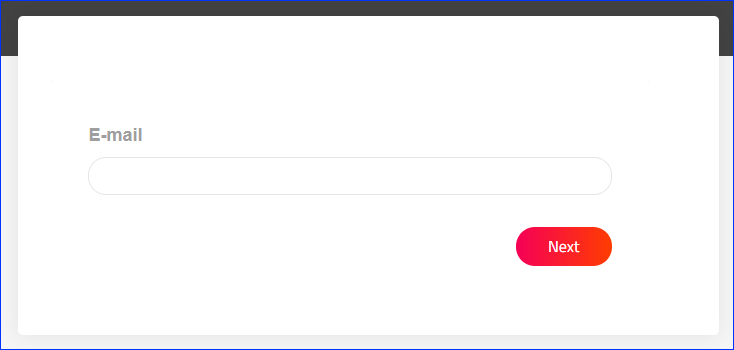
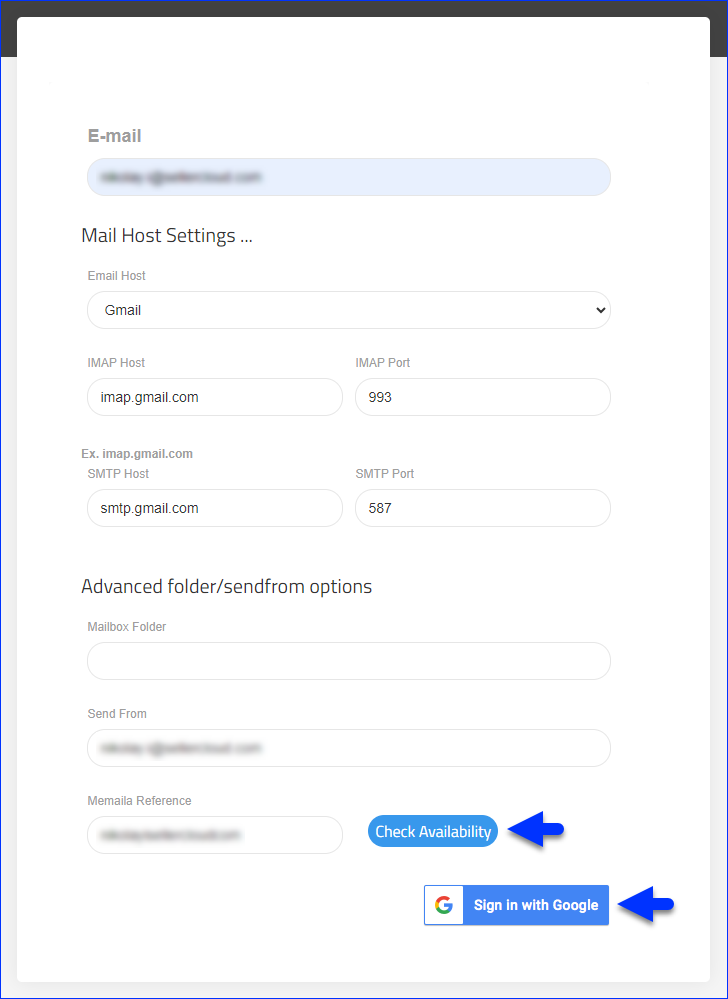
- Enter your existing E-mail and click Next.
- More fields will appear – these are the keys for Memaila to connect to your email:
- Email Host – Choose the host from the dropdown.
If you choose Other, you must manually populate the IMAP and SMTP Host fields below. - Enter the IMAP Host and IMAP Port
- Enter the SMTP Host and SMTP Port
- Enter a Mailbox Folder to send Memaila emails to a specific folder in the connected account’s inbox.
- Enter the email address you want the team to Send From.
- The Memaila Reference field auto-populates as your team email without the @ sign. For example, [email protected] becomes salesyourcompanycom. This is used to forward the emails from your team mailbox to your forwarding email address. If this email already exists in the system, you may have to enter a different name.
- When done, click Test Connection to cross-check the input information and confirm that Memaila can access the email address.
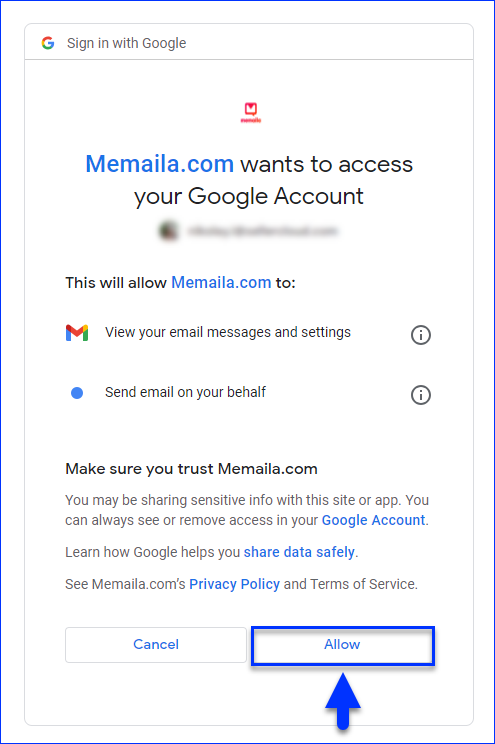
- If you entered a Gmail email address, click Sign in with Google. Otherwise, you will just have to click Next, and then continue these instructions from step 7. Steps 3-6 are only for Gmail accounts.
- Email Host – Choose the host from the dropdown.
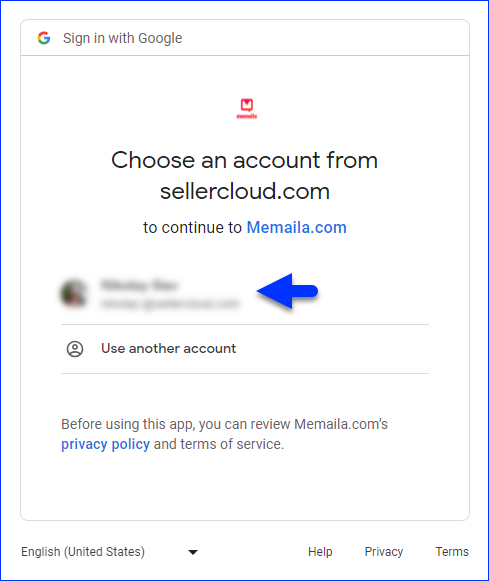
- Select the account to connect.
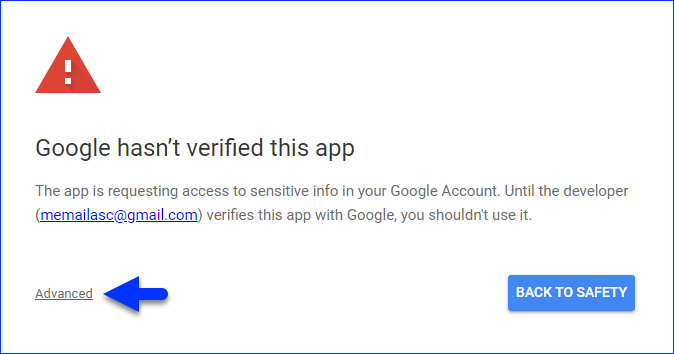
- If you encounter this message, click Advanced.
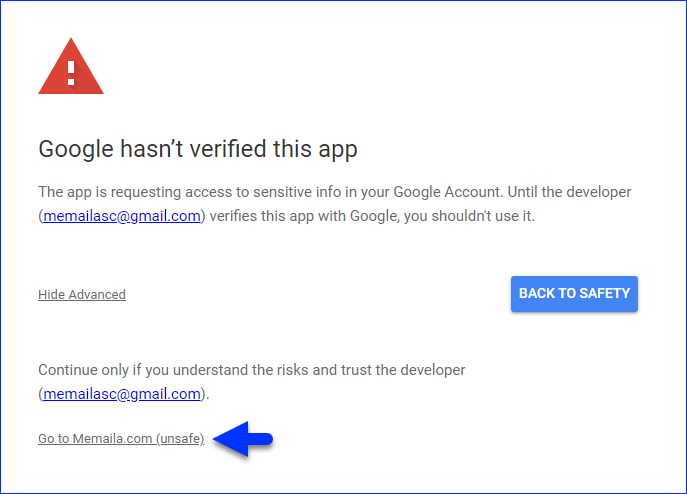
- Then click Go to Memaila.com.
- Click Allow.
- To forward messages sent to the connected email address to specific team members, select them under Group Members Email Accounts. Alternatively, select None to disable forwarding to individual team members’ personal mailboxes.
Click Advanced Options.

- Next, under Integration, select Sellercloud or Amazon. You can also select None now and configure this later.
The integrations are used to bring in customer communication from emails and online marketplace messaging systems. Since Sellercloud typically has the most complete Customer List, with customers from multiple channels, it’s also the best integration option to select here. If you select Amazon, your Team Inbox will only get messages from Amazon customers.- If you selected Sellercloud, you must fill out these fields:
- Team Name – Your Sellercloud team name.
If you don’t know your team name or your company doesn’t have one yet, contact Sellercloud Support. - User Name – Your Sellercloud username.
- Password – Your Sellercloud password.
- Post Full Message Body in Sellercloud – posts the entire conversation with the customer to the Customer Instructions tab in the Order Notes in SC
- Cancel order on Cancellation email – This feature ensures that orders will be placed on hold, preventing them from being shipped if the customer has submitted a cancellation request.
- Cancel Picked order on Cancellation email – Place orders on hold regardless of their Picking status; even Fully Picked orders can be placed on hold.
- Customer Email (to test integration) – Enter a customer email address to see if the details you entered above are valid, then click Test Integration.
- Sync from a specific date – Enter a specific date from which to start syncing the integration.
- Team Name – Your Sellercloud team name.
- If you selected Amazon, you must fill out these fields:
- Authorize Now – Click this button to log in to your Amazon account and authorize Memaila to connect.
- Customer Email (to test integration) – Enter a customer email address to see if the details you entered above are valid, then click Test Integration.
- If you selected Sellercloud, you must fill out these fields:
- Click Save after you’re done entering your integration details.
- Your Team Inbox is being created. You can send a test email message to verify that it works.

- If you added forwarding during step 3, any email addresses you added will receive a confirmation message. Click the link there to confirm your email address, and you will see a page confirming that the forwarding has been enabled.