Overview
Picklists can increase efficiency by generating a summarized list of product quantities needed to fill selected orders. Picklists can be also printed as a PDF document or exported to Excel and given to the shipping department for accurate picking, packing, and shipping. In this article, you will learn how to generate, manage, and filter picklists in Sellercloud. You will also learn how to filter Shipbridge based on assigned split picklists.
In Sellercloud, picklists can be generated based on warehouse, meaning that the inventory and pick quantity displayed will be based on the inventory and pick quantity available at the specified warehouse. This is controlled in Client Settings by checking Enable Pick List Generation by Warehouse.
Orders with shadow products will have parent products in the picklist. Similarly, kit products will have their child components in the picklist.
Generate Picklists
With Sellercloud, you can generate picklists manually or automatically.
Manually
To generate picklists manually:
- Go to Orders > Manage Orders > Select orders.
- Click on Action menu > Generate Pick List.

- Title your Picklist. Choose a Warehouse.

Automatically
For this purpose, you need:
- A Saved View for Orders
- A Scheduled Task of the PickList Generate type
To create the Saved View:
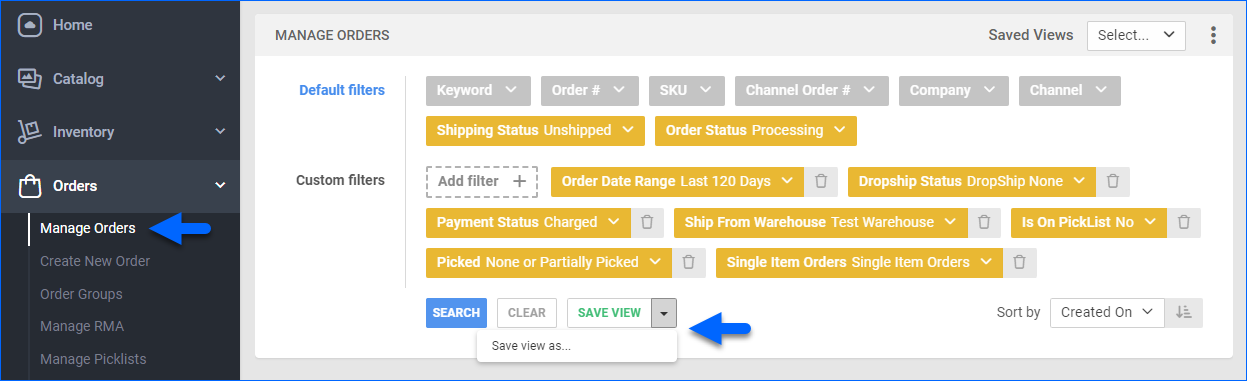
- Go to Orders > Manage Orders.
- Add the following filters:
- Order Date Range = Preferred date range, usually Last 120 days
- Shipping Status = Unshipped
- Order Status = Processing
- Dropship Status = Dropship None
- Payment Status = Charged (If the picklist does not include wholesale orders)
- Ship From Warehouse = One specific warehouse, to have a unique picklist per warehouse
- Is On Picklist = Not In Open Picklist or No (Optional, add it if you use the Close all picklists at midnight setting – check for more information below)
- Picked = None or Partially Picked (If you use Skustack)
- Single Item Orders = Single Item Orders or Multi Item Orders (For separate picklists for single-item and multi-item orders. See Picking Order Items for more information)
- Click the arrow icon next to Save View and select Save view as…
- Name it and click Save.
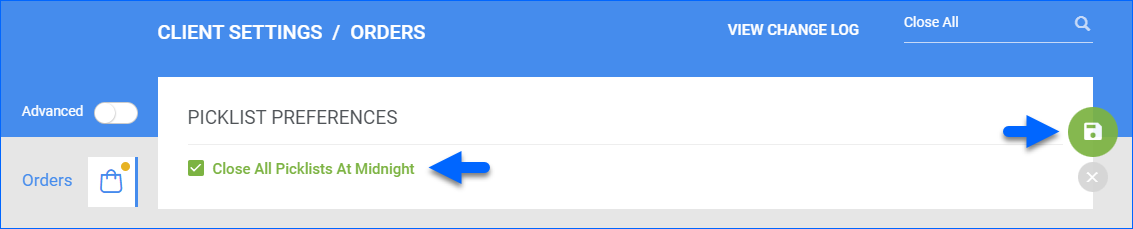
To close all picklists every night and create new ones in the morning that include any unshipped orders, enable the Client Setting Close All Picklists At Midnight and then set the Is On Picklist filter to Not In Open Picklist.
You can always add more filters to separate your picklists by channel, product group, and so on, but the filters listed above are essential.
Next, to create the Scheduled Task:
- Go to Settings.
- Select Scheduled Tasks > Manage Scheduled Tasks.
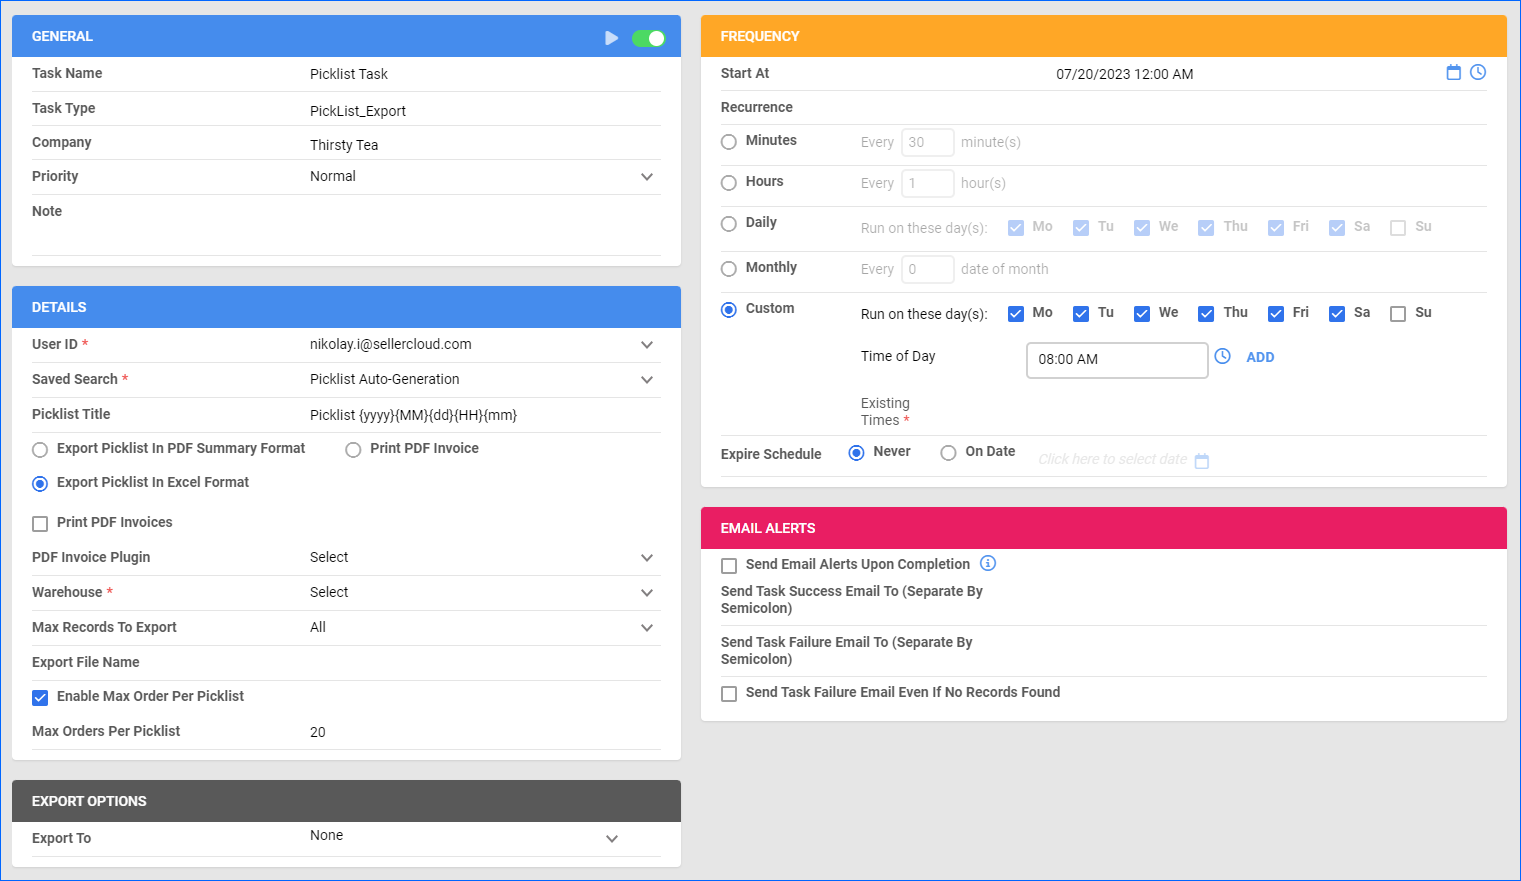
- Click the Create New Scheduled Task + button on the bottom right, and:
- Set the Task Type to PickList Generate.
- Enter a Task Name.
- Select the Company.
- Set the Start Time.
- Click Create.
- The following message appears at the bottom of your screen: “Scheduled task created successfully. Click Here to configure the task details.” – click the link.
- Click the Edit button on the top right.
- In the Details section:
- Click the User ID menu and select your ID.
- Click the Saved Search menu and select the saved search you created earlier.
- Set the Picklist Title as you prefer. You can use the following placeholder {yyyy}{MM}{dd}{HH}{mm} to populate the name with the picklist creation date.
- Optionally, choose if you want to Export Picklist In PDF Summary Format, Print PDF Invoice, or Export Picklist In Excel Format.
- Select the Warehouse.
- Optionally, check Enable Max Order Per Picklist and set the number of Max Orders Per Picklist. This way, the task creates a picklist with child picklists based on the specified limit. Without this option, a default value will be loaded from the Client Setting Default Max. Number of Orders/Shipper.
- This task will create picklists on the Manage Picklists page regardless of the Export To option, but you can also export the picklist in PDF or Excel to one or more email addresses or to an FTP.
- In the Frequency section, specify when the task will run.
- In the General section, click the Enable button.
- Click Save on the top right.
Manage Picklists
To manage picklists:
- To access picklists: Go to Orders > Manage Picklists.
- To close picklists: Select them > Click on the Action menu > Close picklists.
- To export a picklist: Open your picklist > Click on Actions > Select an option.

- To split picklists: When dealing with a high volume of orders, trying to load all the orders across every shipping station risks a system overload. To mitigate this risk you can split your picklists by number of orders per shipper.
- Open your picklist > Products panel > Select items. Use the icon in the upper-right corner to divide the picklist.

- Click the link in the notification to view your queued job.

- Open your picklist > Products panel > Select items. Use the icon in the upper-right corner to divide the picklist.
- You can also Divide Picklist Between Pickers from the Action Menu.
Picklist Columns and Filters
Picklists will generate with the following default columns:
- SKU — An item’s unique identification number.
- Item — Name of the product.
- Qty — Quantity of units to pick to fill selected orders.
- Location — Location of the item in the warehouse (if set on the product’s Home page).
- Package — Shipping package type (if set on the product’s Shipping Preference page).
- Inventory — The available quantity you have on hand to pick: Aggregate + Unshipped = Inventory. This is not necessarily the total physical quantity.
- UPC — The item’s barcode.
Additional columns can be enabled from Client Settings:
- Replacement SKU
- Replacement SKU LOC
- Weight
The following filters can be used to filter SKUs and quantities on the picklist:
| Filter | Description |
| Has Available Inventory |
|
| Available in Warehouse of Picklist | This filter checks the Aggregate (sellable) quantity of the SKUs, and their shadows, within the warehouse specified on the Picklist.
|
| SKU Exists |
|
| Single Item Order |
|
| Rush Order |
|
| Is Kit |
|
| Is Picked |
|
Note: Instead of generating a picklist of all orders and then using the picklist filters, it may be more efficient to filter the orders first. For example, you may want to use the Back Order filter to filter out orders with items that are out of stock. To include orders like this in your picklist, go to Client Settings and check the box marked Consider ReplacementSKU Qty in BackOrder Calculation.
Use Picklists in Shipbridge
Shippers can now filter their Shipbridge based on their assigned split picklist. This allows different orders to be streamed to different stations, which keeps the system from overloading and prevents double shipping.
To generate a picklist in Shipbridge:
-
- Load Orders.
- Check the boxes to the left of orders to select them.
- Click Menu and select Generate Pick List.
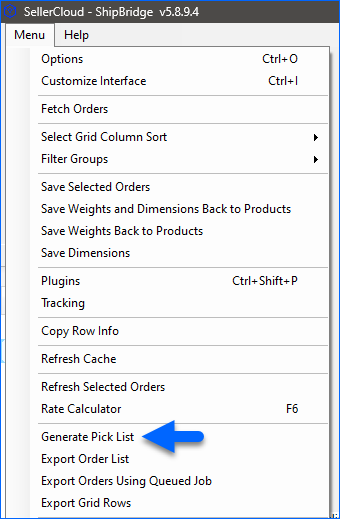
- Check or uncheck the boxes to select what you want to print.
- Select Export to Excel to download the picklist as a .csv file.
- Select Print List to print out the picklist.

To use Sellercloud picklists to prevent double shipping orders in Shipbridge:
- Click Menu > Options and then select the Shipping tab.
- Enable Only allow shipping of orders loaded from picklists.
- Enter the picklist ID in the Picklist # filter. You may need to enable the filter under Menu > Customize Interface > Filters.
- Select the items in the picklist and press Load Selected.
- Press OK to load orders.