Overview
Posting purchase orders in detail will post all PO information, including new items, quantities, vendor info, and costs, as Bills in Quickbooks. Credit memos for POs can also be exported in this module to Quickbooks as Vendor Credits.
Only POs with a Fully Received status will appear in QuickBridge for posting to QuickBooks. To post POs without a Fully Received status based on receive sessions, see instructions for the Posting Vendor Invoices and Payments feature here.
Post Purchase Orders to Quickbooks
- Ensure that Quickbooks is open on the same computer as Quickbridge.
- In Quickbridge, go to Quickbooks Posting Options > Post Detailed Purchase Orders to Quickbooks.
- Select the appropriate dates and click the Get Purchase Orders button. The grid will populate with purchase orders that have not yet been exported to Quickbooks.
Note: The PO Type column will specify the line item’s type – PO or Credit Memo. - Click Post Purchases to Quickbooks and await the pop-up confirmation.
- In Quickbridge – POs will be removed from the grid.
- In Sellercloud – POs will show as Exported in Sellercloud.
Purchase Order Data in Quickbooks
- Vendors – New Vendors that don’t already exist in Quickbooks, are created when POs are exported.
- Products and inventory – When posting using the options setting to “Post item details on the Items tab”; new products are created under the item list in Quickbooks and can be viewed, along with the inventory quantities added from the PO, by accessing the Items and Services page from the Quickbooks Homepage.
Edit an Exported PO
This feature requires selecting the Enable Quickbooks Workflow setting in the company’s Client Settings.
You can easily edit any PO that was already exported by first changing its status to Unexported, and then updating it. Here’s how:
- In Sellercloud, go to Purchasing > Manage POs.
- In the Default filters menu > PO IDs filter, enter the PO # and click Search.
- Select the PO and from the Action menu at the lower right corner, select Exported to Quickbooks Status > Mark as Not Exported to Quickbooks.
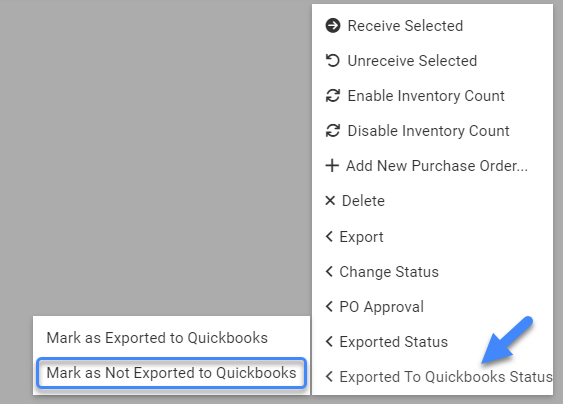
- Edit the PO as needed.
- When done, you have two choices:
- Export the PO to Quickbooks again, but first, ensure the original PO has been deleted to avoid duplicates.
- Edit the PO manually in Quickbooks, and then mark the Sellercloud PO as exported by following the steps above and selecting Mark as Exported to Quickbooks.
Edit an Exported PO
This feature requires selecting the Enable Quickbooks Workflow setting in the company’s Client Settings.
You can easily edit any PO that was already exported by first changing its status to Unexported, and then updating it. Here’s how:
- In Sellercloud, go to Inventory > Purchasing.
- In the filters menu > PO # filter, enter the PO # and click Search.
- Select the PO and from the Action menu in the upper right corner, select Mark QuickBooks Unexported.
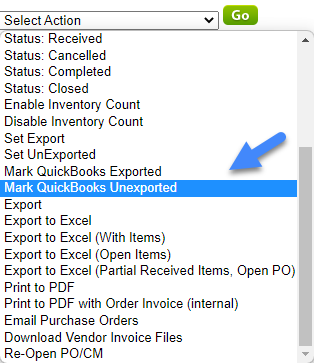
- Edit the PO as needed.
- When done, you have two choices:
- Export the PO to Quickbooks again, but first, ensure the original PO has been deleted to avoid duplicates.
- Edit the PO manually in Quickbooks, and then mark the Sellercloud PO as exported by following the steps above and selecting Mark Quickbooks Exported.
Need Support?Contact Support