Overview
In this article, you will learn about Sellercloud’s Two-Factor Authentication (2FA). 2FA enhances your account’s security and protects it against unauthorized access by requiring you to provide a second form of authentication in addition to your password when logging in.
Key Points
Review the following key points to understand how 2FA works:
- 2FA is mandatory for all Client Admin and Employee accounts.
- 2FA remembers your IP address. Changing to another device or browser while using the same network will NOT trigger 2FA. However, switching to another network will.
- After successful authentication, logging in from the same IP address will NOT trigger another prompt for verification for the next 30 days. After 30 days, you will have to re-verify your identity.
- You can have a primary and secondary (backup) 2FA method.
2FA Methods
There are three 2FA methods that allow you to receive a unique verification code:
- By email
- By SMS (USA numbers only)
- From the Google Authenticator app
Initial Setup
To set up 2FA when logging in to Sellercloud for the first time:
- On the login screen, enter your Email and Password and click Login.

- Sellercloud sends a unique 6-digit verification code to your email and specifies the IP address from which you are authenticating.

- Enter the code on the login screen and click Continue. This authentication will be valid for 30 days, and you will only have to enter your password to log in during that time.

Configure 2FA Settings
To configure your 2FA settings:
- Click your account’s name in the top right and select Account.

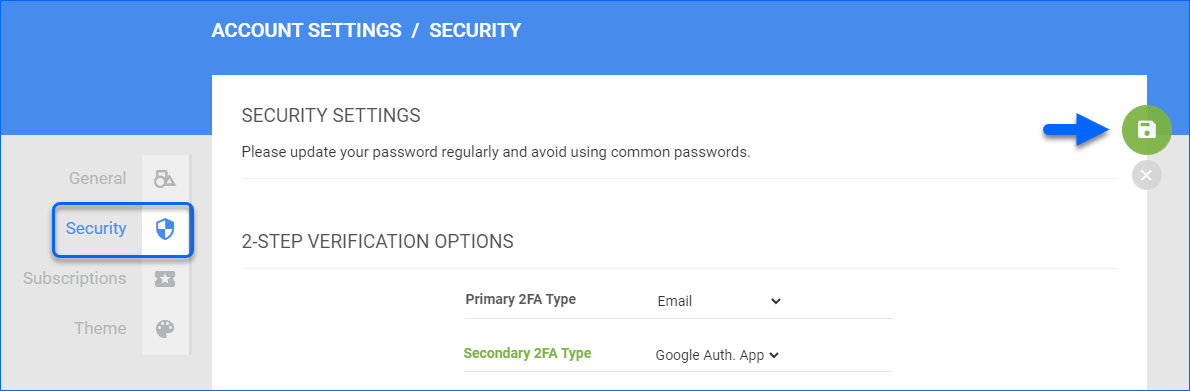
- Select Security.
- Under 2-Step Verification Options, select your Primary and Secondary 2FA Type.
- Click the Save button after any updates.
Google Authentication
To set up 2FA with the Google Authenticator app:
- Download Google Authenticator for Android or iOS.
- Go to your 2FA settings, as shown in the previous step-by-step instructions.
- Set your Primary or Secondary 2FA Type to Googe Auth. App.

- Connect the app to your account in one of these two ways, described in the following two steps (5 and 6):
- To connect the app with a QR code scan:
- Open the Authenticator app.
- Tap the + icon on the bottom right.
- Select Scan a QR code.
- Scan the QR code that appears in your Sellercloud 2FA settings.
- Enter the 6-digit ‘sellercloud’ code in the Authenticator app into the Enter Code field in your Sellercloud settings and click Test Verification.
- To connect the app with a setup key:
- Open the Authenticator app.
- Tap the + icon on the bottom right.
- Select Enter a setup key.
- Type your Account name, enter the Secret Key from the Sellercloud 2FA settings into the Your key field, then click Add.
- Enter the 6-digit code in the Authenticator app into the Enter Code field in your Sellercloud settings and click Test Verification.
Overview
In this article, you will learn about Sellercloud’s Two-Factor Authentication (2FA). 2FA enhances your account’s security and protects it against unauthorized access by requiring you to provide a second form of authentication in addition to your password when logging in.
Key Points
Review the following key points to understand how 2FA works:
- 2FA is mandatory for all Client Admin and Employee accounts.
- 2FA remembers your IP address. Changing to another device or browser while using the same network will NOT trigger 2FA. However, switching to another network will.
- After successful authentication, logging in from the same IP address will NOT trigger another prompt for verification for the next 30 days. After 30 days, you will have to re-verify your identity.
- You can have a primary and secondary (backup) 2FA method.
2FA Methods
There are three 2FA methods that allow you to receive a unique verification code:
- By email
- By SMS (USA numbers only)
- From the Google Authenticator app
Initial Setup
To set up 2FA when logging in to Sellercloud for the first time:
- On the login screen, enter your Email and Password and click Login.

- Sellercloud sends a unique 6-digit verification code to your email and specifies the IP address from which you are authenticating.

- Enter the code on the login screen and click Continue. This authentication will be valid for 30 days, and you will only have to enter your password to log in during that time.
Configure 2FA Settings
To update your 2FA settings:
- Click My Account.
- Select 2FA Setting.
- Select your Primary and Secondary 2FA Type.
Google Authentication
To set up 2FA with the Google Authenticator app:
- Download Google Authenticator for Android or iOS.
- Go to your 2FA settings, as shown in the previous step-by-step instructions.
- Set your Primary or Secondary 2FA Type to Googe Auth. App.
- Click the link in “To reconfigure Google Auth. App click here.

- Connect the app to your account in one of these two ways, described in the following two steps (5 and 6):
- To connect the app with a QR code scan:
- Open the Authenticator app.
- Tap the + icon on the bottom right.
- Select Scan a QR code.
- Scan the QR code that appears in your Sellercloud 2FA settings.
- Enter the 6-digit ‘sellercloud’ code in the Authenticator app into the Enter Code field in your Sellercloud settings and click Test Verification.
- To connect the app with a setup key:
- Open the Authenticator app.
- Tap the + icon on the bottom right.
- Select Enter a setup key.
- Type your Account name, enter the Secret Key from the Sellercloud 2FA settings into the Your key field, then click Add.
- Enter the 6-digit code in the Authenticator app into the Enter Code field in your Sellercloud settings and click Test Verification.
