Overview
The Walmart Fulfillment Service (WFS) allows you to ship inventory to Walmart fulfillment centers so that they can take care of the entire order fulfillment process for you. This includes picking, packing, shipping, delivery, customer support, and returns. You can integrate Walmart WFS with Sellercloud to manage your inventory, send stock to Walmart, and download orders.
This article covers what WFS is, how WFS and Sellercloud work together, and, most importantly, provides links to related articles that go in-depth into each aspect of WFS management.
Enable WFS
To integrate WFS with Sellercloud, you must complete the initial setup.
To enable WFS:
- Go to Company Settings.
- Click Toolbox and select Walmart Marketplace > General Settings.
- Click Edit.
- In the Controls panel, check Enable WFS Workflow.
- Click Save.
Set Up WFS Warehouses
Sellercloud tracks inventory through warehouses, so you must set up a dedicated warehouse to track all WFS-related movements and quantity changes.
When adding items to WFS shipments, inventory will be reserved from your regular warehouses. Once shipped, your inventory is moved to an interim warehouse until it is received in your WFS Warehouse. To ensure everything is handled properly, make sure to create a WFS-type warehouse and assign it under your Channel Warehouses following the steps below:
In Sellercloud, go to Settings > Inventory > Add New Warehouse.
- Enter your warehouse name, for example “WFS Warehouse“, along with its address.
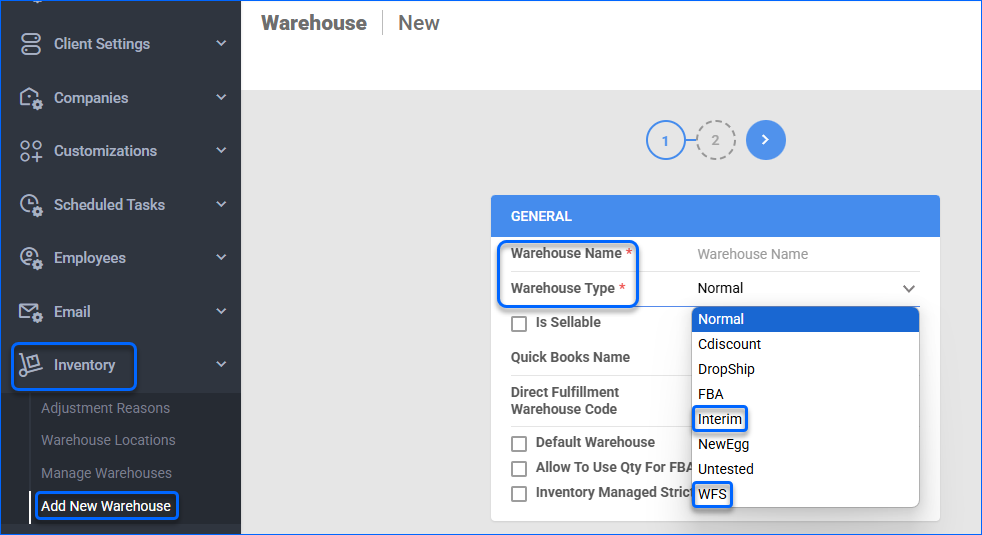
- Select WFS as the warehouse type and click Save.
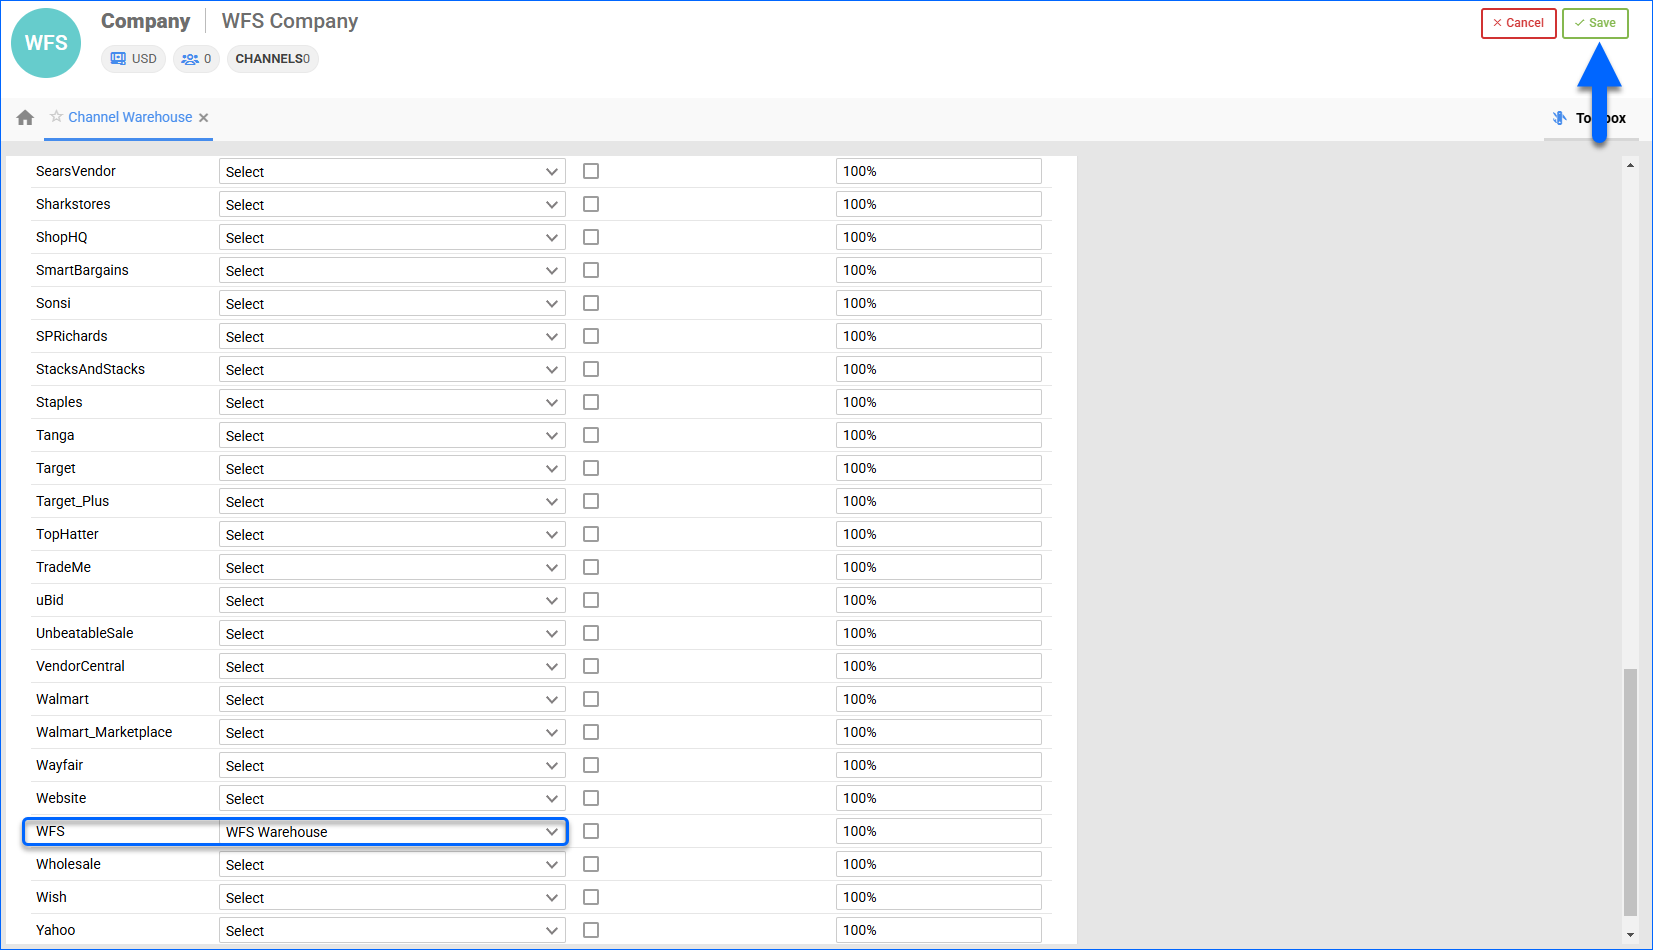
- Next, go to Settings > Companies > Manage Companies > Select a company > Toolbox > Channel Warehouse > Edit.
- Find the WFS channel row > select WFS Warehouse > Save.
Set Up the Interim Warehouse
- Add another warehouse and name it Interim Warehouse.
- Choose Interim as the warehouse type and click Save.
- Set up a default interim warehouse where your Sellercloud inventory will be while it’s physically on its way to the WFS warehouse. Go to Client Settings and update the Default WFS Shipment Interim Warehouse setting.
Allow to Use Qty for WFS Shipments
To create WFS inbound shipments using inventory from your regular warehouses, be sure to enable the option Allow to use qty for FBA and WFS Shipments.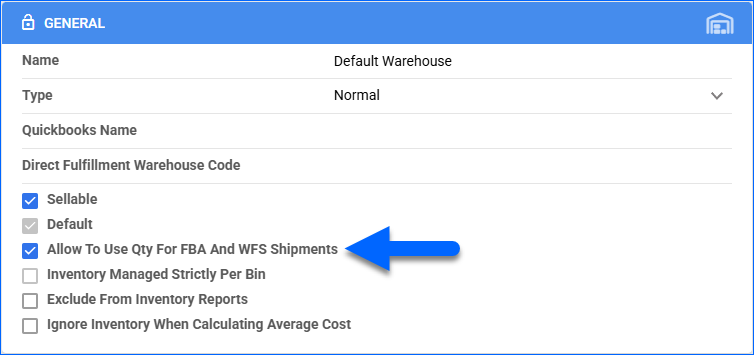
By default, you can add items to your shipment even if they have no available inventory. This is sometimes done when you expect a Purchase Order to arrive shortly and would like to set up the shipment even before it arrives.
- To validate inventory availability when adding a product to a WFS Shipment, enable the Client Setting Enable Validate Inventory for FBA and WFS Shipments. When enabled, if the product has less inventory than the amount added to the shipment, the Shipment Plan will be created locally but won’t be submitted to WFS.
- Enabling the sub-setting Validate FBA and WFS Shipment Inventory per warehouse only allows you to narrow the validation down to the selected Ship From warehouse.
- The product must be from the same company as the company you are shipping from; otherwise, you will see an “Unknown SKU” error message.
Additionally, the Ship From address on the WFS Shipment is pulled from the warehouse address, not the company address. Ensure that the warehouse address is filled in correctly.
WFS Inventory
See WFS Inventory to learn how to enable products for WFS one SKU at a time or in bulk.
Once your products and warehouses are configured correctly, you can move on to the next step, which is to send inventory to Walmart’s fulfillment centers. You do this with WFS Shipment Plans.
WFS Shipment Plans
To have enough inventory for Walmart to fulfill orders for you, you must send shipments to Walmart Fulfillment Centers. In Sellercloud, you do this by creating and processing WFS Shipment Plans.
Workflow Summary
See WFS Shipment Plan Workflow to get an idea of all the steps involved in the WFS shipment plan, it helps to have a list of the usual processes of creating, preparing, and shipping a WFS shipment.
Create Shipment Plans
When you are ready to start processing WFS shipments, see Create a WFS Shipment Plan. This article goes step-by-step through the various options related to creating a shipment plan.
Manage Shipment Plans
Finally, you should see Manage WFS Shipment Plans to learn how to process your WFS shipment plans and any related settings in Sellercloud. You will learn how to:
- Search and find Shipment Plans.
- Bulk-update Shipment Plans.
- View and edit a specific Shipment Plan’s general details.
- Use different actions and options related to a specific Shipment Plan.
- Find and handle partially received and unconfirmed Shipments.
- Import WFS Removals to get inventory back from Walmart.
- Configure default box details for shipments.
- Configure settings that affect the workflow.
WFS Orders
WFS only fulfills orders on Walmart.com and only ships within the United States. WFS-enabled items have 2-Day Shipping and Fulfilled by Walmart tags for increased product visibility and conversion. They are shipped in standard Walmart-branded packaging.
After integrating WFS into Sellercloud and shipping Inventory to a Walmart Fulfillment Center, Walmart can start fulfilling orders for you. You can download WFS-fulfilled orders to Sellercloud automatically or manually. In WFS Orders, you will learn how WFS orders work in Sellercloud and how to download and process them.
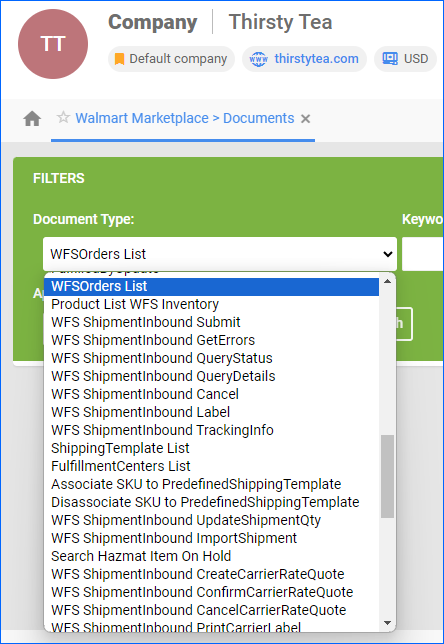
Channel Documents
Sellercloud stores records of documents Sellercloud sends to Walmart and reports received from Walmart. They can be useful when troubleshooting issues. You can access them from Company Settings – click Toolbox and select Walmart Marketplace > Documents or Walmart Marketplace > Reports (API).
For more information, see Channel Documents.
Overview
The Walmart Fulfillment Service (WFS) allows you to ship inventory to Walmart warehouses so that they can take care of the entire order fulfillment process for you. This includes picking, packing, shipping, delivery, customer support, and returns. You can integrate Walmart WFS into Sellercloud to manage your inventory, send items to Walmart, and download orders.
This article covers what WFS is, how WFS and Sellercloud work together on a surface level, and, most importantly, provides links to related articles that go in-depth into each aspect of WFS management.
Enable WFS
To integrate WFS into Sellercloud, you must complete the initial setup.
To enable WFS:
- Go to Company Settings.
- Click Toolbox and select Walmart Marketplace > General Settings.
- Check Enable WFS Workflow.
- Click Save Settings.
WFS Inventory
The initial setup continues as you configure Sellercloud further.
See WFS Inventory to learn how to set up your Sellercloud warehouses by creating a dedicated WFS warehouse that stores your WFS inventory. You can also designate a default interim warehouse, which is where your inventory will be stored while it’s physically on its way to a Walmart fulfillment center.
After your warehouses have been set up, you can enable products for WFS one SKU at a time or in bulk.
Once your products and warehouses are configured correctly, you can move on to the next step, which is to send inventory to Walmart’s fulfillment centers. You do this with WFS shipment plans.
WFS Shipment Plans
To have enough inventory for Walmart to fulfill orders for you, you must send shipments to Walmart fulfillment centers. In Sellercloud, you do this by creating and processing WFS shipment plans.
Workflow Summary
See WFS Shipment Plan Workflow to get an idea of all the steps involved in the WFS shipment plan, it helps to have a list of the usual processes of creating, preparing, and shipping a WFS shipment.
Create Shipment Plans
When you are ready to start processing WFS shipments, see Create a WFS Shipment Plan. This article goes step-by-step through the various options related to creating a shipment plan.
Manage Shipment Plans
Finally, you should see Manage WFS Shipment Plans to learn how to manage your WFS shipment plans and any related settings in Sellercloud. You will learn how to:
- Search and find shipment plans
- Bulk-update shipment plans
- View and edit a specific shipment plan’s general details
- Use different actions and options related to a specific shipment plan
- Find and handle partially received and unconfirmed shipments
- Import WFS removals to get inventory back from Walmart
- Configure default box details for shipments
- Configure settings that affect the workflow
WFS Orders
WFS only fulfills orders on Walmart.com and only ships within the United States. WFS-enabled items have 2-Day Shipping and Fulfilled by Walmart tags for increased product visibility and conversion. They are shipped in standard Walmart-branded packaging.
After integrating WFS into Sellercloud and shipping Inventory to a Walmart Fulfillment Center, Walmart can start fulfilling orders for you. You can download WFS-fulfilled orders to Sellercloud automatically or manually. In WFS Orders, you will learn how WFS orders work in Sellercloud and how to download and process them.
Channel Documents
Sellercloud stores records of documents Sellercloud sends to Walmart and reports received from Walmart. They can be useful when troubleshooting issues. You can access them from Company Settings – click Toolbox and select Walmart Marketplace > Documents or Walmart Marketplace > Reports.
For more information, see Channel Documents.