Overview
In this article, you will learn about Company Settings in Sellercloud. You can use them to configure various options and preferences, add third-party integrations, and more.
These settings exist at the Company level, which means you configure them separately for each individual Company in your account. Changes usually take effect right away. Refresh your browser’s cache if you don’t see the result immediately.
Access Company Settings
To access and update your company settings:
- Click your profile name in the top right and select Company settings.
- Select your company.

- Click Toolbox and scroll through your options. Each option displays a separate tab with settings and info related to your company.
- Optionally, you can click the Star icon to save a tab and have it appear under your company settings by default.
- Optionally, you can click the Star icon to save a tab and have it appear under your company settings by default.

Integration Settings
This is where you can:
- Enter your third-party service credentials to authenticate and establish the connection with Sellercloud.
- Control automatic updates to channels related to order download, tracking, inventory, and more.
- Set up product preferences and defaults for each channel, like the Safety Quantity for products sold on the channel.
- Track inter-service communication such as downloaded and uploaded documents and API calls.
- Configure Channel Warehouse Mapping.
- Configure product Description Templates.
In addition, you can also set up Custom Company Settings, which are essential for non-core third-party service integrations. These are not built into the Sellercloud web interface and must be set up through additional plugins.
Additional Settings
The Company Settings also contain many other pages for company-level configuration and features. Here are some of the top noteworthy options:
- Email Settings such as Blacklisted Domains, Email Rules, Email Templates, POP Accounts, and SMTP Settings.
- Scheduled Tasks and Queued Jobs for automating specific operations.
- Shipping API for calculating rates or tracking order delivery.
- Vendors and Manufacturers.
- Company Defaults.
- Invoice Settings.
- Order Tax Settings.
- Payment Settings.
- Bulk Product Update Log.
- Return Address Settings.
- Security Settings.
- Settlement Reports.
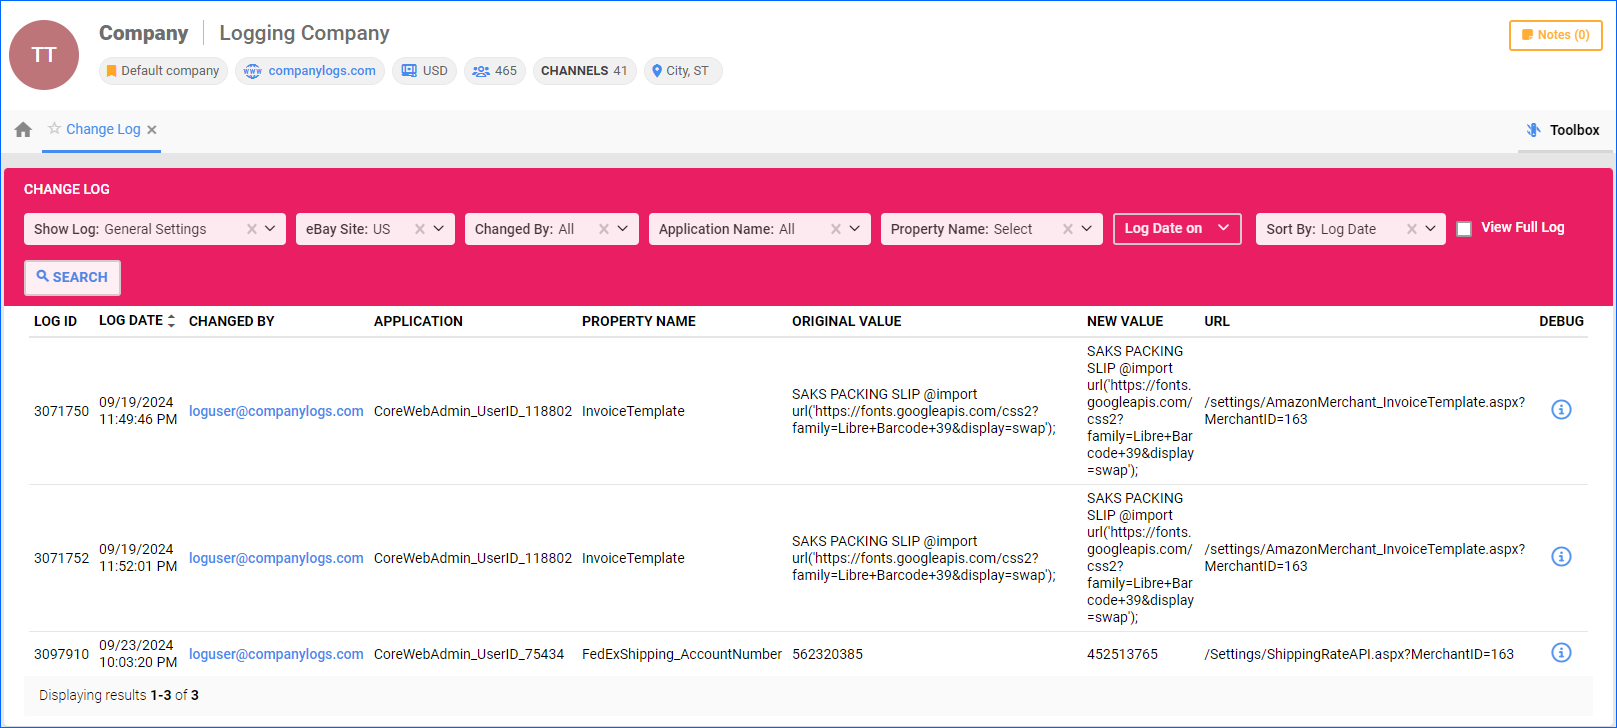
Monitor Changes
You can easily monitor any changes made to the settings by accessing the Change Log. This log shows all changes made on a company level and who made each change.
To monitor changes:
- Click Settings.
- Select your company.
- Click Toolbox and select Change Log.
- Configure the filters as necessary and click Show Log. You have access to the following filter options:
- Show Log – show only specific types of logged events.
- View Full Log – view all logged events.
- eBay Site – Select an eBay site.
- Changed By – The person who made the change
- Application Name – This option shows IDs for each application that has been used to make changes. For example, it will tell you if a user has signed in and made a change manually from a browser or if something else triggered it, such as a scheduled task.
- Property Name – Select a specific setting. Only settings that have been updated recently will appear as options.
- Log Date – A date range with events to show.
- Sort By – Change the way the data is sorted.
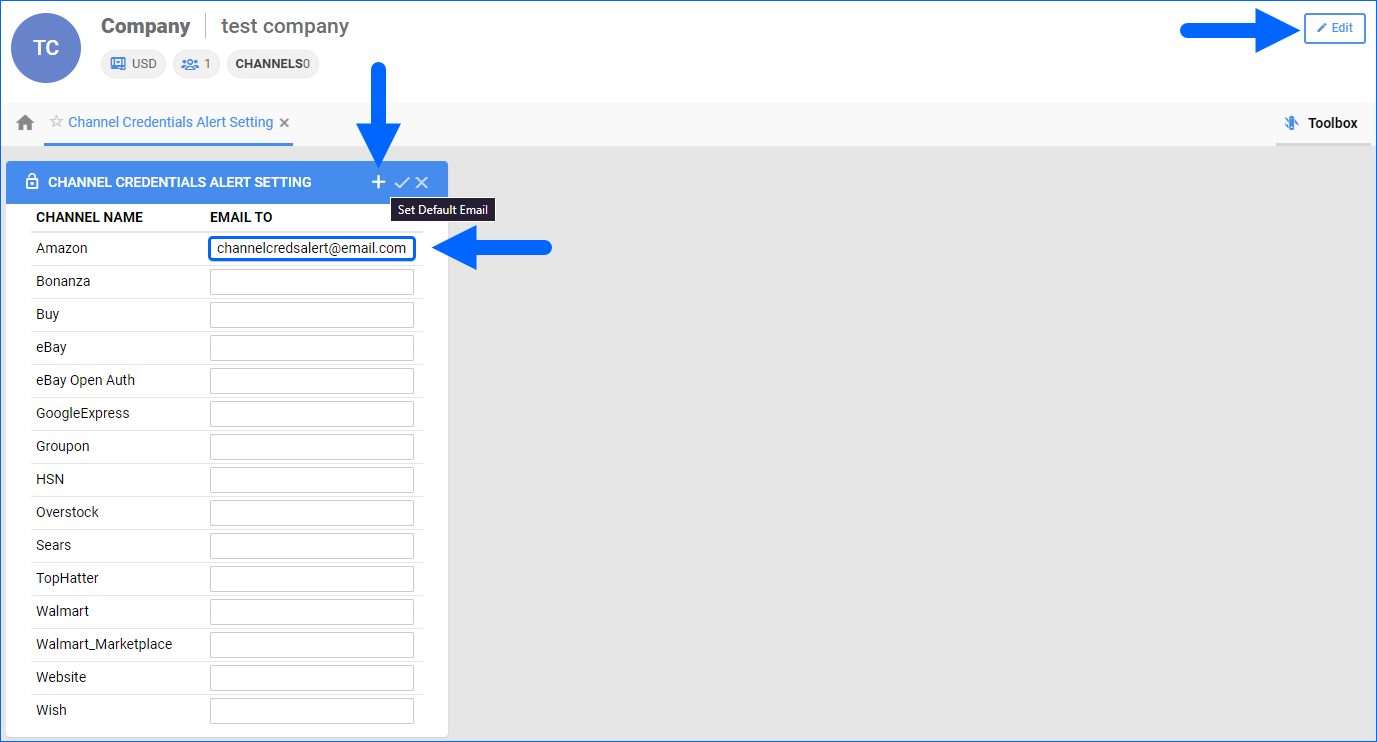
Channel Credentials Alert Setting
This feature allows you to generate and send automatic email notifications to a specified email address when an integration token expires, or the channel credentials are no longer valid. You can configure it to alert you only for specific channels or set a global default email address for all active integrations. To enable this option:
- Navigate to Settings > Select your company > Toolbox > Channel Credentials Alert Setting.
- Open Channel Credentials Alert Setting > Click on the Edit button or the Pencil icon > Enter your per-channel email or default email > Save.
In the event of an authentication error, an automated warning message will be sent to the specified email address. If you receive such a warning, be sure to test your credentials and validate the connection:
- Navigate to Settings > Select your company > Toolbox > Select your channel.
- Go to the channel’s General Settings > Actions > Test credentials/Validate token.
- If they authenticate successfully, the disruption was most likely due to a temporary issue on the channel’s end and you can safely disregard the warning. If you frequently receive such warning emails but your credentials authenticate each time you test, contact Sellercloud Support.
- If they fail to authenticate, confirm if any changes were recently made to the credentials and reach out to the channel directly to investigate further.
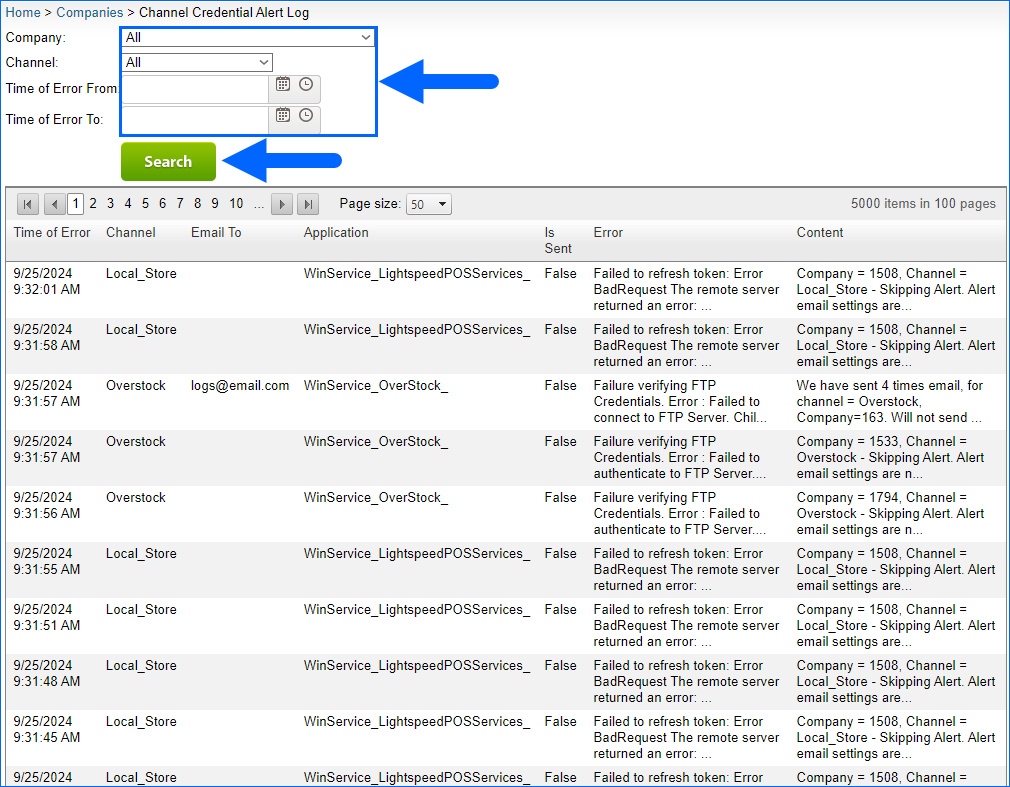
Alert Log
To see a detailed record of all channel credential alerts, go to Settings > Client Settings > Channel Credential Alert Log. Use the Company, Channel, and Time of Error on default filters to narrow down your search.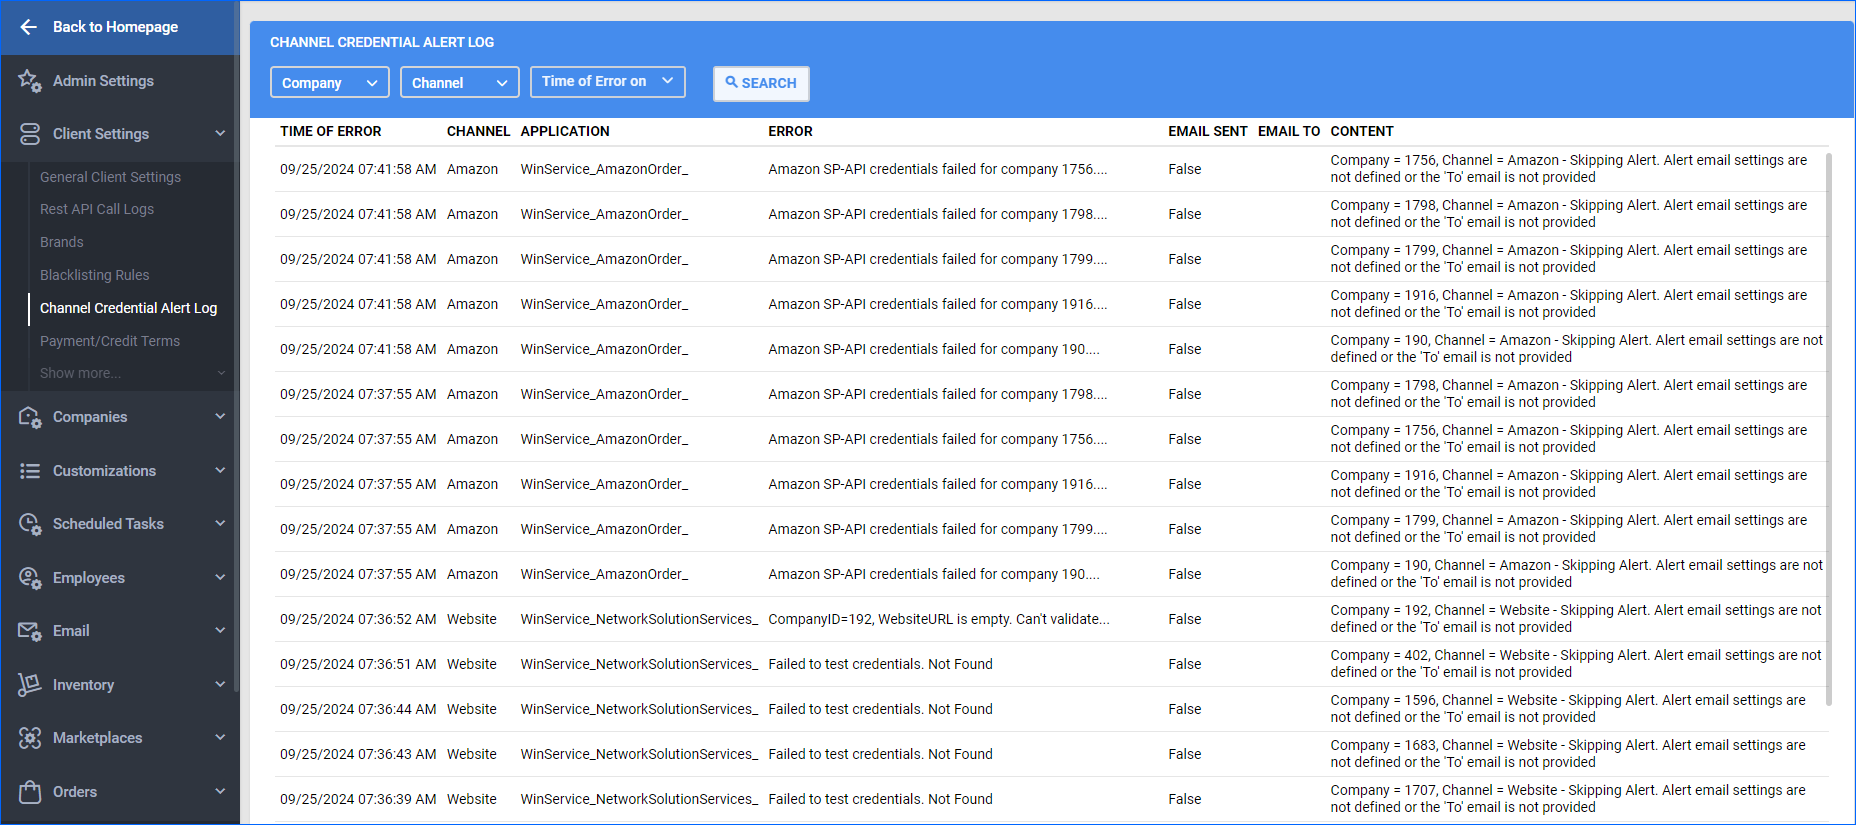
Overview
In this article, you will learn about Company Settings in Sellercloud. You can use them to configure various options and preferences, add third-party integrations, and more.
These settings exist at the Company level, which means you configure them separately for each individual Company in your account. Changes usually take effect right away. Refresh your browser’s cache if you don’t see the result immediately.
Access Company Settings
To access and update your company settings:
- Click Settings.
- Select Company Settings.
- Select your company.
- Click Toolbox and scroll to see all your options. Each option displays a separate tab with settings and info related to your company.
Integration Settings
This is where you can:
- Enter your third-party service credentials to authenticate and establish the connection with Sellercloud.
- Control automatic updates to channels related to order download, tracking, inventory, and more.
- Set up product preferences and defaults for each channel, like the Safety Quantity for products sold on the channel.
- Track inter-service communication such as downloaded and uploaded documents and API calls.
- Configure Channel Warehouse Mapping.
- Configure product Description Templates.
In addition, you can also set up Custom Company Settings, which are essential for non-core third-party service integrations. These are not built into the Sellercloud web interface and must be set up through additional plugins.
Additional Settings
The Company Settings also contain many other pages for company-level configuration and features. Here are some of the top noteworthy options:
- Email Settings such as Blacklisted Domains, Email Rules, Email Templates, POP Accounts, and SMTP Settings.
- Scheduled Tasks and Queued Jobs for automating specific operations.
- Shipping API for calculating rates or tracking order delivery.
- Vendors and Manufacturers.
- Invoice Settings.
- Company Defaults.
- Order Tax Settings.
- Payment Settings.
- Bulk Product Update Log.
- Return Address Settings.
- Security Settings.
- Settlement Reports.
Monitor Changes
You can easily monitor any changes made to the settings by accessing the Change Log. This log shows all changes made on a company level and who made each change.
- Click Settings.
- Select your company.
- Click Toolbox and select Change Log.
- Configure the filters as necessary and click Show Log. You have access to the following filter options:
- Show Log – show only specific types of logged events.
- View Full Log – view all logged events.
- eBay Site – Select an eBay site.
- Changed By – The person who made the change
- Application Name – This option shows IDs for each application that has been used to make changes. For example, it will tell you if a user has signed in and made a change manually from a browser or if something else triggered it, such as a scheduled task.
- Property Name – Select a specific setting. Only settings that have been updated recently will appear as options.
- Log Date – A date range with events to show.
- Sort By – Change the way the data is sorted.
Channel Credentials Alert Setting
This feature allows you to generate and send automatic email notifications to a specified email address when an integration token expires, or the channel credentials are no longer valid. You can configure it to alert you only for specific channels or set a global default email address for all active integrations. To enable this option:
- Go to Settings > Company Settings > Select your company.
- Click Toolbox and select Channel Credentials Alert Setting.
- Enter your per-channel email or default email and Save Setting. Show me an example.
In the event of an authentication error, an automated warning message will be sent to the specified email address. If you receive such a warning, be sure to test your credentials and validate the connection:
- Navigate to Company Settings > Select your company > Toolbox > Select your channel.
- Go to the channel’s General Settings > Actions > Test credentials/Validate token.
- If they authenticate successfully, the disruption was most likely due to a temporary issue on the channel’s end and you can safely disregard the warning. If you frequently receive such warning emails but your credentials authenticate each time you test, contact Sellercloud Support.
- If they fail to authenticate, confirm if any changes were recently made to the credentials and reach out to the channel directly to investigate further.
Alert Log
The channel credential alerts are recorded in the Channel Credential Alert Log. To view the logs, navigate to Settings > Channel Credential Alert Log. You can use the default filters to customize your search.