Overview
In this article, you will learn how to configure your payment settings in Sellercloud and accept order payments using the Waytopay.me application. This application integrates with third-party payment gateways and lets you securely obtain payments by giving your customers a simple way to pay that works on any device.
With Waytopay.me, you can generate a unique payment URL for each order. You create an invoice with all the relevant shipping, payment, and order information and send a payment request to your customer by email. You can also generate a single URL for multiple orders from the same customer.
Key Points
Before you move on to the setup, it is recommended to go through the following aspects of Waytopay.me in order to understand its functionality.
Supported Channels
Most channels require payments to be made on their own platform, which is why Waytopay.me supports the following channels:
- Wholesale
- Local store
- Website
- Magento
Supported Payment Methods
- Credit card payments
- ACH – Electronic check payments. Payers connect with their checking accounts through Plaid, which authenticates and authorizes their payments. Check the Stripe Integration for a comparison between these two payment methods.
- Via Stripe only
- US accounts only
- Payments in USD only
Supported Payment Gateways
Setup
- Simple sign-up using your existing Sellercloud credentials
- Configure the service separately for each of your companies
- Customize payment pages for a branded customer experience
- Easily configure supported payment gateways and processors
Functionality
- Customers can track their order status, pay off balances, and download invoices
- Get your payments all at once, or let customers pay in multiple installments
- Once you receive a payment, the order status is updated in Sellercloud and on the originating channel, and a receipt is generated and sent to your customer
Privacy and Security
- Transactions are securely handled at all times of the collection
- An email address and credit card information are all that is needed to pay for orders
- No personal information is collected from customers to ensure privacy
- Sellercloud’s servers can only store the last four digits of credit card numbers
Sign Up for Waytopay
To configure your payment settings, sign up for Waytopay.me. Once you sign up and enable Waytopay.me, you can manage the payment processing services for each of your companies.
To sign up:
- Go to the Waytopay.me sign-up page.
- Enter your Team Name, Email, and Password.
- If you don’t have a team name, open this sign-up link and then click the Don’t have a team name? Create one link to create a new team name.
- Click Continue.

- Read the Terms of Use and check the I accept the terms of use box, then click Next to continue.

- Select a previously added card or click Add new card to enter your Billing details. A temporary $1 authorization hold will be placed to verify that the card is valid. Click Continue.

- You’ve created your Waytopay.me account. You will now be redirected to the site, where you can configure payment settings as described in the next sections of this article.

Configure Payment Settings
There are two ways to configure payment options: through the Waytopay.me Merchant Portal and through the Sellercloud admin portal. Some payment options are available on both sites. Other options are only available on one or the other.
Waytopay Merchant Portal
To update your payment settings in the Waytopay.me Merchant Portal:
- Go to the Waytopay.me Merchant Portal.
- The Merchant Portal lists your companies with the following details:
- Company – Shows the company name. Click to open the company’s settings page.
- Company Alias – Shows an alternative company name that customers see on payment pages.
- Payment Methods – Each company can accept two payment methods. Choose at least one to use Waytopay.me:
- Waytopay – Shows the current payment status for each company:
- Blue “W” indicates a payment method is chosen and set up.
- Red “!” – Indicates a payment method is not chosen or fully configured.
- Settings button (hover to see) – Click to open the company’s settings page.

- After you click the Company name or the Settings button, you can do the following:
- Enable or disable Waytopay.me for the selected company.
- Enable or disable Waytopay.me for specific channels.
- Add a company logo.
- Type in a custom company alias to show your customers.
- Try Sellercloud’s live CRM service to communicate with buyers. Enter an email for customer support from the payment page, and configure predefined support request reasons. Learn more about setting up Memaila.
- Automatically email receipts to payers.
- Email payment notifications to the merchant.
- Enable or disable partial payments.
- Enable the single-click Stripe integration.
- Set a bank statement descriptor.
- Enable or disable credit card and ACH payments.
- Set a minimum charge for each payment method.
- Configure an alternative credit card gateway – CardKnox, PayTrace or Authorize.net.
- Enable or disable some or all credit card types.
Sellercloud Payment Settings
You can use your Sellercloud settings to update your connected payment processor and specify which credit cards are accepted. Updating the same settings in Waytopay automatically reflects the changes back in Sellercloud.
To update your payment settings in Sellercloud:
- Go to your Company Settings.
- Click Toolbox and select Payment Settings.
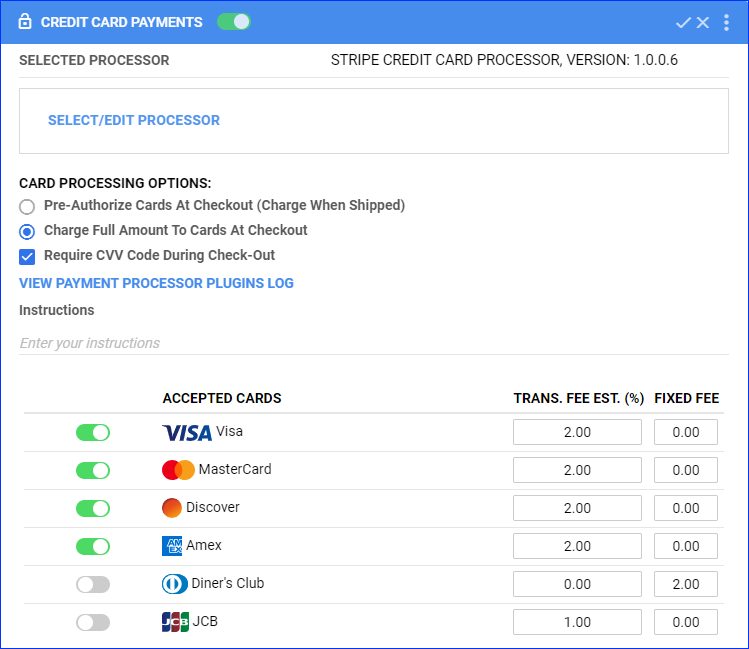
- Click the Edit icon on the top right of the Credit Card Payments section, and be sure to click Save after you make changes. Here, you can do the following:
- Click the toggle button at the top left of the panel to enable or disable these settings.
- Click Select/Edit Processor to select and set up a payment gateway service.
- Configure the Card Processing Options – select if you want to Pre-Authorize Cards At Checkout (Charge When Shipped) or Charge Full Amount To Cards At Checkout. Optionally, check the box to Require CVV Code During Check-Out.
- Enter instructions
- Select Accepted Cards and specify the Transaction Fee Estimate (%) and/or Fixed Fee.
The Card Processing Options and Transaction Fees are not applicable for payments through Waytopay.me. In addition, Diner’s Club and JCB cards are not supported for Waytopay.
When configuring the Card Processing Options, it’s useful for you to be aware that website shopping carts can operate in the following ways:
- Carts that only let the merchant capture credit card information
- In this case, orders import into Sellercloud with a No Payment status.
- Payments are then processed for each order individually through Sellercloud.
- You must configure the Payment Settings to allow credit cards for these orders.
- Carts that capture and authorize the payment to put a hold on the card but do not charge the card.
- In this case, orders come into Sellercloud with an Authorized status.
- You must configure the Payment Settings to allow credit cards for these orders.
- Carts that complete the charging process.
- In this case, the orders come in with a Paid status.
- Since the customer completes the process on your website, you don’t need to configure the Payment Settings to allow credit cards for these orders.
- Note that Magento refers to this as Captured and Authorized, but they charge the credit card.
Connect Payment Gateways
You can set up Waytopay.me to process transactions with one of several credit card gateways:
- Learn how to integrate Waytopay.me with Stripe.
- Learn how to integrate Waytopay.me with Cardknox.
- Learn how to integrate Waytopay.me with PayTrace.
- Learn how to integrate Waytopay.me with Authorize.net.
Generate Waytopay Links
Follow the steps below to generate Waytopay links that customers can use to make payments, download invoices, and more.
For a Single Order
To generate a Waytopay link for a single order:
- Find and go to an order’s details page in Sellercloud.
- Click Actions and select Generate WayToPay Payment Link.

- A success message with a link appears at the bottom. Send this URL to the customer so they can pay for their order.

- Here’s how the payment page generally looks. If you have set up Stripe and enabled ACH, the option to pay via ACH will also appear. Check the Stripe Integration article for more information.
For Multiple Orders
To generate a group link for multiple orders:
- Go to Orders > Manage Orders.
- Check the boxes to the left of orders to select them.
- Click the Actions icon on the bottom right.

- Select Generate Group Waytopay Payment Link.

- A success message with a link appears at the bottom. Send this URL to the customer so they can pay for their order.

- Here’s how the order group payment page generally looks. Customers can switch between orders to view each one. They can also choose which orders to pay by checking the Pay box, allowing them to pay for some or all orders simultaneously.
Vaulted Credit Cards
Vaulting refers to credit/debit card information that is securely captured and stored by a payment processor after a successful transaction. With vaulting, your customers’ card details also get automatically added to Sellercloud, where you can only see the last 4 digits of the card number. This allows you to handle future transactions faster without manually entering credit card details each time.
You can turn off vaulting in Sellercloud by enabling the Client Setting Stop Storing Credit Card Of Customers. You may also be able to turn it off through your third-party payment gateway if their settings allow it.
There are two key pieces of information that enable the quick handling of transactions via vaulting:
- Vault Ref ID (Stripe, PayTrace, Authorize.net) | Card Nonce (CardKnox) – These IDs are used for future charges or payment authorizations instead of getting the card details again.
- Transaction ID – Every successful charge or authorization returns a transaction ID. This transaction ID is used for future refund/void transactions against the original charge or authorization.
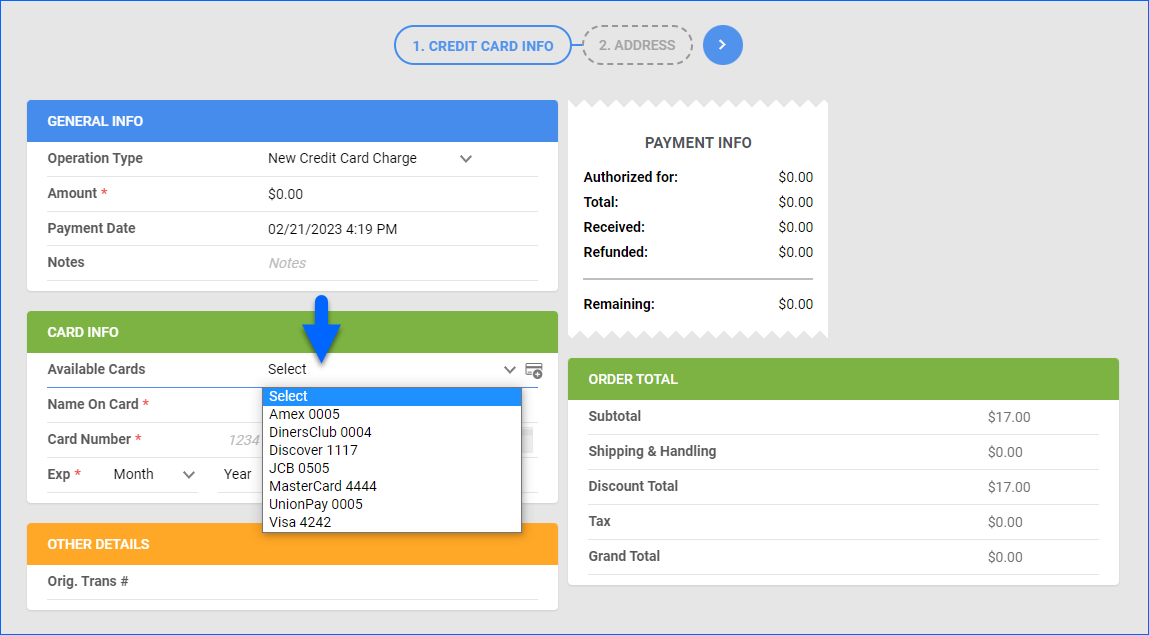
Here is an example of reusing vaulted card details for receiving an order payment:
Manage Card Details
To access and update a customer’s vaulted credit card information:
- Go to Customers > Manage Customers.
- Click the customer’s ID or email.
- Click Toolbox and select Credit Cards.
- To enter credit card details, click Add new card.

- To update credit card details, hover over a card and click Edit card.
- To remove a card, hover over it and click Remove card.
For security, credit card information gets deleted if it isn’t vaulted.


