Overview
Compatible with a wide range of scale models, Sellercloud’s 4D Scale Micro helps you instantly measure the weight of packages and transmit the information to the cloud, where it can be used in various applications. With our robust real-time data transfer, you can capture measurements in less than a second. The 4D Scale Micro makes it easy to add the weight of any new product when you receive a PO or quickly load the box weight of your inbound shipments. This will seamlessly speed up both your receiving and fulfillment workflows.
In this article, you will find all the steps you need to take to properly install and configure your 4D Scale Micro from start to finish. You will learn to install the hardware, connect to the scale, and configure the software settings.
4D Scale Hardware Setup and Compatibility
The 4D Scale Micro is easy to install and requires no special skills or tools.
Included Components:
- 4D Scale Micro
- Power supply
- Over a standard USB Type C cable
- 5VDC @ 2A
- Power consumption — < 10W (No scale attached)
Internet connection:
- Ethernet
- Wi-Fi
Hardware features:
- Works with HID-compliant USB scales*
- 3.5” resistive touchscreen display
- Powers a USB scale over USB (Most scales support power over USB, with some exceptions where scales have their own power cord)
*Ensure that the port on your scale is not power delivery only!
Recommended Compatible Scales
The 4D Scale Micro is compatible with most USB HID scales. Those include scales such as the DYMO M/S series and more. See full list below:
- Mettler Toledo BC60
- Mettler Toledo BC150
- Mettler Toledo PS60
- Dymo 40149
- Dymo S series
- Dymo M series
- ONYX 5lb
- ONYX 70lb
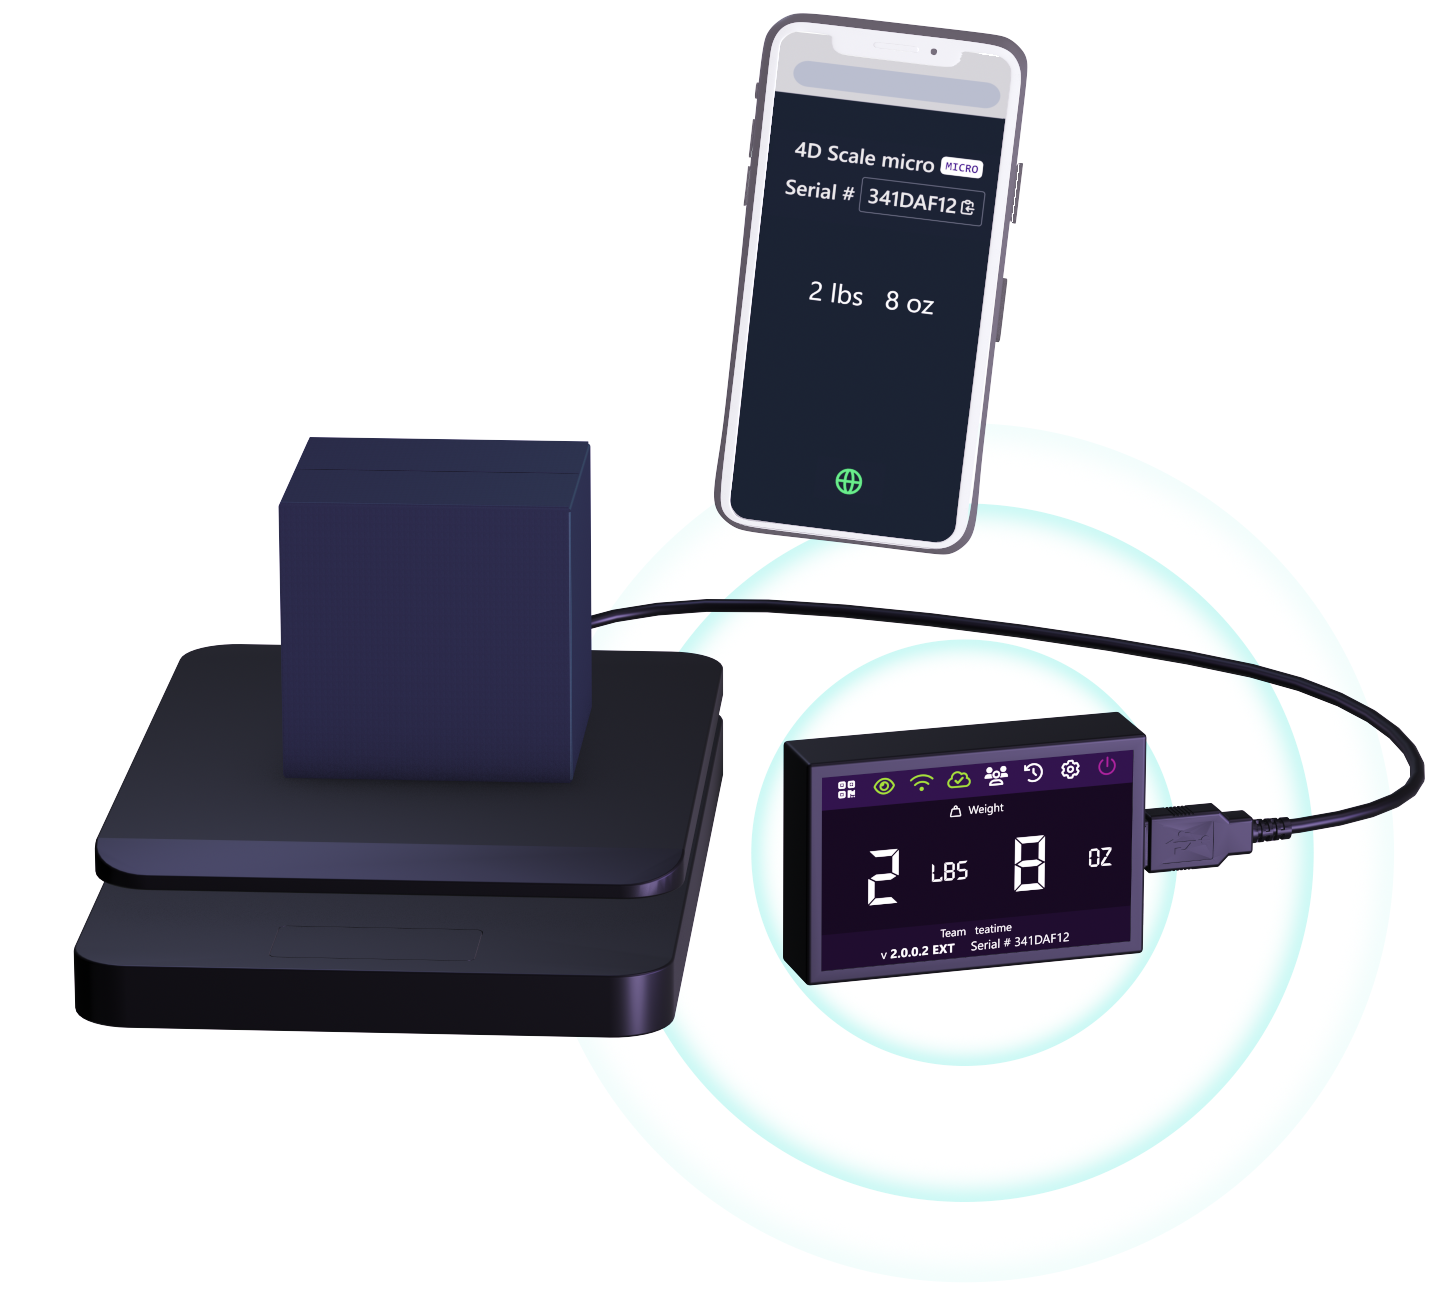
Connect the 4D Scale Micro to your scale
To connect the 4D Scale Micro to your scale, follow the steps below:
- Connect the 4D Scale Micro to your HID-compliant USB scale with the USB Type-B cable.
- Connect the 4D Scale Micro to a power supply (outlet) via the USB Type-C cable/power adapter.
- Wait for the 4D Scale Micro to boot up.
- Connect the 4D Scale Micro to the Internet (either through a Wi-Fi network or the Ethernet port).
4D Scale Mobile App
The 4D Scale app has a web and mobile version. The web version is accessible at app.4dscale.com and also available as a Chrome extension, allowing you to transfer readings from the 4D Scale Micro to any website. The mobile version can be downloaded from the Google Play store for Android and App Store for Apple/iOS. Make sure that your 4D Scale Micro is connected to the internet, either through a Wi-Fi network or the Ethernet port.
Log in
4D Scale is all about improving your shipping process and simplifying your team’s workflow. Simply log in with an existing account or create a new one to access the app. You can log in with your Sellercloud account or a standalone 4D Scale account.
Existing credentials
- Navigate to the 4D Scale Homepage or open the application on your mobile device. Click Log in with Sellercloud for Sellercloud accounts and Log in with email for standalone accounts.
- Enter your Team name, Username, and Password.
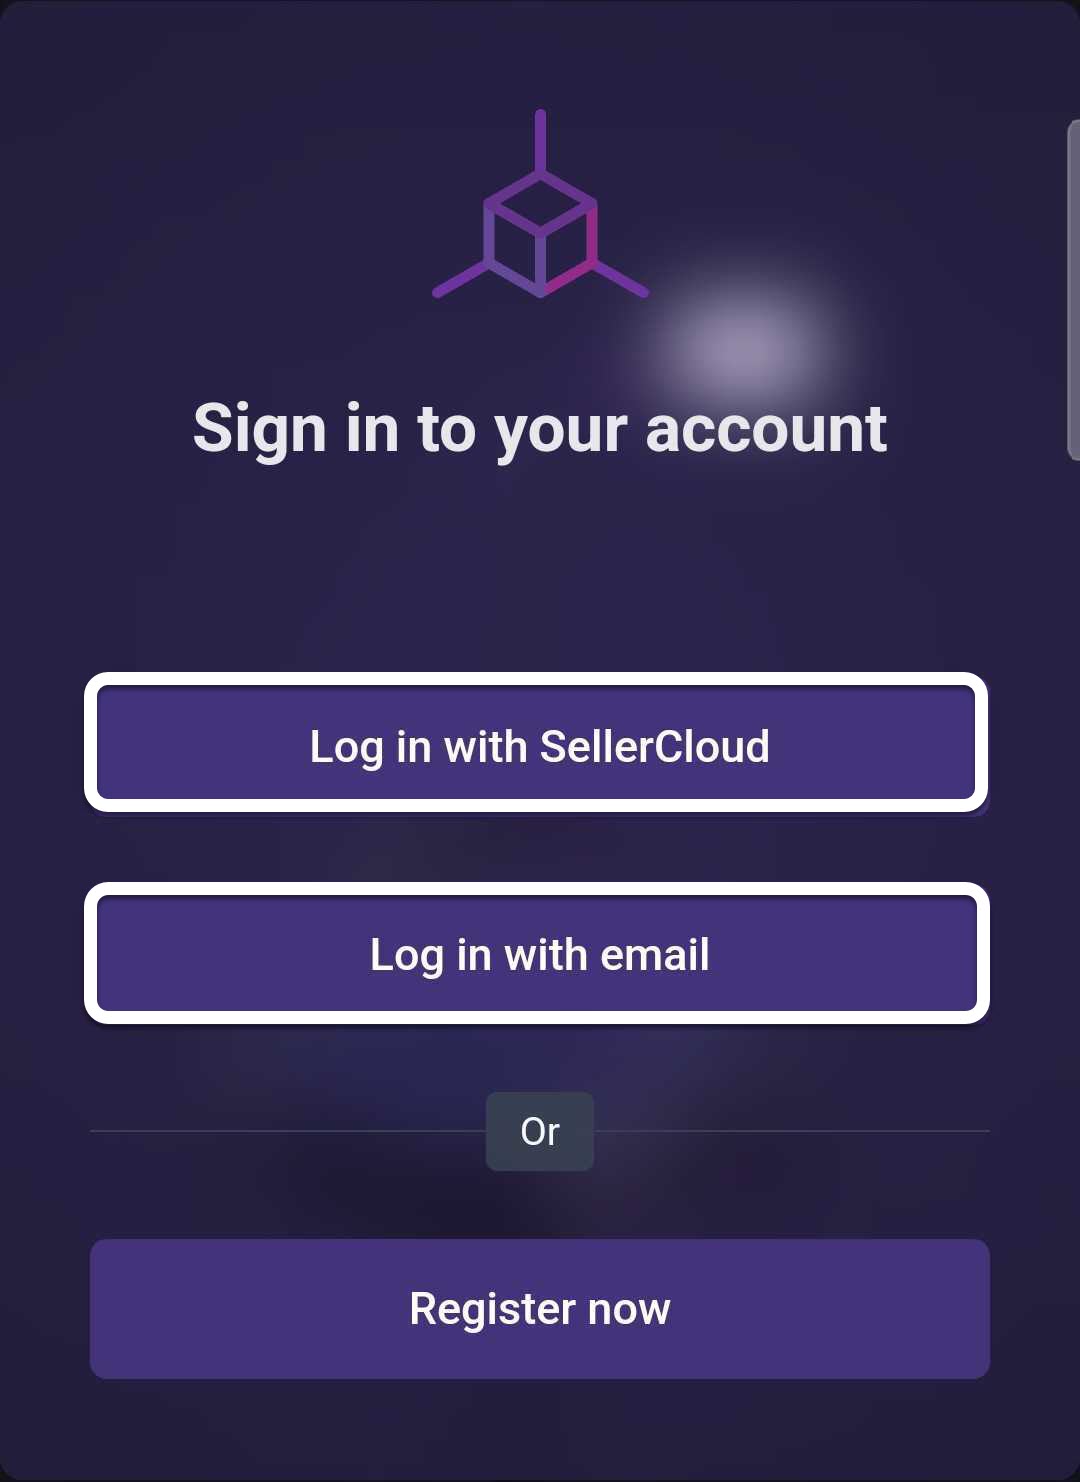
- Click Sign in.
Create a new account
To create a new standalone account, either navigate to the 4D Scale Homepage or open the application on your mobile device and click Register now.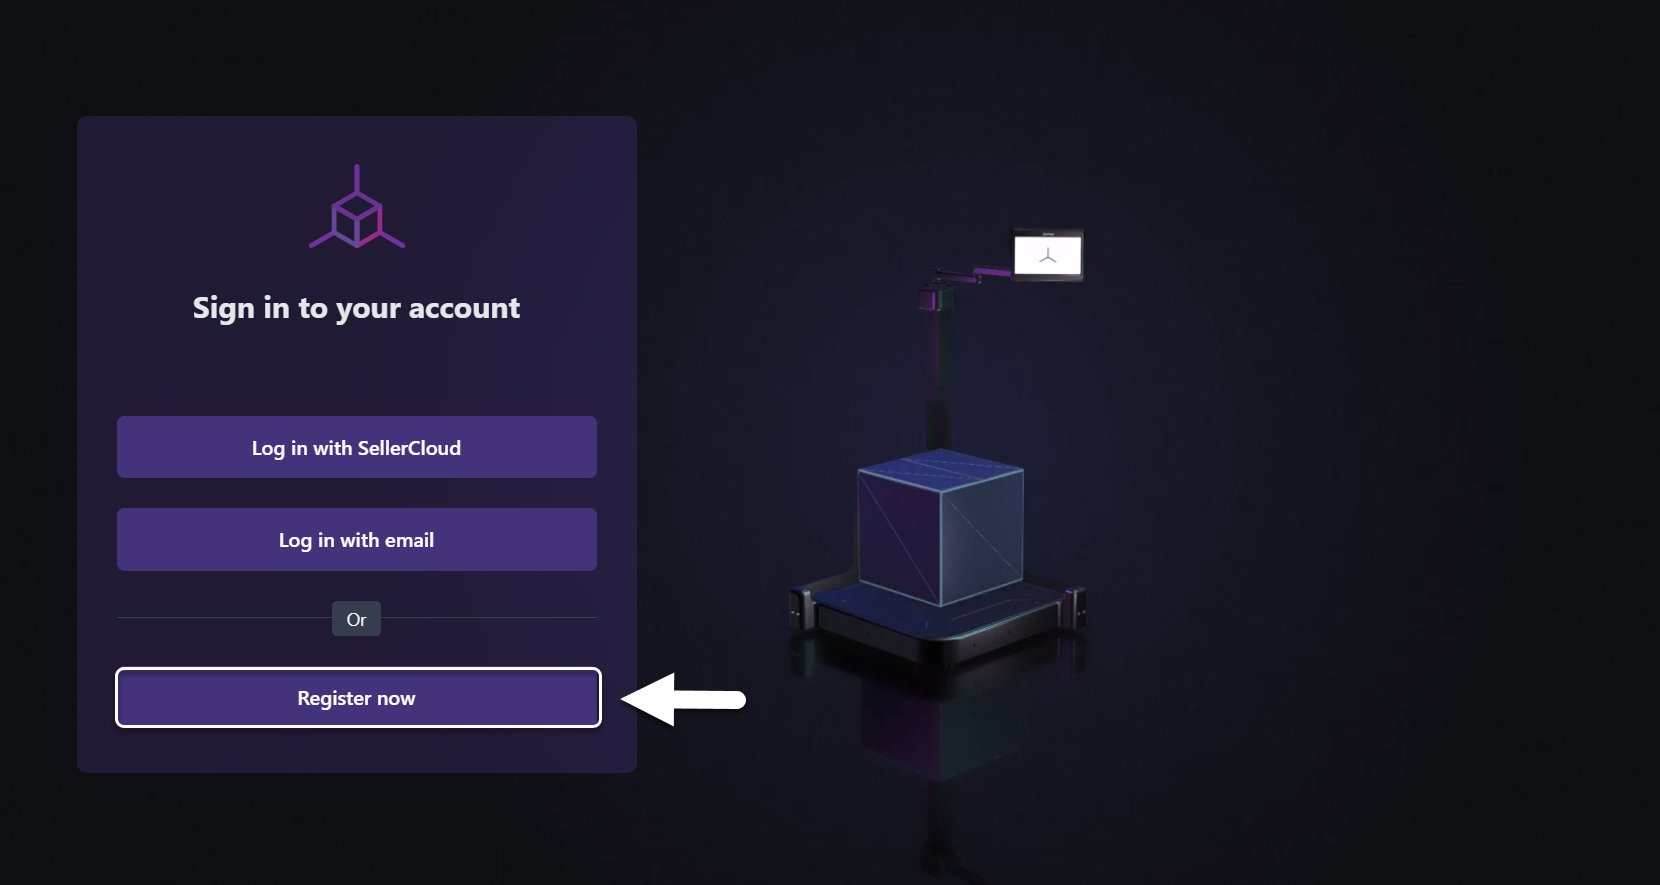
Configure the 4D Scale app
Now that you’ve successfully logged in, follow the steps below to complete the configuration:
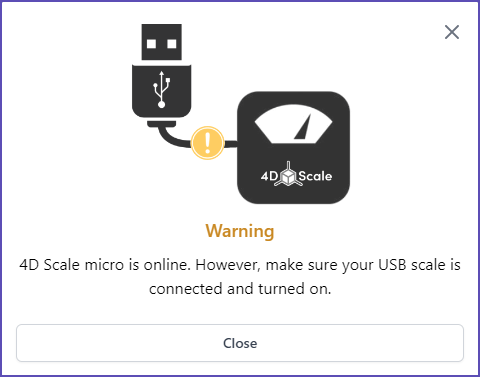
- Make sure that your 4D Scale Micro is connected to the internet, either through a Wi-Fi network or the Ethernet port. The Wi-Fi indicator should be green and your scale powered on.
- Click on Add your 4D scale in the mobile (Android / iOS) or web version of the app.

- Choose one of the two options: Detect automatically or Connect manually instead.
 If the scale is not detected automatically, you can add it manually by entering its serial number. Once you connect 4D Scale Micro to your account and the company’s team name, it cannot be assigned to any other account unless it is unlinked first.
 - Get a test reading by placing an object on the scale to ensure that the weight measurement is displayed correctly on the 4D Scale Micro screen.
Real-time warnings will be sent if your scale is disconnected or asleep/powered off.
4D Scale Micro Interface
In this section, you will find detailed information on the interface panels and how to use them.
Navigate the Home Screen
The 4D Scale Micro Home Screen contains the following details and options:

Refer to the definitions below for a detailed description of each option.
| SETTING | DESCRIPTION |
QR Code |
Use this QR code to open your scale in the mobile application. |
Make Private/Public |
You can choose whether your 4D Scale Micro is visible to other users. When set to Public, your scale readings would be accessible to others. When set to Private, views of your scale readings will be restricted. |
Connectivity |
Wi-Fi indicator. A red color icon indicates that you are currently not connected to any network. |
Real-time updates |
Indicates real-time connection to the cloud. A yellow color icon indicates that there may be an issue with the real-time updates and/or the Wi-Fi connection. |
Subscribers |
Displays all live viewers with access to the scale readings from the mobile (Android / iOS) or web version of the app. |
Log |
The Log provides you with detailed information about the actions and events recorded by the 4D Scale Micro.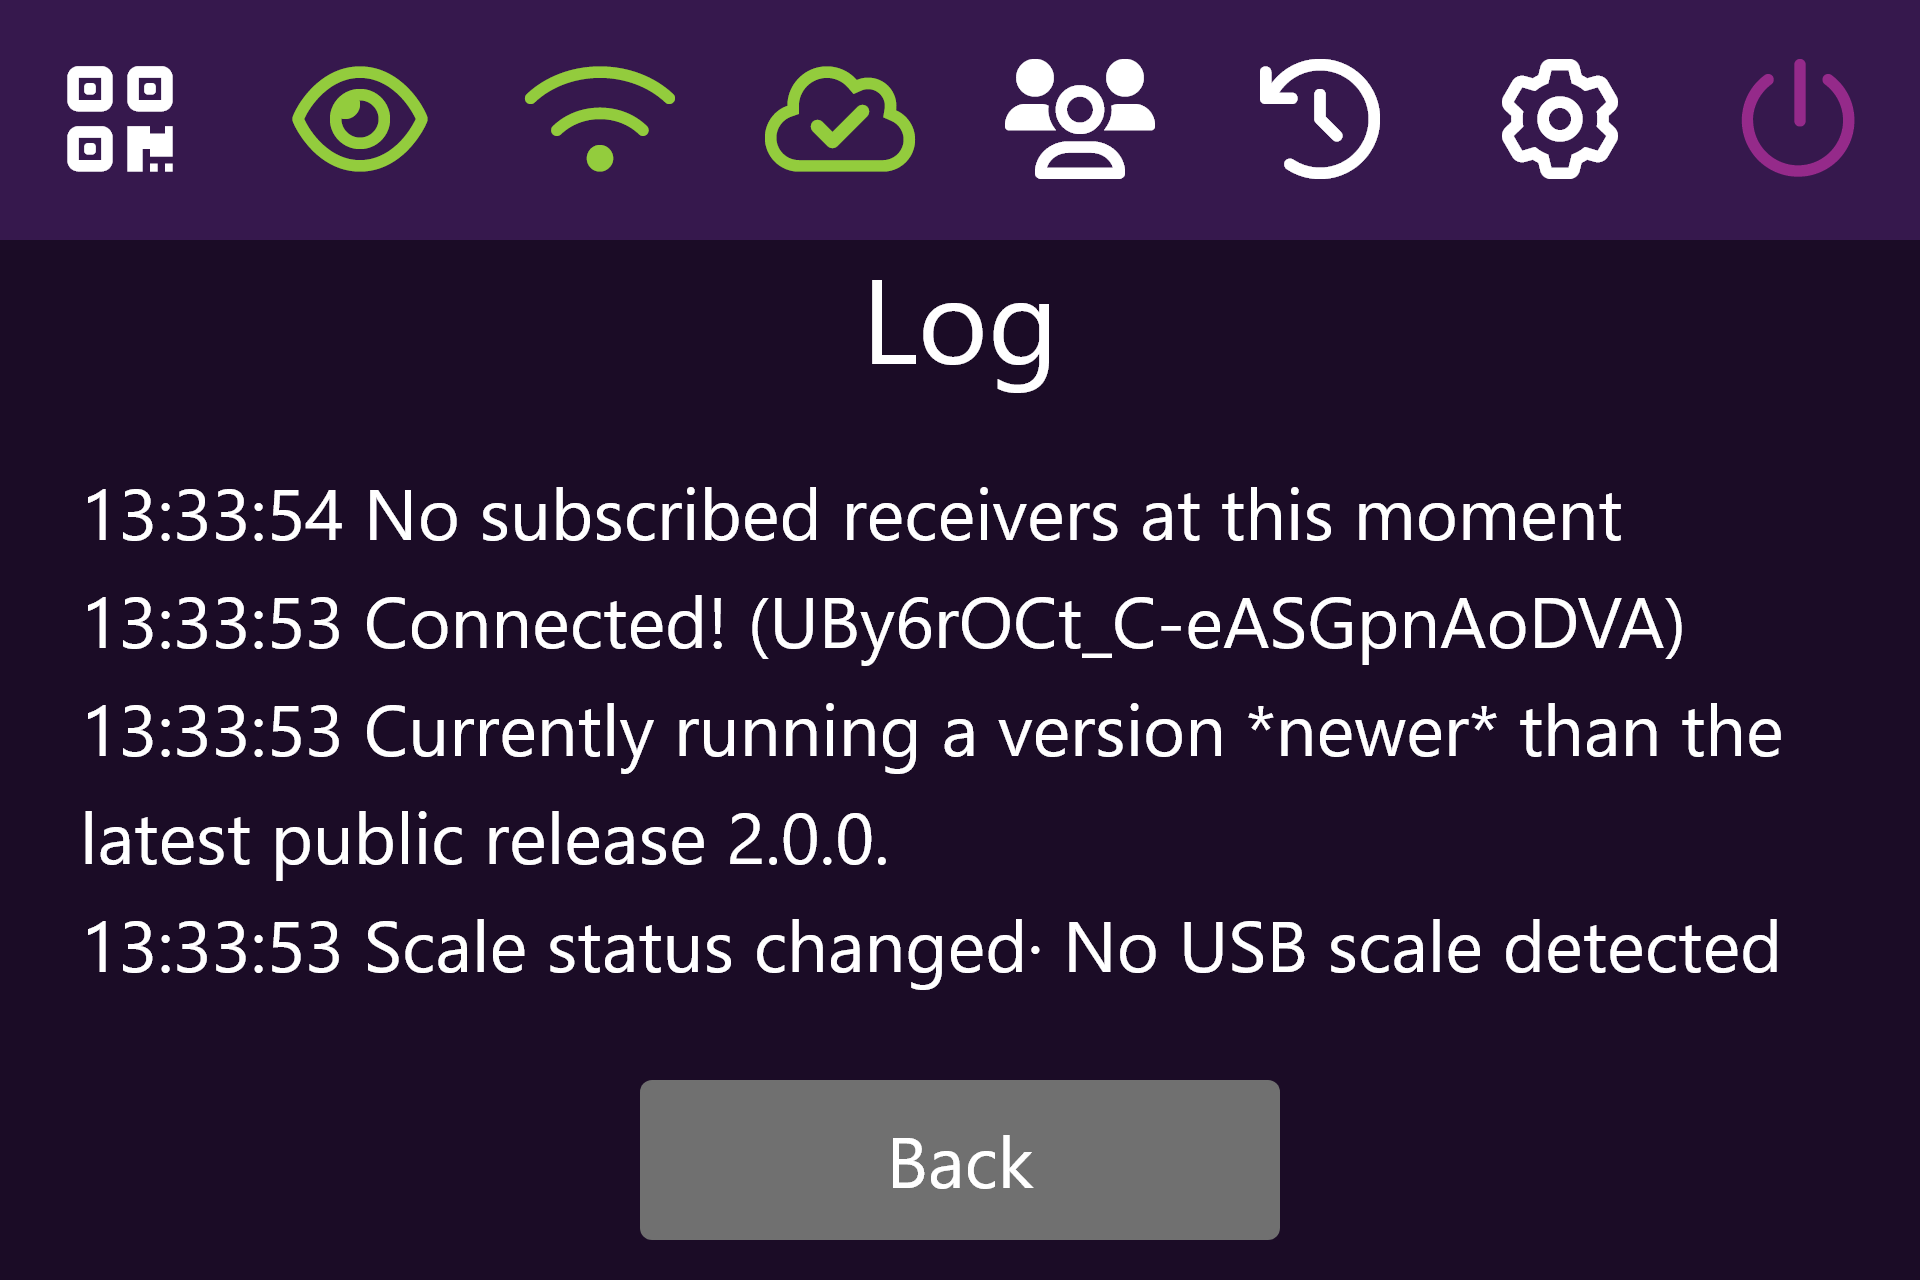 |
Settings |
Located at the top right of the screen, next to the Power button, this option allows you to change the units of measurement. The value defined here will be the standard for measuring. Available options are Pounds, Ounces, Kilograms, and Grams. |
Power off |
Powers the application off. Note: This does not power the 4D Scale Micro off. |
4D Scale Web Portal
The 4D Scale Web Portal allows you to see all scales in your vicinity and manage their settings, as well as gain quick access to their historical readings.

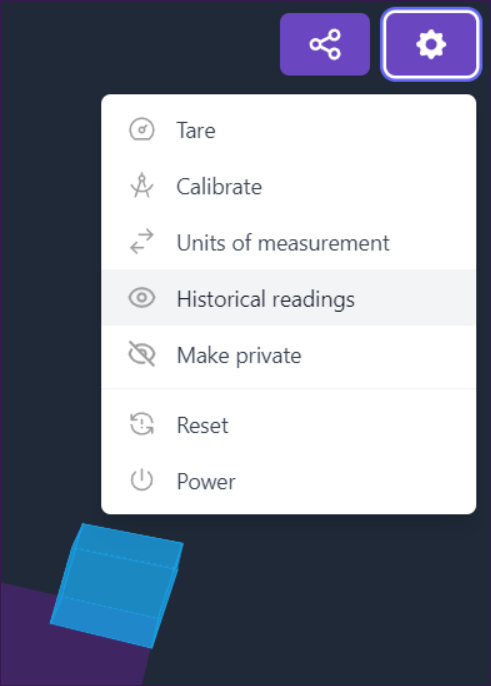
To access the Settings of a specific 4D scale, select your desired device in the grid and click on the Gear icon at the upper right-hand corner of the screen (Show me where!).
The following setting options are available:
- Add 4D Scale to account – This option will be present if the scale hasn’t been added to your account.
- Tare – Tare the scale to set the current weight as the reference point, allowing subsequent measurements to be taken relative to that reference.
- Calibrate – You can calibrate your device to ensure its accuracy and reliability in measuring weight. Ensure that your 4D Scale plate is empty before calibrating the device.
- Units of measurement – This setting allows you to view and update the scale’s units of measurement.
- Historical readings – This option allows you to search and review previous scale readings.
- Make private/ Make public – Select this setting to set the 4D scale as Private/Public.
- Reset – This setting enables you to reset one or more of the following configurations:
- Team – With this option, you can disconnect a scale from your team’s 4D devices.
- User preferences – This option allows you to erase previous preferences, such as units of measurement.
- Hardware calibration – Use this option to discard hardware calibration data.
- Power – You can use this setting to power off a scale remotely. Keep in mind that a scale cannot be started remotely.
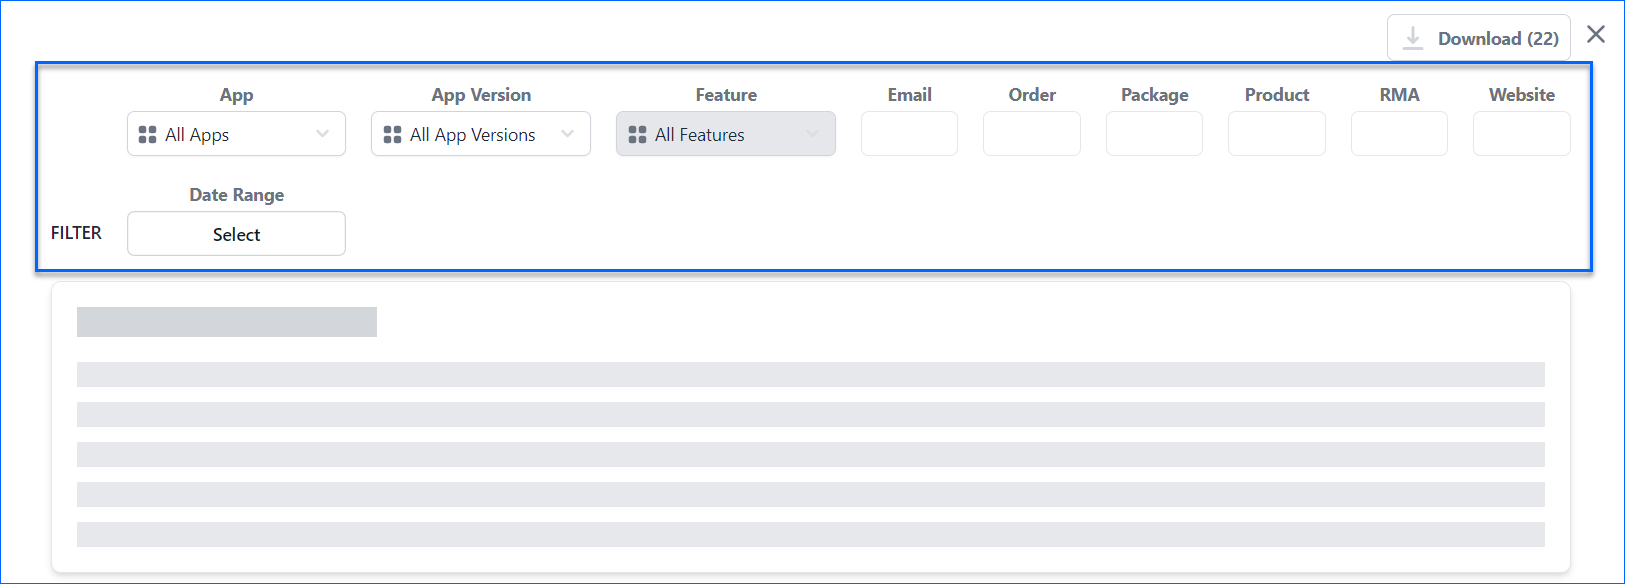
Historical Readings
Every time you utilize your 4D Scale to measure the size of a specific item, you create a reading record. To conveniently access and filter saved readings, open the three-dot menu of the desired scale and select Historical Readings.
You can filter the records by:
- App
- App Version
- Feature
- Order Package
- Product
- RMA
- Website
- Date Range
4D Scale Integrations
Your 4D Scale can easily integrate with different websites and other Sellercloud products.
Chrome Extension
4D Chrome extension allows you to connect various shipping websites with your scale. The extension transfers package measurements from any of your 4D Scales to a preconfigured shipping carrier website. This integration simplifies your shipping process and minimizes manual effort when generating shipping labels.
Learn how to add and configure the 4D Scale Chrome extension.
Integrate with Shipbridge
Your Shipbridge installation integrates with a 4D Scale over the Internet to record real-time and historical data when shipping orders. This enables you to obtain the scale’s readings and instantly reflect them as order measurements in Shipbridge, eliminating the need for manual input when sizing your orders.
Learn how to integrate your 4D Scale with Shipbridge.
Integrate with Skustack
4D Scale connects with Skustack to seamlessly pull in scale readings for any product that is entering or leaving your warehouse. With a single tap on your device’s screen, the scale’s data is immediately reflected in Skustack without additional actions.
Learn how to integrate your 4D Scale with Skustack.