Overview
Lightspeed POS is a cloud-based point-of-sale (POS) system for retail businesses. It offers a suite of features to manage sales, inventory, customer relationships, and reporting. Lightspeed POS allows you to process transactions, track inventory, manage staff, and analyze sales data in real time.
In this article, you will learn how to integrate Lightspeed POS with Sellercloud. This setup will allow you to post products, manage listings, and enable automatic updates.
Integrate Lightspeed POS
You can integrate Lightspeed POS into Sellercloud via API using an Authentication Token.
To set up and enable the integration:
- First, you must Create an API Client at Lightspeed.
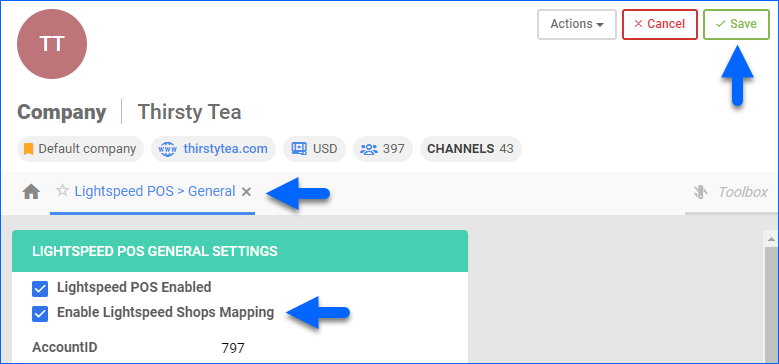
- Next, in Sellercloud, go to your Company Settings.
- Click Toolbox and select Lightspeed POS > General Settings.
- Click Edit.
- Enter your Lightspeed Site ID in the AccountID field.
- Enter the Redirect URI – https://XX.cwa.sellercloud.com/LightspeedPOSOpenAuth.aspx (where XX is your Server ID).
For TF servers, the URI should end with .us instead of .com and instead of your server ID, make sure to write your team name: https://team.ws.sellercloud.us/LightspeedPOSOpenAuth/ - Fill in the Lightspeed Register ID and Lightspeed Employee ID fields.
- Click Actions and select Fetch Token. You will have to log in to Lightspeed to authenticate your account, and your authentication token will be entered into the Auth Token field.
- Check Enable Order Download and Enable Inventory Upload. Optionally, enable the other settings as well. Check the next section of this article for a description of each setting.
- Check Lightspeed POS Enabled.
- Click Save.
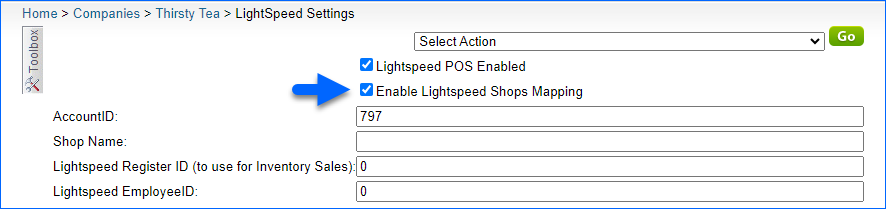
Lightspeed Shops Mapping
If you manage multiple shops on Lightspeed, you can map each of them to one or more Sellercloud Warehouses. This way:
- Product inventory for each shop will be sent only from the respective mapped warehouse(s)
- Product quantities for orders from each shop will be deducted only from the respective mapped warehouse(s)
To map shops to warehouses:
- Go to your Company Settings.
- Click Toolbox and select Lightspeed POS > General Settings.
- Click Edit.
- Check Enable Lightspeed Shops Mapping.
- Click Save.
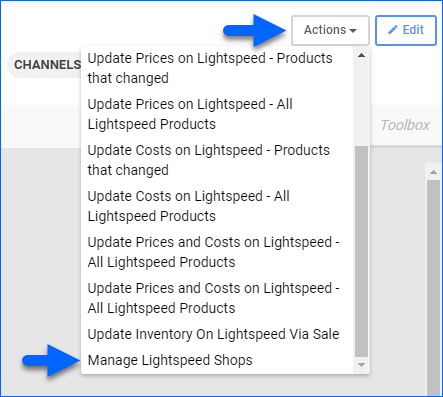
- Click Actions and select Manage Lightspeed Shops.
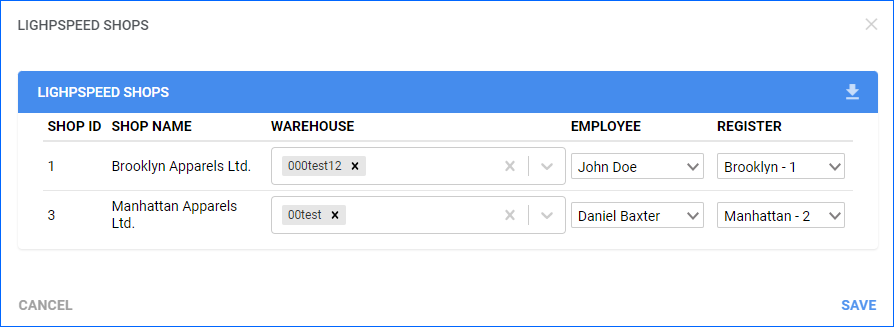
- Click the Re-Download Lightspeed POS Shops icon on the right side of the blue Lightspeed Shops header to download your Lightspeed shops into Sellercloud.
- Map one or more Warehouses to each Shop and select the respective Employee and Register.
- Click SAVE.
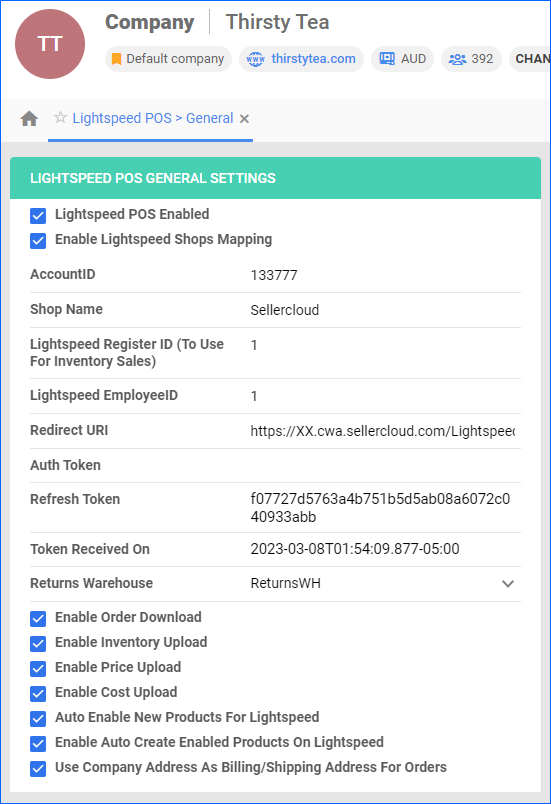
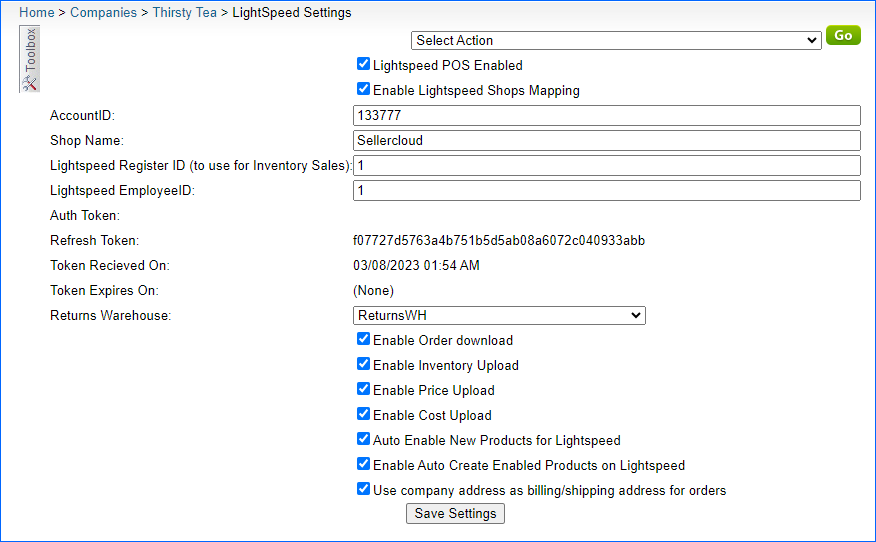
Lightspeed POS Settings
You can configure the following settings on the Lightspeed POS > General Settings page:
| SETTING | DESCRIPTION |
| Lightspeed POS Enabled | Enables the Lightspeed POS integration. |
| Enable Lightspeed Shops Mapping | Enables the Manage Lightspeed Shops action, available under Actions on the same page. This action allows you to map Sellercloud Warehouses to Lightspeed Shops. |
| AccountID | Your Lightspeed Site ID. |
| Shop Name | The name of your shop. |
| Lightspeed EmployeeID | A Lightspeed Employee ID. |
| Redirect URI | Your redirect URI. Refer to step 6 in the instructions outlined above. |
| Auth Token | Populated upon authentication. |
| Refresh Token | Populated upon re-authentication. |
| Token Received On | Populated upon authentication. |
| Returns Warehouse | Select a warehouse for returns. |
| Enable Order Download | Automatically download orders from Lightspeed. |
| Enable Inventory Upload | Automatically upload inventory information to Lightspeed. |
| Enable Price Upload | Automatically upload product pricing information to Lightspeed. |
| Enable Cost Upload | Automatically upload product cost information to Lightspeed. |
| Auto Enable New Products For Lightspeed | Automatically enable new products for Lightspeed. |
| Enable Auto Create Enabled Products On Lightspeed | Automatically create enabled products on Lightspeed. |
| Use Company Address As Billing/Shipping Address For Orders |
Use the Sellercloud company address as the billing/shipping address for orders. |
Overview
Lightspeed POS is a cloud-based point-of-sale (POS) system for retail businesses. It offers a suite of features to manage sales, inventory, customer relationships, and reporting. Lightspeed POS allows you to process transactions, track inventory, manage staff, and analyze sales data in real time.
In this article, you will learn how to integrate Lightspeed POS with Sellercloud. This setup will allow you to post products, manage listings, and enable automatic updates.
Integrate Lightspeed POS
You can integrate Lightspeed POS into Sellercloud via API using an Authetication Token.
To set up and enable the integration:
- First, you must Create an API Client at Lightspeed.
- Next, in Sellercloud, go to your Company Settings.
- Click Toolbox and select Lightspeed POS > General Settings.
- Enter your Lightspeed Site ID in the AccountID field.
- Enter the Redirect URI – https://XX.cwa.sellercloud.com/LightspeedPOSOpenAuth.aspx (where XX is your Server ID).
For TF servers, the URI should end with .us instead of .com and instead of your server ID, make sure to write your team name: https://team.ws.sellercloud.us/LightspeedPOSOpenAuth/ - Fill in the Lightspeed Register ID and Lightspeed Employee ID fields.
- Click Select Action and select Fetch Token > Go. You will have to log in to Lightspeed to authenticate your account, and your authentication token will be entered into the Auth Token field.
- Check Enable Order Download and Enable Inventory Upload. Optionally, enable the other settings as well. Check the next section of this article for a description of each setting.
- Check Lightspeed POS Enabled.
- Click Save Settings.
Lightspeed Shops Mapping
If you manage multiple shops on Lightspeed, you can map each of them to one or more Sellercloud Warehouses. This way:
- Product inventory for each shop will be sent only from the respective mapped warehouse(s)
- Product quantities for orders from each shop will be deducted only from the respective mapped warehouse(s)
To map shops to warehouses:
- Go to your Company Settings.
- Click Toolbox and select Lightspeed POS > General Settings.
- Check Enable Lightspeed Shops Mapping.
- Click Save.
- Click Select Action and select Manage Lightspeed Shops, then click Go.

- Click the Re-Download Lightspeed POS Shops to download your Lightspeed shops into Sellercloud.
- Map one or more Warehouses to each Shop and select the respective Employee and Register.
- Click SAVE.

Lightspeed POS Settings
You can configure the following settings on the Lightspeed POS > General Settings page:
| SETTING | DESCRIPTION |
| Lightspeed POS Enabled | Enables the Lightspeed POS integration. |
| Enable Lightspeed Shops Mapping | Enables the Manage Lightspeed Shops action, available under Actions on the same page. This action allows you to map Sellercloud Warehouses to Lightspeed Shops. |
| AccountID | Your Lightspeed Site ID. |
| Shop Name | The name of your shop. |
| Lightspeed EmployeeID | A Lightspeed Employee ID. |
| Redirect URI | Your redirect URI. Refer to step 5 in the instructions outlined above. |
| Auth Token | Populated upon authentication. |
| Refresh Token | Populated upon re-authentication. |
| Token Received On | Populated upon authentication. |
| Returns Warehouse | Select a warehouse for returns. |
| Enable Order Download | Automatically download orders from Lightspeed. |
| Enable Inventory Upload | Automatically upload inventory information to Lightspeed. |
| Enable Price Upload | Automatically upload product pricing information to Lightspeed. |
| Enable Cost Upload | Automatically upload product cost information to Lightspeed. |
| Auto Enable New Products For Lightspeed | Automatically enable new products for Lightspeed. |
| Enable Auto Create Enabled Products On Lightspeed | Automatically create enabled products on Lightspeed. |
| Use Company Address As Billing/Shipping Address For Orders |
Use the Sellercloud company address as the billing/shipping address for orders. |