Overview
Once you’ve successfully Integrated WFS into Sellercloud and Prepared your Products, you can Create and Manage your WFS Shipments from Sellercloud. In this article, you will learn how to manage your shipments, configure default boxes for shipments, and learn about client settings that impact the way Sellercloud processes WFS Shipment Plans.
Manage Shipment Plans
In this section, you will see how to:
- Search for and find shipment plans within Sellercloud.
- Bulk-update shipment plans.
- View and edit a specific shipment plan.
- Use different actions and options related to a specific shipment plan.
- Find and handle partially received and unconfirmed shipments.
- Import WFS Removals to get inventory back from Walmart.
Search for WFS Plans
To search for shipment plans:
- Go to Inventory > WFS Shipment Plans > Manage WFS Shipment Plans.
- Click Search to see all shipment plans, or use the following filters to narrow down the search results:
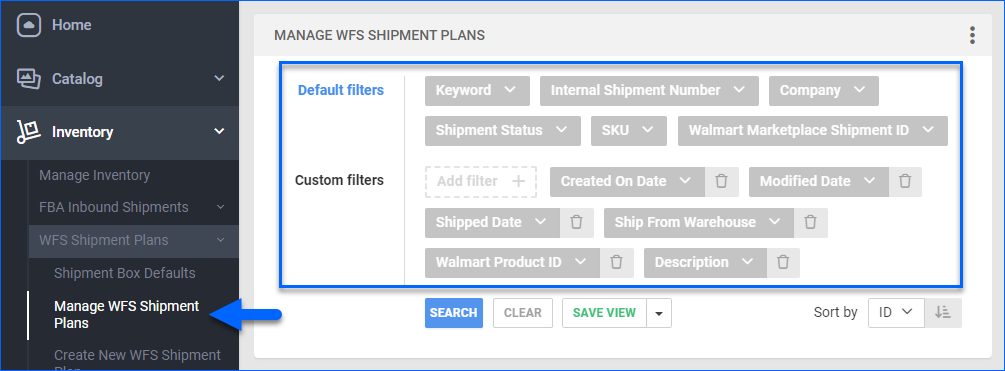
- Company – Show only the shipment plans of one or more specific companies.
- Keyword – Search for specific keywords that could be anywhere in a shipment plan.
- Description – Search for specific keywords in your shipment plans’ descriptions.
- SKU – Search for shipment plans with specific Sellercloud SKUs.
- Walmart Marketplace Shipment ID – Search for specific Walmart Shipment IDs.
- Internal Shipment Number – Search by Sellercloud shipment plan ID.
- Shipment Status – Search by shipment status
- Walmart Product ID – Search for shipment plans with a specific Walmart product ID. This is the WPID field in Sellercloud, which appears after you post the product to Walmart.
- Ship From Warehouse – Search by From Warehouse.
- Created On Date – Search by creation date.
- Modified Date – Search by modification date.
- Shipped Date – Search by shipping date.
Bulk-Update WFS Plans
To bulk-update WFS shipment plans:
- Search for WFS shipment plans.
- Check the boxes next to plans to select them.
- Click the blue Actions icon on the bottom right.
- Select from the following actions:
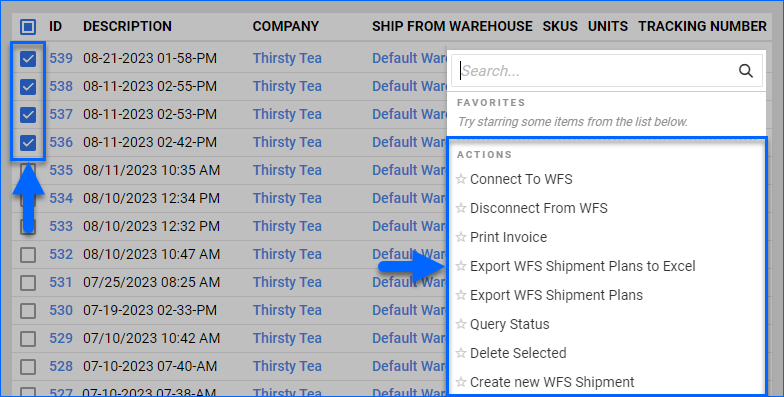
- Connect To WFS – Connect the shipment plans to WFS.
- Disconnect From WFS – Disconnect the shipment plans from WFS so that any actions performed in Sellercloud don’t update Walmart.
- Print Invoice – Print PDF invoices for the selected shipments.
- Export WFS Shipment Plans to Excel – Download the selected WFS shipment details to an Excel spreadsheet.
- Export WFS Shipment Plans – Start a Queued Job that exports the selected shipments to an Excel spreadsheet.
- Query Status – Start a Queued Job that refreshes the selected shipments’ shipping status based on information from Walmart.
- Delete Selected – Start a Queued Job that deletes the selected shipments and cancels them on Walmart. You cannot delete shipments with a Shipped status.
- Create new WFS Shipment – Start creating a new WFS shipment.
View and Edit WFS Plan Details
To view and edit a specific shipment plan’s details:
- Search for WFS shipment plans.
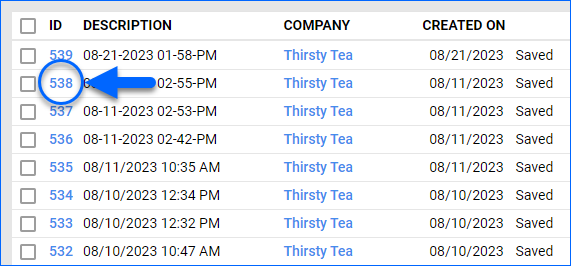
- Click a specific plan’s ID to open the shipment plan’s page.
- This page features three panels on top: General, Ship From Address, and Changes. Click Edit to update them.
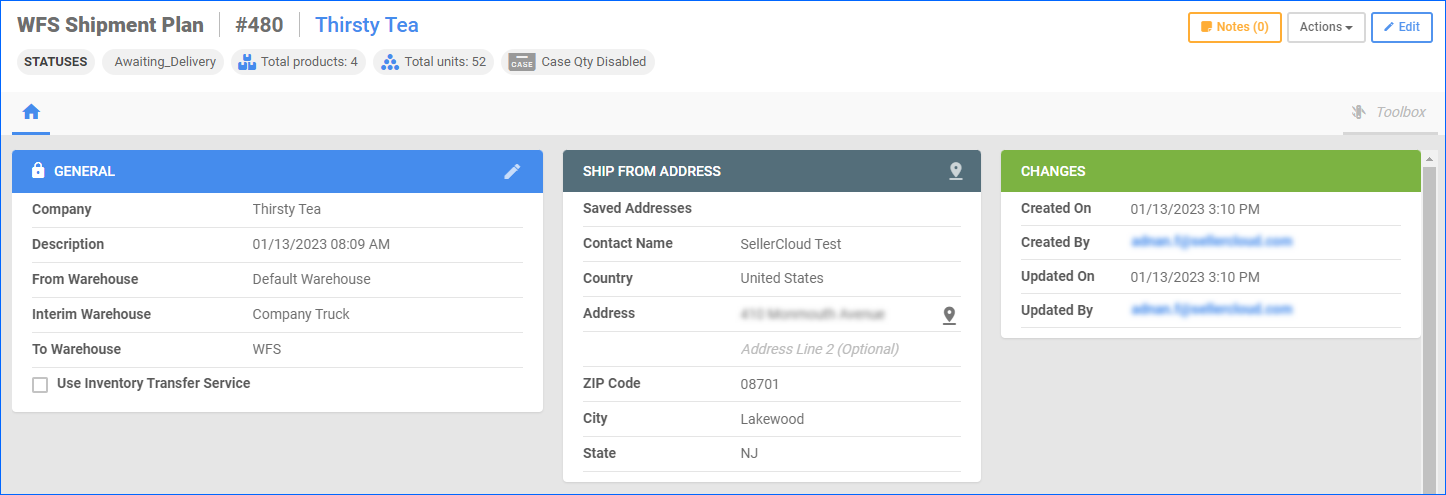
- General – Edit the general details – the Company, Description, From Warehouse, Interim Warehouse, and To Warehouse, as well as whether to use the Inventory Transfer Service or not.
- Ship From Address – Edit the ship from address – select a Saved Address or manually set the Contact Name, Country, Address, Postal Code, City, and Region.
- Changes – See who created and last updated the shipment plan and the exact date and time of each action. You can’t edit this information.
- There is a fourth panel below these, called Shipments, which lets you manage your shipments. You can:

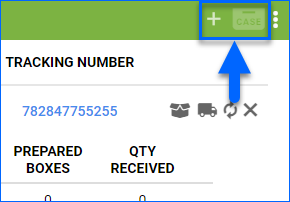
- Click the Add Products icon to add more products to a shipment. The inventory you add will be reserved for the shipment automatically and will not be made available for sale until it has arrived at a Walmart fulfillment center.
- If you are using the Sellercloud Mobile Application, you can scan barcodes with your device’s camera for this step.
- Click the Enable Case Qty icon to enable the quantity per case feature, which ensures that Walmart will not split the product quantities per case. Products in cases will be multiples of the same item, typically packaged by the manufacturer, with each case having the same quantity. This option enables the Qty Per Case and Case Qty To Ship fields in the Shipments panel.
- Update the Shipment Name.
- Update the Expected Delivery Date.
- Update the Qty To Ship for each item.

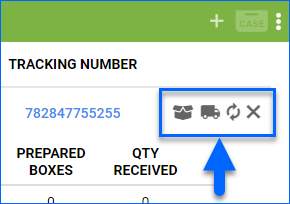
- Click the Manage Shipping Boxes icon to manage your shipping boxes and box contents.
- Click the Ship Items icon to edit or import tracking numbers and mark shipments as shipped.
- Click the Query Shipment Status icon to refresh the shipment’s shipping status based on information from Walmart.
- Click the Cancel Shipment icon to cancel a shipment.
- Click the Add Products icon to add more products to a shipment. The inventory you add will be reserved for the shipment automatically and will not be made available for sale until it has arrived at a Walmart fulfillment center.
- If you check the boxes next to items in a shipment and then click the three dots icon in the top right of the Shipments panel, you can perform the following actions:

- Delete Items – Remove the selected items from the shipment. You can’t delete items for WFS-connected shipments with any status other than Saved or Cancelled.
- Mark Exported – Marks the shipment as Exported.
- Mark Not Exported – Marks the shipment as Not Exported.
- Disconnect From WFS – Disconnect the selected shipments from WFS.
- Query Shipments Status – Refreshes the selected shipments’ shipping status based on information from Walmart.
- Cancel Shipments – Cancel any selected shipments.
- Print Product Labels – Print product UPC barcode labels.
- Print Package Label – Print package labels from Walmart.
- Print Sellercloud Package Label – Print the required Walmart Box Label from Sellercloud.
WFS Plan Actions and Options
To access and use different actions and options related to a specific shipment plan:
- Search for WFS shipment plans.
- Click a specific plan’s ID to open the shipment plan’s page.
- Click the Actions icon on the top right to perform the following actions:
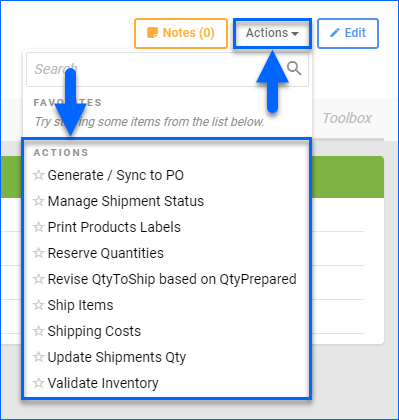
- Generate / Sync to PO – Link or Copy to a new or existing PO. The Copy option copies the shipment’s items to a PO, and the Link option copies the shipment’s items to a PO and connects the WFS Shipment to a PO so that your vendor can ship directly to WFS. Learn more at Link a Shipment Plan to a PO. Alternatively, you can start from a Purchase Order and link it to a new or existing WFS Shipment Plan. This is a convenient way to streamline the process of purchasing inventory and sending it to Walmart’s Fulfillment Centers. Learn more at Link PO to WFS Shipment Plan.
- Manage Shipment Status – Update the status of each shipment in the shipment plan.
- Print Products Labels – Print product UPC barcode labels.
- Reserve Quantities – Adjust the product quantities to reserve for the shipment plan. To ensure that the quantity you are adding is currently available, make sure to enable the advanced Client Setting Enable Validate Inventory For FBA And WFS Shipments. When you click the Reserve Quantities button, the system will now check the actual availability and will return an error message if there is no availability.
- Revise QtyToShip based on QtyPrepared – This action recalculates the Qty To Ship in the Shipments panel. In case the initial quantities you’re planning to send to WFS aren’t available in your warehouse at the time of shipping, you can make sure there are no inventory discrepancies.
- Ship Items – This action becomes available after you print shipping labels. It allows you to edit or import tracking numbers and mark shipments as shipped.
- Shipping Costs – View and update shipment tracking numbers and shipping costs.
- Update Shipments Qty – Use this action to update recently sent shipment quantities prior to delivery to the Walmart fulfillment center.
- Validate Inventory – Confirm that you have enough available inventory for the shipment.
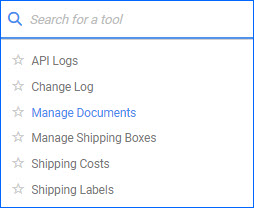
- Click the Toolbox icon on the top right to open the following tabs:
- API Logs – View a log with information about all API calls related to the shipment plan.
- Change Log – View a log with information about all changes made to the shipment plan.
- Manage Documents – The documents tab allows you to upload any relevant files for your own internal recordkeeping.
- Manage Shipping Boxes – Manage your shipping boxes and box contents.
- Shipping Costs – View and update shipment tracking numbers and shipping costs.
- Shipping Labels – Request, print, or void shipping labels from a non-partnered carrier.
Partially Received and No Confirmation Shipments
Sellercloud helps you track and manage shipments that have been partially received or have not been confirmed.
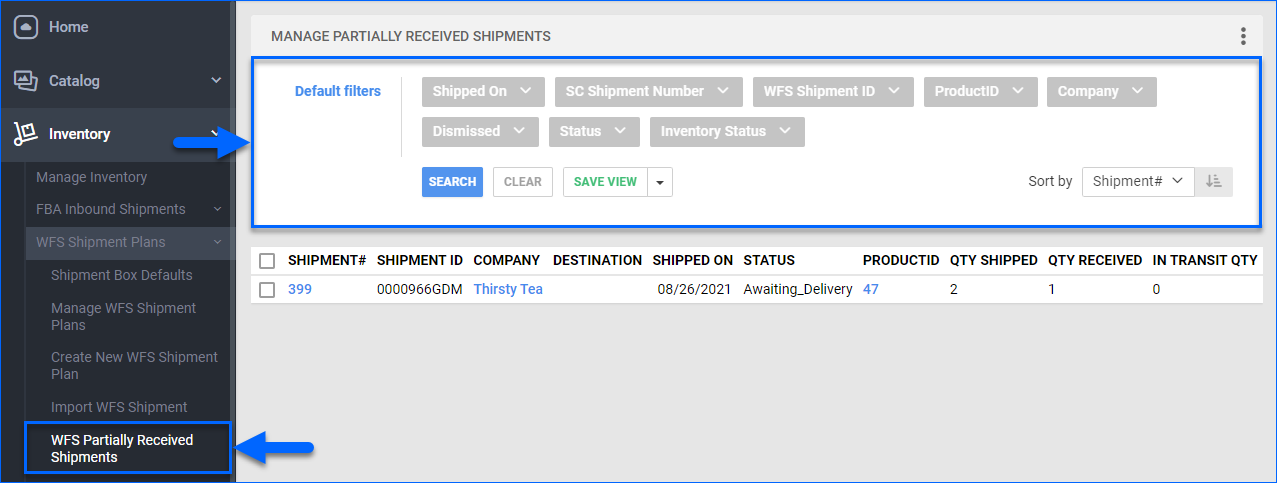
- To view and manage partially received WFS shipments, go to Inventory > WFS Shipment Plans > WFS Partially Received Shipments.
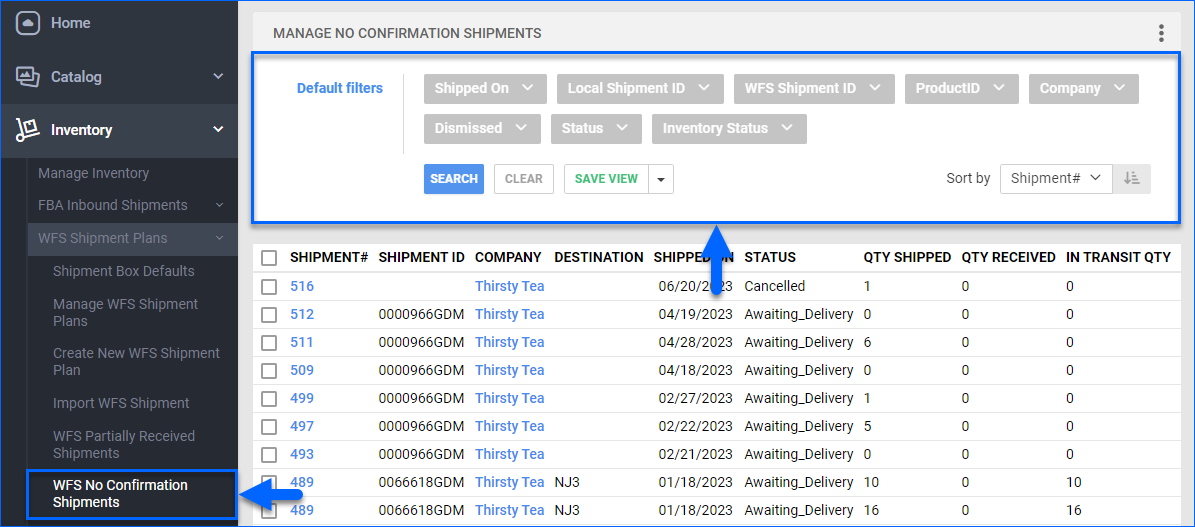
- To view and manage no-confirmation WFS shipments, go to Inventory > WFS Shipment Plans > WFS No Confirmation Shipments.
The next steps are the same regardless of which option you selected:
- Click Search to find all such shipments, or use any combination of the following Default filters to narrow down your search results:
- Shipped On – Define a time range to see only shipments that have been shipped within it.
- SC Shipment Number / Local Shipment ID – Search by Sellercloud shipment number.
- WFS Shipment ID – Search by WFS shipment ID.
- ProductID – Search for one or more Sellercloud SKUs.
- Company – Search by one or more companies.
- Dismissed – Search only for dismissed or non-dismissed shipments.
- Status – Search by shipment status.
- Inventory Status – Search by inventory status. Clear will only pull up shipments where the In Transit Qty has been cleared to 0. Not Clear will pull up only shipments with In Transit Qty.
- The grid displays the following information about shipments:
- Shipment # – The Sellercloud shipment number.
- Shipment ID – The WFS shipment ID.
- Company – The company.
- Destination – The shipping destination address.
- Shipped On – The shipping date.
- Status – The shipment status.
- Product ID – The Sellercloud SKU of the shipped product.
- Qty Shipped – The quantity shipped to Walmart.
- Qty Received – The quantity received by Walmart.
- In Transit Qty – The quantity that’s currently on the way.
- Check the boxes next to shipments to select them and then click the blue Actions icon on the bottom right to perform the following actions:
- Dismiss – Flag the selected shipment plans as dismissed for sorting purposes.
- UnDismiss – Undismisses the selected shipment plans.
- Clear In-Transit Warehouse Inventory – Resets the In Transit Qty to 0, removes the inventory from the Interim warehouse, and completely removes the existing associated inventory adjustments from the product’s Inventory Movement History.
- Transfer Un-Received to ShipFrom Warehouse – Transfer some or all of the In Transit Qty to any warehouse of your choice. This adjustment is visible in the Inventory Movement History.
- Query Status – Refreshes the selected shipments’ shipping status based on information from Walmart.
- Export to Excel – Downloads an Excel file with Shipment Information such as Company, Ship Date, SKUs, and quantities.
Additionally, you can change how the report looks:
- To change the way the results are sorted, click the Sort by drop-down menu on the top right.
- To change which columns appear in the grid and in what order, click the three dots icon on the top right and select Customize Columns.
WFS Removals
In some cases, you may need some of the WFS inventory sent back to your local warehouse due to various reasons, such as product recalls or quality issues. These cases are handled through WFS Removal Orders.
While the actual order must be placed on Walmart, you will need to create a warehouse inventory transfer in Sellercloud, which can be received when the shipment arrives at your warehouse. This workflow allows you to track the inventory’s movement history.
See Import WFS Removals to learn more about this process.
Shipment Box Defaults
You can optimize the WFS shipments packaging process in Sellercloud by setting up customized shipment box defaults and using them later when creating new shipments.
To configure WFS shipment box defaults:
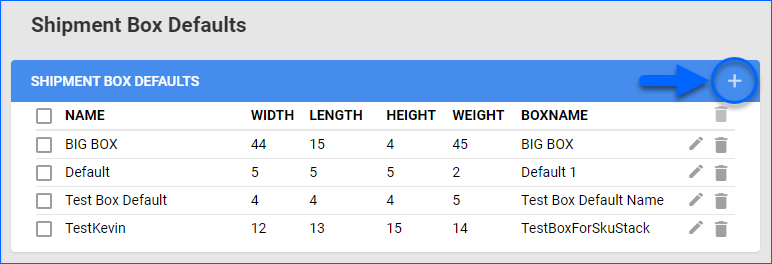
- Go to Inventory > WFS Shipment Plans > Shipment Box Defaults.
- To edit existing box profiles or delete them, click the icons on the right side of the panel.
- To add a new default box profile, click the Add Profile plus icon.
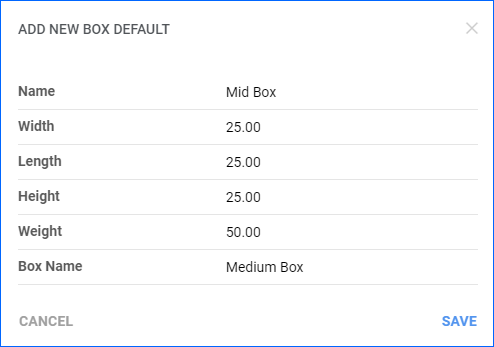
- Name the default box profile and set the Width, Length, Height, and Weight.
- Click SAVE.
To use a default box profile:
- Open a WFS shipment plan.
- Click Toolbox and select Manage Shipping Boxes.
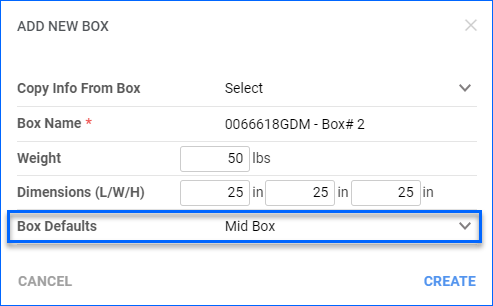
- Click the Add New Box plus icon in the Boxes panel.

- Set the Box Defaults profile. This automatically sets the weight and dimensions.
- Click Create.
Client Settings
The following Client Settings affect the WFS shipment plans workflow:
Defaults
- Default FBA and WFS Ship From Warehouse – Select the default warehouse to send WFS shipments from.
- Enable Tracking Number Per Shipping Box In FBA And WFS Shipments – Allows you to add tracking numbers to each box in the shipment separately.
- Reduce InTransit Quantity As FBA And WFS Receive It – Reduces your interim warehouse inventory automatically when Walmart receives a shipment.
- Do Not Cancel FBA Or WFS Shipment Locally If Cancelled By Channel – Prevents shipments from being cancelled in Sellercloud after being cancelled on Walmart.
- Do Not Over Receive FBA Or WFS Shipment – Prevents the Quantity Received from being more than the quantity shipped.
- Enable Classic FBA And WFS Box Content Upload Template – Enables the classic WFS shipment box content template.
- Enable Extended Filters On Manage FBA Shipments And Manage WFS Shipment Plans Pages – Enables additional filters on the Manage WFS Shipment Plans page.
- Allow To Prepare FBA And WFS Shipment At Any Stage – When enabled, the system will not show records where the shipment package status is Saved or Pending Shipment Details.
- Enable case quantity for new WFS Shipments – when enabled, all new WFS Shipment Plans will have Case Quantity enabled, and you will not be able to disable it in the WFS Shipment Plan Creation Wizard.
Inventory
- Enable Validate Inventory For FBA And WFS Shipments – Automatically ensures that there is enough available inventory for each shipment and helps prevent your inventory from going into negative values.
- Enable Validate Inventory For FBA And WFS Shipments – Ignore Replenishable Products – Ignore Replenishable Products when validating inventory for WFS shipments.
- Validate FBA And WFS Shipment Inventory Per Warehouse Only – Only checks the From Warehouse on the shipment for available inventory quantities.
- Auto Reserve When Adding Product To FBA And WFS Shipment – Automatically sets the Quantity To Ship as a Reserved Quantity for the shipment.
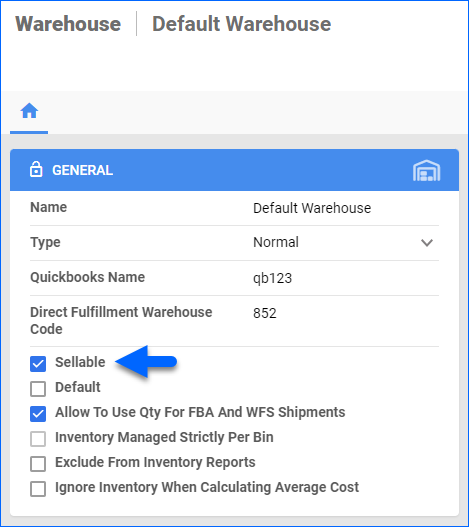
- Include Non-Sellable Qty When Validating FBA And WFS Shipment Qty – Include inventory stored in warehouses that are not marked as Sellable in the inventory validation.
- Include Component Qty When Validating FBA And WFS Shipment Qty – Include Kit Component quantities in the inventory validation.
- Include Non-Sellable Qty When Validating FBA And WFS Shipment Qty – Include inventory stored in warehouses that are not marked as Sellable in the inventory validation.
Adding Products
- Do Not Allow Merchant Fulfilled Items In FBA Or WFS Shipment – Prevents non-WFS-enabled items from being added to WFS shipment plans.
- Do Not Allow Other Company Products In FBA And WFS Shipment – Makes it so that the company you select when creating a WFS shipment is the only company whose products you can add.
- Do Not Allow Adding Same SKU To FBA And WFS Shipment From Add Items – Prevents adding a SKU to a shipment more than once. To add more of a SKU, edit the quantity.
- Allow Over Prepare FBA And WFS Shipment – Allows you to add more than your available inventory to a shipment.
- FBA Inbound And WFS Shipment Qty Must Be Multiple Of Case Qty – Ensures that the shipment item quantity is a multiple of its Case Quantity.
Adjustments
- Do Not Change Quantity Shipped In FBA Or WFS Shipment When Querying Shipment From Channel – Prevents the shipped quantity from being updated by the Query Shipment Status action when there’s a different quantity on Walmart’s end.
- Do Not Adjust FBA And WFS Qty Shipped Even If Over Received – With this setting enabled, if the quantity received reported by Amazon is greater than the shipped quantity in Sellercloud, Sellercloud will not auto-update the shipped quantity to reflect it.
Kit Products
- Only Allow Kits On FBA And WFS Shipment That Are Independent Kits – Prevents Main Component and All Components kits from being added to shipments.
- Auto Reserve When Adding Kit Components To FBA And WFS Shipment – Automatically sets the Quantity To Ship of any kit components as a Reserved Quantity.
- Auto Assemble Kit When Adding To FBA And WFS Shipments – Automatically assembles kits when you add them to a shipment.
- Auto Assemble Kit When Importing FBA And WFS Shipment – Automatically assembles kits when you import them to a shipment.
- FBA And WFS Shipments Ignore Negative Inventory When Assembling Kit – Enable to ignore negative inventory while assembling kits. For example, if your kit inventory is -1 and you create a shipment for 10 kits, only 10 kits will be assembled and the Kit will retain its negative quantity.
- Auto Dis-Assemble Kit When Removing From FBA And WFS Shipments – Automatically disassembles kits when you remove them from a shipment.
- Auto Dis-Assemble Kit When Cancelling FBA And WFS Shipment – Automatically disassembles kits when you cancel a shipment.
- Auto Disassemble Kits When Receiving FBA And WFS Removals – Automatically disassembles kits when receiving a WFS Removal.
- Require Default Vendor And/Or Kit Parent When Adding Item To FBA And WFS Shipment – Requires you to select a default kit parent and/or vendor ID before adding items.