Overview
Zen Cart is an open-source, customizable shopping cart that has powered online stores since 2003. It’s particularly popular among small to medium-sized businesses due to its flexibility, range of features, and ease of customization.
Integrating Zen Cart into your Sellercloud account allows you to seamlessly import orders, upload tracking information, and ensure your Zen Cart store is always up-to-date with the latest inventory data. The integration works through API, transmitting information between the two services via core-integrated plugins.
Prerequisites
Before you can integrate Zen Cart with Sellercloud, you must:
- Open a ticket with Sellercloud Support to request the plugins for the integration.
- ZenCart DLL – To be installed on your Sellercloud server.
- ZenCart PHP – To be installed on your Zen Cart website. Sellercloud Support will attach it to the ticket in a .ZIP format. The installation URL is http://example.com/sczen.php?dispatch=install&u=[ADMIN USERNAME]&p=[ADMIN PASSWORD]
- Obtain your Zen Cart admin credentials. You will need them when setting up the integration. For more information on how to do that, refer to Zen Cart’s Documentation.
Integrate with Zen Cart
To integrate Zen Cart with Sellercloud, navigate to:
- Settings > Manage Companies > Select a company.
- Go to the Toolbox and select Website > General.
- Click Edit and set the Store Type to Custom.
- Select ZenCart from the Store Plugin dropdown menu.
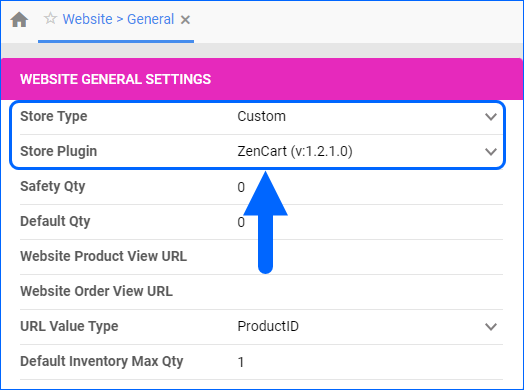
- Click Save and refresh the page to ensure the changes have been applied.
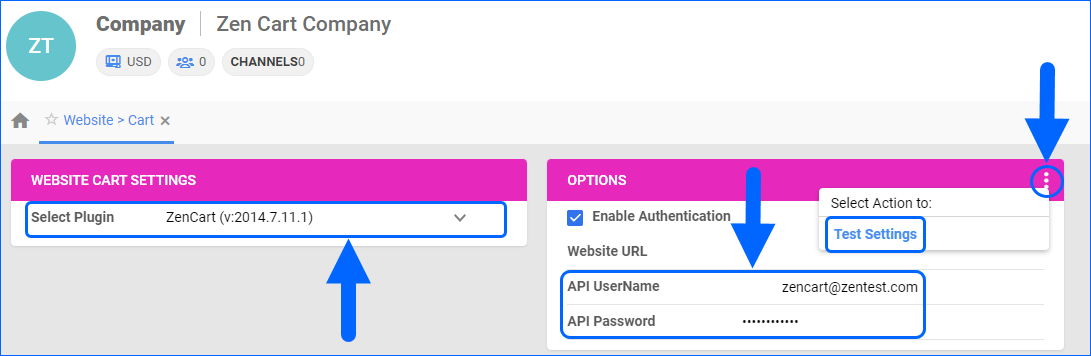
- Next, access the Toolbox and select Website > Sellercloud Plug-In Website > Cart General.
- The ZenCart plugin should be pre-selected in the Website Cart Settings panel.
- In the Options panel, click Enable Authentication and enter your Website URL.
- Enter your admin credentials in the API UserName and API Password fields. The API UserName corresponds to your Zen Cart admin username, and the API Password corresponds to your Zen Cart admin password.
- Verify your API connection and settings by clicking the Three dots menu > Test Settings.
- Click Save.
Zen Cart General Settings
By automating key processes and customizing your workflow, you can not only save valuable time but also enhance overall efficiency. To open the Zen Cart General Settings:
- Go to Company Settings.
- Click Toolbox and select Website > General.
 Refer to the tables below for descriptions of all the Website and Zen Cart settings.
| SETTING | DESCRIPTION |
| WEBSITE GENERAL SETTINGS PANEL | |
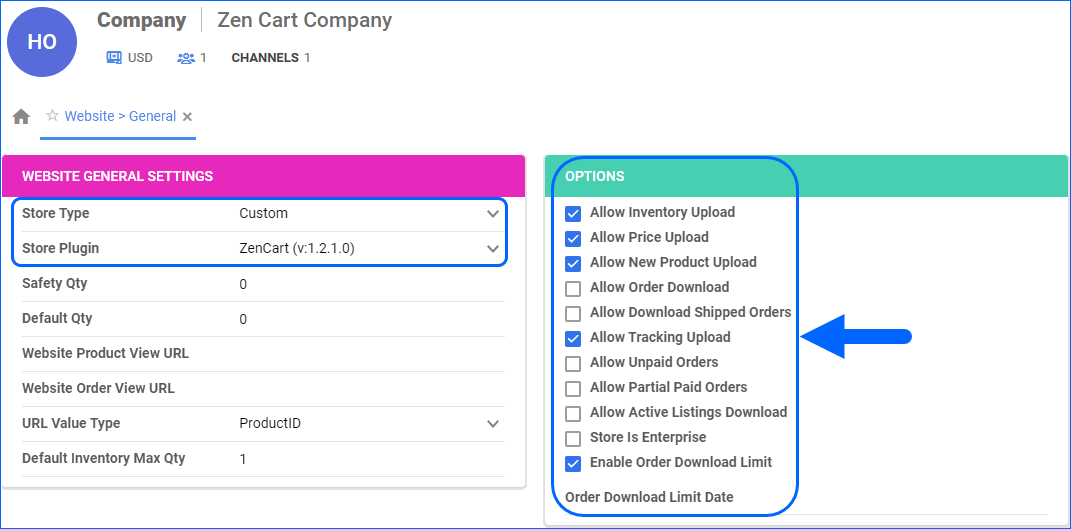
| Store Type | Choose a core-integrated or plugin website from the dropdown. In this case, select Custom and then set the Store Plugin to ZenCart. |
| Safety Qty | A buffer between the amount of inventory you have and the amount Sellercloud is sending to the channel to prevent overselling of items in high demand. This will be the Safety Quantity used for your products where Use Default is checked on their Website properties. |
| Default Qty | This only applies to Replenishable Products. For these products, the Default quantity is the amount that will always be sent to the channel in inventory updates regardless of the actual available inventory. This will be the Default quantity used for your products where Use Default is checked on their Website properties. |
| Website Product View URL | The link to your website’s products page. |
| Website Order View URL | The link to your website’s orders page. |
| URL Value Type | Select the product identifier for the preview links:
|
| Default Inventory Max Qty | Limits the inventory available for Zen Cart. |
| OPTIONS PANEL | |
| Allow Inventory Upload | Enable Sellercloud to send automatic inventory updates to Zen Cart regularly. Only enable this setting once you are ready to have Sellercloud control your inventory on Zen Cart.
Products that are not Website Enabled will be updated with a quantity of zero. To Bulk Update them, use the column header WebEnabled and set it to True.
|
| Allow Price Upload | Enable Sellercloud to send automatic price updates for Website Enabled products to Zen Cart regularly. |
| Allow New Product Upload | Allow new products to be posted on Zen Cart from Sellercloud. This action is available both individually and In Bulk. |
| Allow Order Download | Enable automatic order download from Zen Cart to your Sellercloud account. |
| Allow Download Shipped Orders | Allows orders marked as shipped to be automatically downloaded from Zen Cart to your Sellercloud account. |
| Allow Tracking Upload | Enable Sellercloud to upload fulfillment information for orders placed on Zen Cart automatically. |
| Allow Unpaid Orders | Enable Sellercloud to download Unpaid Orders from Zen Cart to your Sellercloud account automatically. |
| Allow Partial Paid Orders | Enable Sellercloud to download partially paid orders from Zen Cart to your Sellercloud account automatically. |
| Allow Active Listings Download | Allows product listing reports for active products to be automatically downloaded from Zen Cart to your Sellercloud account. |
| Store Is Enterprise | Not applicable to Zen Cart. |
| Enable Order Download Limit | Enable this setting to prevent orders created prior to a specified date from being downloaded into Sellercloud. You must also select an Order Download Limit Date. |
| Order Download Limit Date | Set the date in the calendar pop-up. |