Launch Channel Listings


Overview

In Sellercloud, you can easily post and manage your products listings across various different channels all from one place. 

Before you can post a listing, the selected Marketplace should be integrated with your Sellercloud account, the chosen product must be present in and Enabled for the integrated channel, and is ready to post.


Prepare Products

Once you complete your Channel integration with Sellercloud, you can start preparing the products that you intend to list. You need to ensure that your products are Enabled for the targeted Channels and ready to post, as per the channel-specific requirements, before you can launch them. 

Enable and Disable Products

To Enable a product for a specific Channel, you need to:

  1. Navigate to your Catalog > Manage Catalog and open the product that you wish to list.
  2. From the product’s Toolbox select the desired Channel > General Settings
  3. Click on Edit and check the Channel Enabled box in the General panel.
  4. Click Save.

Once your product is Enabled for a specific Channel, Sellercloud will send automatic inventory and/or price updates to that Marketplace. Some channels might have additional requirements in order to accept the update. 

To Disable a product, you can simply uncheck the Channel Enabled box and Save your change. 

Alternatively, you can Enable/Disable multiple products for several Channels simultaneously:

  1. Navigate to Catalog > Manage Catalog and select the required products. 
  2. From the Action menu, choose Enable/Disable for Channel.
  3. Check all required Channels and select the needed action – Enable or Disable.
  4. Click Update.

A Queued Job is created and when completed, your products will be updated according to the selected action. 

Ready to Post

Some channels have specific requirements when posting or updating a listing. Therefore, you need to ensure that your products are ready to post before you can launch them. This means entering the minimum information required by the channel for listing a product.

With Sellercloud, you have the option to ready your products in bulk or individually.

While preparing your products for posting, you can also set up a pre-defined description template for your listings.

Refer to the table below that outlines some of the most common channel specifications.

CHANNEL LISTING SPECIFICATIONS
Amazon To enable Sellercloud to automatically update Amazon listings prices, the AmazonPricesUpdateService must be installed on your server, and the Amazon setting Allow Price Update (Regular) must be enabled.

When searching for Posted and Active Amazon products in Sellercloud, the search results return SKUs that are on the Amazon Active Listing Report. Sellercloud periodically runs a service that looks at products on the reports and marks them as Posted and Active, etc. Therefore, you may have products that have been recently posted but will not be included in the Posted and Active search results.

When you edit Amazon listings in bulk from the Manage Catalog page, you can use different Update actions, depending on the result that you are looking to achieve (for example to Update Inventory on Channel, Update Prices on Channel, etc.). 

When posting/changing Amazon listings, you can use different actions to achieve different results – Post Product on Amazon, Post Product to Amazon (Existing Catalog), or Post Product to Amazon (Partial Update). Amazon listing management article provides more information on the topic. 

Bonanza You can use a Description Template for this channel, which you can reutilize to send consistent information across different channels listings. You can also create ready-to-use templates for different types of products, or for different seasons to showcase seasonal information. 

A Bonanza Category is required to post a listing on Bonanza. You can choose a Bonanza Category from the various available options, based on your product’s specific features.

eBay Sellercloud eBay Listing Manager allows you to create a listing, verify the item and post it on eBay. To access this feature, navigate to your product’s Toolbox and select eBay Listing Manager.

You can use a Description Template for this channel, which you can reutilize to send consistent information across different channels listings. You can also create ready-to-use templates for different types of products, or for different seasons to showcase seasonal information. 

Google Shopping You should first create product listings on the Google Merchant Center platform and optimize them to appear in relevant search results. When a user clicks on a product listing, they are directed to your website. 

To post products on Google Shopping, uncheck the Require Link for Product Posting in your Google Shopping General Settings.

Learn in detail how to sell on Google Shopping.

NewEgg.com Take into consideration the following NewEgg Client Settings

    • NewEgg.com Force Send MAP PriceMAP Price is the Minimum Advertised Price set by the manufacturer for all resellers, which is a NewEgg.com requirement that all resellers should adhere to when advertising products. When enabled, the setting forces Sellercloud to send product Minimum Advertised Price when listing products on NewEgg.com.
  • Post Minimum Product info on NewEgg.com – Allows you to establish a minimum amount of information required before a product can be listed on NewEgg.com. This setting ensures that the user has entered all the necessary information for the product before it is posted to the marketplace. 
Overstock Sellercloud doesn’t send automatic price updates to Overstock. Prices need to be approved by Overstock. You can submit the price that you are willing to sell it for to Overstock, but ultimately they control the prices displayed to the end consumer.

To update listings available quantity, select Revise Inventory from the Action Menu on the product’s Overstock Properties Page. You can also update other existing listing details from the Action Post Product.

Target You must first create the listings on Target.com before you can manage and update them through Sellercloud.

Pricing changes must be negotiated with a Target representative. Currently, no option exists to update pricing in inventory feeds. The Initial Retail field on the product’s Target Properties page is only for reference.

You must configure the following channel-specific product attributes on the Target properties page for the product to be included in the inventory feed:

  • Target Web Tool ID
  • Target Initial Cost
Walmart Marketplace Walmart Marketplace limits the Product Add and Update Inventory for single items to 10 items per hour. 

The image URL cannot have “https” in the URL or will fail to post; it must be “http.” You can adjust this on the Image Hosting Settings page. The image file size cannot exceed 1MB.

Walmart Marketplace Attributes should be configured before a product listing can be posted on Walmart Marketplace.

You can find detailed information on posting requirements in each channel listing management article.

Launch Channel Listings

When products are Enabled and ready for posting, you can use the Launch on Channel option to post them. Alternatively, you can use Sellercloud’s Product Publishing Tool to automate the process.

Launch Products In Bulk

If required, you can launch multiple products on your chosen retail Channel:

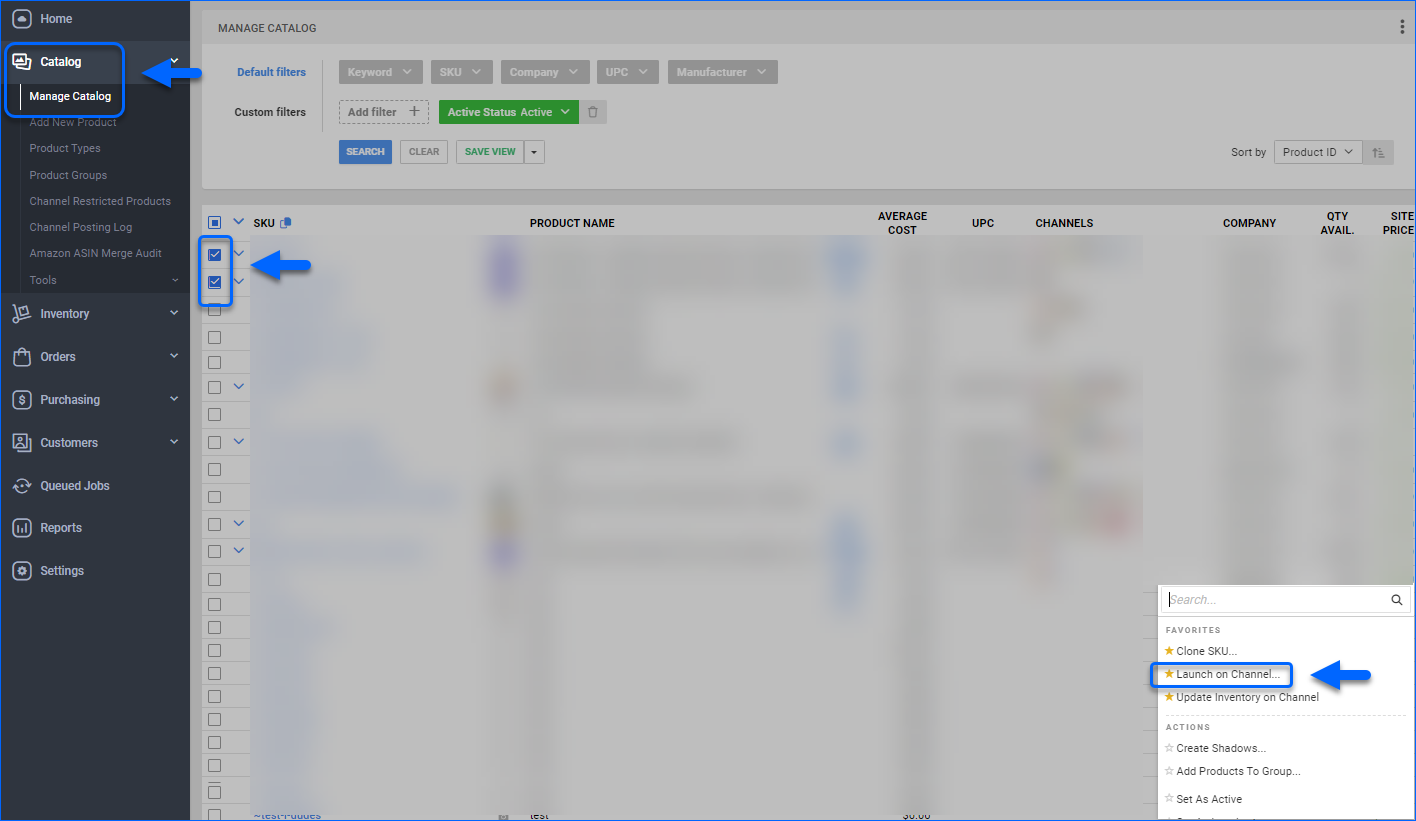
  1. Access Catalog > Manage Catalog > Select your products.
  2. Click the Action menu and choose Launch on Channel.
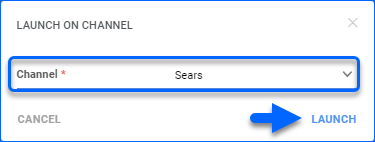
  3. Select the desired Channel from the dropdown menu and click Launch.

A Queued Job is created and when completed, your products will be posted on the selected channel.

Launch Individual Product

You can also post products individually:

  1. Access Catalog > Manage Catalog and open your product.
  2. From its Toolbox choose the required Channel.
  3. Click Actions and select Post on Channel/List on Channel.
Depending on the channel, you may see a different action listed in the drop-down. If you don’t see the option to post to your chosen channel, the option might be unavailable due to integration limitations.

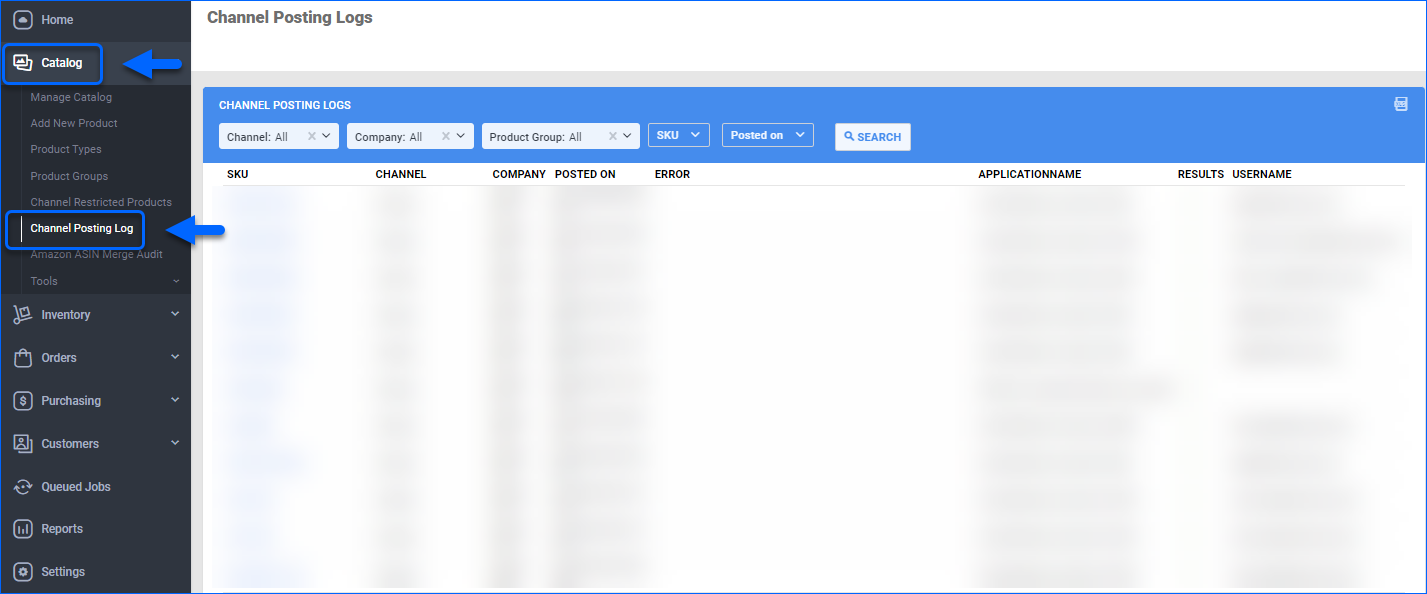
Channel Posting Log

Every time you post a channel listing on Amazon and Walmart Marketplace, a record of the action is registered in Sellercloud’s Channel Posting Log

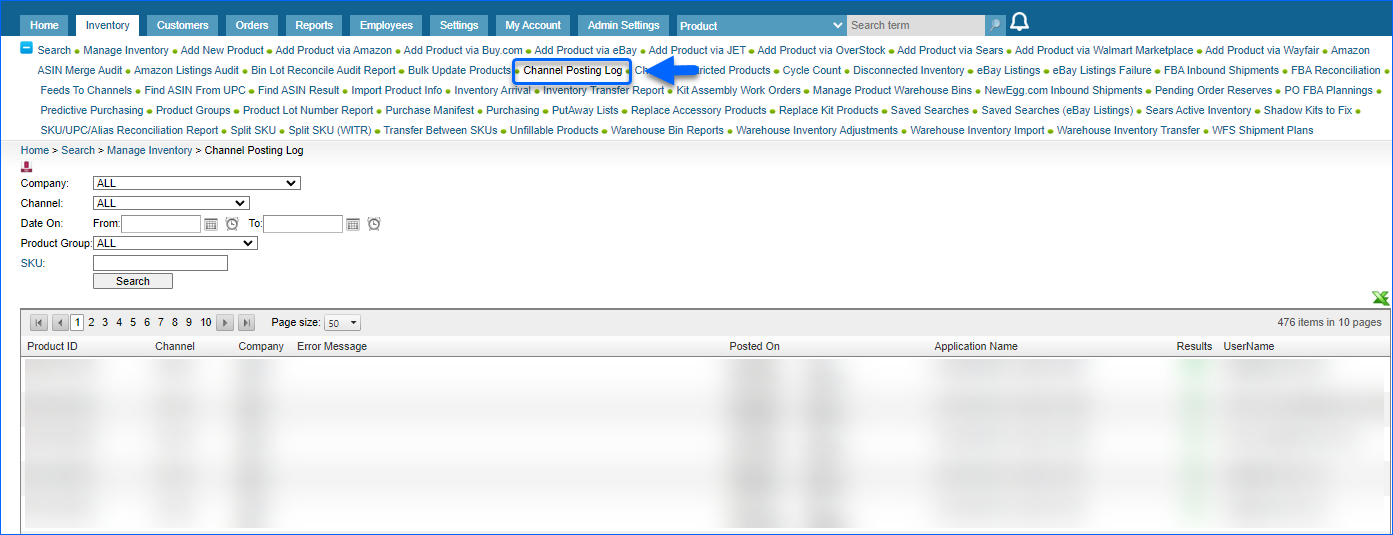
To locate your company’s posting records, navigate to Catalog and click Channel Posting Log.

You can limit the number of displayed logs, by using the available filters and clicking the Search button. 

Export to Excel

If you wish to export your channel posting logs list, click the Export to Excel button.

The exported Excel file will contain the following columns:

  1. ProductID – Product’s SKU.
  2. ErrorMessage – If the listing launch is unsuccessful, the reason will be displayed in this field.   
  3. PostedOn – This is the date on which the posting was attempted.
  4. UserName – The email of the person who attempted to post the listing.
  5. ApplicationName – The way the posting was requested (e.g. via a Queued job).
  6. IsSuccess – If the posting was successful, the value in this field will be True. In case of an error, it will be False.
  7. Company Name – The company associated with the posting.
  8. Channel Name – In this field you can find on which channel the listing was published.
You can also locate posting records from channels other than Amazon and Walmart Marketplace, in their respective company’s Channel documents.

Overview

In Sellercloud, you can easily post and manage your products listings across various different channels all from one place. 

Before you can post a listing, the selected Marketplace should be integrated with your Sellercloud account, the chosen product must be present in and Enabled for the integrated channel, and is ready to post.


Prepare Products

Once you complete your Channel integration with Sellercloud, you can start preparing the products that you intend to list. You need to ensure that your products are Enabled for the targeted Channels and ready to post, as per the channel-specific requirements, before you can launch them. 

Enable and Disable Products

To Enable a product for a specific Channel, you need to:

  1. Navigate to your Inventory > Manage Inventory and open the product that you wish to list.
  2. From the product’s Toolbox select the desired Channel. 
  3. Check the Channel Enabled box.
  4. Click Save.

Once your product is Enabled for a specific Channel, Sellercloud will send automatic inventory and/or price updates to that Marketplace. Some channels might have additional requirements in order to accept the update. 

To Disable a product, you can simply uncheck the Channel Enabled box and Save your change. 

Alternatively, you can Enable/Disable multiple products for several Channels simultaneously:

  1. Navigate to Inventory > Manage Inventory and select the required products. 
  2. From the Select Action menu, choose Enable/Disable for Channel.
  3. Check all required Channels and select the needed action – Enable or Disable.
  4. Click Continue.

A Queued Job is created and when completed, your products will be updated according to the selected action. 

Ready to Post

Some channels have specific requirements when posting or updating a listing. Therefore, you need to ensure that your products are ready to post before you can launch them. This means entering the minimum information required by the channel for listing a product.

With Sellercloud, you have the option to ready your products in bulk or individually.

While preparing your products for posting, you can also set up a description template for your listings.

Refer to the table below that outlines some of the most common channel specifications.

CHANNEL LISTING SPECIFICATIONS
Amazon To enable Sellercloud to automatically update Amazon listings prices, the AmazonPricesUpdateService must be installed on your server, and the Amazon setting Allow Price Update (Regular) must be enabled.

When searching for Posted and Active Amazon products in Sellercloud, the search results return SKUs that are on the Amazon Active Listing Report. Sellercloud periodically runs a service that looks at products on the reports and marks them as Posted and Active, etc. Therefore, you may have products that have been recently posted but will not be included in the Posted and Active search results.

When you edit Amazon listings in bulk from the Manage Inventory page, you can use different Update actions, depending on the result that you are looking to achieve (for example to Update Inventory on Channel, Update Prices on Channel, etc.). 

When posting/changing Amazon listings, you can use different actions to achieve different results – Post Product on Amazon, Post Product to Amazon (Existing Catalog), or Post Product to Amazon (Partial Update). Amazon listing management article provides more information on the topic. 

Bonanza You can use a Description Template for this channel, which you can reutilize to send consistent information across different channels listings. You can also create ready-to-use templates for different types of products, or for different seasons to showcase seasonal information. 

A Bonanza Category is required to post a listing on Bonanza. You can choose a Bonanza Category from the various available options, based on your product’s specific features.

eBay Sellercloud eBay Listing Manager allows you to create a listing, verify the item and post it on eBay. To access this feature, navigate to your product’s Toolbox and select eBay Listing Manager.

You can use a Description Template for this channel, which you can reutilize to send consistent information across different channels listings. You can also create ready-to-use templates for different types of products, or for different seasons to showcase seasonal information. 

Google Shopping You should first create product listings on the Google Merchant Center platform and optimize them to appear in relevant search results. When a user clicks on a product listing, they are directed to your website. 

To post products on Google Shopping, uncheck the Require Link for Product Posting in your Google Shopping General Settings.

Learn in detail how to sell on Google Shopping.

NewEgg.com Take into consideration the following NewEgg Client Settings

    • NewEgg.com Force Send MAP PriceMAP Price is the Minimum Advertised Price set by the manufacturer for all resellers, which is a NewEgg.com requirement that all resellers should adhere to when advertising products. When enabled, the setting forces Sellercloud to send product Minimum Advertised Price when listing products on NewEgg.com.
  • Post Minimum Product info on NewEgg.com – Allows you to establish a minimum amount of information required before a product can be listed on NewEgg.com. This setting ensures that the user has entered all the necessary information for the product before it is posted to the marketplace. 
Overstock Sellercloud doesn’t send automatic price updates to Overstock. Prices need to be approved by Overstock. You can submit the price that you are willing to sell it for to Overstock, but ultimately they control the prices displayed to the end consumer.

To update listings available quantity, select Revise Inventory from the Action Menu on the product’s Overstock Properties Page. You can also update other existing listing details from the Action Post Product.

Target You must first create the listings on Target.com before you can manage and update them through Sellercloud.

Pricing changes must be negotiated with a Target representative. Currently, no option exists to update pricing in inventory feeds. The Initial Retail field on the product’s Target Properties page is only for reference.

You must configure the following channel-specific product attributes on the Target properties page for the product to be included in the inventory feed:

  • Target Web Tool ID
  • Target Initial Cost
Walmart Marketplace Walmart Marketplace limits the Product Add and Update Inventory for single items to 10 items per hour. 

The image URL cannot have “https” in the URL or will fail to post; it must be “http.” You can adjust this on the Image Hosting Settings page. The image file size cannot exceed 1MB.

Walmart Marketplace Attributes should be configured before a product listing can be posted on Walmart Marketplace.

You can find detailed information on posting requirements in each channel listing management article.

Launch Channel Listings

When products are Enabled and ready for posting, you can use the Launch on Channel option to post them. Alternatively, you can use Sellercloud’s Product Publishing Tool to automate the process.

Launch Products In Bulk

If required, you can launch multiple products on your chosen retail Channel:

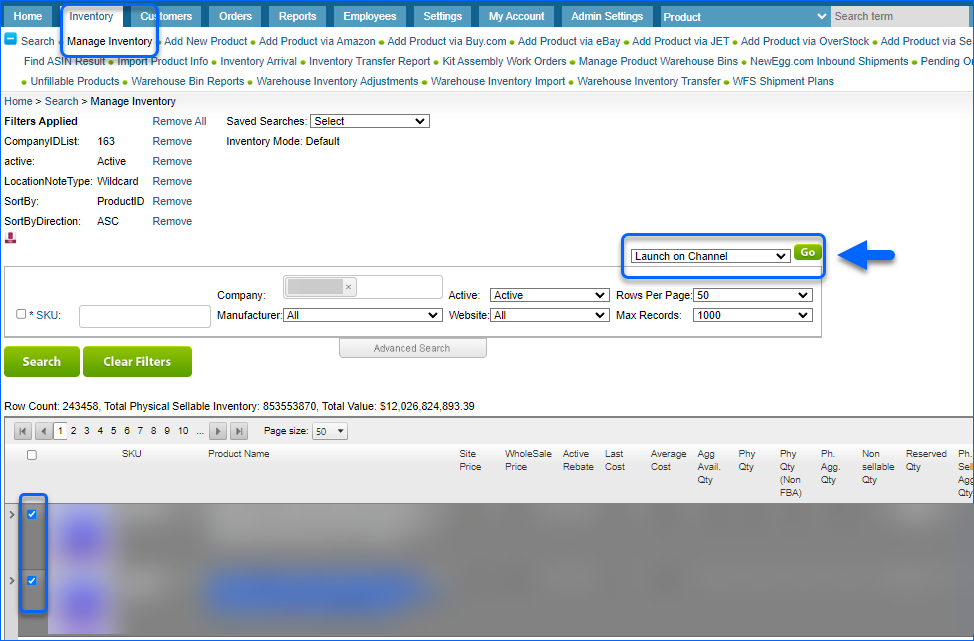
  1. Access Inventory > Manage Inventory > Select your products.
  2. Click the Select Action menu, choose Launch on Channel and press Go.
  3. Select the desired Channel from the dropdown menu and click Continue

A Queued Job is created and when completed, your products will be posted on the selected channel.

Launch Individual Product

You can also post products individually:

  1. Access Inventory > Manage Inventory and open your product.
  2. From its Toolbox choose the required Channel.
  3. Click Select Action > Post/List Product to Channel and press Go.

Depending on the channel, you may see a different action listed in the drop-down. If you don’t see the option to post to your chosen channel, the option might be unavailable due to integration limitations. 

Channel Posting Log

Every time you post a channel listing on Amazon and Walmart Marketplace, a record of the action is registered in Sellercloud’s Channel Posting Log

To locate your company’s posting records, navigate to Inventory and click Channel Posting Log.

You can limit the number of displayed logs, by using the available filters and clicking the Search button. 

Export to Excel

If you wish to export your channel posting logs list, click the Export to Excel button.

The exported Excel file will contain the following columns:

  1. ProductID – Product’s SKU.
  2. ErrorMessage – If the listing launch is unsuccessful, the reason will be displayed in this field.   
  3. PostedOn – This is the date on which the posting was attempted.
  4. UserName – The email of the person who attempted to post the listing.
  5. ApplicationName – The way the posting was requested (e.g. via a Queued job).
  6. IsSuccess – If the posting was successful, the value in this field will be True. In case of an error, it will be False.
  7. Company Name – The company associated with the posting.
  8. Channel Name – In this field you can find on which channel the listing was published.
You can also locate posting records from channels other than Amazon and Walmart Marketplace, in their respective company’s Channel documents.

Was this article helpful?

Need Support?
Can't find the answer you're looking for?
Contact Support