Overview
Shipwire is a leading commerce solution that provides logistics and fulfillment services worldwide for B2B and B2C customers. As a full-service 3PL provider with a global warehouse network, it fulfills e-commerce orders for direct-to-consumer, retail, and dropship channels, making sure to uphold the delivery experience your customers expect along the way.
Integrating Shipwire allows you to process and optimize order fulfillment quickly and efficiently. This integration works by transmitting information between the two services via API. The following plugins are currently available in Sellercloud:
- Order Export – This plugin exports new order details from Sellercloud to Shipwire.
- Get Tracking Status Export – This plugin exports an order list to Shipwire and imports back tracking information to Sellercloud.
- Inventory Import – Imports your inventory information from Shipwire to Sellercloud.
If necessary, you can contact Sellercloud Support to request additional customizations or other plugins for this integration. Any such modifications will be billable.
Prerequisites
Before you can integrate Shipwire with Sellercloud, complete the following requirements.
Custom Company Settings
Create the following Custom Company Settings:
- ShipWireAPIUserName – Obtain from Shipwire.
- ShipWireAPIPassword – Obtain from Shipwire.
- ShipWireWarehouseID – The warehouse ID where the inventory will be stored.
- EmailShipWireInvDescrepancyTo – Indicates the address where the email will be sent.
- ShipWireLastEmailSent – The plugin checks the date of the last email sent. If the current date is today, no email is sent. However, if the date is different from today, it triggers the plugin to send an email. Additionally, after sending the email, the plugin updates its setting value to the current date.
Sellercloud Support
You must contact Sellercloud Support and request:
- To install the Shipwire Plugins on your server.
- The following Custom Order Column:
- ShipWireOrderID – The setting is populated by the Order Export plugin. When an order is first exported to Shipwire, a response is received from Shipwire, containing a unique ID generated for that specific order. This ID is then stored in the ShipwireOrderID column. Subsequently, the Get Order Tracking Status plugin utilizes this stored value to perform its functions or retrieve relevant information about the order from Shipwire.
Order Export
This plugin sends order information to Shipwire for shipping purposes.
When sending an order to Shipwire, we use the Sellercloud Order number as an identifier. Additionally, the external ID field corresponds to the OrderSourceOrderID.
The plugin does not send values from the warehouseId, warehouseRegion, and warehouseArea fields.
When determining shipping methods in Shipwire, we rely on the information provided in the ShippingServiceSelected field within Sellercloud. To ensure consistency, there’s a mapping system that aligns the Service Level Codes from Shipwire with the corresponding options available in Sellercloud.
Once Shipwire sends a response to Sellercloud, the plugin extracts the necessary information from a specific location known as status/resource/items/resource/ID and assigns or stores this extracted information in the custom column ShipWireOrderID within the order data.
Before you move on, create a Saved Search for orders filtered by:
- Order Status – Processing.
- Shipping Status – Unshipped.
- Payment Status – Charged.
Automate Order Export
To create a Scheduled Task that exports order information:
- Navigate to Settings > Scheduled Tasks > Manage Scheduled Tasks.
- Click the green + icon: Create New Scheduled Task.
- Complete as follows:
- Click Task Type and select Export Orders.
- Set the Task Name.
- Select the Company.
- Select the Start Time.
- Click CREATE.
The company you select to host the Scheduled Task will not affect which orders get exported. The Order IDs are compiled by the Saved Search associated with the task and can include any combination of companies.
- The following message appears at the bottom of your screen: “Scheduled task created successfully. Click Here to configure the task details.” – click the link.
- Click the Edit button on the top right.
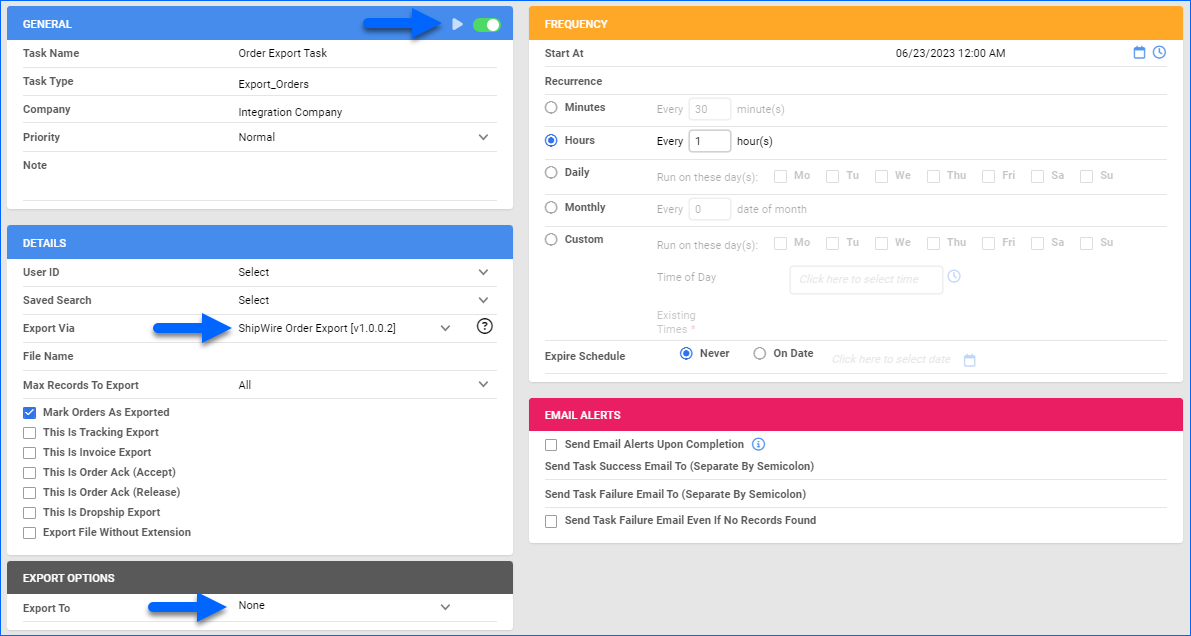
- In the Details section:
- Click the User ID menu and select your ID.
- Click the Saved Search menu and select the saved search you created earlier.
- Click the Export Via menu and select Plugin.
- Check This Is Tracking Export.
- In the Export Options section, set Export To to None.
- In the Frequency section, specify the task frequency. For optimal performance, select a range between thirty minutes and one hour.
- In the General section, click the Enable toggle button.
- Click Save on the top right.
Get Order Tracking Status Export
This plugin communicates with Shipwire by sending a list of order IDs to check if they have been shipped. If Shipwire confirms the shipments, it then sends back the tracking information to Sellercloud and updates the order records within Sellercloud.
When we communicate with Shipwire to get shipping information for a particular order, we send the value of the custom column called ShipWireOrderID to Shipwire. This value is used as part of the URL in the API call: “https://api.shipwire.com/api/v3/orders/” followed by the shipWireOrderID and “/trackings”. The plugin uses the ShipWireOrderID from the custom column linked to the order, which gets populated by the initial Order Import plugin.
Once we gather the required Tracking, Carrier, and OrderID information from Shipwire, we mark the order as shipped.
Automate Get Order Tracking Status Export
To create a Scheduled Task that exports order tracking status:
- Navigate to Settings > Scheduled Tasks > Manage Scheduled Tasks.
- Click the green + icon: Create New Scheduled Task.
- Complete as follows:
-
- Click Task Type and select Export Orders.
- Set the Task Name.
- Select the Company.
- Select the Start Time.
- Click CREATE.
The company you select to host the Scheduled Task will not affect which orders get exported. The Order IDs are compiled by the Saved Search associated with the task and can include any combination of companies.
-
- The following message appears at the bottom of your screen: “Scheduled task created successfully. Click Here to configure the task details.” – click the link.
- Click the Edit button on the top right.
- In the Details section:
- Click the User ID menu and select your ID.
- Click the Saved Search menu and select the saved search you created earlier.
- Click the Export Via menu and select Plugin.
- In the Export Options section, set Export To to None.
- In the Frequency section, specify the task frequency. For optimal performance, select a range between thirty minutes and one hour.
- In the General section, click the Enable toggle button.
- Click Save on the top right.

Inventory Import
This plugin imports inventory from Shipwire to Sellercloud. A request is sent to the Shipwire API, which includes the credentials from the company settings
When retrieving inventory data, there might be multiple records for each SKU because of different locations. To simplify the process, we combine the quantities marked as good for each SKU.
The plugin checks the current inventory status and looks for new orders. If there’s a big difference between available inventory and ordered quantities, the plugin does not process that order and excludes it from the inventory import.
After updating the inventory, we send an email notification. To determine if an email has already been sent, the plugin checks the ShipWireLastEmailSent company setting. If it’s the same day as today, the plugin will stop processing. Otherwise, it will continue. The email includes an attachment with important information like the product ID, warehouse quantity, ordered quantity, and specified quantity in the file.
Automate Inventory Import
To create a Scheduled Task that regularly imports inventory info from Shipwire to Sellercloud:
- Navigate to Settings > Scheduled Tasks > Manage Scheduled Tasks.
- Click the green + icon: Create New Scheduled Task.
- Complete as follows:
- Click Task Type and select Import Products.
- Set the Task Name.
- Select the Company.
- Select the Start Time.
- Click CREATE.
- The following message appears at the bottom of your screen: “Scheduled task created successfully. Click Here to configure the task details.” – click the link.
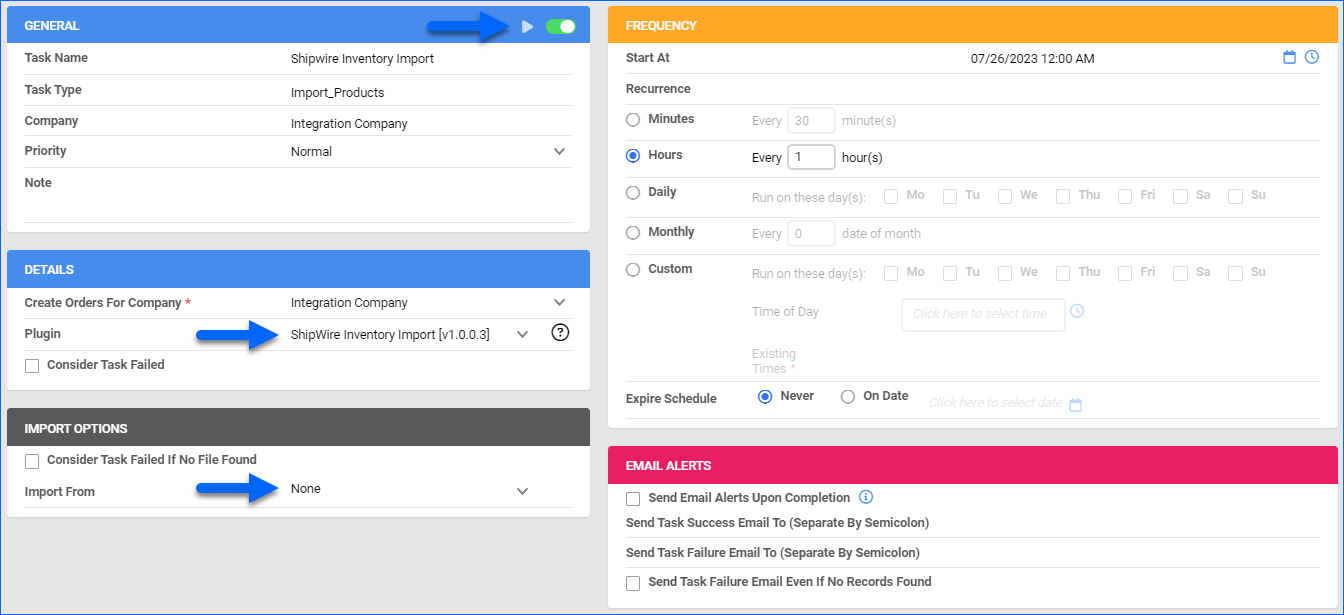
- Click the Edit button on the top right.
- In the Details section:
- Create Orders For Company – Choose the designated Company.
- Plugin – Select the Plugin from the dropdown.
- In the Import Options section, set Import From to None.
- In the Frequency section, specify the task frequency. For optimal performance, select a range between thirty minutes and one hour.
- In the General section, click the Enable toggle button.
- Click Save on the top right.