Overview
Scheduled Tasks in Sellercloud allow you to configure routine e-commerce processes for automated execution and recurrence at custom intervals. With this feature, you can streamline different tasks and significantly reduce the manual workload when managing standard e-commerce operations, such as importing information, generating picklists, exporting data, and more.
This article will guide you through the process of creating and managing scheduled tasks. To learn more about the different types, refer to Scheduled Task Types.
Create a Scheduled Task
To create a new scheduled task:
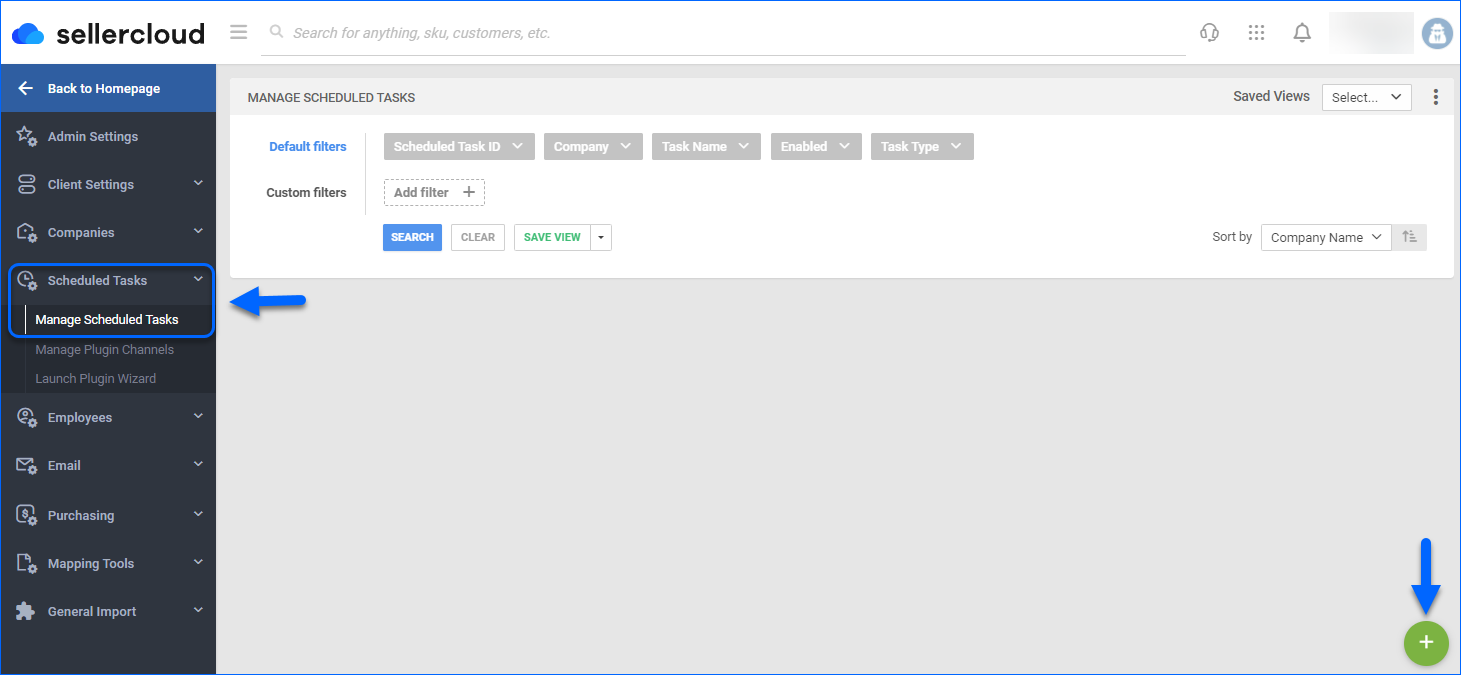
- Navigate to Settings > Scheduled Tasks > Manage Scheduled Tasks.
- Click on the green + icon at the bottom right corner.
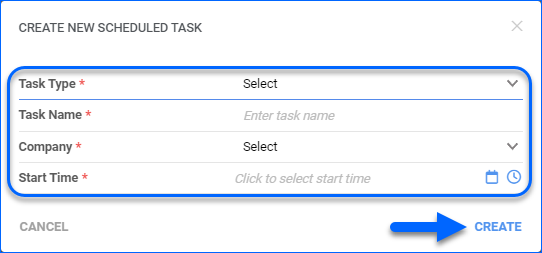
- In the Create New Scheduled Task popup, add:
- Task Type – Select the type of the desired task.
- Task Name – A unique name for the task.
- Company – Choose the company to which the task applies.
- Start Time – Select the calendar date and start time of the task execution.
- Click Create.
- A Success message validates the creation of the task. Click on the hyperlink to Enable it and to specify its details.

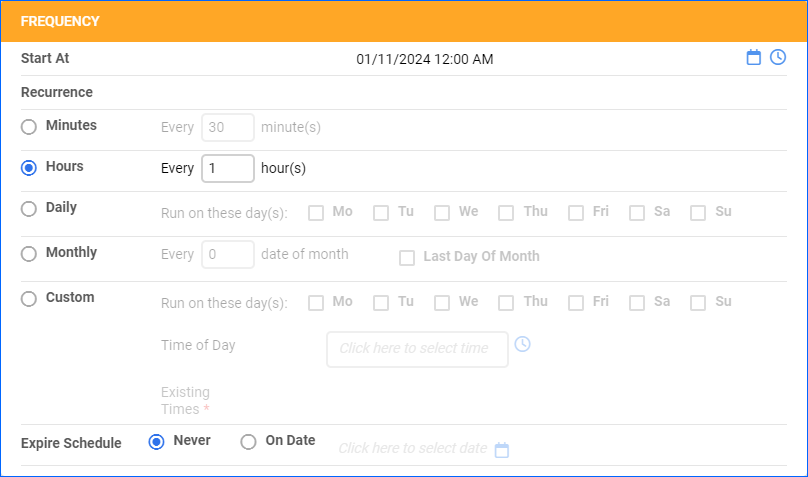
- Click Edit and select the task Frequency:
- Start At – Indicate the start date and time.
- Recurrence – Determine the desired execution intervals:
- Hourly – Enables the hourly scheduler for setting hourly intervals.
- Daily – Enable this option to appoint daily intervals or specific weekdays.
- Monthly – Select when the task runs once per month on a specific date or on the Last Day Of Month.
- Custom – Enable this setting to set the task for specific days of the week and times.
- Expire Schedule – By default, scheduled tasks never expire. This optional setting allows you to determine a date and time when the task will be discontinued.
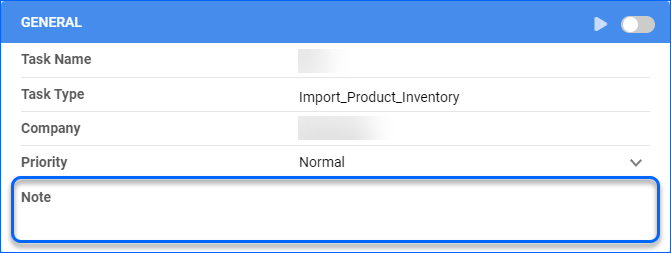
- If desired, add a Note about the scheduled task in the General panel. This field supports up to 300 characters.
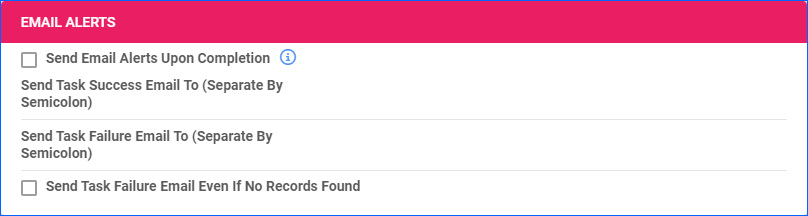
- Optionally, you can set up Email Alerts to be sent to specific email addresses, upon task completion or failure.
- Populate the required data in the Details panel. Depending on the task type, the panel contents vary.
- Choose the method to Export or Import and add the respective credentials.
- You can Export To either FTP, VAN, or Email.
- You have the option to Import From either FTP, HTTP, or Email.
- All Import task types have an additional option in this panel: Consider Task Failed If No File Found. When enabled, Queued Jobs that run upon task executions that do not find a file to process will be considered as Failed and you will receive notifications accordingly.
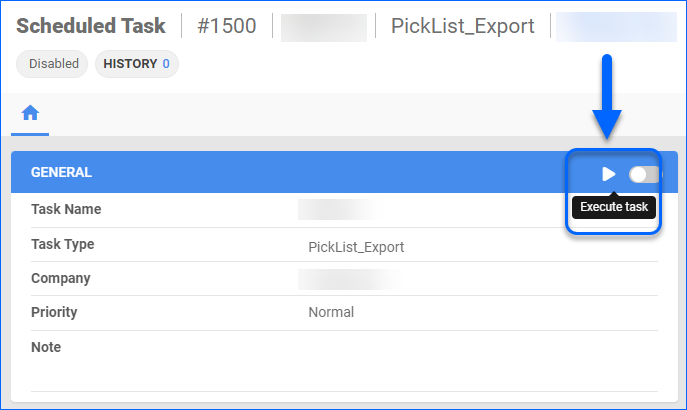
- Click on the Execute task button to test the task. A Queued Job will be generated and once successfully done, the task will be completed.
- Once done, click Save.
FTP
When your scheduled task operates via FTP, prepare the following information:
- The FTP Server and the following credentials:
- FTP User
- FTP Password
- Confirm the password.
- FTP Port
- FTP Encoding information from the FTP provider and enable the appropriate configurational details:
- Use Passive – Enable this setting to use passive mode for data transfer. This can be helpful in bypassing firewalls filtering the data port connection from the server.
- Use Binary – Enable this setting for the data to be transferred in binary mode.
- Use SSH FTP With Key Authentication – Enable this setting if the FTP connection is encrypted using SSH.
- Use Secure FTP – Enable this setting if you are using a Secure File Transfer Protocol connection (SFTP).
- You can configure the task to delete the file from the FTP by choosing Delete Files after Processing. If incoming files are not cleared on the FTP server, it may cause retrieval timeouts. Enabling this option helps avoid FTP clutter. It is strongly recommended to enable this if:
- File dropped onto the directory is always renamed.
- File is not set to overwrite an existing file.
- Alternatively, you can choose to archive the file after processing by enabling the option Archive files after Processing. A sub-directory within the specified directory is required.
For Scheduled Tasks that operate via Email, consider the following:
- You may want to create a dedicated email for your task.
- For Gmail users: Generate an app-specific password from your Gmail account. You can get an app password here. Note that two-step verification must be enabled. Learn more about app passwords here. In Gmail, go to Settings > See all settings > Forwarding and POP/IMAP > Select Enable IMAP (if not already selected) > Save Changes.
- If you are using a new non-Gmail account: You may want to check your email settings for any settings that may prevent downloads. Navigate to your email settings and to make sure IMAP is enabled.
- Prepare the email Credentials, Email Server, and Port. Detailed information on the appropriate server/port based on your email provider can be found here.
- Check Server is IMAP and My Server requires SSL connection, if applicable.
- Optionally, check Delete Email After Processing if you want Sellercloud to delete the email after the task completion. If left unchecked, the task will automatically mark the email as Read.
- Prepare your SMTP profile and the applicable SMTP settings.
- Choose an Email Template.
HTTP
For Scheduled Tasks that operate via HTTP, consider the following:
- This option allows you to import data from a URL. The URL should lead directly to a file on the web server. The file will be downloaded and used to import data into Sellercloud.
- The URL you import from must be publicly accessible without requiring login credentials.
- Common file types to import data from are .csv, .txt, and Excel spreadsheets.
- Any file type can be processed with plugins as long as they are made to support it.
- You can import data from Google Sheets if the sheets are Shared Publicly. To share sheets publicly, click File, then select Share > Publish to web. Next, under Link, select the sheet and set the format to Comma-separated values (.csv). Then click Publish, copy the public link, and paste it into the HTTP URL field on the Scheduled Task.
- To map the columns of imported files to Sellercloud fields, use an Import Mapping Profile.
Manage Scheduled Tasks
To view and manage your Scheduled Tasks:
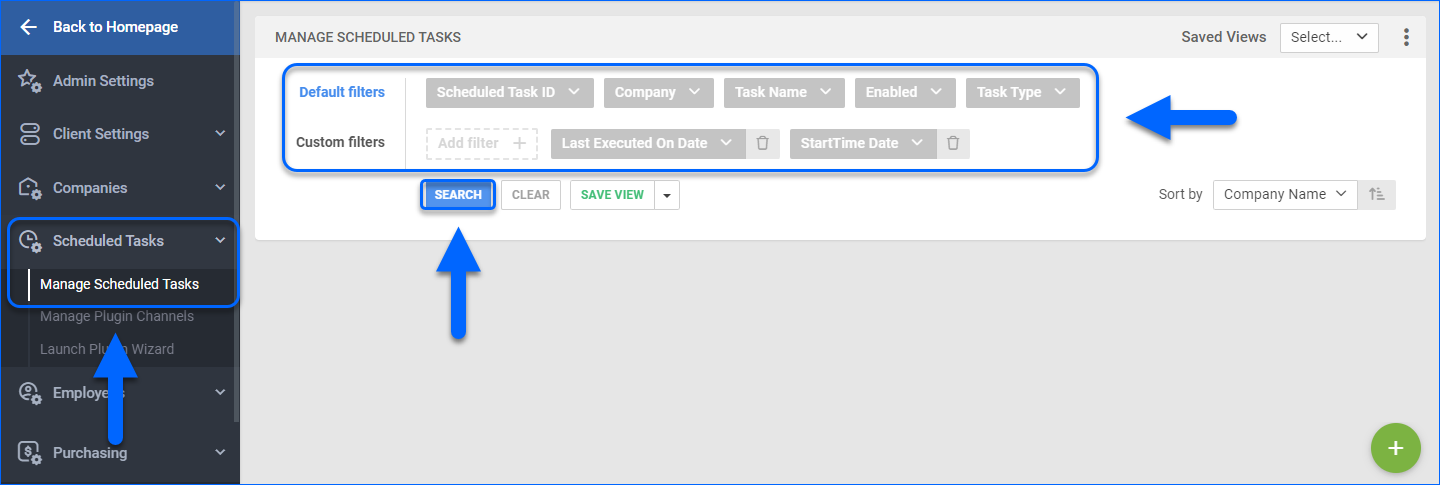
- Navigate to Settings > Scheduled Tasks and select Manage Scheduled Tasks.
- Use the Default and Custom filters to search for specific tasks, or just click Search to display all tasks.
- You can access and update a task by clicking its ID.
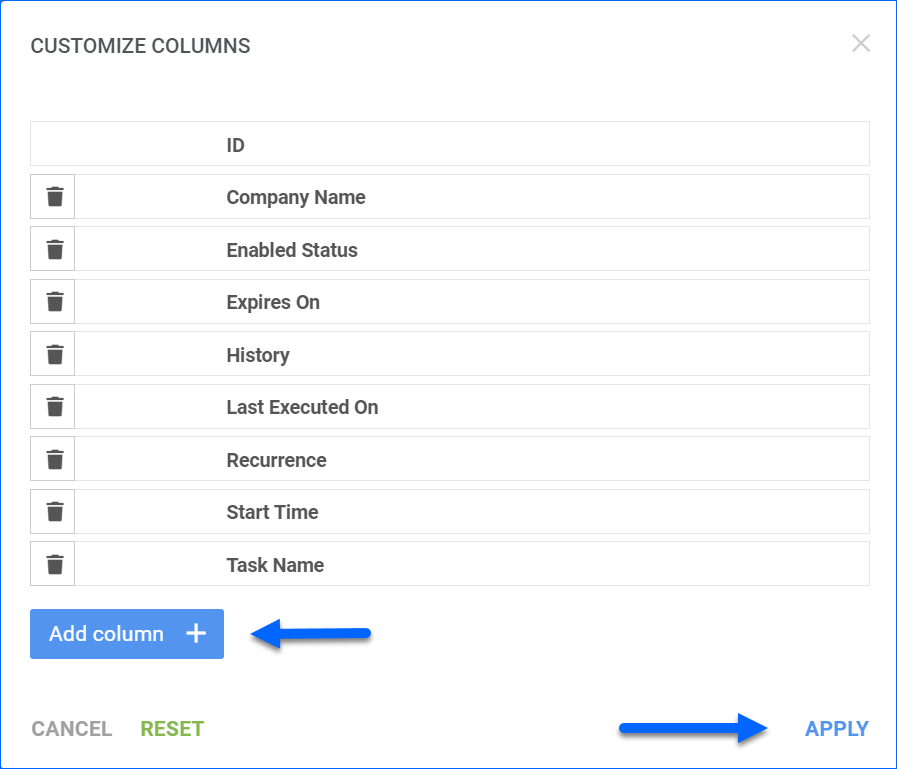
Additionally, you can change and rearrange the grid columns on the Manage Scheduled Tasks page. Click on the three dots in the top right corner of the page and select Customize Columns. In the pop-up dialog, you can:
- Click and drag columns to arrange them.
- Click Add Column to see unselected options.
- Remove columns by clicking the bin icon.
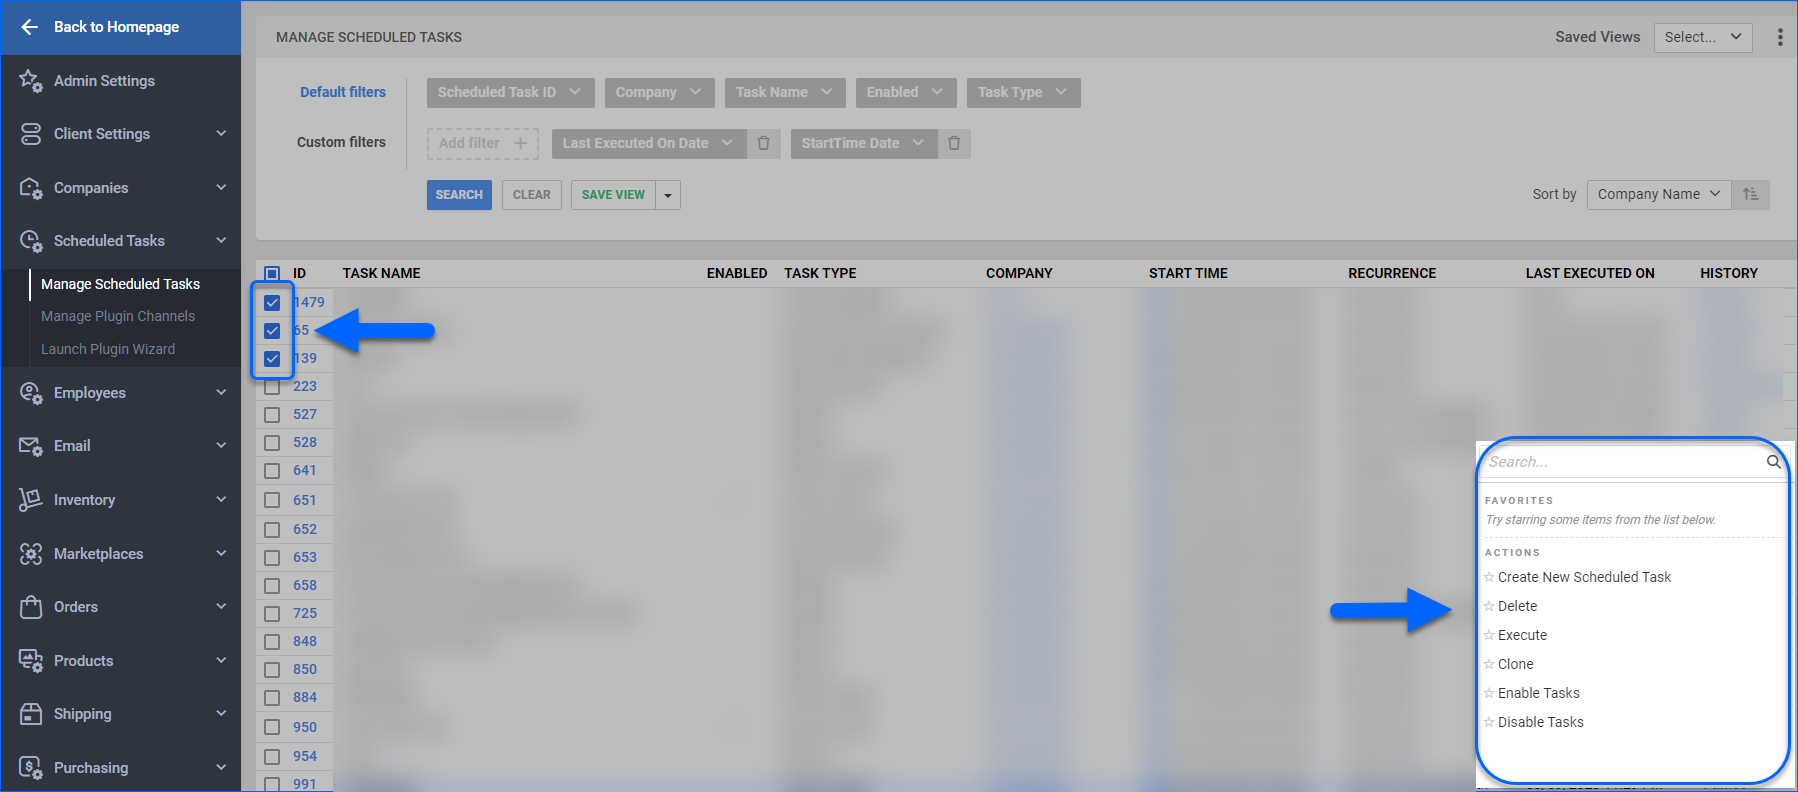
Actions
When you check the boxes to the left of tasks to select them, you can manage them in bulk – simply click on the Actions icon on the bottom right to perform the following operations:
- Delete – To delete a task from the list.
- Execute – To perform a task.
- Clone – To duplicate a task.
- Enable Tasks – To enable the selected tasks.
- Disable Tasks – To enable the selected tasks.
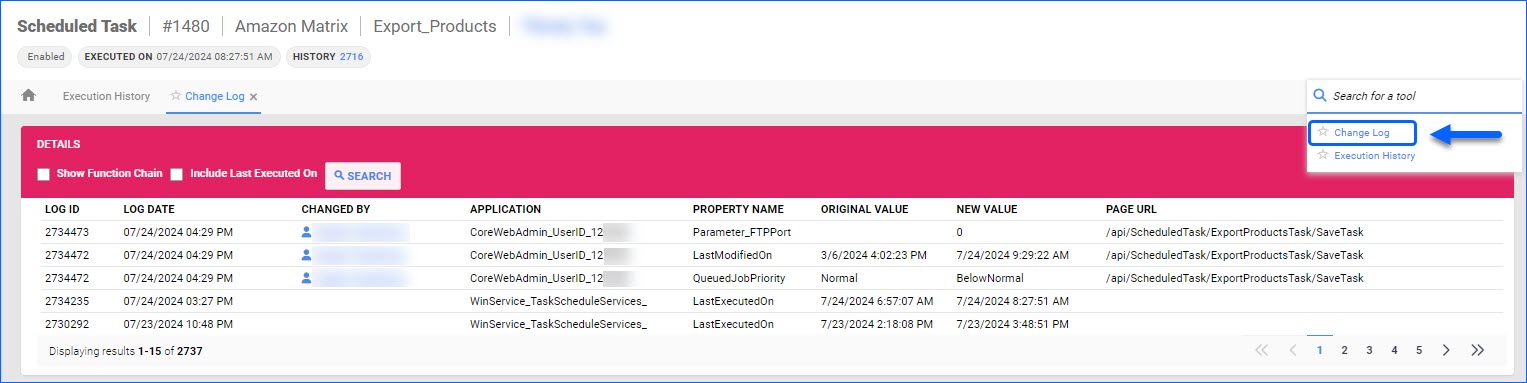
Change Log
The Change Log of a Scheduled Task gives insight into how, when, and by whom the task’s details were configured. You can access it via the Toolbox when you open a specific Scheduled Task details page.
The Change Log contains the following columns:
- Log ID – a unique numerical identifier generated by Sellercloud.
- Log Date – timestamp of the date and time when the change occurred.
- Changed By – when empty, it means the change was made by an automated service. If done manually, you will see the name of the user who initiated the change. It is also a hyperlink that leads to the relevant Employee Details page.
- Application – if a user initiated the change, you will see their ID in this column. If the system made the change, you will see the relevant automated service name.
- Property Name – indicates which field was updated.
- Original Value – keeps a record of the field’s value before the change.
- New Value – displays the new value.
- Page URL – when applicable, displays the specific page the user was on when they made the change.
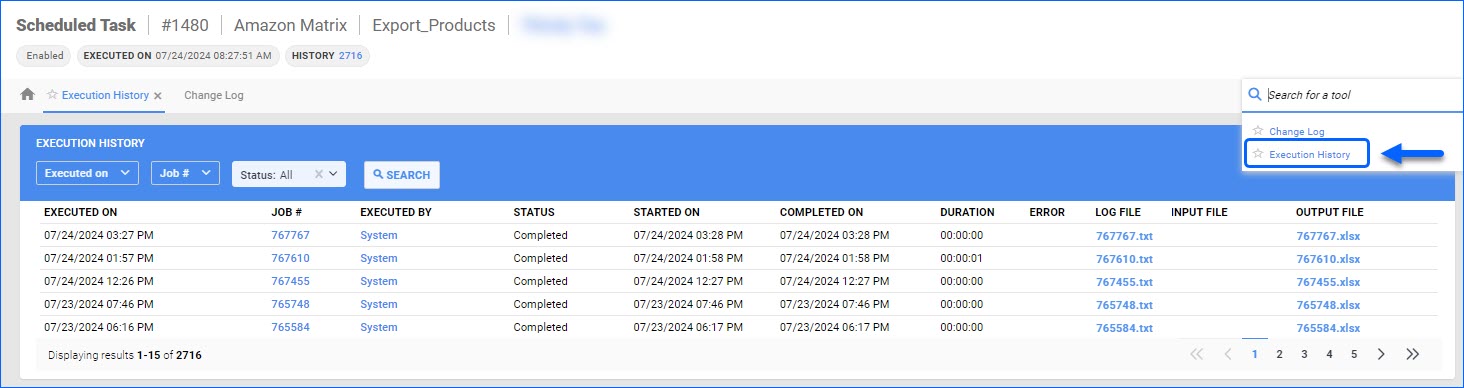
Execution History
The Execution History of a Scheduled task provides a list of all Queued Jobs generated as a result of running the task, either manually or automatically. You can access it via the Toolbox when you open a specific Scheduled Task details page.
The Execution History contains the following columns:
- Executed On – timestamp of the date and time when the task execution was triggered and the Queued Job was generated.
- Job # – ID of the specific Queued Job generated by Sellercloud when executing the task. Click on it to see the Queued Job details page.
- Executed By – indicates whether the task was executed by the System or manually and by which Employee.
- Status – displays the current Queued Job Status.
- Started On – indicates the exact time the Queued Job started processing.
- Completed On – shows the exact time when the Queued Job finished processing.
- Duration – the amount of time the job needed to finish processing.
- Error – displays the job’s error message if applicable.
- Log File – downloadable .txt file with detailed records of the Queued Job process. Useful for troubleshooting errors.
- Input File – click to download. Not all Queued Jobs have an Input File. For example, if you do a Bulk Product Update, you can see and download the original file you imported into Sellercloud here.
- Output File – click to download. Not all Queued Jobs have an Output File. For example, if you have a scheduled a Report, you can download the generated data from this page.
You can filter the Execution History by:
- Executed On – From and To date range. By default, this filter will pre-load the previous two days. You can manually change the dates or remove them completely to see the full list.
- Job # – search for a specific Queued Job ID.
- Status – search by specific Queued Job status: Submitted, Processing, Completed, Failed, Partial Success, On Hold, Cancelled, Cancelled Service Restarted, Aborted Too much Time Consumed, Cancelled while Running. Select All to see the full list.
Plugin Wizard
Scheduled Tasks for plugin imports and exports can be configured to run periodically via the Plugin Wizard.
To configure your Scheduled Tasks, navigate to Settings > Scheduled Tasks > Launch Plugin Wizard and start the Plugin Wizard.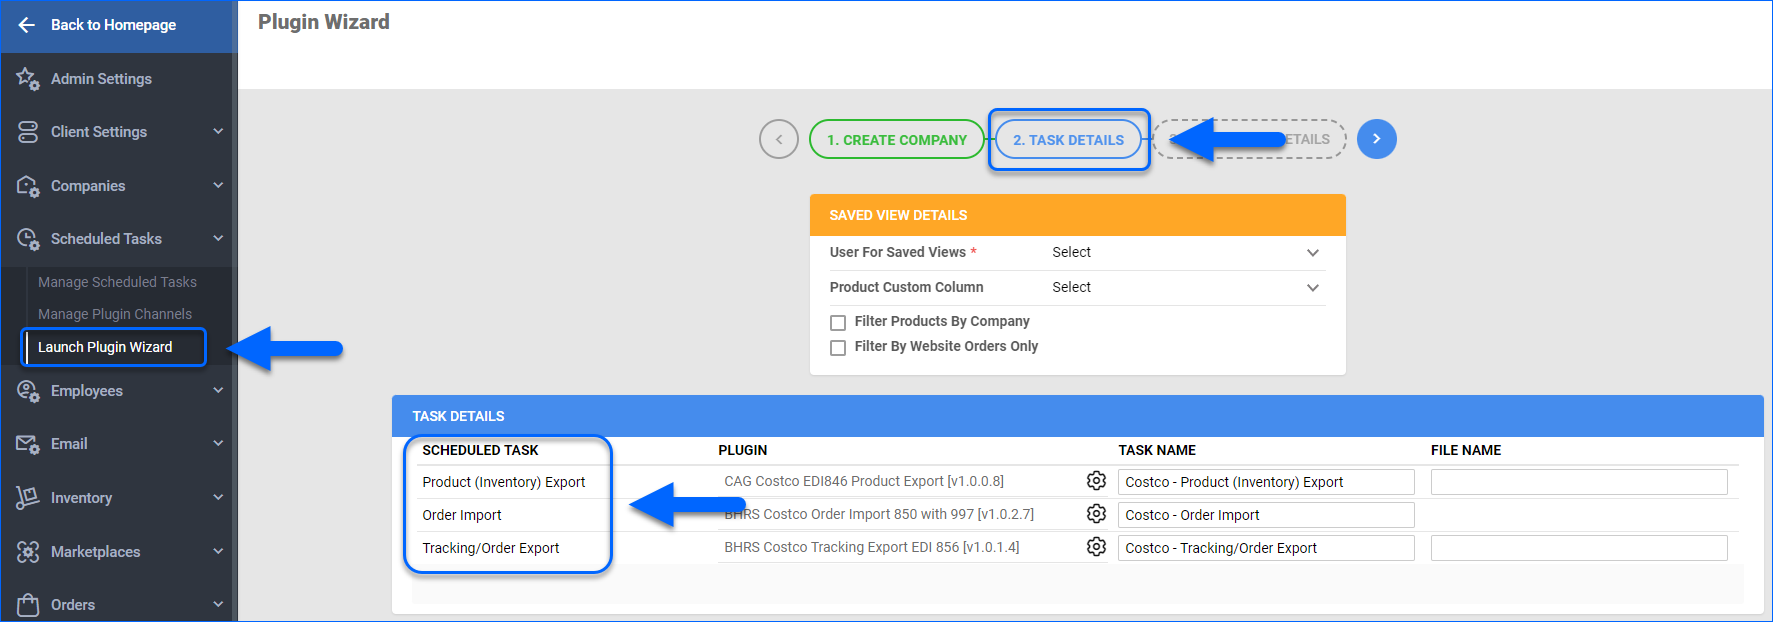
Overview
Scheduled Tasks in Sellercloud allow you to configure routine e-commerce processes for automated execution and recurrence at custom intervals. With this feature, you can streamline different tasks and significantly reduce the manual workload when managing standard e-commerce operations, such as importing information, generating picklists, exporting data, and more.
This article will guide you through the process of creating and managing scheduled tasks. To learn more about the different types, refer to Scheduled Task Types.
Create a Scheduled Task
To create a new scheduled task:
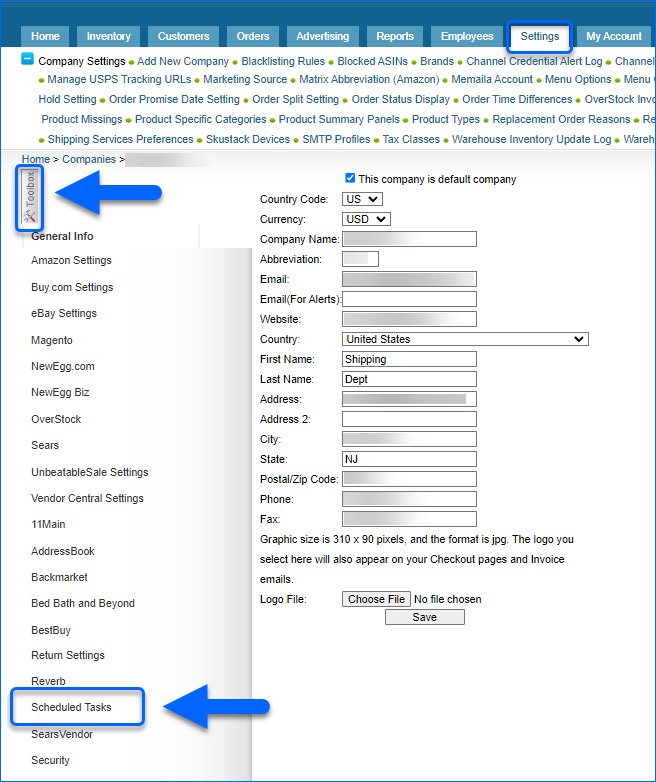
- Navigate to Settings > Select a company and from its Toolbox, choose Scheduled Tasks.
- From the New Task Type dropdown, select the desired Task Type.
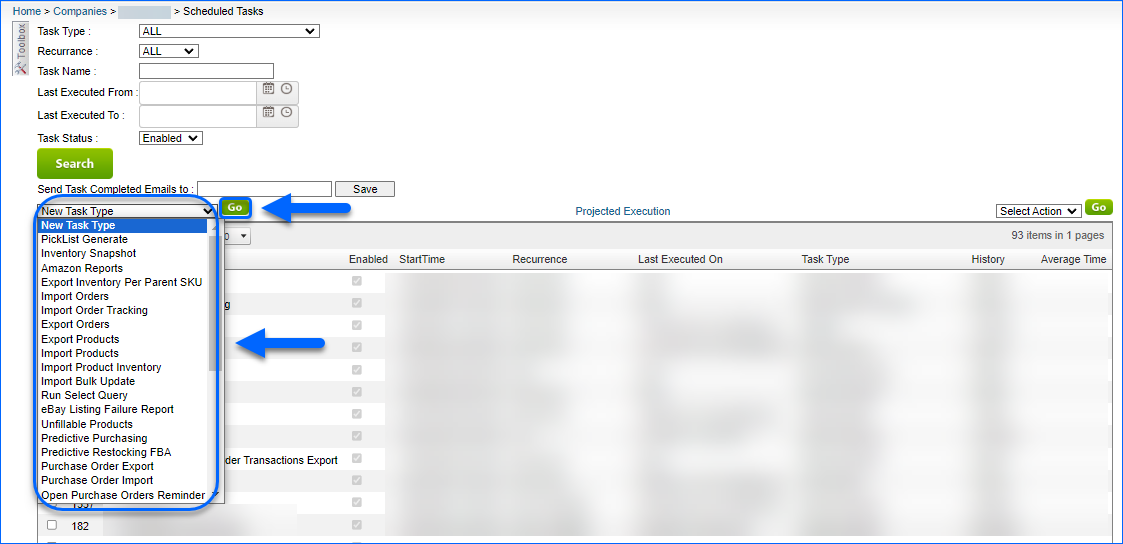
- In the new Scheduled Task page, add:
- Task Name – A unique name for the task.
- Start Time – Select the calendar date and start time of the task execution.
- Task Recurrence:
- Minutes – For setting minute intervals. Set the desired frequency, by adding the desired minutes in the appointed field to the right.
- Hourly – For setting hourly intervals.
- Daily – Appoint daily intervals or specific weekdays.
- Weekly – Select the weekdays on which the task runs.
- Monthly – Select when the task runs once per month on a specific date or on the Last day of month.
- Custom – Enable this setting to set the task for specific days of the week and times.
- Expire Schedule – By default, scheduled tasks Never expire. This optional setting allows you to determine a date and time when the task will be discontinued.
- If desired, select the related Queued Job Priority and add a Queued Job Note about the scheduled task (this field supports up to 300 characters).
- Optionally, you can set up Email Alerts to be sent to specific email addresses, upon task completion or failure.
- Populate any required data. The needed information varies, depending on the task type.
- Choose the method to Export or Import and add the respective credentials.
- You can Export To either FTP, VAN, or Email.
- You have the option to Import From either FTP, HTTP, or Email.
- Once done with the task configuration, check the Scheduled Enabled box and Save the task.
FTP
When your scheduled task operates via FTP, prepare the following information:
- The FTP Server and the following credentials:
- FTP User
- FTP Password
- Confirm the password.
- FTP Port
- FTP Encoding information from the FTP provider and enable the appropriate configurational details:
- Use Passive – Enable this setting to use passive mode for data transfer. This can be helpful in bypassing firewalls filtering the data port connection from the server.
- Use Binary – Enable this setting for the data to be transferred in binary mode.
- Use SSH FTP With Key Authentication – Enable this setting if the FTP connection is encrypted using SSH.
- Use Secure FTP – Enable this setting if you are using a Secure File Transfer Protocol connection (SFTP).
- You can configure the task to delete the file from the FTP by choosing Delete Files after Processing. If incoming files are not cleared on the FTP server, it may cause retrieval timeouts. Enabling this option helps avoid FTP clutter. It is strongly recommended to enable this if:
- File dropped onto the directory is always renamed.
- File is not set to overwrite an existing file.
- Alternatively, you can choose to archive the file after processing by enabling the option Archive files after Processing. A sub-directory within the specified directory is required.
For Scheduled Tasks that operate via Email, consider the following:
- You may want to create a dedicated email for your task.
- For Gmail users: Generate an app-specific password from your Gmail account. You can get an app password here. Note that two-step verification must be enabled. Learn more about app passwords here. In Gmail, go to Settings > See all settings > Forwarding and POP/IMAP > Select Enable IMAP (if not already selected) > Save Changes.
- If you are using a new non-Gmail account: You may want to check your email settings for any settings that may prevent downloads. Navigate to your email settings and to make sure IMAP is enabled.
- Prepare the email Credentials, Email Server, and Port. Detailed information on the appropriate server/port based on your email provider can be found here.
- Check Server is IMAP and My Server requires SSL connection, if applicable.
- Optionally, check Delete Email After Processing if you want Sellercloud to delete the email after the task completion. If left unchecked, the task will automatically mark the email as Read.
- Prepare your SMTP profile and the applicable SMTP settings.
- Choose an Email Template.
HTTP
For Scheduled Tasks that operate via HTTP, consider the following:
- This option allows you to import data from a URL. The URL should lead directly to a file on the web server. The file will be downloaded and used to import data into Sellercloud.
- The URL you import from must be publicly accessible without requiring login credentials.
- Common file types to import data from are .csv, .txt, and Excel spreadsheets.
- Any file type can be processed with plugins as long as they are made to support it.
- You can import data from Google Sheets if the sheets are Shared Publicly. To share sheets publicly, click File, then select Share > Publish to web. Next, under Link, select the sheet and set the format to Comma-separated values (.csv). Then click Publish, copy the public link, and paste it into the HTTP URL field on the Scheduled Task.
- To map the columns of imported files to Sellercloud fields, use an Import Mapping Profile.
Manage Scheduled Tasks
To view and manage your Scheduled Tasks:
- Navigate to Settings > Select a company and from its Toolbox, choose Scheduled Tasks.
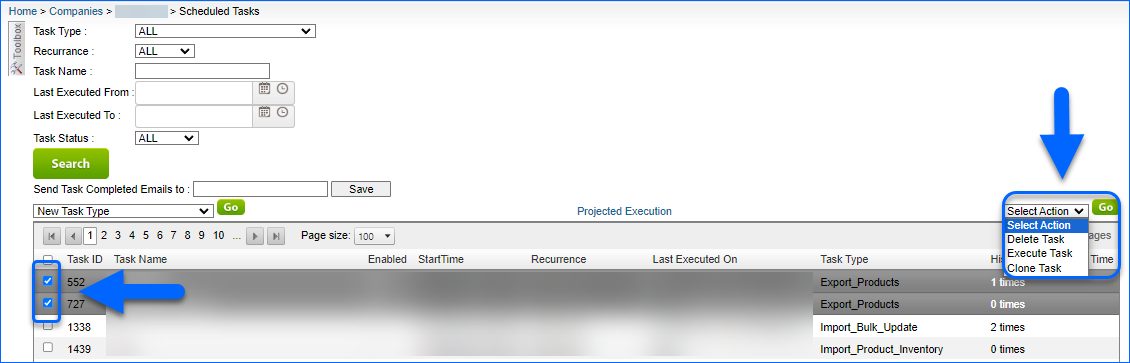
- By default, all scheduled tasks for the selected company will be displayed. Use the following filters, to search for specific tasks:
- Task Type
- Recurrence
- Task Name
- Last Executed From and To time
- Task Status
- You can access and update a task by clicking its Name.
Actions
When you check the boxes to the left of tasks to select them, you can manage them in bulk – simply click on the Select Action dropdown to perform the following operations:
- Delete – To delete a task from the list.
- Execute – To perform a task.
- Clone – To duplicate a task.
- Enable Tasks – To enable the selected tasks.
- Disable Tasks – To enable the selected tasks.