Overview
Target is one of the largest discount retailers in the United States. Sellercloud and Target communicate via EDI documents passed through a VAN (BoldVan account). In this article, you will learn how to integrate your Target account with Sellercloud.
Integrate with Target
To set up your Target account:
- Go to Company Settings > select a company > Toolbox > Target > General Settings.
- Click Edit.
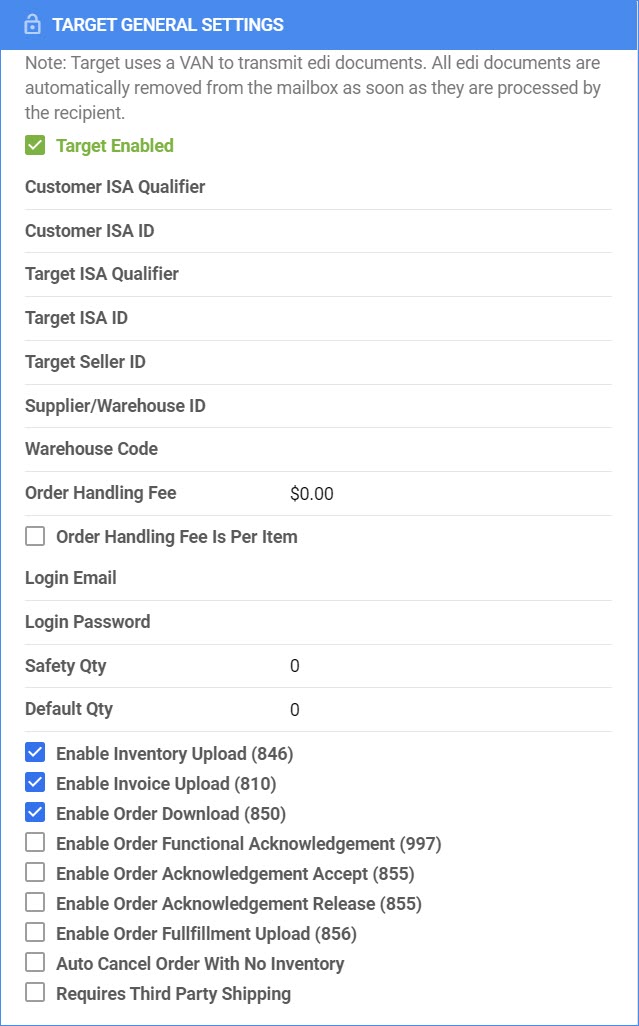
- Enter the identification and qualifiers on the Target General Settings page.
Name Instructions Customer ISA Qualifier Enter ZZ. Customer ISA ID Typically, a unique phone number is entered. Make sure this ISA ID is not used for any other integration. Target ISA Qualifier Enter ZZ. Target ISA ID Supplied by Target. Usually TGTDVS. Target Seller ID Supplied by Target (referred to as Vendor ID). Supplier/Warehouse ID Supplied by Target. Warehouse Code Supplied by Target (referred to as EDC). Target often assigns its own Customer ISA ID to vendors. For this reason, you need open a ticket with Target Support and fill out a form for the EDI integration. In this form, you will let them know the phone number you have chosen for your ISA ID, and they will change it on their side as well. - Sellercloud Support will set up a VAN account for the client.
- Enter a safety quantity, if applicable.
- Enter a Default qty for replenishable products, if applicable.
- Check the Target Enabled checkbox.
- Enable the automatic controls, below, after EDI has been tested and you are ready to ship orders. Inventory should be enabled only after you are sure that your inventory is accurate and the products are “Enabled for Target.”
- The following EDI documents are transmitted between Sellercloud and Target. Each document must be tested and approved before you can go live with Target.
- 846 Inventory Upload— Updates inventory.
- 850 Order Download— Purchase order document from Target. Contains customer order info.
- 997 Order Functional Acknowledgement – Acknowledges receipt of order.
- 855 Order Accept— Sends to Target one of two messages, either that the order has been received and will be shipped, or the order has been rejected and is being canceled. The document is sent immediately in response to the 850 order file received. The channel setting “Auto cancel order with no inventory” will auto-send a cancellation notice if there is insufficient inventory to fill the order.
- 856 Order Fulfillment Upload— Notifies Target of shipping and provides shipping date/time and tracking.
- 860 Purchase Order Change Request— Buyer Initiated.
- 865 Acknowledgement to a Purchase Order Change Request.
 Note: See instructions about setting co-op fees here for dropship.
 - When your VAN account is ready, enter the credentials you obtained from Sellercloud Support:
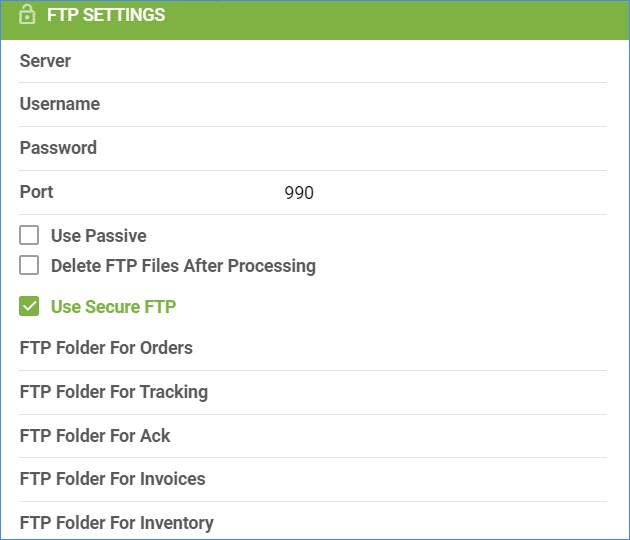
- FTP Server – Set to sftp.ecgrid.io
- FTP Username
- FTP Password
- FTP Port— 22 by default.
- Check Use Secure FTP checkbox and set up the FTP folders:
- FTP Folder For Orders – Use/In as the directory as this is the directory for the information that is sent from Target.
- FTP Folder For Tracking – Use/Out as the directory as this is the directory for the information received by Target.
- FTP Folder For Ack – Use/Out as the directory.
- FTP Folder For Invoices – Use/Out as the directory.
- FTP Folder For Inventory – Use/Out as the directory.
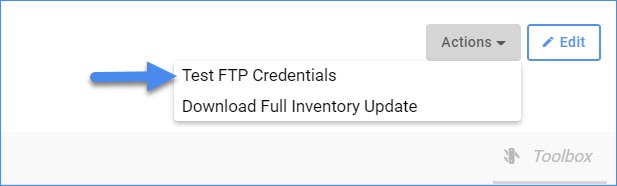
- Click Save.
- Click Actions > Test FTP Credentials.
Target General Settings
You can configure the following settings on the Target General Settings page:
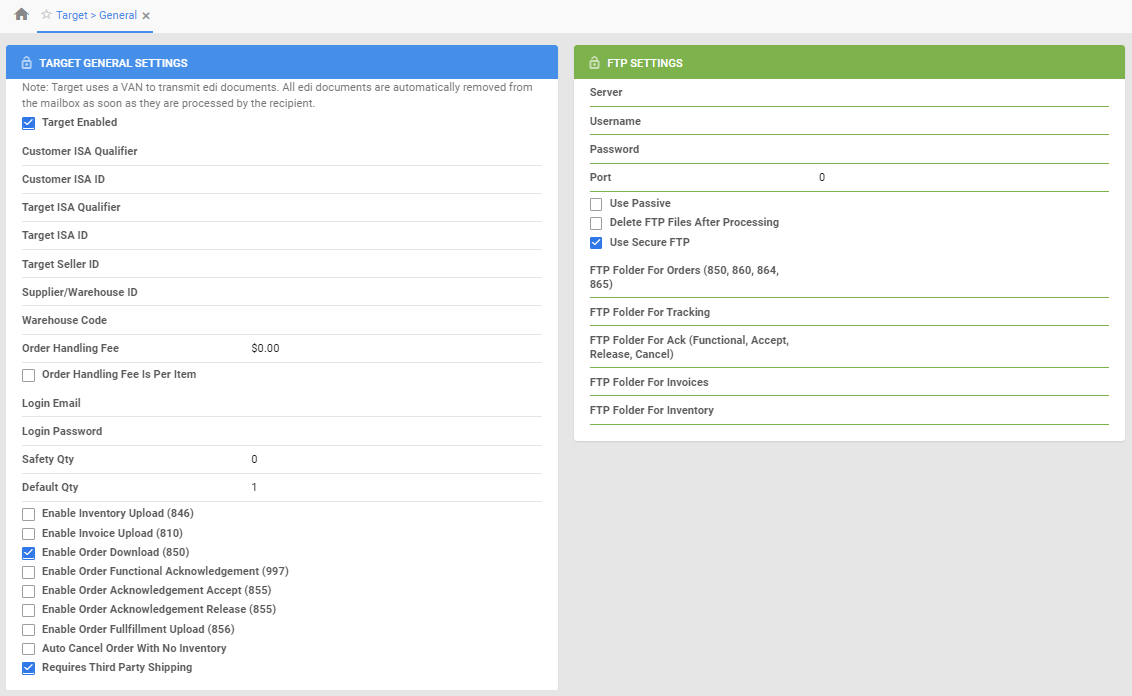
| SETTING | DESCRIPTION |
| TARGET GENERAL SETTINGS | |
| Target Enabled | Makes products available for Target listing. |
| Customer ISA Qualifier | Enter ZZ. |
| Customer ISA ID | Typically a unique phone number. Make sure this ISA ID is not used for any other integration. |
| Target ISA Qualifier | Supplied by Target. |
| Target ISA ID | Supplied by Target (referred to as Vendor ID). |
| Target Seller ID | Supplied by Target. |
| Supplier/Warehouse ID | Supplied by Target. |
| Warehouse Code |
Supplied by Target (referred to as EDC). |
| Order Handling Fee | Fee for the order per item. |
| Login Email | Enter login email. |
| Login Password | Enter login password. |
| Safety Qty | The number of items that will not be set to the channel in order to prevent overselling. |
| Default Qty | Sets a default number of items that will always be available on the channel. Use this option for replenishable products. |
| Enable Inventory Upload | Enable this setting to let Target upload inventory information from Sellercloud. |
| Enable Invoice Upload | Enable this setting to let invoice upload to Sellercloud. |
| Enable Order Download | Purchase Order document from Target that contains customer order info. Enable this setting to let Target orders be downloaded to Sellercloud. |
| Enable Order Functional Acknowledgement | Enable this setting to receive an FA document for the order. |
| Enable Order Acknowledgement Accept | Sends to Target one of two messages, either that the order has been received and will be shipped, or the order has been rejected and is being canceled. The document is sent immediately in response to the 850 order file received. The channel setting “Auto cancel order with no inventory” will auto-send a cancellation notice if there is insufficient inventory to fill the order. |
| Enable Order Acknowledgement Release | Enable this setting to allow confirmation that the order was canceled. |
| Enable Order Fulfillment Upload | Enable this setting to let Target upload tracking and shipping date from Sellercloud. |
| Auto Cancel Order With No Inventory |
Enable this setting to allow automatic cancelation of an order with no inventory. |
| Requires Third Party Shipping | This indicates that the product requires third-party shipping. |
| FTP SETTINGS | |
| Server | Address of the FTP server. BoldVan VAN FTP URL |
| Username |
BoldVan VAN Customer Mailbox ID. |
| Password |
BoldVan VAN Customer Mailbox password. |
| Port |
The provided port is 22 by default. Should be set to 22. |
| Use Passive | Check this option to connect to the server in passive mode. |
| Use Secure FTP (SSH) | Check this option to use Secure Shell (SSH) FTP protocol. |
Map Target Locations
If you have more than one Target Location, each must be mapped to a corresponding warehouse in Sellercloud. This mapping will determine which warehouse’s available inventory is sent to which location and prevent errors when updating inventory or tracking information.
Overview
In this article, you will learn how to integrate your Target account with Sellercloud. Target is one of the largest discount retailers in the United States. Sellercloud and Target communicate via EDI documents passed through a VAN (BoldVan account).
Integrate with Target
To set up your Target account:
- Go to Company Settings > select a company > Toolbox > Target > General Settings.
- Enter the identification and qualifiers on the Target General Settings page.
Name Instructions Customer ISA Qualifier Enter ZZ. Customer ISA ID Typically, a unique phone number. Make sure this ISA ID is not used for any other integration. Target ISA Qualifier Enter ZZ. Target ISA ID Supplied by Target. Target Seller ID Supplied by Target (referred to as Vendor ID). Supplier/Warehouse ID Supplied by Target. Warehouse Code Supplied by Target (referred to as EDC). Target often assigns its own Customer ISA ID to vendors. For this reason, you need open a ticket with Target Support and fill out a form for the EDI integration. In this form, you will let them know the phone number you have chosen for your ISA ID, and they will change it on their side as well. - Sellercloud Support will set up a VAN account for the client.
- Enter a safety quantity, if applicable.
- Enter a Default qty for replenishable products, if applicable.
- Check the Target Enabled checkbox.
- Enable the automatic controls, below, after EDI has been tested and you are ready to ship orders. Inventory should be enabled only after you are sure that your inventory is accurate and the products are “Enabled for Target.”
- The following EDI documents are transmitted between Sellercloud and Target. Each document must be tested and approved before you can go live with Target.
- 846 Inventory Upload— Updates inventory.
- 850 Order Download— Purchase order document from Target. Contains customer order info.
- 997 Order Functional Acknowledgement – Acknowledges receipt of order.
- 855 Order Accept— Sends to Target one of two messages, either that the order has been received and will be shipped, or the order has been rejected and is being canceled. The document is sent immediately in response to the 850 order file received. The channel setting “Auto cancel order with no inventory” will auto-send a cancellation notice if there is insufficient inventory to fill the order.
- 856 Order Fulfillment Upload— Notifies Target of shipping and provides shipping date/time and tracking.
- 860 Purchase Order Change Request— Buyer Initiated.
- 865 Acknowledgement to a Purchase Order Change Request.
 Note: See instructions about setting co-op fees here for dropship.
 - When your VAN account is ready, enter the credentials you obtained from Sellercloud Support:
- FTP Server
- FTP Username
- FTP Password
- FTP Port— 990 by default.
- Check Use Secure FTP checkbox and set up the FTP folders:
- FTP Folder For Orders – Use /Send as the directory as this is the directory for the information that is sent from Target.
- FTP Folder For Tracking – Use /Receive as the directory as this is the directory for the information received by Target.
- FTP Folder For Ack – Use /Receive as the directory.
- FTP Folder For Invoices – Use /Receive as the directory.
- FTP Folder For Inventory – Use /Receive as the directory.

- Click Save Settings.
Map Target Locations
If you have more than one Target Location, each must be mapped to a corresponding warehouse in Sellercloud. This mapping will determine which warehouse’s available inventory is sent to which location and prevent errors when updating inventory or tracking information.