Overview
When setting up a WFS (Walmart Fulfillment Services) Shipment in Sellercloud, you have two choices. The first option is to utilize the Inventory Transfer Service (ITS). This involves sending your inventory to a designated transfer station. Walmart then takes care of allocating enough inventory to the initial fulfillment center to keep your items stocked, while the remaining inventory is distributed to other locations.
The second option is to ship the items to the fulfillment centers independently without using Walmart’s Inventory Transfer Service.
For more detailed information about ITS, you can refer to Walmart’s Seller Help site.
Prerequisites
To enable the WFS Inventory Transfer Service:
- Go to Settings > Company Settings > Open a Company.
- Click Toolbox > Walmart Marketplace > General Settings.
- Click Edit.
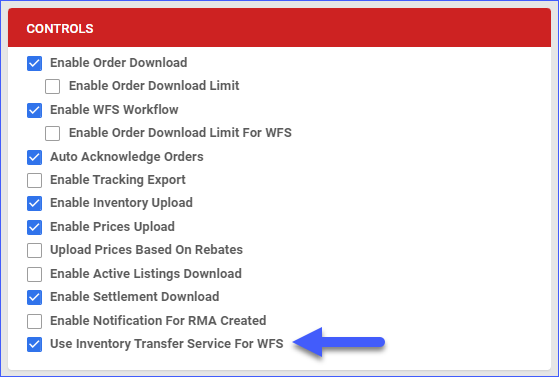
- In the Controls panel, enable Use Inventory Transfer Service for WFS
- Click Save.

WFS Inventory Transfers
If you enable the company-level setting Use Inventory Transfer Service for WFS, you will see a new label on top of the WFS Shipment Plan pages, called Using ITS. If you check the Use Inventory Transfer Service box for a shipment, the Using ITS label will say Yes, otherwise, it will say No.
To create a WFS Inventory Transfer:
- Go to Inventory > WFS Shipment Plans > Create New WFS Shipment Plans.
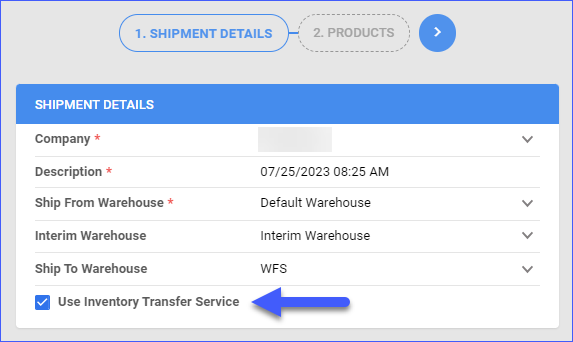
- Specify the Shipment Details.
- Company – select the company with products to ship.
- Description – type a name for the shipment plan – usually a date.
- Ship From Warehouse – select the warehouse to ship from.
- Interim Warehouse – select the warehouse for inventory in transit.
- Ship To Warehouse – select the WFS warehouse.
- Use Inventory Transfer Service – check to enable ITS.

- Click the Next Step arrow icon.
- Add products manually or bulk import them with a file. Refer to the WFS Workflow article for more details.
- Click the Submit Shipment to WFS flag icon.
To convert an existing WFS shipment to an Inventory Transfer:
- Go to Inventory > WFS Shipment Plans > Manage WFS Shipment Plans.
- Search and then click a plan’s ID to view it.
- Click Edit on the top right.
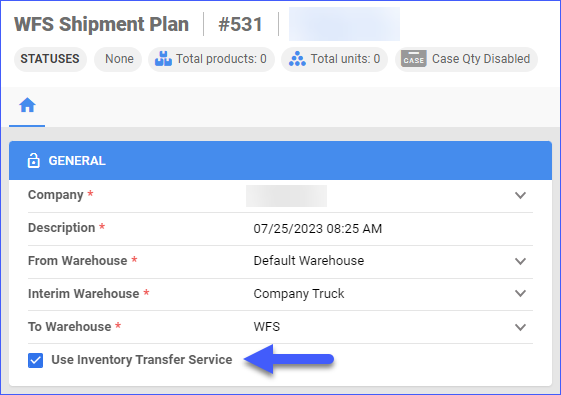
- In the General panel, check the Use Inventory Transfer Service box.

Overview
When setting up a WFS (Walmart Fulfillment Services) Shipment in Sellercloud, you have two choices. The first option is to utilize the Inventory Transfer Service (ITS). This involves sending your inventory to a designated transfer station. Walmart then takes care of allocating enough inventory to the initial fulfillment center to keep your items stocked, while the remaining inventory is distributed to other locations.
The second option is to ship the items to the fulfillment centers independently without using Walmart’s Inventory Transfer Service.
For more detailed information about ITS, you can refer to Walmart’s Seller Help site.
Prerequisites
To enable the ability to use Inventory Transfer Service:
- Go to Company Settings.
- Click Toolbox and select Channels > Walmart Marketplace > General Settings.
- In the Controls panel, check Use Inventory Transfer Service for WFS, which is a child setting of the checkbox Enable WFS Workflow.
- Click Save Settings.
WFS Inventory Transfers
If you enable the company-level setting Use Inventory Transfer Service for WFS, you will see a new label on top of the WFS Shipment Plan pages, called Using ITS. If you check the Use Inventory Transfer Service box for a shipment, the Using TS label will say Yes, otherwise, it will say No.
To create a WFS Inventory Transfer:
- Go to Inventory > WFS Shipment Plans > Create New Shipment Plan.
- Specify the Shipment Details.
- Company – select the company with products to ship.
- Description – type a name for the shipment plan – usually a date.
- Use Inventory Transfer Service – check to enable ITS.
- Click Continue.
- Add products manually or bulk import them with a file. Refer to the WFS Workflow article for more details.
To convert an existing WFS Shipment to an Inventory Transfer:
- Go to Inventory > WFS Shipment Plans.
- Search and then click a plan’s ID to view it.
- Navigate to the Action Menu and select Edit > Go.
- Check the Use Inventory Transfer Service box.
- Click Save Shipment.