Overview
Sellercloud lets you manage Purchase Order details in different places in the system. This helps you update purchasing information quickly without opening each Purchase Order separately.
With purchase orders, you can track orders from suppliers, view inventory levels and availability, plan for future orders, and set up automatic re–ordering. Purchase orders can also be used to consolidate multiple orders from multiple suppliers, giving the ability to reduce costs and streamline your purchasing process.
To learn more about managing Purchase Orders in Sellercloud, refer to Managing POs and Managing POs: Advanced Functions articles.
Add Products to a Purchase Order
Sellercloud lets you fill a Purchase Order with products during PO’s creation or later on. You can add products in individual quantities or case-packed quantities.
From Purchase Order
This is the most common way to pack a PO with items. Usually, the system automatically forwards you to this step when creating a new PO.
- Go to Purchasing > Manage POs.
- Select the Purchase Order you want to add products to.
- Click Toolbox, and select Items.
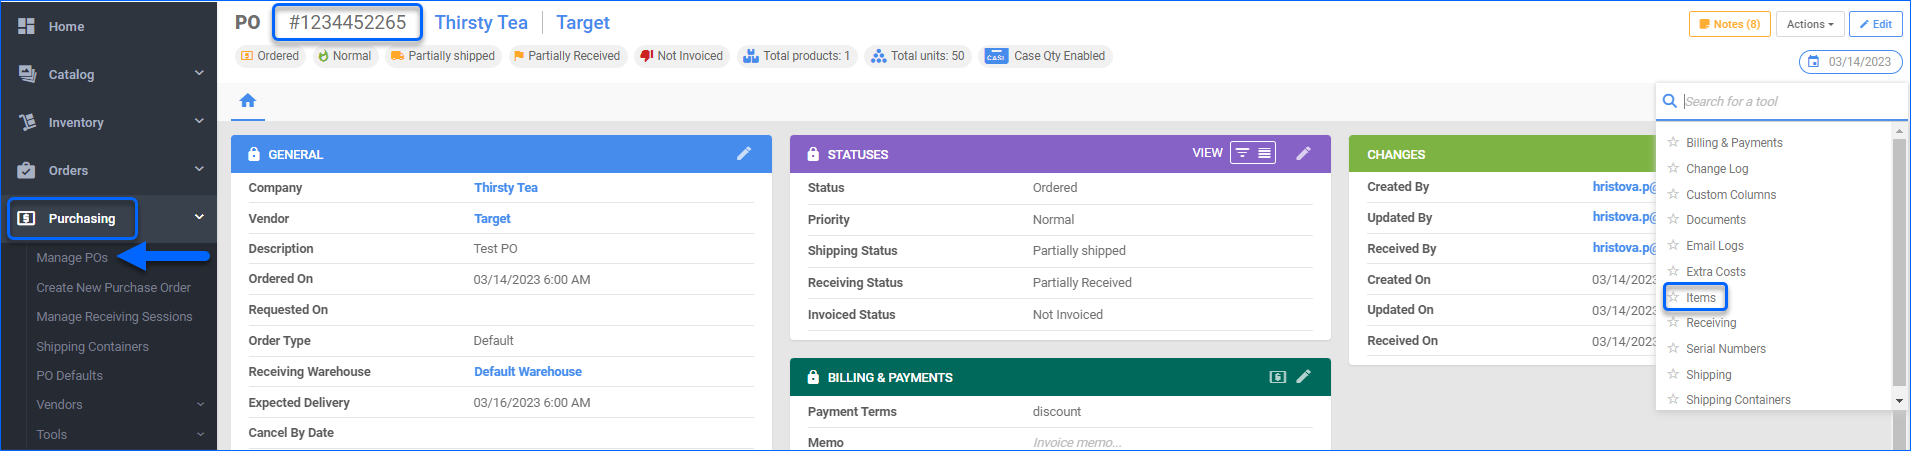
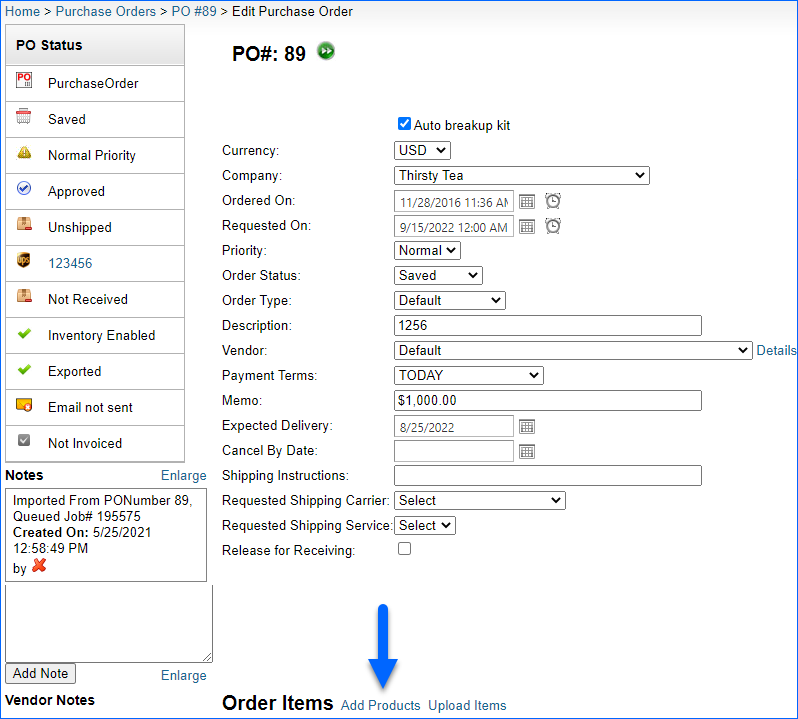
- In the upper right of the PO’s page, click the Edit button.
- On the Items panel, click the plus icon.
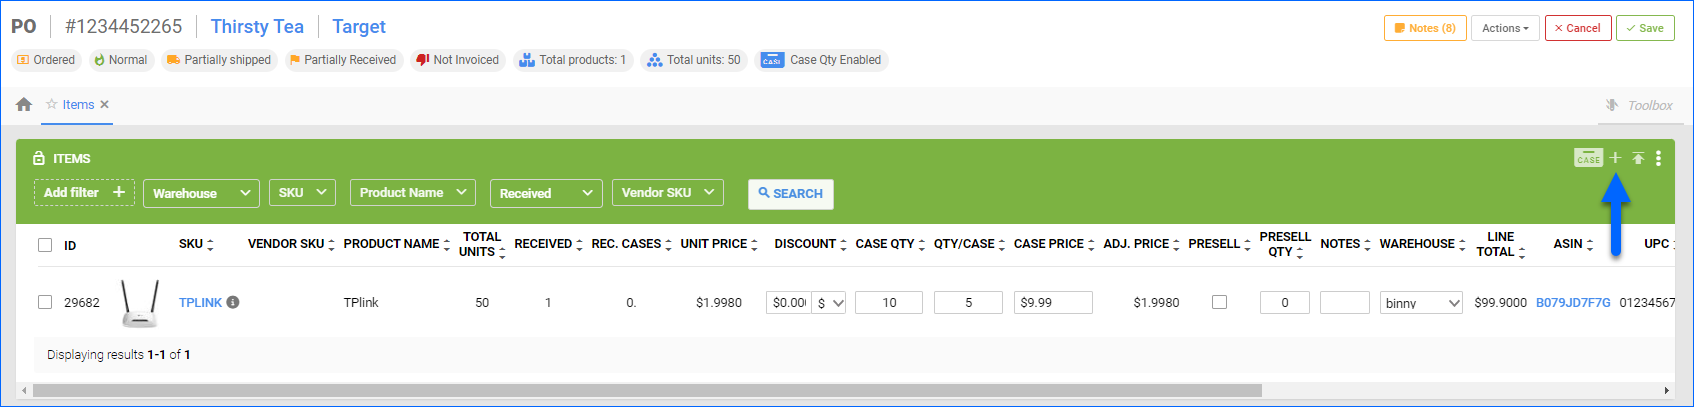
- In the Add Products dialog box that appears, use the top filters or the search function to find the requested product. Alternatively, click the Add New Product button to create a new product. When the appropriate product appears in the list, select the relevant checkbox. Sellercloud’s mobile application supports barcode scanning using your phone’s camera.
- You can add products through their respective SKU. To do that, switch the SKU List Mode on. You can also add items by their Vendor SKU from the Add Products page.
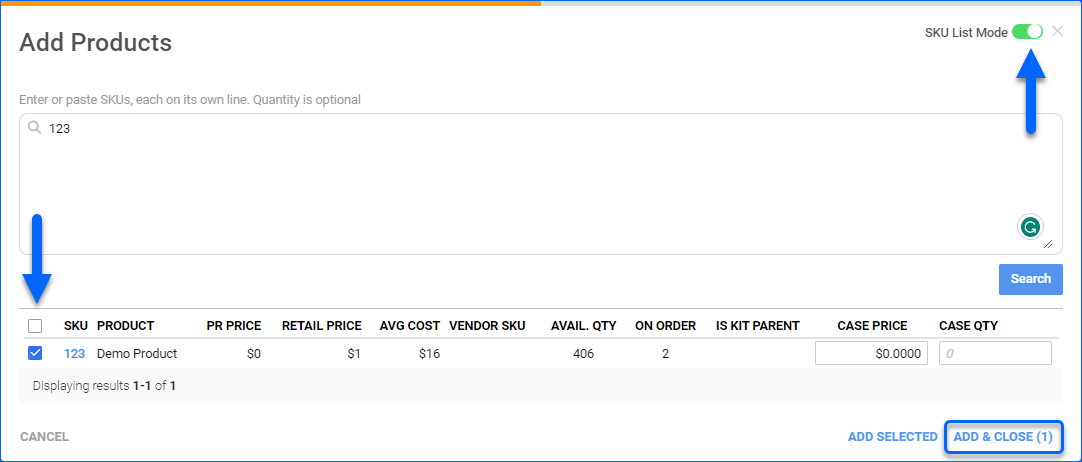
- Enter the quantity for each product selected. You can manage those quantities individually, for each product item, or per a case-packed product with multiple units. To learn more about purchasing by case, refer to the Order Case-Packed Products header below.
- Click Add & Close. The products selected are added to the PO details.
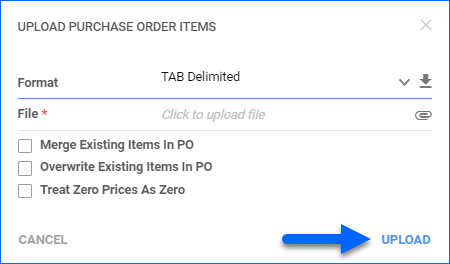
- To append multiple products to PO details, use the file upload function. To upload the products list, click the Upload Products icon.

- Enter the required information.
- Click Save.
- In the upper right, click the Save button to update a PO.
From Product Page via Quick Add Option
Alternatively, you can add a product to a PO from the respective product page.
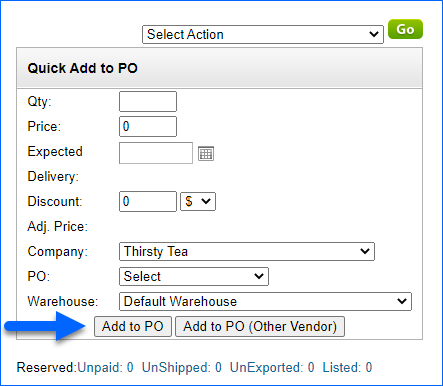
Navigate to Catalog > Manage Catalog > Product > Toolbox > Purchasing > Quick Add to PO.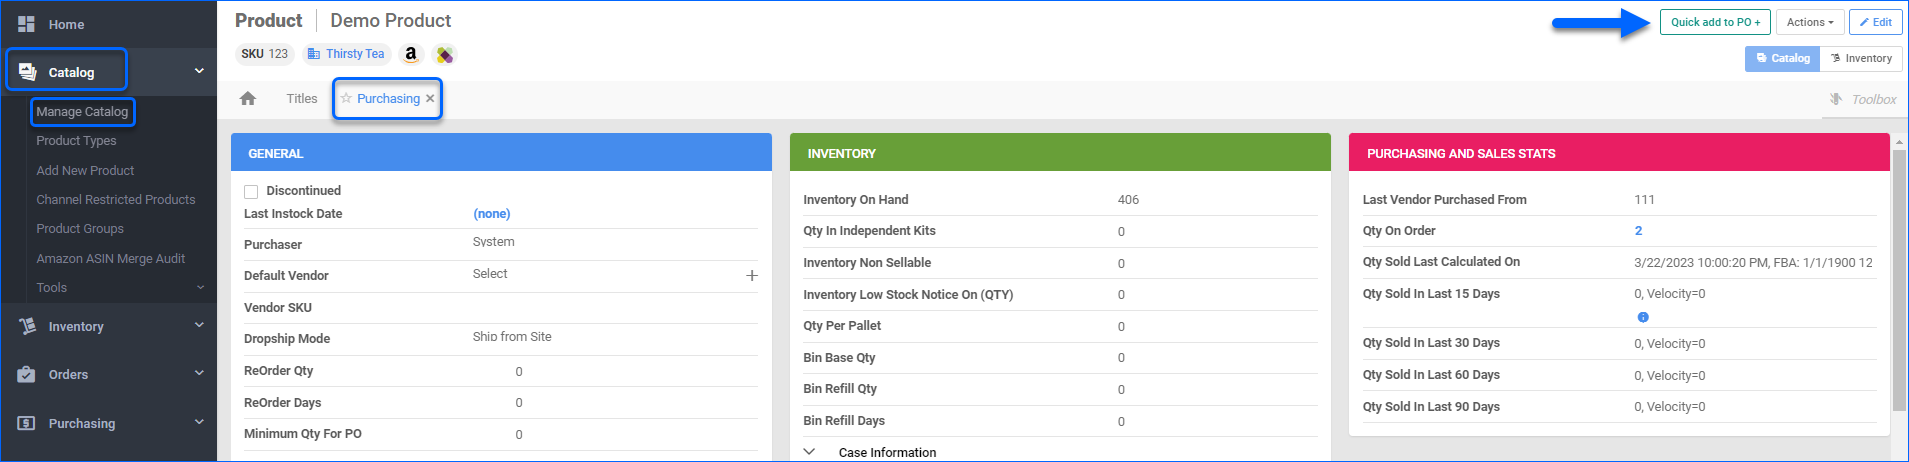
From Manage Inventory Page
If you need to add multiple products to a PO at a time, follow the path below.
Inventory > Manage Inventory > Select products > Actions >Add to PO.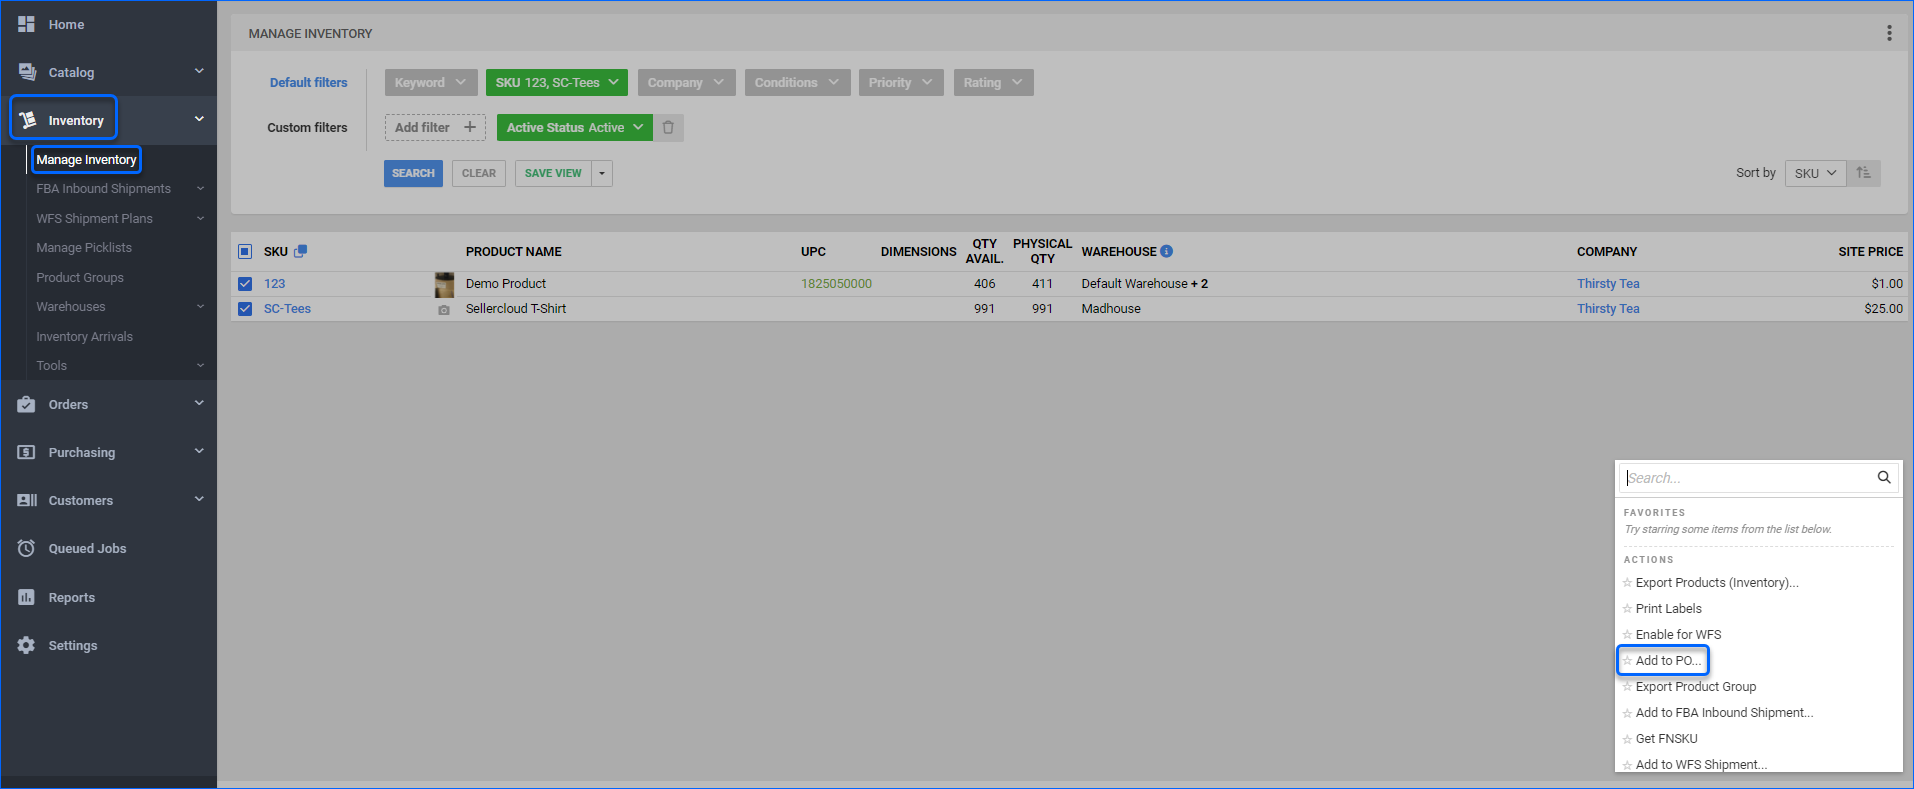
In addition, you can add products to a PO by moving them from different POs. For details, refer to Add Products from Another PO.
Add Kits to a Purchase Order
Similar to purchasing products separately, you can purchase a Kit by adding the Kit Parent to a PO.
If the setting is Enabled:
- When adding via the Purchase Order Creation Wizard: search for the desired Kit when adding items to the PO. Once selected, click Continue. In the pop-up, indicate the components that you want to add. If you want to order all of the Kit’s components, click the upper Select All checkbox.
- If there are multiple items in the Kit, each one will display in the grid, and the order quantity will be the quantity of the kit parent multiplied by the component quantity needed to make up the kit.
- If there is only one item in the Kit, for example, a pack of 4, the component will display in the grid with the kit quantity. This means if you ordered 1 parent, the component will display with a quantity of 4.
- When Adding via the Manage Inventory page: select the Kit Parent. The pop-up will display the components, and you will need to enter a quantity for all of them. It doesn’t need to comply with the component quantity needed to make up the kit.
If the setting is Disabled:
- When adding via the Purchase Order Creation Wizard: search for the Kit Parent and put in Quantity to Order. The Kit Components will not display. When the PO is created, only the Kit Parent will be in the product grid.
- When Adding via the Manage Inventory page: select the Kit Parent and click Add to PO.. from the Actions menu. In the pop-up, you will see only the kit parent and only the parent SKU will be added to the PO.
Define the Cost Ratio for Kit Products added to a PO
To trigger a cost update for each product added to a PO via a kit, the related kit has to be Independent and its quantity disassembled. This will split the kit cost among the components eventually. If you want to split the cost with a different ratio, set the relevant ratio value before disassembling the kit. To do that:
- Access Inventory > Manage Inventory.
- Open the Kit SKU you want to change the components’ Cost Ratio for.
- Click Toolbox, and select Kit.
- In the upper right, click Edit.
- Set the requested Cost Ratio parameter in the Components panel.

- Save the changes.
Order Case-Packed Products
When you need to purchase all the components from a specific Kit, it is better to add the relevant Kit Parent to a PO and then split that Kit into individual products. Likewise, when a vendor sells a product as a case, and you want to sell its components as individual products, use the Case option to add products to a PO. To do that, you need to switch to the Case Mode before adding products to a PO.
You can configure Costs, Quantities, and Shipping Dimensions for products you sell and purchase per case on the Purchasing Page of your products. You can configure them on a General level and on the Vendor Product level. When you add an item to a case quantity-enabled PO, we will prioritize the Vendor-level quantity, and only if there is none, we will use the general product case quantity configuration.
- To switch to the Case Mode, open the PO and click on Items from the Toolbox menu.
- Click on Edit.
- Click on Enable Case Qty.

- Then click the plus icon, and search for the requested products.
- When the Price and Quantity per each case are indicated, click Add & Close.

Related Client Settings
- Enable Per Case Qty Mode – This setting allows you to separate individual and case quantities for a product in their inventory.
- Do not show Case Qty in PO PDF Print – This allows you to choose whether or not to include the case quantity values on a purchase order PDF printout.
- Allow to edit Qty per Case in PO – This setting allows you to edit the quantity per case when creating a purchase order. This way, you don’t have to manually enter the quantity of each item in the purchase order.
- Enable Case Qty for new purchase orders – This setting allows you to purchase items in bulk and have the order broken down into smaller case quantities when the item is received.
To learn more about how to purchase products by case and then sell them apart, refer to Understanding Quantities on POs.
Manage Product Purchasing Data
Once a product is added to a PO, the relevant price and discount amounts are automatically added. To manage that data, go to the product’s page, and select Purchasing from the Toolbox. After clicking Edit, correct the prices, and Save. This will not change the existing Purchase Orders but will impact future POs when you select the products from a catalog.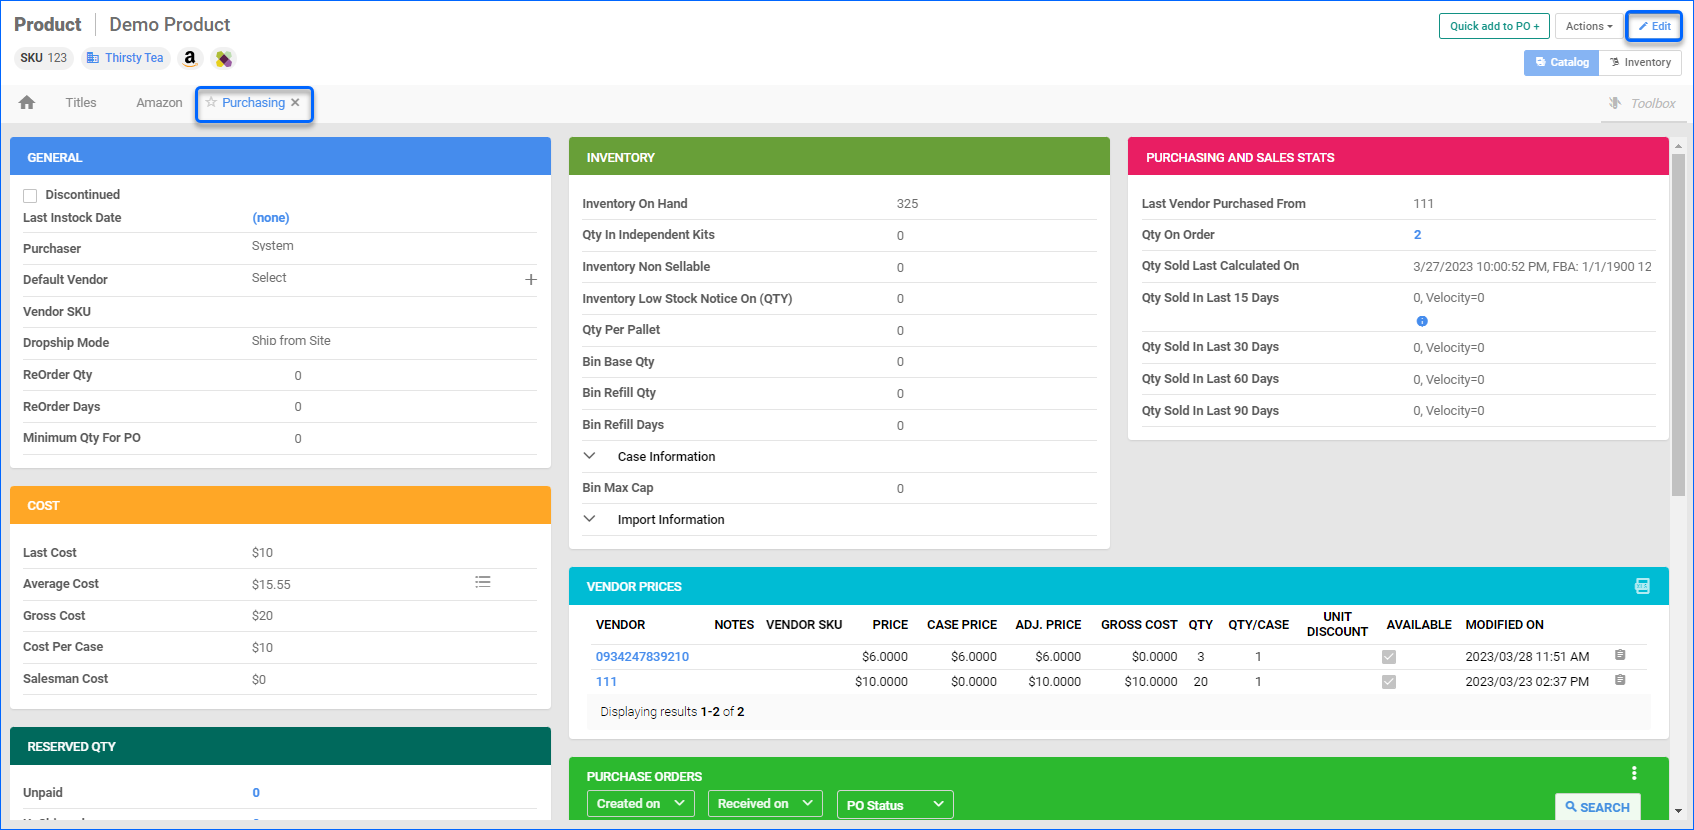 Vendor pricing and promotions can be set to automatically default to the correct price and discount when adding a product to a PO. Learn more about Vendor Promotions.
Once you’ve added a product to be purchased from a particular vendor, you can also apply a specific vendor discount either to an individual PO or to all POs of the selected vendor. To learn more about vendor discounts, refer to Applying Discounts to Purchase Orders.
View Product’s Purchasing History
To view a list of Purchase Orders for a particular product that has been added, follow the steps below.
- Access Inventory > Manage Inventory.
- Select the product for which you want to display the purchasing history.
- Click Toolbox, and select Purchasing.
- Refer to the Purchase Orders panel.

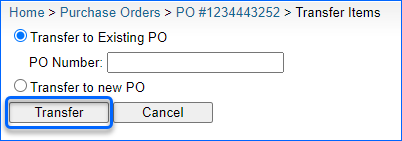
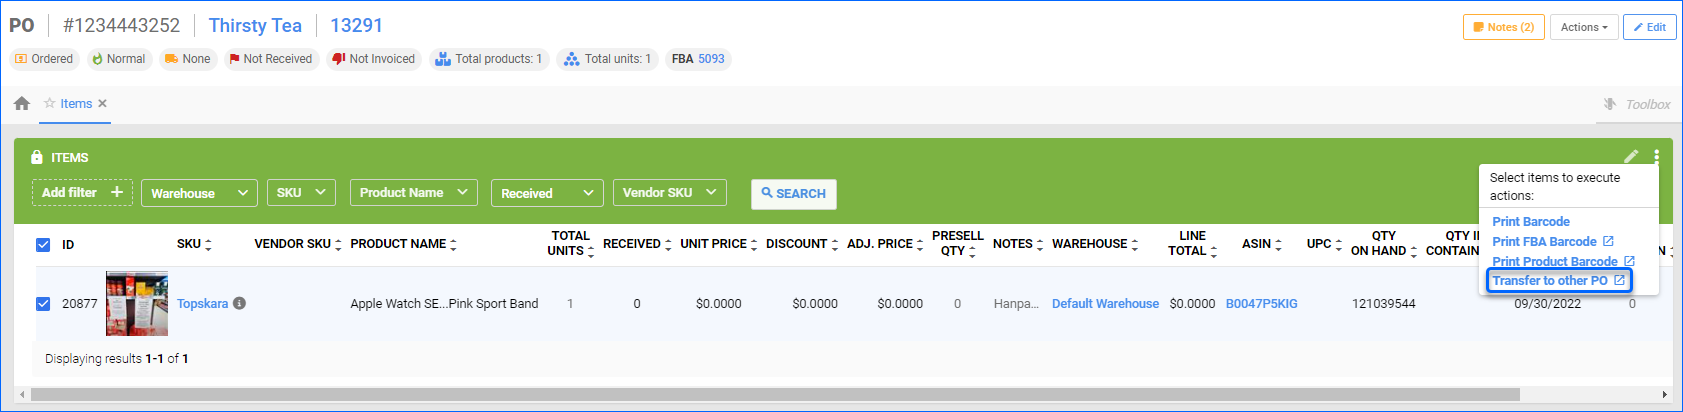
Transfer Items to Another PO
- Go to Purchasing > Manage POs.
- Select the Purchase Order you want to add products to.
- Click Toolbox, and select Items.
- Chose Transfer to another PO from the three-dot menu.
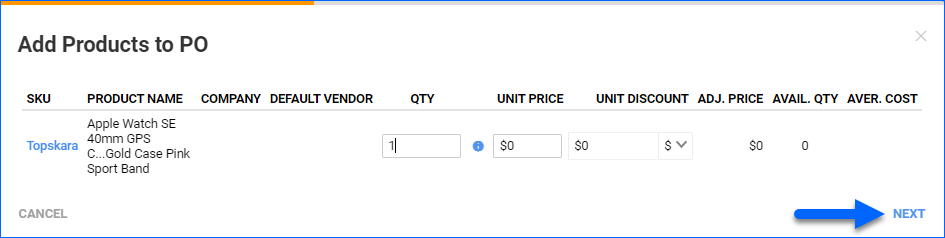
- Enter the Qty you want to transfer.
- Click Next.
- Choose Exisitng PO or New PO.
Overview
Sellercloud lets you manage Purchase Order details in different places in the system. This helps you update purchasing information quickly without opening each Purchase Order separately.
With purchase orders, you can track orders from suppliers, view inventory levels and availability, plan for future orders, and set up automatic re–ordering. Purchase orders can also be used to consolidate multiple orders from multiple suppliers, giving the ability to reduce costs and streamline your purchasing process.
To learn more about managing Purchase Orders in Sellercloud, refer to Managing POs and Managing POs: Advanced Functions articles.
Add Products to a Purchase Order
Sellercloud lets you fill a Purchase Order with products during PO’s creation or later on. You can add products in individual quantities or case-packed quantities.
From Purchase Order
This is the most common way to pack a PO with items. Usually, the system automatically forwards you to this step when creating a new PO.
- Go to Inventory > Purchasing.
- Select the Purchase Order you want to add products to.
- Click on Add Products next to Order Items.
- A pop-up will appear.
- Enter the required product information and click on Search.
- Find the product you want to add and click on Add Selected Items.
From Product Page via Quick Add Option
Alternatively, you can add a product to a PO from the respective product page.
- Navigate to Inventory > Manage Inventory > Product > Toolbox > Purchasing > Quick Add to PO.
- You can also click on Add to PO (Other Vendor), which will add the product to the purchase other from a different vendor.
From Manage Inventory Page
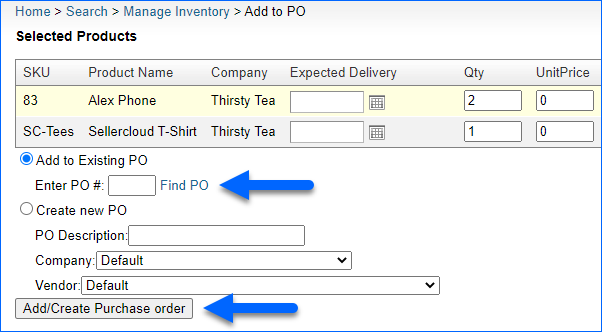
If you need to add multiple products to a PO at a time navigate to:
- Inventory > Manage Inventory > Select products > Actions >Add to PO > Go.
- A pop-up will appear.
- Enter the Required information.
- Enter the PO number to which you will be adding the products.
- Click on Add/Create Purchase Order.
In addition, you can add products to a PO by moving them from different POs. For details, refer to Add Products from Another PO.
Add Kits to a Purchase Order
Similar to purchasing products separately, you can purchase a Kit by adding the Kit Parent to a PO.
If the setting is Enabled:
- When adding via Create New PO: search for the desired Kit when adding items to the PO. In the pop-up window, search for the parent, select it, and click Add. The page will refresh, and you will see the components instead. If you want to order all of the Kit’s components, click the upper Select All checkbox.
- If there are multiple items in the Kit, each one will display in the grid, and the order quantity will be the quantity of the kit parent multiplied by the component quantity needed to make up the kit.
- If there is only one item in the Kit, for example, a pack of 4, the component will display in the grid with the kit quantity. This means if you ordered 1 parent, the component will display with a quantity of 4.
- When Adding via the Manage Inventory page: select the Kit Parent. The following page will display the components, and you will need to enter a quantity for all of them. It doesn’t need to comply with the component quantity needed to make up the kit.
If the setting is Disabled:
- When adding via Create New PO: search for the Kit Parent and put in Quantity to Order. The Kit Components will not display. When the PO is created, only the Kit Parent will be in the product grid.
- When Adding via the Manage Inventory page: select the Kit Parent and click Add to PO from the Action menu. In the following window, you will see only the kit parent and only the parent SKU will be added to the PO.
Define the Cost Ratio for Kit Products added to a PO
To trigger a cost update for each product added to a PO via kit, the related kit has to be Independent and its quantity disassembled. This will split the kit cost among the components eventually. If you want to split the cost with a different ratio, set the relevant ratio value before disassembling the kit. To do that:
- Access Inventory > Manage Inventory.
- Open the Kit SKU you want to change the components’ Cost Ratio for.
- Click Manage Kits.
- Click Edit Cost Ratio.
- Set the requested Cost Ratio parameter.
- Click Update.

Order Case-Packed Products
When you need to purchase all the components from a specific Kit, it is better to add the relevant Kit Parent to a PO and then split that Kit into individual products. Likewise, when a vendor sells a product as a case, and you want to sell its components as individual products, use the Case option to add products to a PO. To do that, you need to switch to the Case Mode before adding products to a PO.
You can configure Costs, Quantities, and Shipping Dimensions for products you sell and purchase per case on the Purchasing Page of your products. You can configure them on a General level and on the Vendor Product level. When you add an item to a case quantity-enabled PO, we will prioritize the Vendor-level quantity, and only if there is none, we will use the general product case quantity configuration.
- To switch to the Case Mode, choose Enable Per Case Qty from the Action menu.
- Click Go.
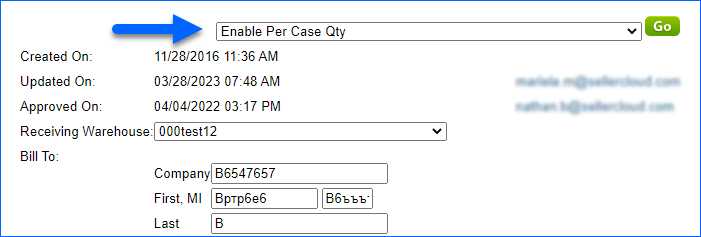
- When this is enabled, you will see three new rows – Qty/Case, Cost/Case, Case/Qty Received
- Populate the rows and click Save.
Related Client Settings
- Enable Per Case Qty Mode – This setting allows you to separate individual and case quantities for a product in their inventory.
- Do not show Case Qty in PO PDF Print – This allows you to choose whether or not to include the case quantity values on a purchase order PDF printout.
- Allow to edit Qty per Case in PO – This setting allows you to edit the quantity per case when creating a purchase order. This way, you don’t have to manually enter the quantity of each item in the purchase order.
- Enable Case Qty for new purchase orders – This setting allows you to purchase items in bulk and have the order broken down into smaller case quantities when the item is received.
To learn more about how to purchase products by case and then sell them apart, refer to Understanding Quantities on POs.
Manage Product Purchasing Data
Once a product is added to a PO, the relevant price and discount amounts are automatically added. To manage that data, go to the product’s page, and select Purchasing from the Toolbox. After correcting the prices, click Save. This will not change the existing Purchase Orders but will impact future POs when you select the products from a catalog.
Vendor pricing and promotions can be set to automatically default to the correct price and discount when adding a product to a PO. Learn more about Vendor Promotions.
Once you’ve added a product to be purchased from a particular vendor, you can also apply a specific vendor discount either to an individual PO or to all POs of the selected vendor. To learn more about vendor discounts, refer to Applying Discounts to Purchase Orders.
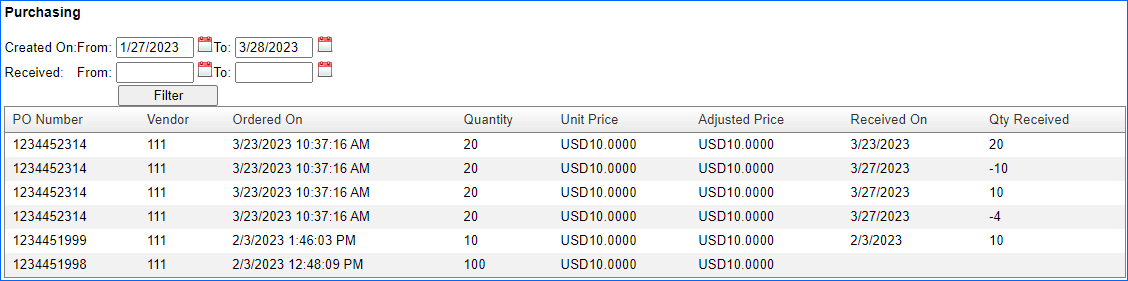
View Product’s Purchasing History
To view a list of Purchase Orders to which a particular product has been added, follow the steps below.
- Access Inventory > Manage Inventory.
- Select the product for which you want to display the purchasing history.
- Click Toolbox, and select Purchasing.
- Refer to the Purchase Orders panel.
Transfer Items to Another PO
- Select the items from the grid in the PO.
- Click Transfer to Other PO on the Action Menu.
- Click Go.

- Transfer to existing PO by entering the PO number, or transfer to a new PO.