Overview
To configure how Sellercloud data transfers into Quickbooks, open Quickbridge > Click File > Options to open a new window with seven tabs:
- Main
- Shipped Orders Grid Columns
- Sales Orders
- Inventory
- POs & VIs
- Channel Invoice
- Quickbooks Features
Prerequisites:
- To see Quickbooks’ settings, enable Sellercloud’s Client Settings Enable Quickbooks WorkFlow.
- To post from Quickbridge to Quickbooks, obtain the needed permissions.
Main Tab

| Setting | DESCRIPTION |
| Use Generic Customer Name | Creates one generic customer for each channel’s orders.
Example: Sellercloud _Wholesale_Customer If disabled, the Sellercloud Customer ID is used as the Customer Name in Quickbridge. |
| Use the Sellercloud Company / Channel Name as the Customer Name | When selected with Use Generic Customer Name, creates a customer name based on the company name and the channel name.
Example: Thirsty Tea_Wholesale_Customer You can define a customer name in Sellercloud instead of the above format by enabling both settings and entering a QB Customer Name (show me where). The value in this field should not exceed 41 characters.
|
| Mark Orders Paid | Mark Orders in Quickbridge as:
|
| Mark Sales Orders as UnPaid for all Channels | Overrides the payment status selection in the Mark Orders in Quickbridge as setting. |
| Add BillTo Address on Invoices | V1.0.6.0 introduced this new feature when using Post Detailed Shipped Orders to QuickBooks to bring in the order’s Sold To information and show it in the Quickbooks’ invoice’s Bill To section. You can choose which channels will import the Bill To information.
By default, only the Ship To section will populate; the Bill To section will not populate and will not override the Bill To information stored in Quickbooks for that customer. Example: If you want to export Overstock orders, but you want to bill Overstock and do not want to bring in the Sold To information on the order, disable Add BillTo Address on Invoices. You can use this setting with other ones, such as Use Generic Customer Name and Use the Sellercloud Company / Channel Name as the Customer Name. Here’s an example of when Add BillTo Address on Invoices is enabled:
|

Shipped Orders Grid Columns Tab
You can choose what data is displayed in the Shipped Orders Grid by selecting specific columns to appear. This does not affect what data gets posted.
Sales Orders Tab
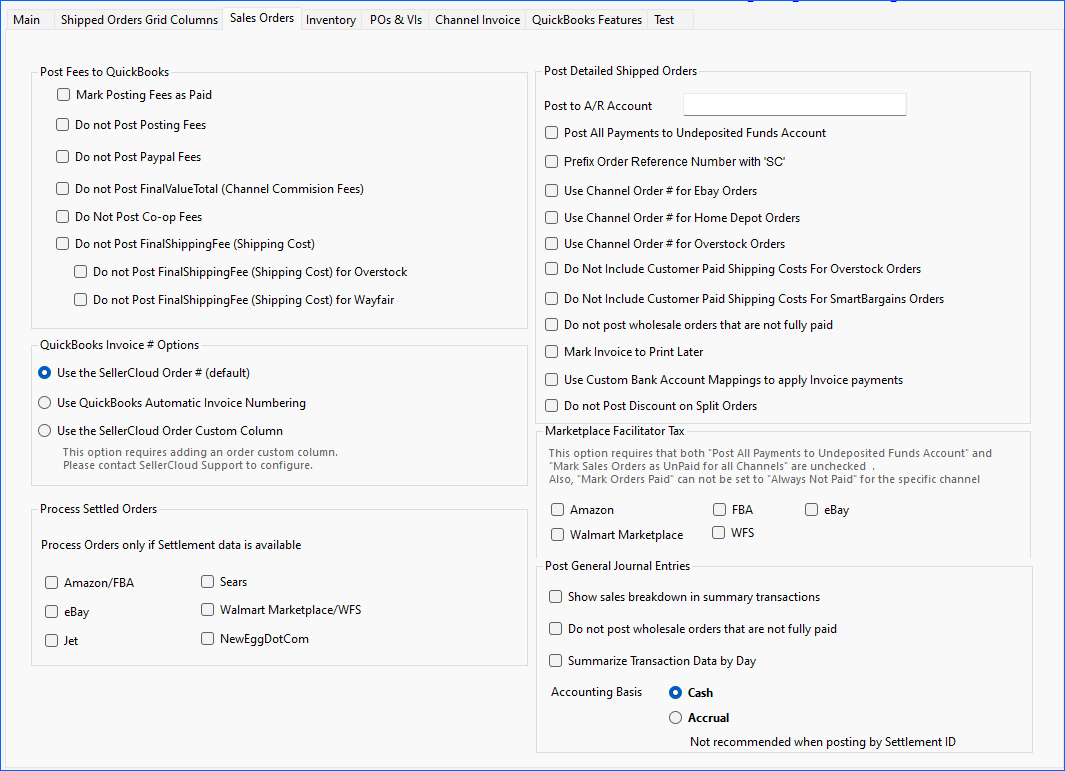
| Setting section | DESCRIPTION |
| Post Fees to Quickbooks | Mark Posting Fees as Paid – Any of the posting, Paypal, or commission fees will post as a bill to the vendor along with a payment from an interim account.
By default, all fees will post to Quickbooks, but you can prevent certain fees from posting:
|
| Quickbooks Invoice # Options | By default, the invoice number in Quickbooks is posted based on the Sellercloud Order ID. These settings allow you to choose between the following options for the invoice number as displayed in Quickbooks:
|
| Post Detailed Shipped Orders | Post to A/R Account – Allows you to define the accounts receivables that the orders will be posted to instead of the generic “Accounts Receivables.”
Post All Payments to Undeposited Funds Account – By default, payments are exported to a special Sellercloud bank account for each channel. This setting posts the payments to an Undeposited Funds account instead, which can be a different account type. Prefix Order Reference Number with ‘SC’ – Add a prefix for Sellercloud. Use Channel Order # for Ebay Orders – / Use Channel Order # for Home Depot Orders/ Use Channel Order # for Overstock Orders – Posts the channel order number instead of the channel order number 2. Do not Include Customer Paid Shipping costs for Overstock /SmartBargains Orders – Customer pays shipping directly to Overstock /SmartBargains, so you do not get that money. If you are not posting the Shipping fee, it is advised to not post the paid shipping costs. Do not post wholesale orders that are not fully paid Mark Invoice to Print Later – Auto-flag all invoices that you post as Print Later, so you can easily print all of them in bulk. Use Custom Bank Account Mappings to apply Invoice payments – This setting is based on the Mark Order Paid setting in the Main tab (see above.) When enabled, this setting allows for a customized mapping of the payment applied to the invoice instead of using the default bank account created by Sellercloud for that channel. This will display the Check Payment Account button on the Post Detailed Shipped Orders page, which provides a pop-up window with the bank account mapping. Show me where. Do not post Discount on Split Orders – When enabled, does not post the split order discount on a child order. |
| Marketplace Facilitator Tax |
When enabled, this post taxes paid by the channel as an “Other Charge” item that is mapped to your payment account, in place of the default “Sales Tax” item. This option requires that both “Post All Payments to Undeposited Funds Account” and “Mark Sales Orders as UnPaid for all Channels” are unchecked. Also, “Mark Orders Paid” cannot be set to “Always Not Paid” for the specific channel. |
| Post General Journal Entries | Show sales breakdown in summary transactions. This will impact the Sales journal entry type.
Do not post wholesale orders that are not fully paid Summarize Transaction Data by Day – Each date with transactions will have its own journal entry (instead of one journal entry) for all dates with transactions in your chosen date range. Use this setting to see your sales activity in Quickbooks by its actual transaction date, not by your posting date. Accounting basis – You can choose between Cash and Accrual. |
| Process Settled Orders | Selecting settings removes concerns about posting orders without settlement data for the selected channel. |
Inventory Tab

| Setting Section | SETTING AND DESCRIPTION |
|
|
Treat kits as group product type – Have a kit imported into a Group Product Type in Items and Services. Group Product Type and Components must already be in Quickbooks.
Do not post subtotal for group – Price must be defined on the items in Quickbooks and may not match the order price. Enable Kit Components with Sales Qty – Sends kit component quantities to Quickbooks and ignores kit parent quantities. The Sales Price will be shown on a new item called Kit Subtotal. Enable Kit Components with Sales Qty and Price – Posts the sales of kit items by their components and distributes the kits’ sales amounts using the cost ratio calculation. None – Posts only the kit parent without reference to the components. |
| Product Class Posting Options | Use the QuickbooksClass field defined on the product in Sellercloud – If enabled, it will create a class for each product that is exported with the product name. You can assign this custom class per product in Sellercloud. This can be set in two ways:
Use “Sellercloud” as product class – If enabled, create a class named Sellercloud for each item exported. When enabled, there is an option Custom Class Name to choose your own class name.
Use warehouse name as product class –
None
|
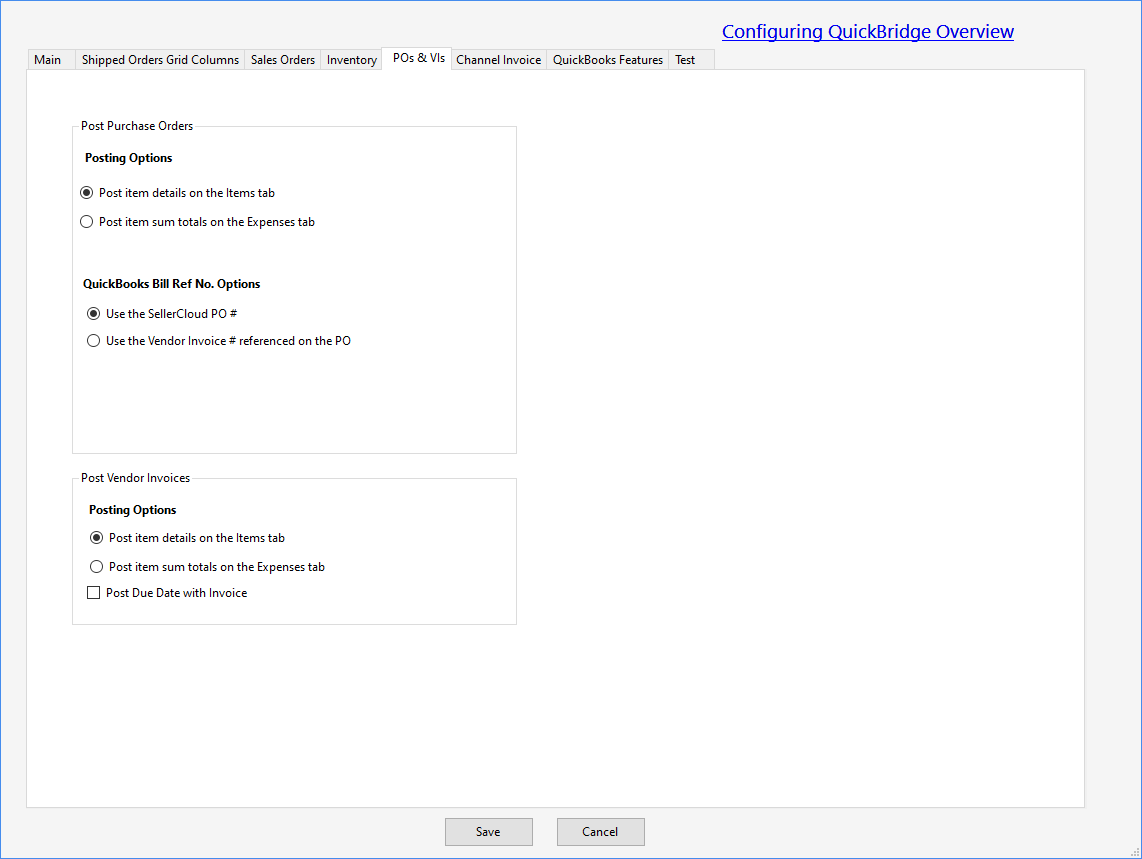
POs & VIs Tab
The following preferences are available when posting purchase orders and vendor invoices to QuickBooks:
| Settings section | SETTING AND DESCRIPTION |
|
|
Two Posting Options are available for purchase orders or vendor invoices:
QuickBooks Bill Ref No. Options:
|
|
|
|


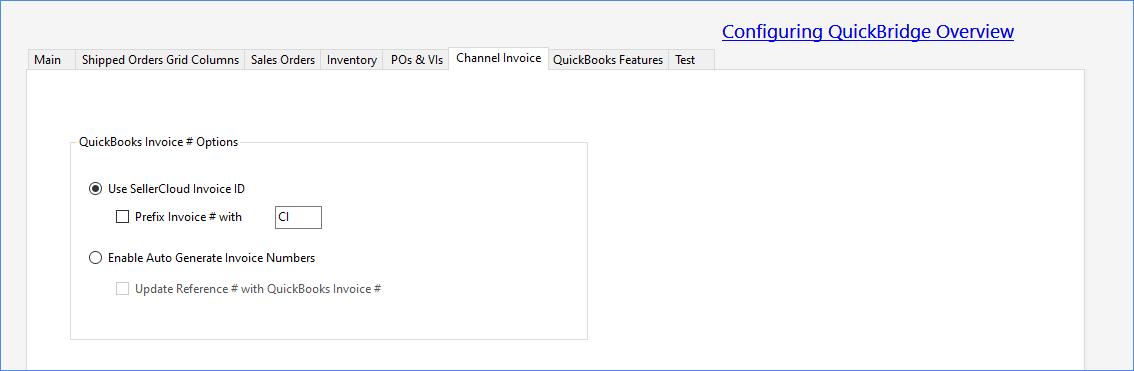
Channel Invoice Tab
The following preferences are available when posting channel invoices to Quickbooks:
| Settings | SETTING AND DESCRIPTION |
|
|
|
Quickbooks Features
Two Quickbooks feature settings (one for Enterprise version only) are available.

| CALLOUT NUMBER | SETTING AND DESCRIPTION |
|
|
When selected:
|
|
|
By default, orders in foreign currency will post to QuickBooks in USD using the conversion rate saved on the order, but you can use this setting to retain the foreign currency of orders when posting to QuickBooks. See the key points of using this setting.
This setting requires a Quickbooks version with an enabled multi-currency feature. |
Product and SKU Options
Sellercloud offers the following additional product and SKU options:
- If there is SKU mismatch between Sellercloud and Quickbooks – You can enter the Quickbooks SKU in the Master SKU field on the product’s home page. This field is used when posting transactions to Quickbooks. If the field is blank, the regular product ID is used.
- If you are a seller who uses the sub-item functionality in Quickbooks and needs to send the product with a parent item – Enable the Use the Master SKU as the Parent SKU for QuickBooks in Sellercloud’s Client Settings. Quickbridge will format the SKU as “Master SKU, colon, and product id (ABC:123).”
For multiple levels of the sub-items, use the above format in the Master SKU field to reflect the multiple levels (e.g., Grandparent:ABC)

Client and Vendor Settings
Sellercloud offers the following additional client and vendor settings:
- In Sellercloud, if you click Customers and open one, you can see the Business Name field. This can be mapped to a QuickBooks Customer for Wholesale, Local Store, Magento, and Groupon Channel orders.
- Vendors can also be mapped to QuickBridge using the field QB Vendor Name. In Sellercloud, go to your company > Toolbox > Vendors and select a vendor to locate this field.
Map Channel Orders to QuickBooks Customers
You can map channel orders to a specific customer in QuickBooks.
This feature requires the QuickBridge settings Use Generic Customer Name and Use the SellerCloud Company / Channel Name as the Customer Name to be checked.

How it works:
- If you post Amazon orders and only check Use Generic Customer Name by itself, you will create a customer in QuickBooks named SellerCloud Amazon Customer.
- If you also check Use the SellerCloud Company / Channel Name as the Customer Name, you will create a customer in QuickBooks named Thirsty Tea_Amazon_Customer.
- If you prefer to use a custom name instead of the predefined ones, input a name in the QB Customer field, and it will be the customer name created in QuickBooks.
Next:
- Go to your Company Settings.
- Click Toolbox and select QB Settings > General Configurations.
- Click Edit. Then select a Channel, enter the QuickBooks Customer name to be mapped, and click Save.
