Overview
You can manually create new Wholesale and Local Store orders in Sellercloud. The order creation wizard allows you to input customer information, control shipping details, add products, and manage the order’s payment information.
This article covers the steps for creating an order via the Order Creation Wizard. However, you also have the option to manually Import Orders via File and Schedule an automatic Order Import.
Create New Orders
To create a new order:
- Go to Orders > Create New Order.
- Complete the Customer information and the Order Details. You can search for a customer using the icon in the corner of Customer. Click the blue arrow at the top-right corner to continue.
 If the selected Customer has an assigned Account Manager, you can configure Sellercloud to automatically populate the Order Sales Rep during this step. This option is based on the Manual Order Creation: Default the Sales Rep to the Customer’s Account Manager Order Client Setting.
 - Click on Add Products.

- Select your products and their order quantities > Click Add & Close. You can add filters to find products (such as SKU, Vendor SKU, or Price) or enable SKU List Mode to paste multiple SKUs.
- If you are using the Sellercloud Mobile Application, both modes support camera barcode scanning.

- Optionally, you can edit the quantities and pricing for each item in the Products panel. When you are ready, press the blue arrow.

- Complete the Shipping Address and Shipping Method panels > Click the Dollar icon for the Shipping Calculator.
 The carrier’s Shipping API credentials must be configured for the Company in order to see the shipping rates window.
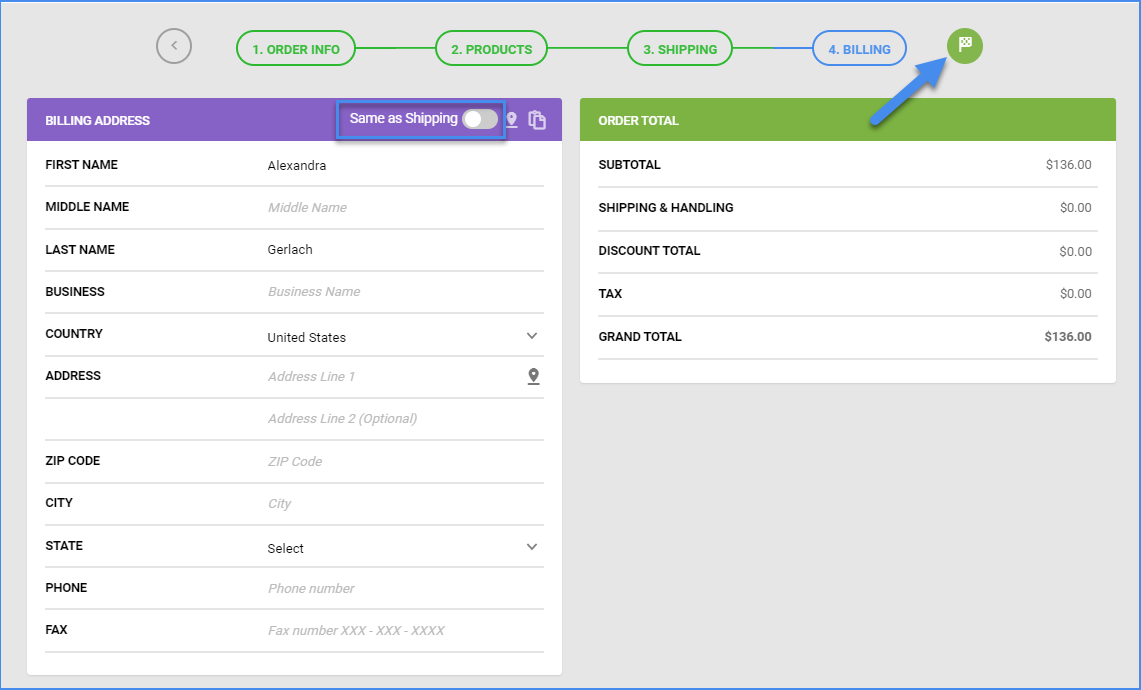
 - Fill out the Billing Address information > Click the green flag icon at the top-right corner. If the billing address is the same as the shipping address, toggle Same as Shipping.
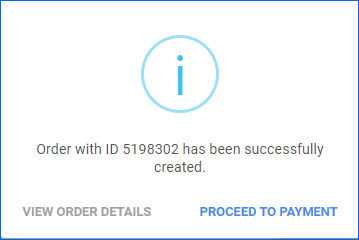
- You will see a pop-up that confirms your order was created.
- If you click View Order Details, the order will remain Unpaid, and you will be redirected to the Order Details page.
- To mark the order as Charged, click Proceed to Payment.
Add Payment
Clicking on the Proceed to Payment button on the pop-up prompt will redirect you to the same page you can reach via the Receive Payment order action or by clicking the Receive Payment icon on the Payment tab from the Order Toolbox.
The page will look slightly different based on the selected method. Read our dedicated article for more information about the Payment Methods and how to mark your order as Charged.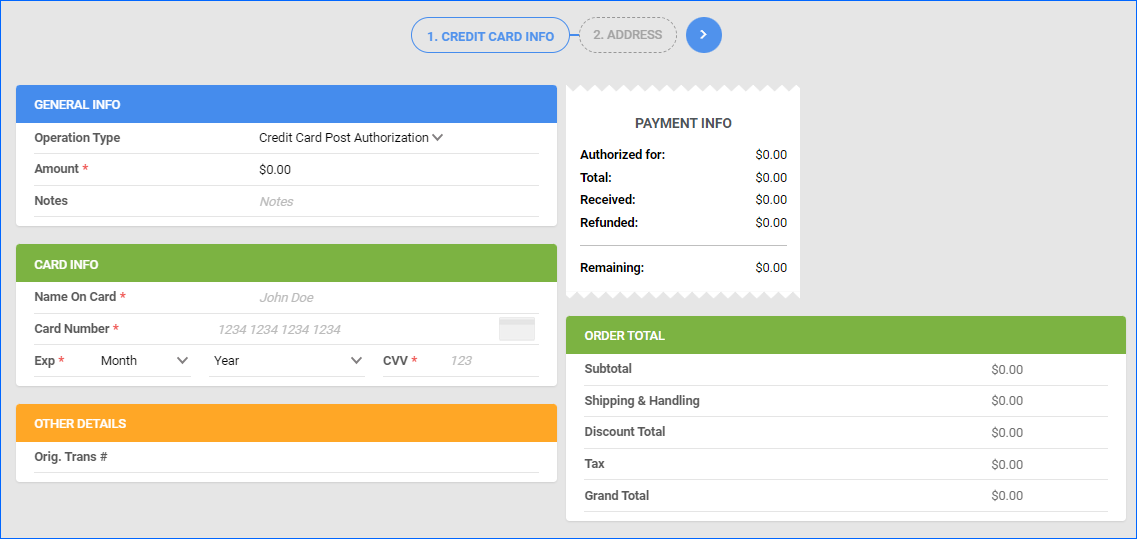
Add SKUs to an Order
If a product is missing from an order, you can simply add the SKU from the order details page. Note that you can only add SKUs that are listed under the related company and are also marked as Active. To add items to an existing order:
- Go to Orders > Manage Orders.
- Open an order and click Edit.
- In the Items tab, click on the Add icon.

- Use filters to find products more easily. Alternatively, use SKU List Mode to paste a list of SKUs to search. Select your products > Add & Close. If you are using the Sellercloud Mobile Application, both modes support camera barcode scanning.

- The selected products will appear in the Items panel. Input a quantity for each item. You can also edit prices, discounts, and item-specific notes.

- Click Save.
Replace Order SKUs
You can replace order SKUs individually or in bulk.
Individually
- On the Order Details page, click Edit.
- In the Items tab, enter a new SKU in the SKU field.
- Click the checkmark at the upper right-hand corner of the tab to save the change.

In Bulk
- Go to Orders > Manage Orders.
- Select the orders which SKUs you want to replace in bulk.
- From the Action icon at the lower right-hand corner, select Bulk Replace SKU.
You can only select orders with the same Product ID and a single item in each order.

- In the newly open window, enter the new SKU that will replace the other SKUs and click Process Replacement.