Overview
With Sellercloud, you can import orders automatically from most popular marketplaces and shopping carts. However, sometimes, you may have to import orders manually. For example, you may have to import orders or specific order-related information from marketplaces that are not integrated with Sellercloud or from an external database. Wholesale orders can be imported as well. You can do this using Sellercloud’s Order Import tool.
To access the Order Import tool, go to Orders > Tools > Import Order Info Via File. Then, check the next sections of this article for more details about each option in the tool. The Order Import tool offers the following options:
- Import Bulk Replace Order SKUs File – Replace any products on order in bulk.
- Import Amazon Transparency Codes – Import Amazon Transparency Codes used to identify individual product units and verify authenticity.
- Import P&L Adjustments – Manually adjust your Orders’ P&L in bulk.
- Import Orders Via Profile – Manually import orders from a spreadsheet using a Mapping Profile.
- Import Orders Via Plugin – Manually import orders from a file using an Order Import-type plugin.
- Import Channel Orders – Manually import orders from a specific channel using a file.
- Import Shipping Costs – Manually import shipping costs in a Generic or carrier-specific format. Carrier-specific formats are available for DHL, FedEx, UPS, and UPS Mail Innovations.
- Import Tracking Via Profile – Manually import tracking information from a spreadsheet using a Mapping Profile.
- Import Tracking Via Plugin – Manually import tracking information from a file using a Tracking Import-type plugin.
- Import Tracking – Manually import tracking information from a spreadsheet.
Import Orders
There are a few different ways to import orders from a file. You can import orders from specific channels supported by the import feature, create custom mappings and import from other channels, or even use an order import plugin.
Via Profile
If you can’t import orders from your channel using the Import Channel Orders option because the channel is not on the list, you can still import your orders using an Import Mapping Profile. The mapping profile allows you to Map Custom Spreadsheet Column Headers to Sellercloud Fields. The mapping process essentially makes any file with order information compatible with Sellercloud.
Once you create a profile and have your orders file ready, you can import it as follows:
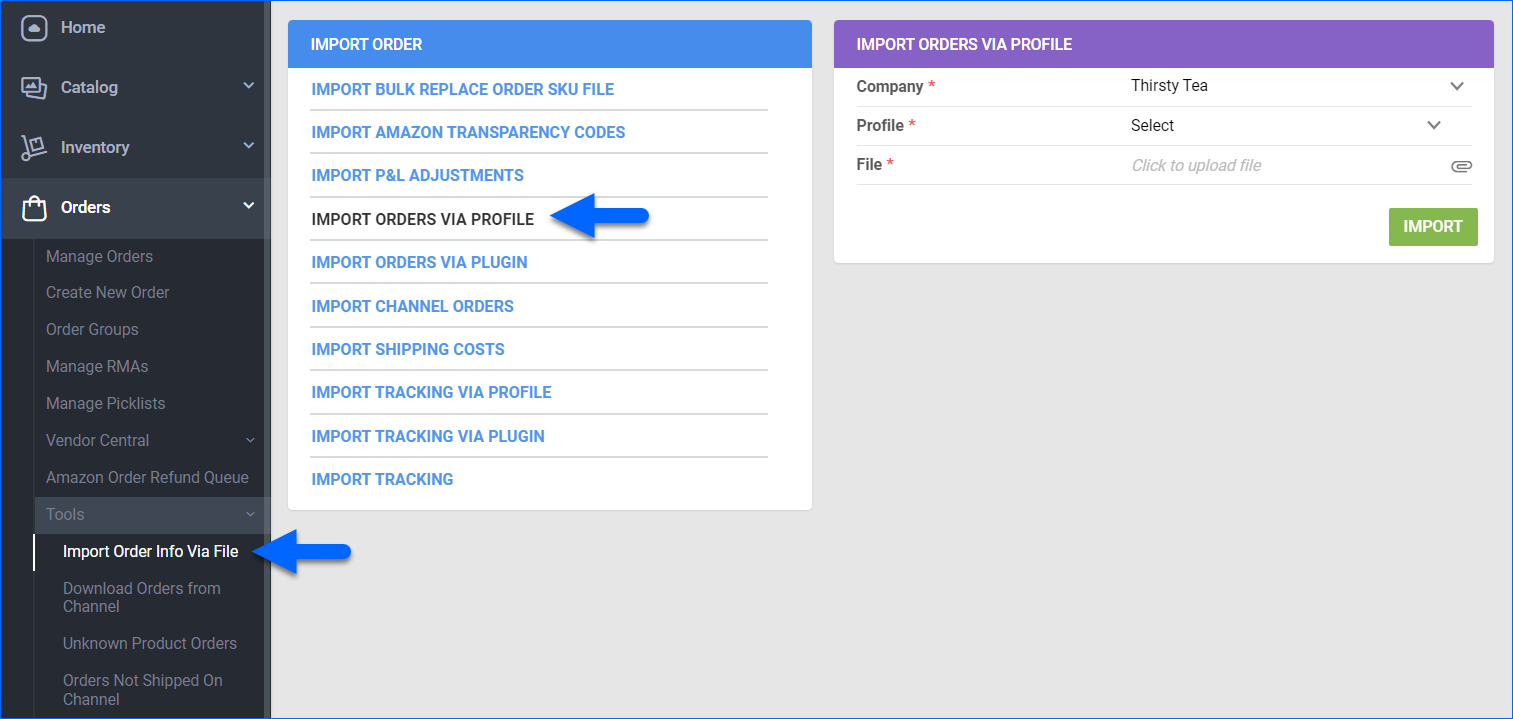
- Go to Orders > Tools > Import Order Info Via File.
- Select Import Orders Via Profile.
- Select the Company where you want to import orders.
- Select your import mapping Profile.
- Select your orders’ File.
- Click Import.
Via Plugin
When setting up Channel Integrations Via Plugins, you usually have an Order Import plugin that automatically downloads orders from EDI, XML, or other files using Scheduled Tasks. However, you can also use Order Import plugins to manually import orders from supported files.
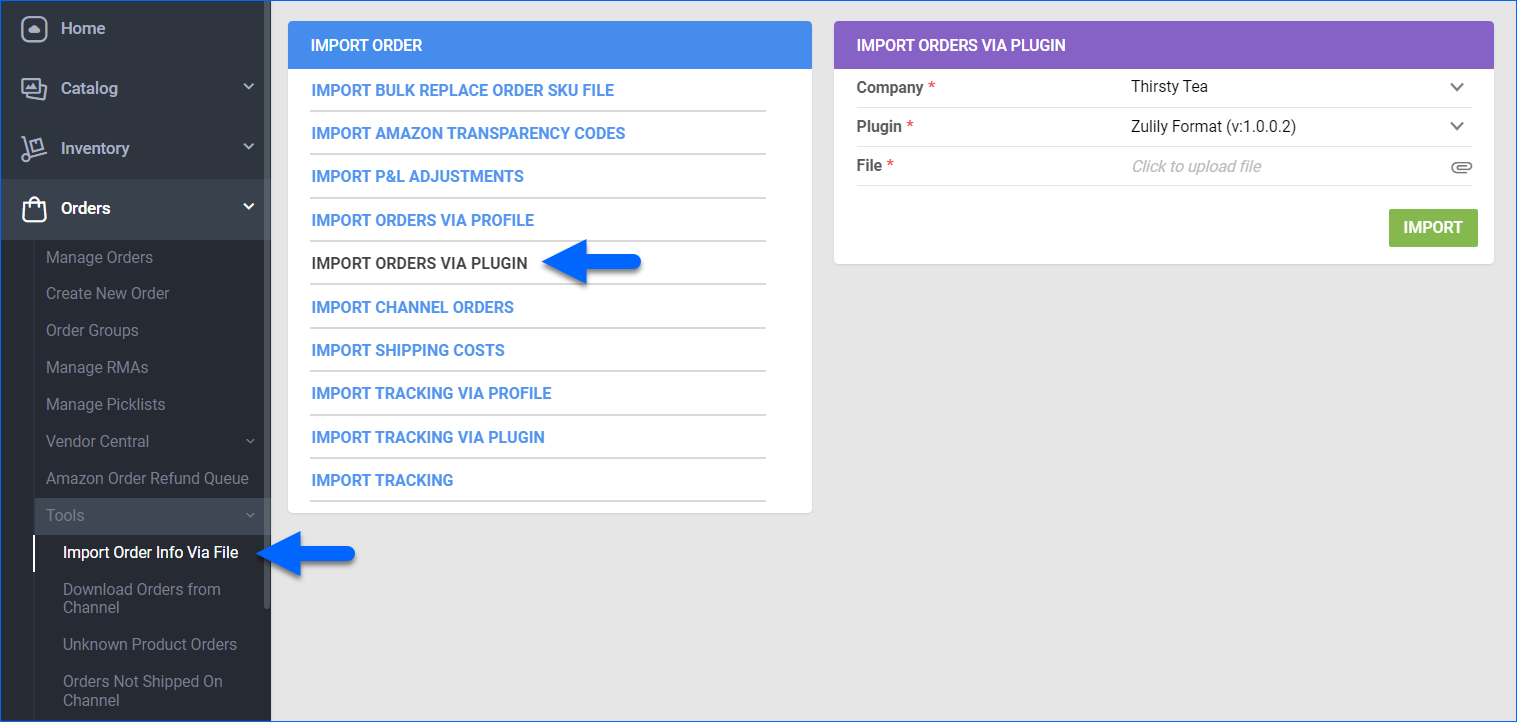
- Go to Orders > Tools > Import Order Info Via File.
- Select Import Orders Via Plugin.
- Select the Company where you want to import orders.
- Select your order import Plugin.
- In the File field, upload a file format that the plugin works with.
- Click Import.
Channel Orders
Since each channel is different, the file templates you can use to upload channel orders include different column headers. In general, you need to download the orders directly from your channel first. Sellercloud also includes downloadable templates for some channels supported by the Import Channel Orders feature.
You can import orders from the following channels:
- 11 Main
- Amazon (Template available)
- ATG Stores
- Bed Bath & Beyond
- Best Buy
- Best Buy DS
- Direct Fulfillment
- Drugstore
- DSW
- FBA
- Finger Hut
- Full Beauty
- Groupon
- Groupon Marketplace
- Hayneedle
- Home Depot
- HSN
- KMart
- Kohls
- Meijer
- NewEgg (Template available)
- NewEgg Business
- NewEgg Mall
- Overstock (Template available)
- Price Falls
- Sears (Template available)
- Sears Vendor
- ShopHQ
- Smart Bargains
- Sonsi
- SP Richards
- Staples
- Target
- uBid
- Unbeatable Sale (Template available)
- Vendor Central (Template available)
- Walmart
- Walmart Fulfillment Services
- Walmart Marketplace (Template available)
- Wayfair (Template available)
- Wholesale (Template available)
- Yahoo
To import channel orders:
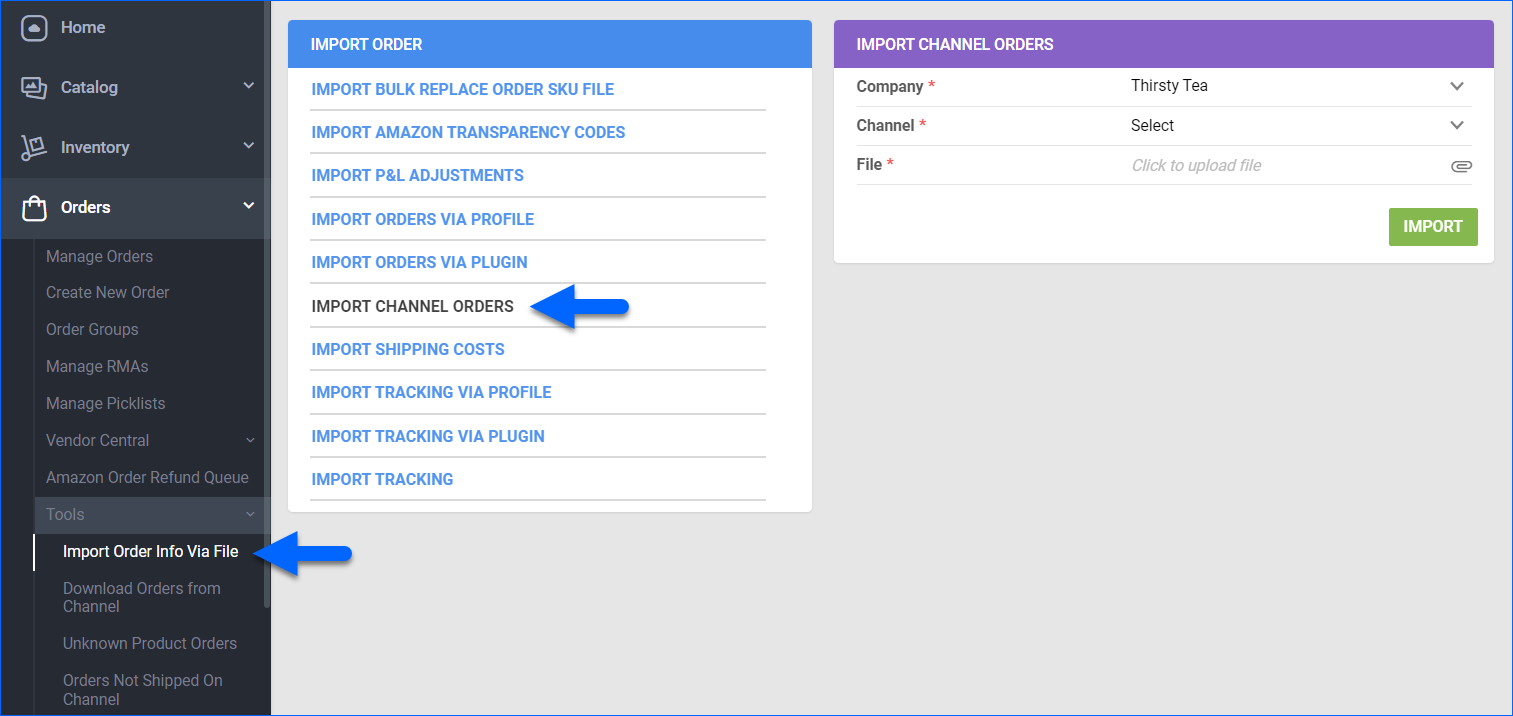
- Go to Orders > Tools > Import Order Info Via File.
- Select Import Channel Orders.
- Select a Company.
- Select a Channel.
- If there’s a template available for your channel, you can click the Download Template icon and populate the fields in the file.
- Click File and select your orders’ file.
- Click Import.
Wholesale Orders
To import wholesale orders:
- Go to Orders > Tools > Import Order Info Via File.
- Select Import Channel Orders.
- Select a Company.
- Set the Channel to Wholesale.
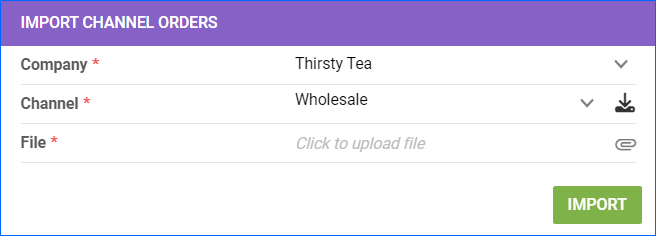
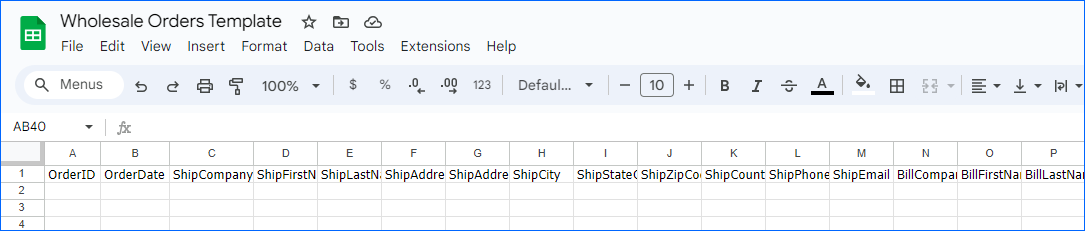
- Click the Download Template icon and populate the fields in the file. You don’t need to populate all the fields in the template, but be sure not to remove any column headers. Check below for more information about the template.
- Click File and select your order file.
- Click Import.
Here are some important details about the column headers in the order import template:
- The OrderID header is for the Channel Order #. The system will automatically assign a Sellercloud Order ID upon import.
- The orders will be imported with their Payment Status set to Charged.
- If you don’t enter the price of the product being ordered, the plugin will pull the Site Price from that product in Sellercloud. If the Site Price is 0, the order will come in with No Payment.
- You can enter 1 or TRUE under the RushOrder column to mark an order as Rush.
- ShipFromWarehouseName should be the warehouse from which you want to deduct inventory.
- If you don’t enter a ProductDescription, the product name comes from the ordered SKU.
- If you don’t enter a ShipToEmail, Sellercloud automatically generates an email following the [email protected] format.
- If you decide to enter them, ShippingCarrierRequested and ShippingMethodRequested must be filled out exactly as spelled on the dropdowns on the Ship Items page accessible from the Action menu on each order.
Import Shipping Costs
Shipping rates quoted by your carrier are estimates based on your supplied information. Other shipping charges may apply, and your final Shipping Cost may differ from the estimate, which will cause discrepancies in your orders’ Profit and Loss.
Sellercloud allows you to correct such discrepancies by manually importing order shipping costs in bulk.
See Import Order Shipping Cost for more information on this topic.
Import Tracking
When dropshipping, vendors often send tracking information in a file. Sellercloud provides a template you can use to import tracking information, such as the shipping date, carrier name, shipping method and cost, and more.
Note that the tracking information will be imported to the customer order, not the auto-generated PO enabled by the dropshipped request. It will be uploaded to the channel with the next automatic feed.
See Tracking Import for Orders and POs for more information on this topic.
Import Other Order Information
Other than orders, tracking, and shipping costs, Sellercloud also allows you to replace order SKUs and import Amazon transparency codes or P&L adjustments in bulk. Refer to the lists below for descriptions of the column headers you must fill out in each spreadsheet template.
Import Bulk Replace Order SKUs File – Replace any products on order in bulk.
- OrderID (required) – The Sellercloud order ID, commonly found on the Manage Orders Page or the Order Details Page.
- OrderItemID (required) – The unique order-specific line item ID of the original SKU on the order.
- OriginalSKU (required) – The order item SKU that is currently on the order.
- NewSKU (required) – The new SKU that will replace the current SKU.
- ShipFromWarehouseName (required) – The Ship From warehouse.
Import Amazon Transparency Codes – Import Amazon Transparency Codes used to identify individual product units and verify authenticity.
- OrderID (required) – The Sellercloud order ID, commonly found on the Manage Orders Page or the Order Details Page.
- ProductID (required) – The unique Sellercloud SKU of a product on the order.
- TransparencyCode (required) – The Amazon transparency code.
- Qty (required) – The number of product units on order.
Import P&L Adjustments – Manually adjust your Orders’ P&L in bulk.
- Order # – The Sellercloud order ID, commonly found on the Manage Orders Page or the Order Details Page.
- Order Item # – A reference number for individual items within the order.
- SKU – The unique Sellercloud SKU of a product on the order.
- Amount – The numerical value representing the adjustment amount.
- Reason – The explanation or rationale for the P&L adjustment.
- Adjustment Type – The type of adjustment being made (e.g., refund, fee adjustment).
- Adjustment # – A specific reference identifier for the adjustment.
- Channel Order # – The order number as recognized by the sales channel or platform.
- Channel Name – The name of the sales channel or platform where the order originated.
- _ACTION_ – Use this column to specify the action to be taken with the adjustment.
Overview
With Sellercloud, you can import orders automatically from most popular marketplaces and shopping carts. However, sometimes, you may have to import orders manually. For example, you may have to import orders or specific order-related information from marketplaces that are not integrated with Sellercloud or from an external database. Wholesale orders can be imported as well. You can do this using Sellercloud’s Order Import tool.
The instructions below detail how to use the standard Sellercloud import format. However, you can import a file that is formatted differently by using the Order Import Mapping Tool.
- Go to Orders > Import Orders.
- Select a Company.
- Click Channel > Website.
- Select General Format from the Cart Type. Use this template even when importing wholesale orders.
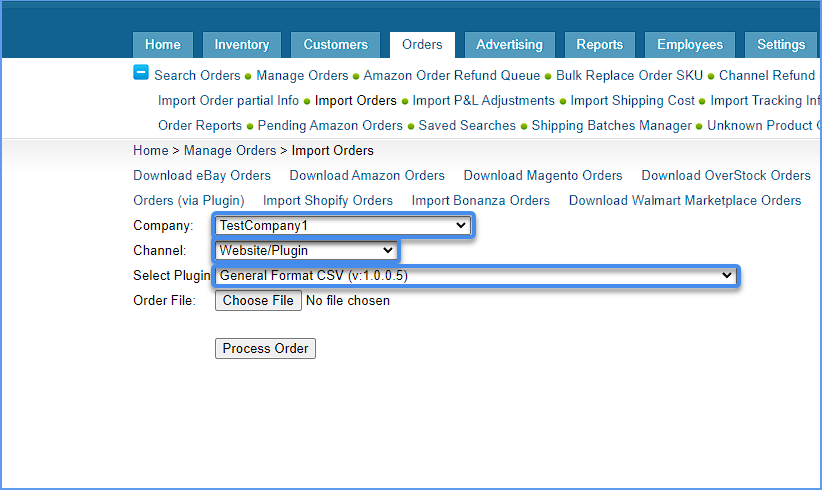
- Download Sample. Always use this exact template and always use an xls or xlsx format.
Populate required fields:- OrderID— This ID will import as the OrderSourceOrderID. The system will assign a
- Sellercloud order ID.
- OrderDate
- ShipFirstName
- ShipLastName
- ShipCity
- ShipStateCode
- ShipZipCode
- ProductID
- QtyPurchased
- For multi-item orders, every line item should be inserted onto a separate row with all the required columns filled out on each respective row.
- Save File.
- Select Channel > Website. Click Cart Type > General Format.
- Choose the file > Process Order.
You don’t need to populate all of the fields in the template, but be sure not to remove any column headers.
For multi-item orders, every line item should be inserted onto a separate row with all required columns filled out on each respective row. Multi-item orders will be imported as one single order (they will not be split into separate orders).
Here are some important details about the column headers in the order import template:
- The OrderID header is for the Channel Order #. The system will automatically assign a Sellercloud Order ID upon import.
- The orders will be imported with their Payment Status set to Charged.
- If you don’t enter the price of the product being ordered, the plugin will pull the Site Price from that product in Sellercloud. If the Site Price is 0, the order will come in with No Payment.
- You can enter 1 or TRUE under the RushOrder column to mark an order as Rush.
- ShipFromWarehouseName should be the name of the warehouse from which you want to deduct inventory.
- If you don’t enter a ProductDescription, the product name comes from the ordered SKU.
- If you don’t enter a ShipToEmail, Sellercloud automatically generates an email following the [email protected] format.
- If you decide to enter them, ShippingCarrierRequested and ShippingMethodRequested must be filled out exactly as they are spelled on the dropdowns on the Ship Items page accessible from the Action menu on each order.