Overview
In most cases, customer accounts are created automatically when orders are imported from integrated sales channels like Amazon, eBay, Walmart, etc. However, if you’re handling phone and email purchases outside of those platforms, or operating a brick-and-mortar location, creating a dedicated account for each customer helps you store key details such as contact information, addresses, payment terms, pricing agreements, shipping preferences, and more.
Create a Customer Account
There are two types of customer accounts in Sellercloud – Wholesale and Retail. Wholesale Customers usually represent businesses that purchase products in significant quantities, frequently at discounted prices. Retail Customers represent the individual buyers that purchase smaller quantities from your local stores. These accounts allow you to auto-fill customer data when you Create New Orders and maintain complete historical records. You can create customer accounts in one of two ways:
- Create a single customer account
- Import customer accounts in bulk
Individually
To create a single customer account:
- Go to Customers > Manage Customers > Click on the Add icon at the lower-right corner. You can use the default or custom filters from this page to find specific customers.
- Select Retail or Wholesale.
- Select the Company from the dropdown menu and populate the rest of the fields.

- Click Save. You will be redirected to the Customer Details page, where you can Edit or add more information as needed.
In Bulk
Importing customer accounts through a file saves you time by allowing you to upload information in bulk. You can import a list of customers with their addresses, mark customers as wholesale, and more. Simply download a template, populate the fields, and upload it into Sellercloud.
To import customer accounts:
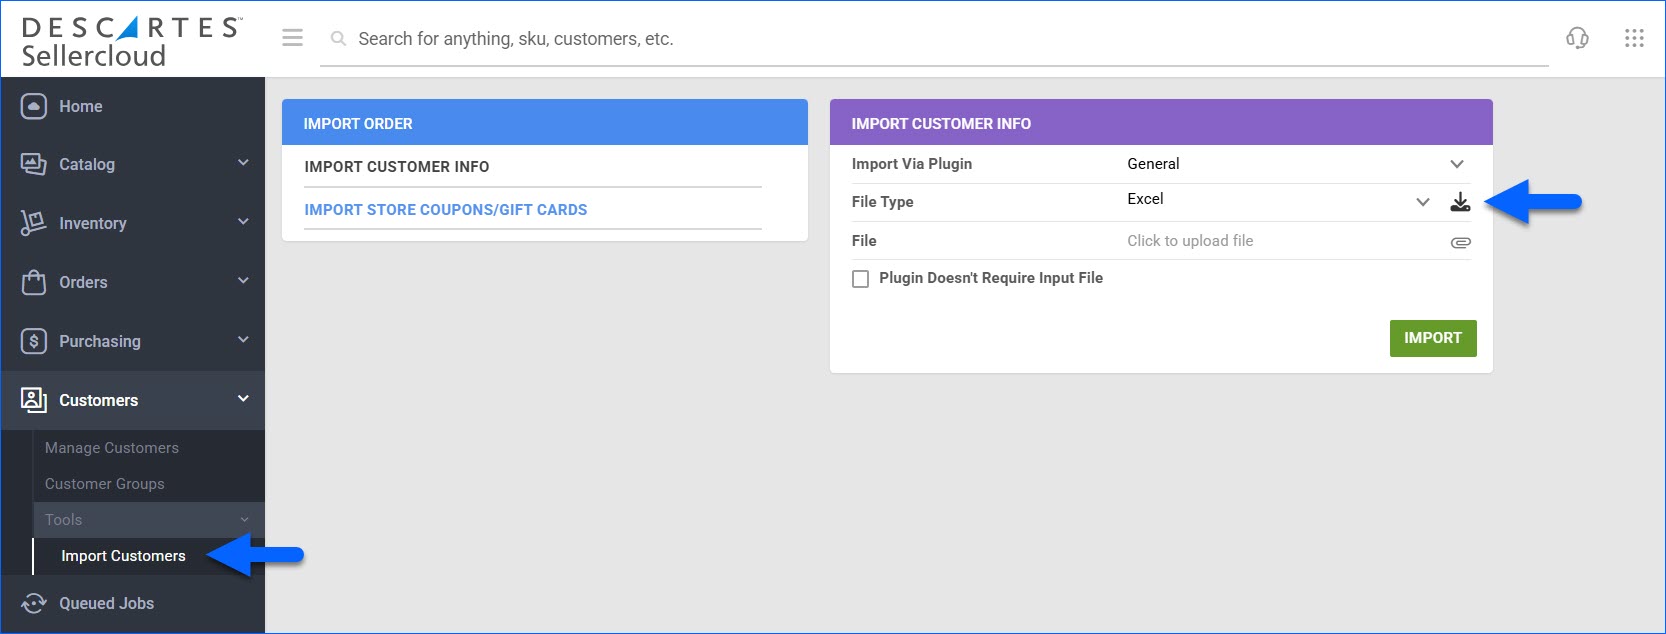
- Go to Customers > Tools > Import Customers.
- Select your preferred File Type and click the Download icon to get a template file.

- Enter the customer information into the template.
- Required for non-wholesale customers: Fill in the customer’s FirstName and LastName.
- Required for wholesale customers: Fill in the customer’s BusinessName.
- Required for all customers: Fill in the customer’s Email.
- To mark a customer as wholesale, enter 1 or True into the IsWholeSale column.
- To mark a customer as tax-exempt, enter True into the TaxExempt column. To mark them as not tax-exempt, enter False.
- To add a customer to a group, enter the appropriate group name into the column UserGroupName.
- To allow unpaid orders to be shipped for that customer, set the AllowShippingUnPaidOrders column to True. This option is set to False by default.
- To remove all old addresses of a customer, enter DeleteAddresses into the Action column. If there are new addresses in the input file, those addresses will be saved.

- Save the file.
- In Sellercloud’s File field, select the file, and click Import.
Manage Customers
You can export customer information, add customers to groups, hide and unhide (using the Include Hidden Customers filter), merge, create, and delete customers. These actions become available when you go to Customers > Manage Customers > Select the IDs > Click on the Action menu at the lower-right corner. You can choose from the following options:
- Export – Download information for the selected customers in your preferred file format (CSV,TAB Delimited, or Excel. You can use the exported file to update customer information as needed.
- Add to Group – Add customers to an existing Customer Group or create a new one to include them in.
- Hide – Hide customer profiles.
- UnHide – Undo the above action. To use it, filter by hidden customers (Include Hidden Customers – Yes) and select which profiles to unhide.
- Merge Customers – Merge multiple customer profiles into one.
- Create Customer… – An alternative option to create a new customer profile.
- Delete – Delete customer profiles. This action is irreversible.
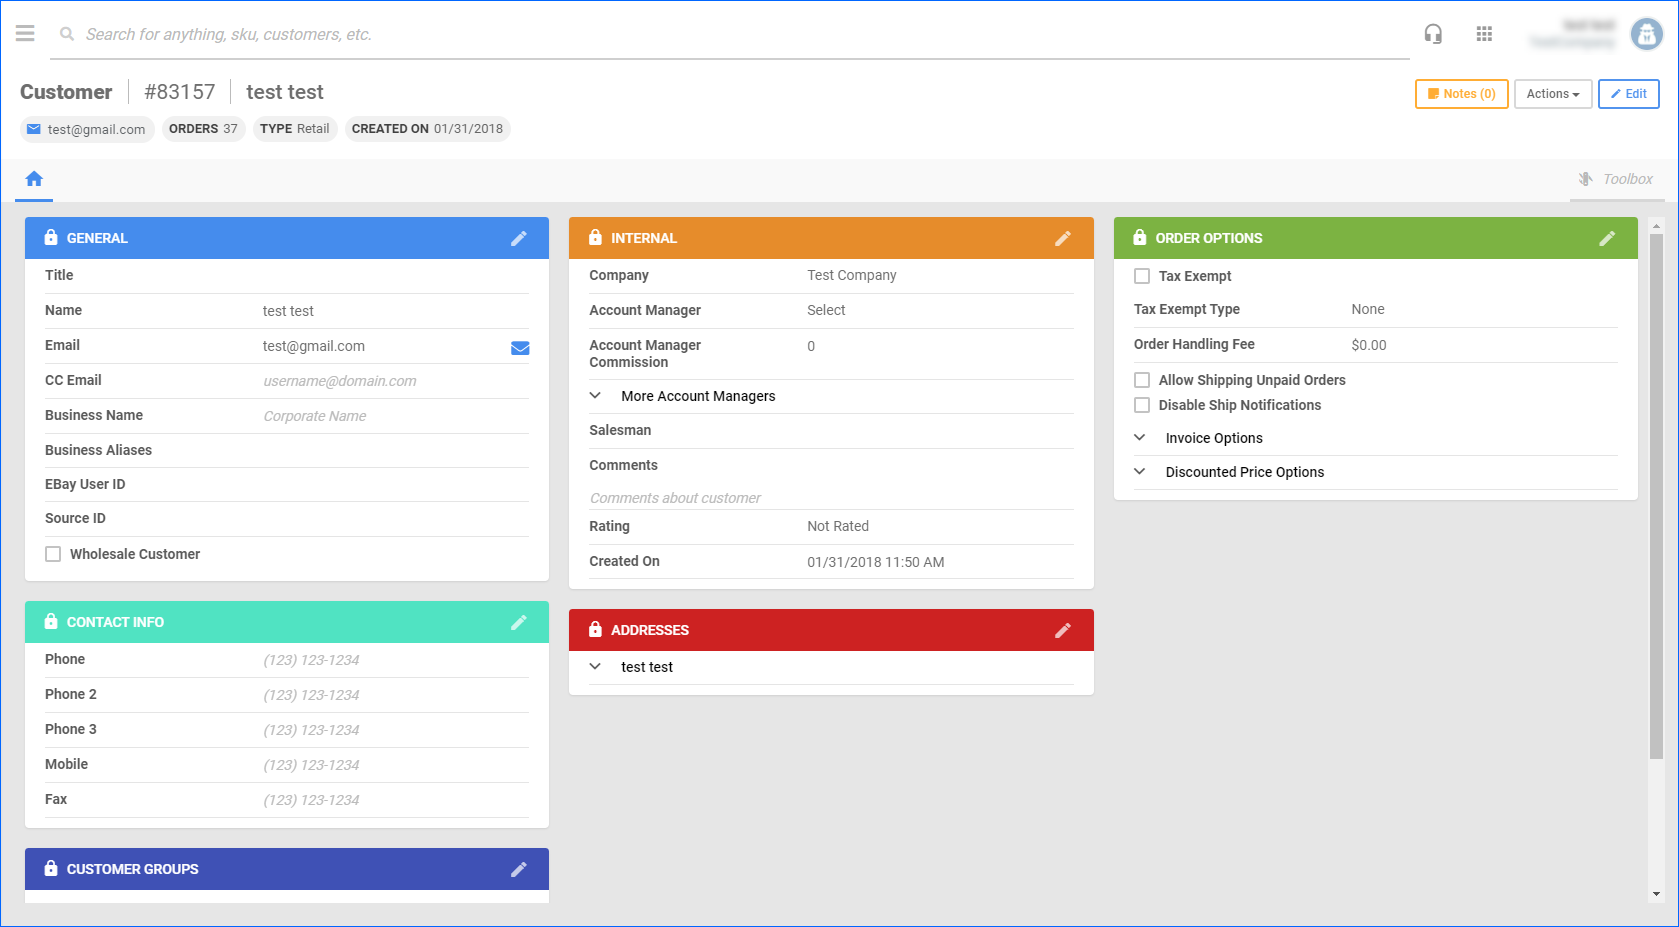
You can also access the Customer Details page by clicking on an ID. The Customer Details page allows you to view and edit individual customer information, such as shipping preferences, contact information, and user groups.
Overview
In most cases, customer accounts are created automatically when orders are imported from integrated sales channels like Amazon, eBay, Walmart, etc. However, if you’re handling phone and email purchases outside of those platforms, or operating a brick-and-mortar location, creating a dedicated account for each customer helps you store key details such as contact information, addresses, payment terms, pricing agreements, shipping preferences, and more.
Create a Customer Account
There are two types of customer accounts in Sellercloud – Wholesale and Retail. Wholesale Customers usually represent businesses that purchase products in significant quantities, frequently at discounted prices. Retail Customers represent the individual buyers that purchase smaller quantities from your local stores. These accounts allow you to auto-fill customer data when you Create New Orders and maintain complete historical records. You can create customer accounts in one of two ways:
- Create a single customer account
- Import customer accounts in bulk
Individually
To create a single customer account:
- Hover over the Customers tab > Click Add New Customer.
- Email, First Name, and Last Name are required fields > Save. You will be redirected to the Customer Details page, where you can edit and add more information as needed.
In Bulk
Importing customer accounts through a file saves you time by allowing you to upload information in bulk. You can import a list of customers with their addresses, mark customers as wholesale, and more. Simply download a template, populate the fields, and upload it into Sellercloud.
To import customer accounts:
- Go to Customers > Import Customers.
- Select a File Type > Click Download Template to download a template file.
- Enter your information into the template.
- Required for non-wholesale customers: Fill in the customer’s FirstName and LastName.
- Required for wholesale customers: Fill in the customer’s BusinessName.
- Required for all customers: Fill in the customer’s email in Email.
- Enter 1 or True into the IsWholeSale column to mark a customer as wholesale.
- Enter True into the TaxExempt column to mark a customer as tax-exempt. Enter False to mark them as not tax-exempt.
- Enter the appropriate group name into the column UserGroupName to add a customer to a group.
- The column AllowShippingUnPaidOrders is set to False by default. If set to True, it will allow unpaid orders to be shipped for that customer.
- To remove all old addresses of a customer, enter DeleteAddresses into the Action column. If there are new addresses in the input file, those addresses will be saved.
- Save the file.
- Click Select File > Select the file > Upload Customers.
Manage Customers and Customers Details
The Manage Customers page lets you manage all your customers. You can perform several actions on this page, such as:
- Add customers to groups
- Export customer information
- Merge customers
- Access the Customer Details page
The Customer Details page lets you view and edit individual customer information, like:
- Shipping preferences
- Contact information
- User groups
To access the Manage Customers page:
- Go to the Customers tab. You can filter your search here to find specific customers. Show me a sample page.
- From this page, you can check customers and navigate to the Action menu to perform individual or bulk actions.
To access the Customer Details page:
- From the Manage Customers page, you can click Edit to edit a customer’s information. You will be redirected to the Customer Details page. Show me a sample page.


