Overview
The Import Mapping Tool is a helpful feature that lets you import information into Sellercloud from files (Excel, CSV, or Tab Delimited) with columns that are not the same as the standard Sellercloud fields. This way, external information can be brought into Sellercloud without the need to manually reformat the data.
To export data instead, refer to our Export Mapping Tool.
Access Import Mapping Tool
You can easily access the Import Mapping Tool from your Settings > Mapping Tools > Manage Import Mapping Profiles.
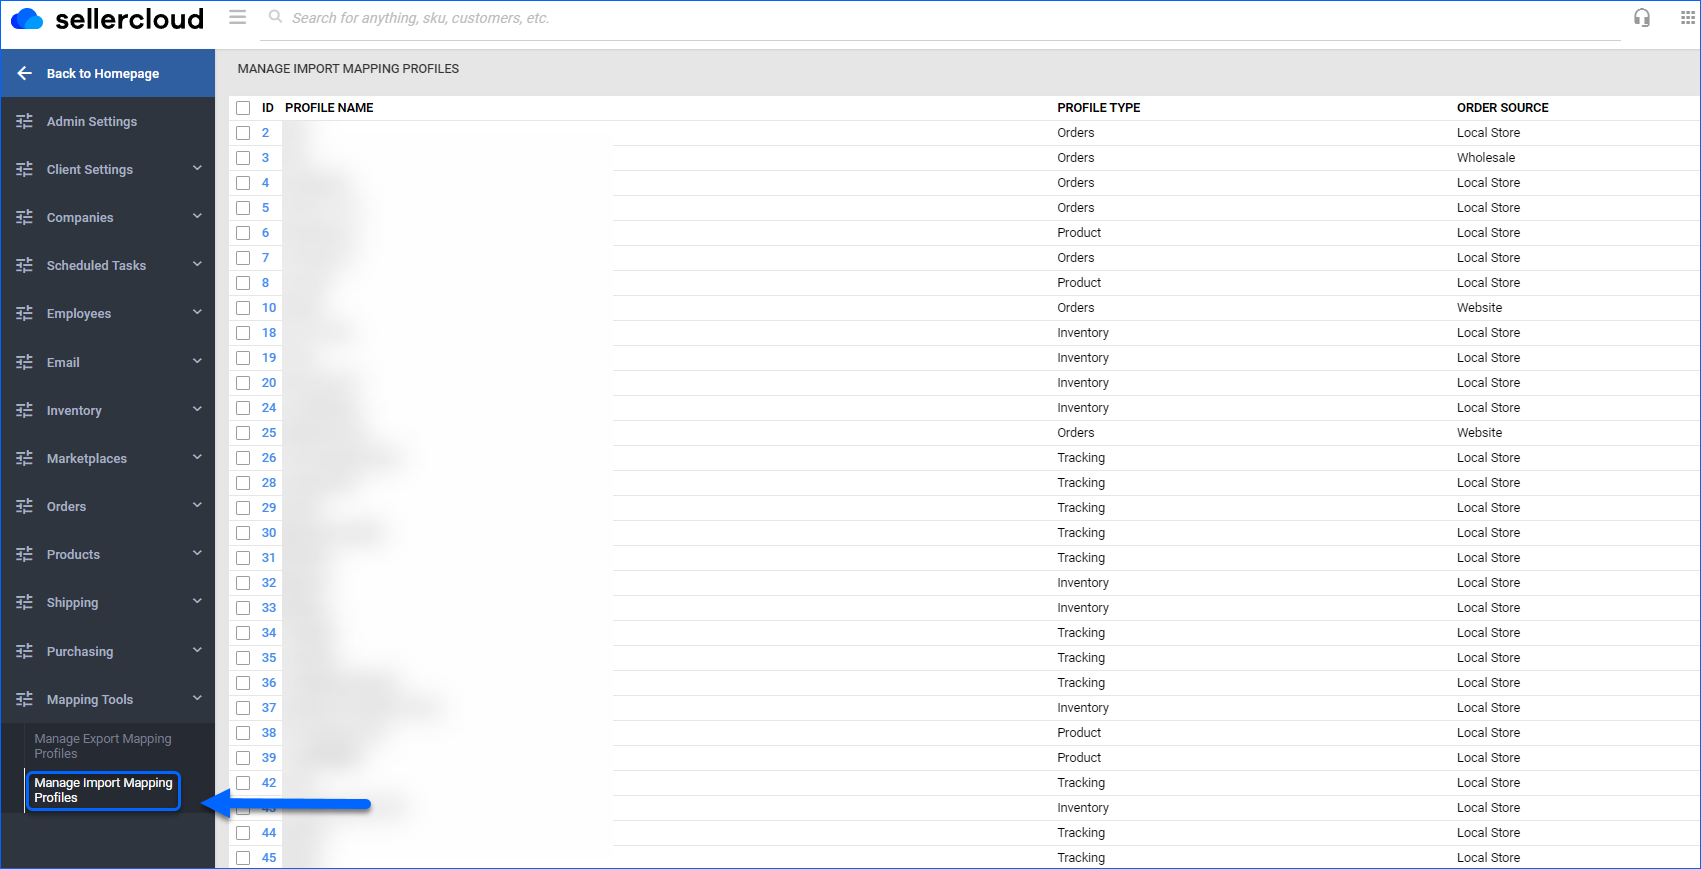
From the Import Mapping Tool Page, you can perform a variety of actions:
- Create – To create a new Import Mapping Profile.
- Upload – To upload a profile. Go to the Action icon > Drag and drop a file, or click to select your file > Upload.
- Download Template – Go to the Action icon > Click Upload > Click Download Template.
- Export – To export an existing profile. Select the profile you want to export > Go to the Action icon > Select Export.
- Delete – To delete an existing profile. Select the profile you want to delete > Go to the Action icon > Select Delete > Confirm you want to delete by clicking Continue.
- Clone – To clone a profile. Select the profile you want to clone > Go to the Action icon > Select Clone > Enter New Profile Name > Save.
Create a Mapping Profile
Mapping Profiles help Sellercloud understand the data you are importing. You can create multiple Mapping Profiles based on your company’s requirements:
- Orders Profile
- Tracking Profile
- Product Profile
- Inventory Profile
- Warehouse Inventory Profile
- Vendor Product Profile
- Customer Profile
After you create a new profile, you go to the Mapping Profile Details Page to map your columns.
Order Profiles
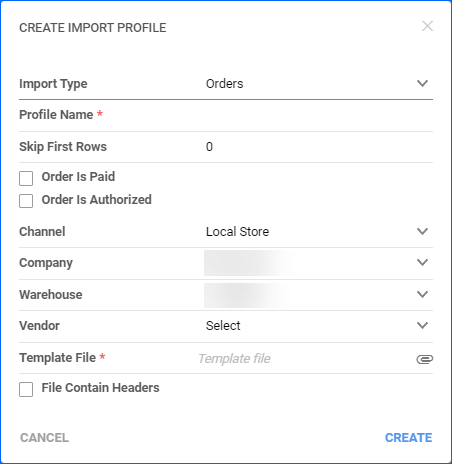
An Orders Profile lets you import Order new orders into Sellercloud. To create an Orders Profile:
- Go to Settings > Mapping Tools > Manage Import Mapping Profiles > Go to the Action icon > Click Create.
- Select Orders from the Import Type dropdown menu.
- Enter Profile Name.
- If initial rows from your file should be skipped, enter their amount in the Skip First Rows field.
- If applicable, check:
- Order is Paid – the imported orders will have Payment Status: Charged.
- Order is Authorized – in case a credit card was authorized, but the payment hasn’t been captured. The Orders imported will have Payment Status: Authorized.
- Select a Channel for the orders imported under the profile – Local Store, Website, or Wholesale.
- Select Company.
- Choose Warehouse from the dropdown menu – the Warehouse that these orders should ship from.
- Leave the Vendor dropdown blank to affect all applicable vendors. Specify Vendor to limit profile’s functionality.
- Select your Template File.
- If applicable, check File Contains Headers.
- Click Create. The page will automatically refresh to your new Mapping Profile Details Page, where you can map your columns.
Tracking Profiles
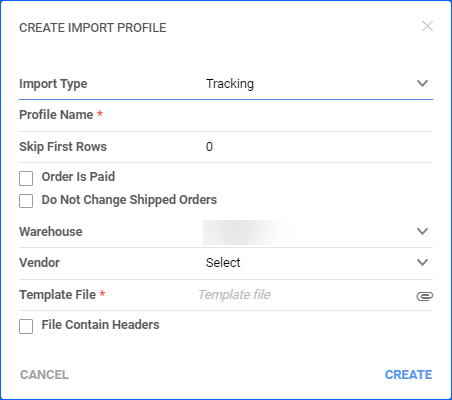
A Tracking Profile lets you import an order tracking information into Sellercloud. To create a Tracking Profile:
- Go to Settings > Mapping Tools > Manage Import Mapping Profiles > Go to the Action icon > Click Create.
- Select Tracking from the Import Type dropdown menu.
- Enter Profile Name.
- If initial rows from your file should be skipped, enter their amount in the Skip First Rows field.
- If applicable, check:
- Order is Paid
- Do Not Change Shipped Orders
- Select your Warehouse and Vendor.
- Upload your Template File.
- If applicable, check File Contain Headers.
- Click Create. The page will automatically refresh to your new Mapping Profile Details Page, where you can map your columns.
Product Profiles
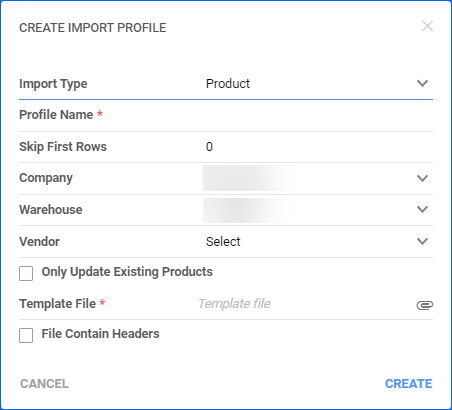
A Product Profile lets you create new products and update existing product information. To create a Product Profile:
- Go to Settings > Mapping Tools > Manage Import Mapping Profiles > Go to the Action icon > Click Create.
- Select Product from the Import Type dropdown menu.
- Enter Profile Name.
- If initial rows from your file should be skipped, enter their amount in the Skip First Rows field.
- Select Company, Warehouse, and Vendor.
- If applicable, check Only Update Existing Products to prevent the Profile to create new SKUs.
- Upload your Template File.
- If applicable, check File Contain Headers.
- Click Create. The page will automatically refresh to your new Mapping Profile Details Page, where you can map your columns.
Inventory Profiles
By default, Inventory imports work with inventory ranges. This means that an import with an Inventory Profile will set the Inventory to the lowest value within the range. This feature can be used as a Safety Quantity setup to avoid potential overselling.
- For Example: If the range is 10-20 and the product’s inventory on file is 17, then the quantity will be set to 10.
Refer to the following table for inventory import ranges and corresponding buckets:
| Range | Imported Value |
| 0 – 4 | 0 |
| 5 – 9 | 5 |
| 10 – 19 | 10 |
| 20 – 29 | 20 |
| 30 – 39 | 30 |
| 40 – 49 | 40 |
| 50 – 74 | 50 |
| 75 – 99 | 75 |
| 100 – 149 | 100 |
| 150 – 199 | 150 |
| 200 – 249 | 200 |
| 250 – 499 | 250 |
| 500 – 999 | 500 |
| >999 | 1000 |
To update the exact quantity, follow the instructions outlined in step 10 below.
Inventory Profiles let you import files to update inventory quantities of products in the Warehouse you select. With this mapping tool, you can update the following Product’ attributes:
- Physical Inventory Qty
- Vendor SKU
- Site Cost
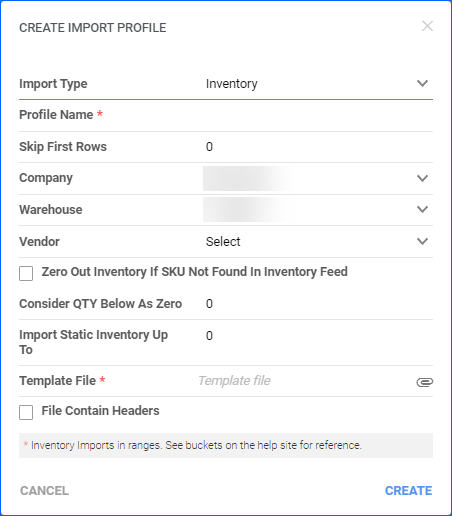
To create an Inventory Profile:
- Go to Settings > Mapping Tools > Manage Import Mapping Profiles > Go to the Action icon > Click Create.
- Select Inventory from the Import Type dropdown menu.
- Enter Profile Name.
- If initial rows from your file should be skipped, enter the number in the Skip First Rows field.
- Select Company.
- Select the Warehouse that your inventory will go under for the whole profile.
- Select Vendor.
- If applicable, check Zero Out Inventory If SKU Not Found In Inventory Feed – if a SKU is not in the imported file, then that SKU’s inventory will be set to zero for the selected Warehouse.
This option only applies to SKUs associated with the selected Vendor.
- If applicable, enter Consider Qty below as Zero – all products with quantity below the specified amount will be considered as zero quantity. For example, if you set this value to 10, then all inventory values below 10 will be considered 0.
- Enter data into Import Static Inventory Up To, if required – this feature imports static inventory up to a certain value with exact quantities entered in the file and then continues with ranges for inventory over this value.
- Example: If the static inventory up to is 50, then all inventory up to 50 will be imported as entered in the file. Then, from 50 above, it will look at the default range.
- Upload your Template File.
- If applicable, check File Contain Headers.
- Click Create. The page will automatically refresh to your new Mapping Profile Details Page, where you can map your columns.
Warehouse Inventory Profiles
A Warehouse Inventory Profile allows you to assign a Warehouse per Product and update multiple inventories of multiple warehouses. With this profile, you can update the following product attributes:
- Physical Inventory Qty
- Vendor SKU
- Site Cost
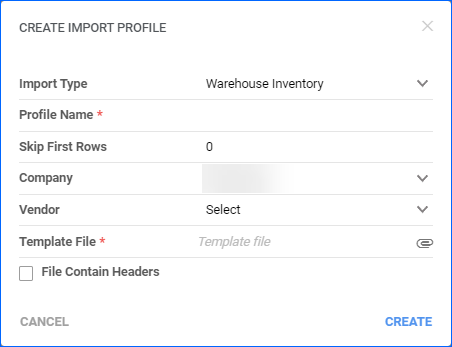
To create a Warehouse Inventory Profile:
- Go to Settings > Mapping Tools > Manage Import Mapping Profiles > Go to the Action icon > Click Create.
- Select Warehouse Inventory as the Import Type.
- Enter Profile Name.
- If initial rows from your file should be skipped, enter their amount in the Skip First Rows field.
- Select the Company for which the profile will be used.
- Select Vendor.
- Upload your Template File.
- If applicable, check File Contain Headers.
- Click Create. The page will automatically refresh to your new Mapping Profile Details Page, where you can map your columns.
Vendor Product Profile
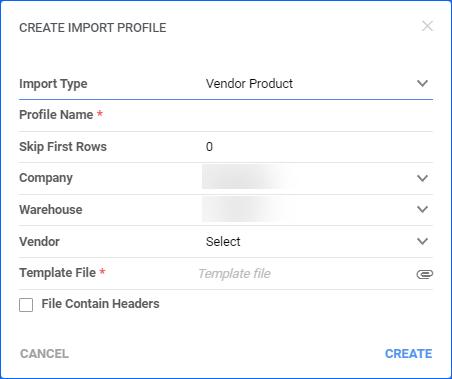
A Vendor Product Profile lets you update product information for a particular vendor. To create a Vendor Product Profile:
- Go to Settings > Mapping Tools > Manage Import Mapping Profiles > Go to the Action icon > Click Create.
- Select Vendor Product as the Import Type.
- Enter Profile Name.
- If initial rows from your file should be skipped, enter their amount in the Skip First Rows field.
- Select Company, Warehouse, and Vendor.
- Upload your Template File.
- If applicable, check File Contain Headers.
- Click Create. The page will automatically refresh to your new Mapping Profile Details Page, where you can map your columns.
Customer Profiles
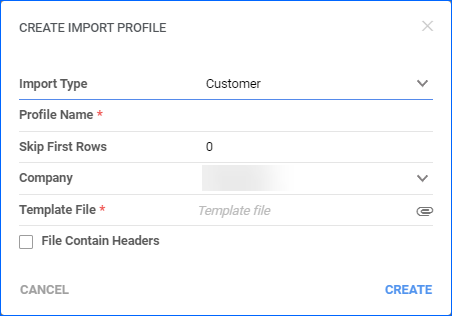
To create a Customer Profile:
- Go to Settings > Mapping Tools > Manage Import Mapping Profiles > Go to the Action icon > Click Create.
- Select Customer from the Import Type dropdown menu.
- Enter Profile Name.
- If initial rows from your file should be skipped, enter their amount in the Skip First Rows field.
- Select Company from the dropdown menu.
- Upload your Template File.
- If applicable, check File Contain Headers.
- Click Create. The page will automatically refresh to your new Mapping Profile Details Page, where you can map your columns.
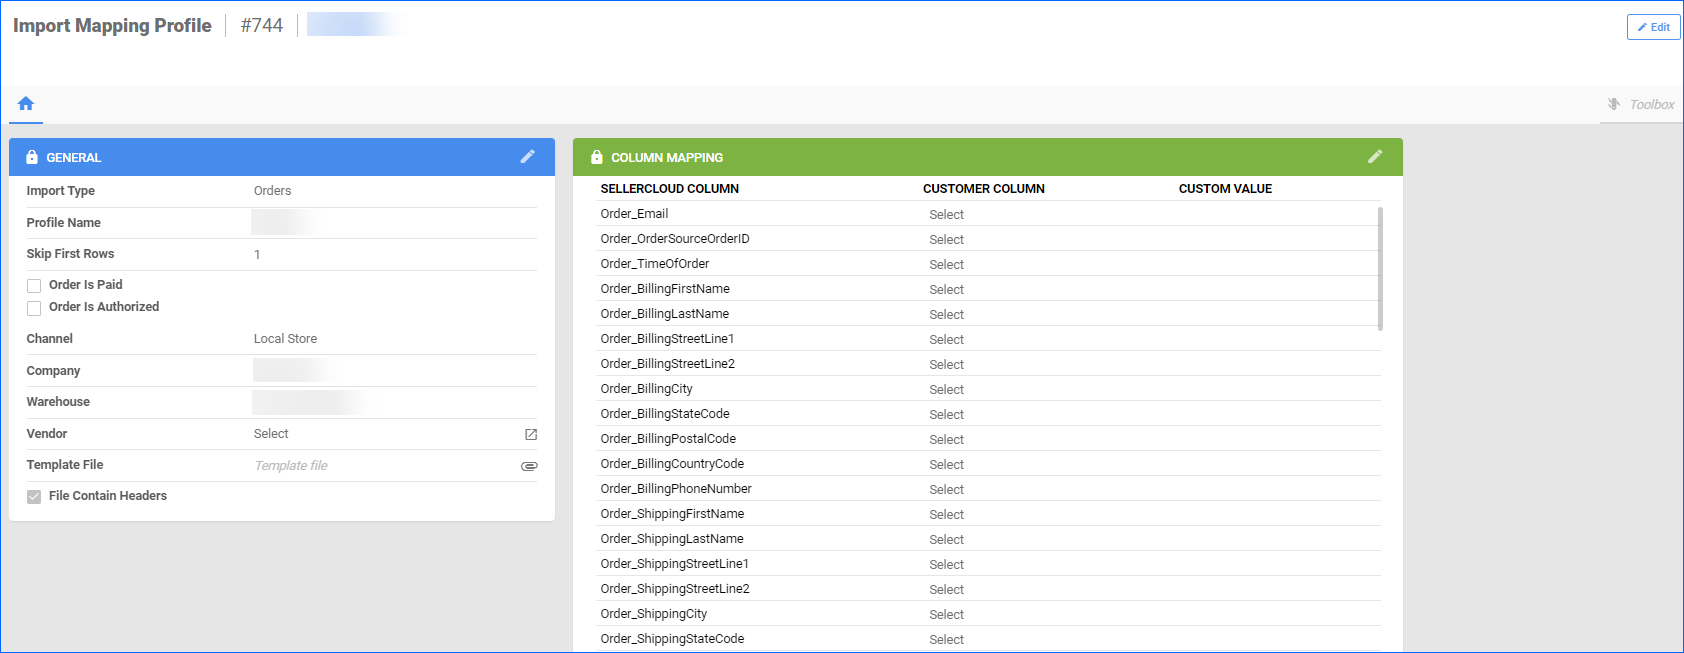
Map Profile Details
Once you create a profile, a Mapping Profile Details Page will be automatically generated. This page lets you view information and perform actions related to a specific profile. Some actions and information on the Mapping Profile Details Page overlap, but there are a few differences between the profile types.
To access the Mapping Profile Details Page:
- Go to Settings > Mapping Tools > Manage Import Mapping Profiles.
- Search for your profile > Click Profile ID.
On certain Mapping Profile Details Pages, you can also edit and view Shipping Method Mapping from your Toolbox.
Columns Mapping
The Mapping Profile Details Page is where you can map your columns. To map columns means to select the headers from your file and appoint them to Sellercloud fields based on your created Import Mapping Profile.
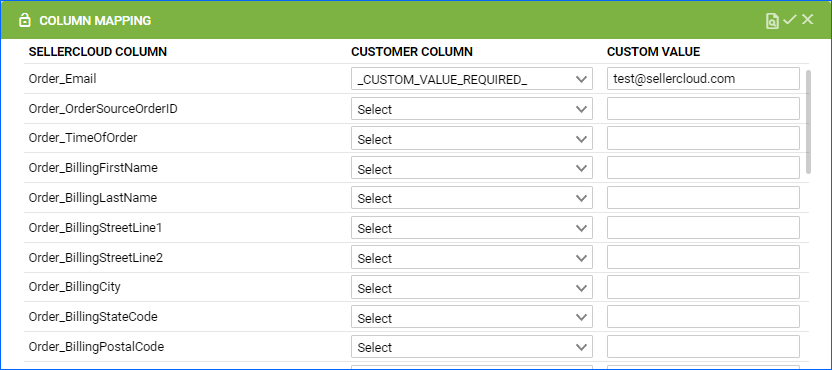
When you access the Mapping Profile Details Page, you will see three columns:
- Sellercloud Column – The column in Sellercloud.
- Customer Column – The column headers from your file.
- Custom Value: If you want a static value to be imported for one of the fields (for example, the Order_Email should always be the same here), choose _CUSTOM_VALUE_REQUIRED_ from the Customer Column dropdown, and then enter your static data into the Custom Value column.
If you are unsure how to map your columns, the below tips may help you:
- To find any Order-Related column, review the Order Change Log. To access your Order Change Log go to Order Details page > Toolbox > Change Log.
- To find any Product-Related column, alter the product information you want to know the column name for and then view the column associated with that change in the Change Log. To access your Product Change Log go to Product Details page > Toolbox > Change Log.
To map your columns:
- Go to the Mapping Profile Details Page > Click Edit.
- Go to the Column Mapping panel > Input your information > Save.
Import Data via a Profile
After you’ve created your profile and mapped your columns, it’s time to use your profile to upload information into Sellercloud. The steps to import information vary depending on the selected profile type.
Import Order Profiles
To import information with an Orders Profile:
- Go to Orders > Tools > Import Order Info.
- Select Import Orders via Profile > Select your Company and your Profile.
- Upload your File.
- Click on Import. A Queued job will be created, and once completed, the intended data will be integrated into Sellercloud.
Import Tracking Profiles
To import information with a Tracking Profile:
- Go to Orders > Tools > Import Order Info.
- Select Import Tracking via Profile > Select your Company and your Profile.
- Upload your File.
- Click on Import. A Queued job will be created, and once completed, the intended data will be integrated into Sellercloud.
Import Product Profiles
To import information using a Product Profile:
- Go to Catalog > Tools > Import Product Info.
- Select Import Info via Plugin/Profile.
- Select your Company and Profile.
- Upload your File.
- Click on Import. A Queued job will be created, and once completed, the intended data will be integrated into Sellercloud.
Import Vendor Product Profiles
To import information using a Vendor Product Profile:
- Go to Purchasing > Tools > Import Purchase Info.
- Select Import Vendor Price.
- Select your Company and Profile.
- Upload your File.
- Click on Import. A Queued job will be created and once completed, the intended data will be integrated into Sellercloud.
Import Inventory and Warehouse Inventory Profiles
To import information using an Inventory or Warehouse Inventory Profile:
- Go to Inventory > Tools > Import Inventory Info.
- Click Import Inventory via Profile.
- Upload your File.
- Select your Profile from the dropdown menu.
- Click on Import. A Queued job will be created, and once completed, the intended data will be integrated into Sellercloud.
Import Customer Profiles
To import information using a Customer Profile:
- Go to Customers > Tools > Import Customers > Import Customer Info.
- Select your profile from the Import Via Plugin dropdown menu.
- Select your File Type – Excel, CSV, or Tab Delimited.
- Upload your File.
- Click on Import. A Queued job will be created, and once completed, the intended data will be integrated into Sellercloud.
Import via Scheduled Tasks
In addition to importing data manually, you can also set up a Scheduled task that imports information via a Mapping Profile. This is particularly useful when you are receiving inventory information from Vendors, importing orders from a marketplace that is not integrated with Sellercloud, or in any other case where the imports need to happen on a regular basis.