Overview
Sellercloud’s Inventory Management Tool lets you set the current physical inventory count for one or multiple products in your warehouses. In contrast to adjusting inventory, where you enter the amount by which your inventory should be changed, this process allows you to set the exact physical inventory count of your products per warehouse.
Set Physical Inventory
Once you have reconfirmed the precise physical inventory count of a product within a warehouse, you can update that in-stock quantity in Sellercloud either manually, or via a file import.
Manually
You have two alternatives to set a product’s inventory count manually:
- Via the Warehouse Inventory tab.
- Via the Physicals tab.
To set the physical inventory of a product:
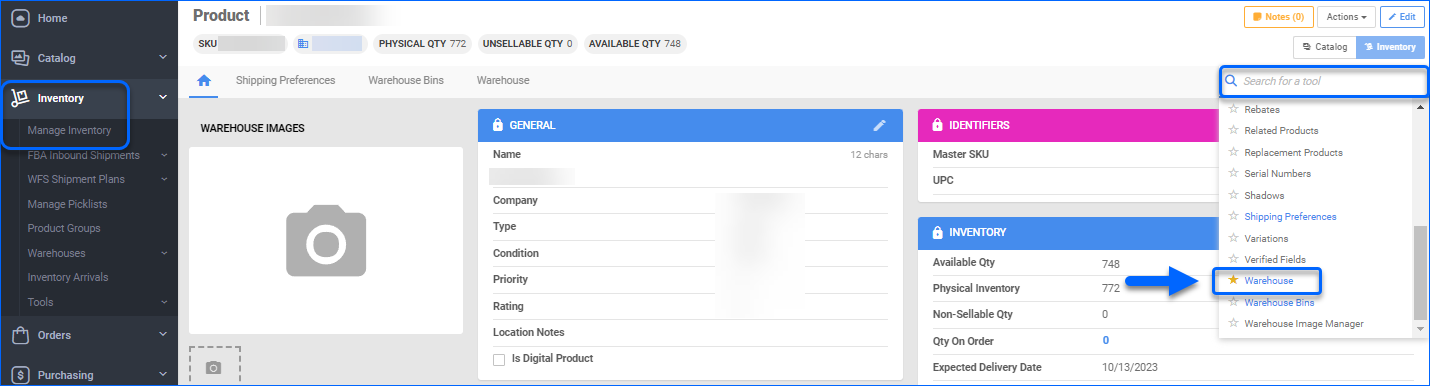
- Navigate to Inventory > Manage Inventory and open the needed product.
- From the Toolbox, choose Warehouse.
- Enter the new inventory count in one of the following ways:
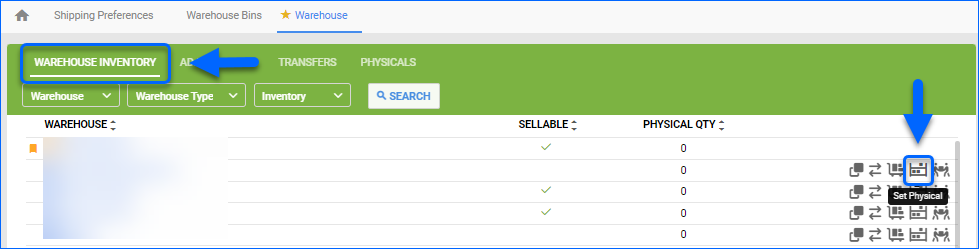
- In the Warehouse Inventory tab, select the Set Physical icon on the right of the desired warehouse.
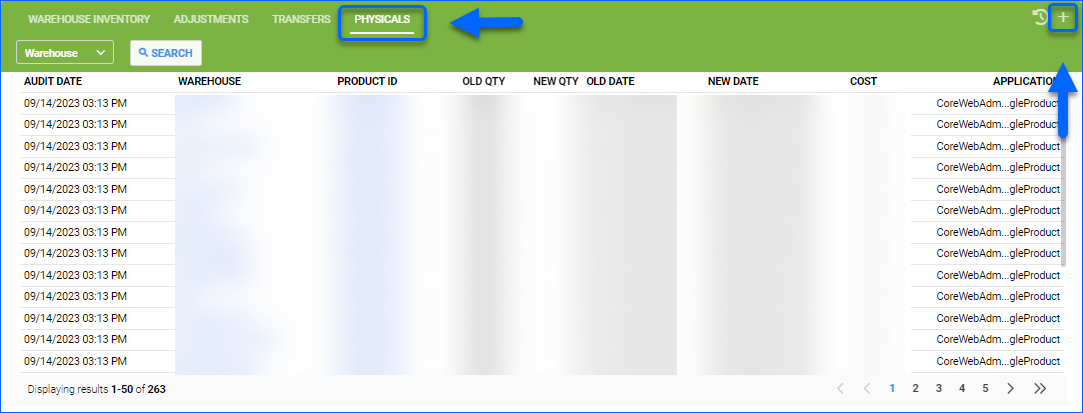
- Alternatively, open the Physicals tab, and click the + icon on the right of the desired warehouse.
- In the Warehouse Inventory tab, select the Set Physical icon on the right of the desired warehouse.
- In the following popup, select the desired Warehouse and specify the Physical Qty.

- Indicate an Inventory Date to record the time of your inventory check. If you wish, add an Inventory Cost associated with the new physical quantity.
- If the updated product is a child SKU, check Merge Warehouse Inventory Into the Parent Sku, so to add the updated physical count to the Parent SKU inventory.
- Click Set.
In Bulk
With Sellercloud’s Physical Inventory Import, you can set the Physical Inventory for multiple products using a file import.
To import physical inventory in bulk:
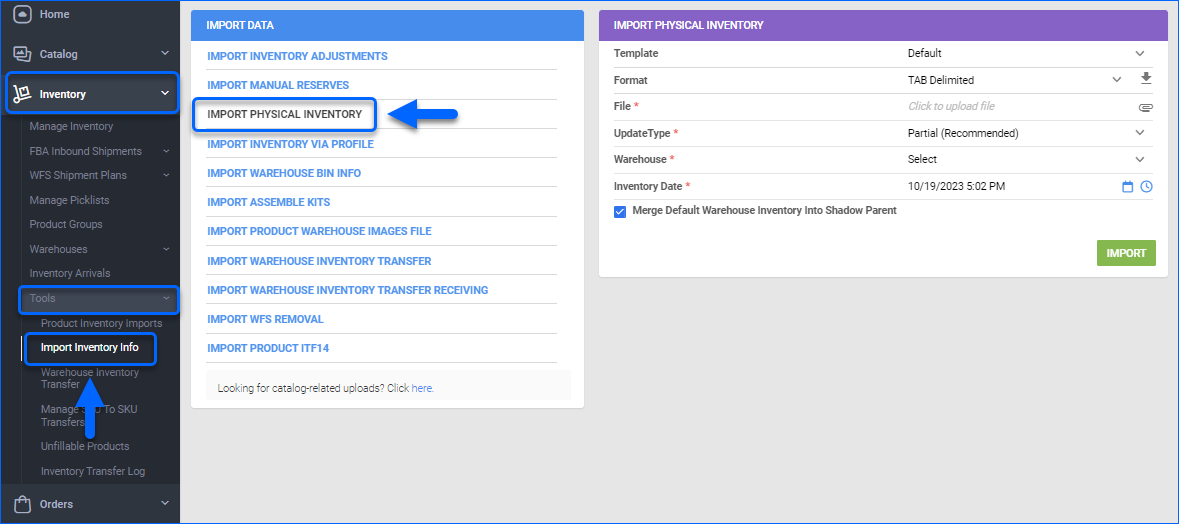
- Navigate to Inventory > Tools > Import Inventory Info.
- Select Import Physical Inventory.
- Choose a Template:
- Default – the template file will only contain the necessary headers. You can fill in the SKUs and warehouses you want to update.
- All products – this template comes prefilled with all your SKUs (one row per warehouse), the last physical inventory date, and inventory of 0.
- All products no shadow/dependent kits – the generated file will contain all your SKUs, excluding Shadow Products and All Components and Main Component Kit Parents.
- All products with inventory – generates the same template as All products, with the Qty column filled in with the current physical inventory for each SKU in all local warehouses.
The maximum number of rows you can have in an Excel spreadsheet is 1,048,576. If the generated template has more rows, it will automatically be convereted to .txt format.
- Select a file Format (either TAB Delimited, CSV, or Excel) and click the Download icon in the Import Physical Inventory panel, to obtain a template file.

- Populate the spreadsheet with the following details:
- ProductID – The product’s SKU.
- Warehouse – The warehouse for which you are setting physical inventory. You can only add one warehouse per row, so you may need to add each SKU multiple times.
- PhysicalInventoryQty – The intended product’s physical inventory count.
- InventoryDate – Record the time when the inventory was last physically checked (format is m.d.yyyy h:mm AM/PM)
- LocationNotes – Add the product’s location details (e.g. aisle 9, top shelf).
- Repeat this process for all the items in the import. Once done, Save the file and return to the Import Physical Inventory panel.
If any of the rows contain a Shadow SKU, you must check the Merge Default Warehouse Inventory Into Shadow Parent box before uploading. - Click the File field and upload the appropriate document from your computer.
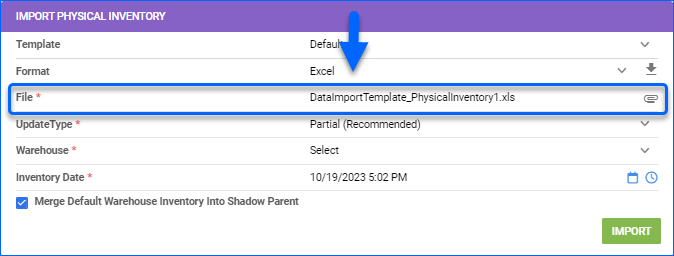
- In the UpdateType field, specify the type of import you want to perform.
Partial import is strongly recommended for enhanced precision in your inventory management, as it exclusively updates specified SKUs in designated warehouses. If you want to completely zero out the inventory of SKUs not present in your import file, use the Full import option.
-
- Partial (Recommended) – We strongly recommend performing a Partial inventory import, because it is the safest option to set inventory counts. Unlike a Full import, the Partial import updates only the quantities of the specific SKUs entered in the file, eliminating any possibility of error.
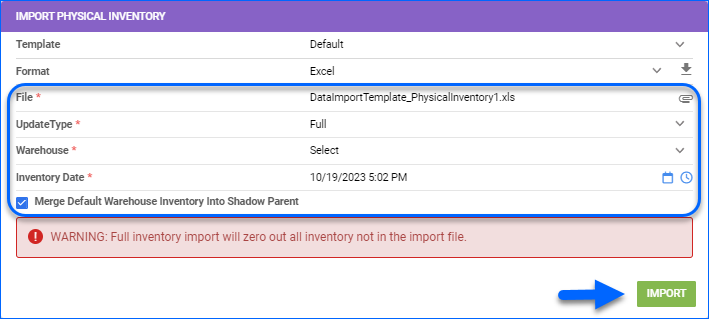
- Full – This update is only done in case you are sure that the new count accurately reflects the complete inventory and you want to zero out any other item that is currently in the system. The Full import sets the inventory count of the SKUs entered in the file to the specified amount, however, SKUs that are not in the file will be automatically zeroed out.
To limit the inventory update to a specific warehouse, Client Setting Enable Warehouse Inventory Import by Warehouse must be enabled. -
- If Client Setting Enable Warehouse Inventory Import by Warehouse is enabled, indicate the affected Warehouse. Make sure the warehouse in your import file matches the selected warehouse from the dropdown, otherwise, the import may result in an error. If you set the physical count of multiple warehouses, select All from the dropdown.
- If the updated product is a child SKU, check Merge Warehouse Inventory Into the Parent Sku, so to add the updated physical count to the Parent SKU inventory.
- Click Import.
A Queued Job will be created, from which you can monitor the status of the import. Once successfully completed, the new physical inventory count is set in the specified warehouse/s.
Automate Inventory Imports
In Sellercloud, you can automate the physical inventory import from an FTP (File Transfer Protocol) using a Scheduled task. This way your import can run on a schedule of your choosing:
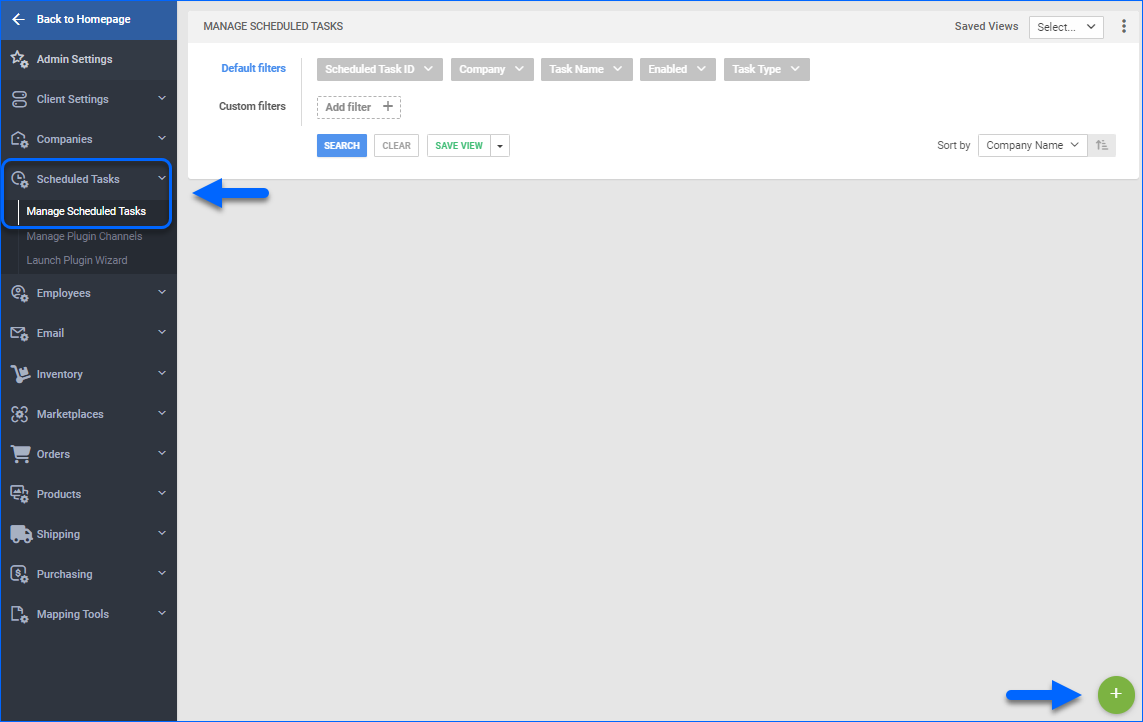
- Navigate to Settings > Scheduled Tasks > Manage Scheduled Tasks.
- Click the plus icon at the lower-right corner to create a new scheduled task.
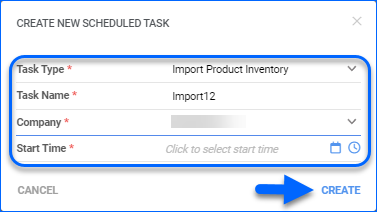
- Set the Task Type as Import Product Inventory and add a Task Name.
- Choose a Company from the dropdown menu.
- Select effective Start Time and click Create.
- Open the scheduled task.
- Click Edit and Enable the task from the toggle in the General panel.
- In the Details panel:
- If the updated product is a child SKU, check Merge Shadow Inventory, so to add the updated physical count to the Parent SKU inventory.
- Select a Plugin. If the file format matches the Sellercloud format, use the Warehouse Inventory Import Format. If the file is formatted differently, a plugin is needed for the scheduled task.
- Check Full Inventory Import, only in case you want to zero out the count of SKUs that are not in the imported file, but are in the same warehouse.
- Select a Warehouse from the dropdown.
- In the Import Options panel, select FTP as a source to Import From, enter the FTP credentials, and configure the rest of the options, as desired.
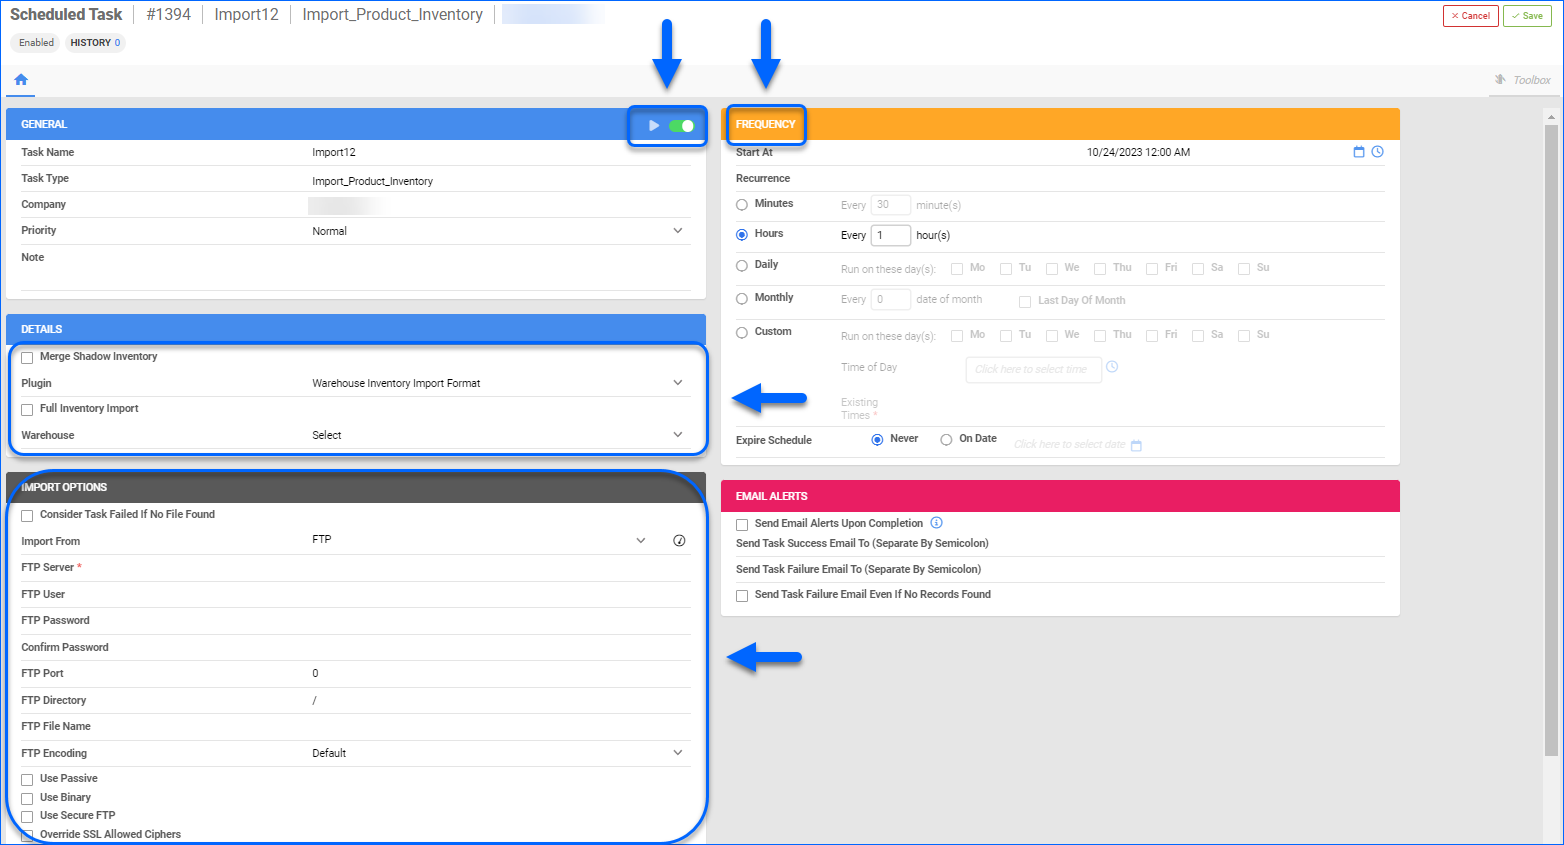
- Select the Frequency of your automated task.
- Save your changes.
Overview
Sellercloud’s Inventory Management Tool lets you set the current physical inventory count for one or multiple products in your warehouses. In contrast to adjusting inventory, where you enter the amount by which your inventory should be changed, this process allows you to set the exact physical inventory count of your products per warehouse.
Set Physical Inventory
Once you have reconfirmed the precise physical inventory count of a product within a warehouse, you can update that in-stock quantity in Sellercloud either manually, or via a file import.
Manually
To set the physical inventory of a product:
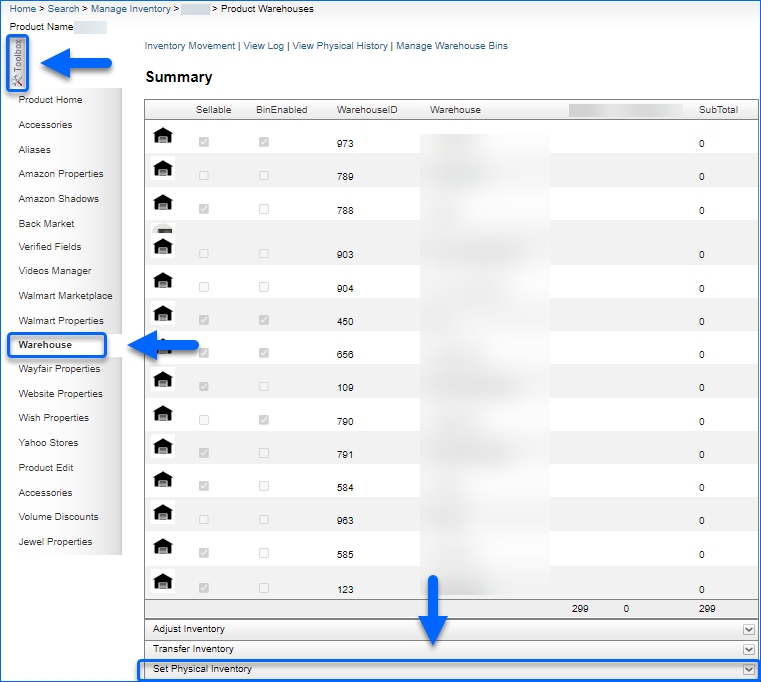
- Navigate to Inventory > Manage Inventory search and open the needed product.
- From the Toolbox, choose Warehouse.
- Scroll down and select Set Physical Inventory.
- Select the desired Warehouse and specify the Physical Qty.

- Indicate an Inventory Date to record the time of your inventory check. If you wish, add an Inventory Cost associated with the new physical quantity.
- If the updated product is a child SKU, check Merge Warehouse Inventory Into The Parent Sku, so to add the updated physical count to the Parent SKU inventory.
- Click Set.
In Bulk
With Sellercloud’s Physical Inventory Import, you can set the Physical Inventory for multiple products using a file import.
To import physical inventory in bulk:
- Navigate to Inventory > Warehouse Inventory Import.
- Select Action from the dropdown menu to download a template file.
- Populate the spreadsheet with the following details:
- ProductID – The product’s SKU.
- Warehouse – The warehouse for which you are setting physical inventory.
- PhysicalInventoryQty – The intended product’s physical inventory count.
- InventoryDate – Record the time when the inventory was last physically checked (format is m.d.yyyy h:mm AM/PM)
- LocationNotes – Add the product’s location details (e.g. aisle 9, top shelf).
- Repeat this process for all the items in the import. Once done, Save the file and return to the import page.
- Click the Choose File button and upload the appropriate document from your computer.
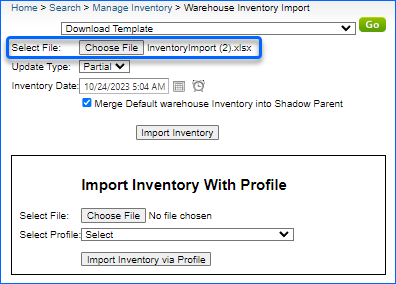
- In the UpdateType field, specify the type of import you want to perform.
Partial import is strongly recommended for enhanced precision in your inventory management, as it exclusively updates specified SKUs in designated warehouses. If you want to completely zero out the inventory of SKUs not present in your import file, use the Full import option.
-
- Partial (Recommended) – We strongly recommend performing a Partial inventory import, because it is the safest option to set inventory counts. Unlike a Full import, the Partial import updates only the quantities of the specific SKUs entered in the file, eliminating any possibility of error.
- Full – This update is only done in case you are sure that the new count accurately reflects the complete inventory and you want to zero out any other item that is currently in the system. The Full import sets the inventory count of the SKUs entered in the file to the specified amount, however, SKUs that are not in the file will be automatically zeroed out.
To limit the inventory update to a specific warehouse, Client Setting Enable Warehouse Inventory Import by Warehouse must be enabled.
-
- If Client Setting Enable Warehouse Inventory Import by Warehouse is enabled, indicate the affected Warehouse. Make sure the warehouse in your import file matches the selected warehouse from the dropdown, otherwise, the import may result in an error. If you set the physical count of multiple warehouses, select ALL from the dropdown.
- If the updated product is a child SKU, check Merge Warehouse Inventory Into the Parent Sku, so to add the updated physical count to the Parent SKU inventory.
- Click Import Inventory.
A Queued Job will be created, from which you can monitor the status of the import. Once successfully completed, the new physical inventory count is set in the specified warehouse/s.
Automate Inventory Imports
In Sellercloud, you can automate the physical inventory import from an FTP (File Transfer Protocol) using a Scheduled task. This way your import can run on a schedule of your choosing:
- Navigate to Settings and select the desired company’s Scheduled Tasks.
- Select Import Product Inventory from the New Task Type dropdown.
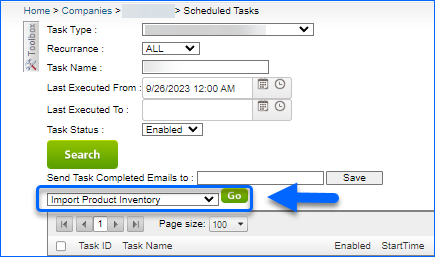
- Check Schedule Enabled and add a Task Name.
- Choose a task Recurrance. If desired, check Enable Email alerts on Complete box and add emails to receive success and failure task notifications.
- If the updated product is a child SKU, check Merge shadow inventory (default import only), so to add the updated physical count to the Parent SKU inventory.
- Keep the Inventory Processor Plugin as Warehouse Inventory Import Format.
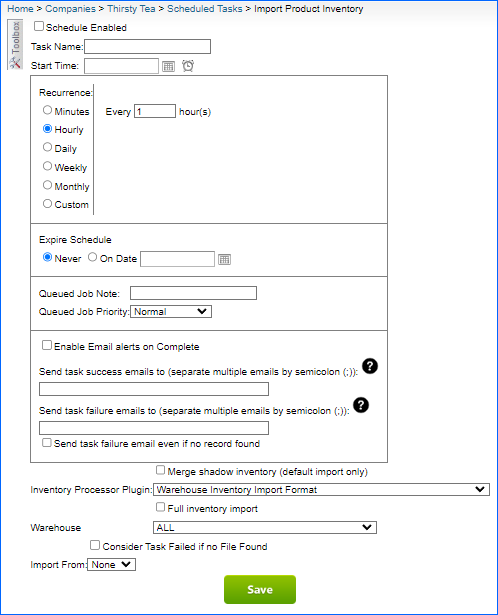
- Check Full inventory import, only in case you want to zero out the count of SKUs that are not in the imported file, but are in the same warehouse. In case of a Full inventory import, select the applicable Warehouse from the dropdown.
- Check Consider Task Failed if no File Found if you wish to mark the task as failed in case of a missing import file.
- Select FTP as a source to Import From, enter the FTP credentials, and configure the rest of the options, as desired.
- Save your changes.