Overview
The Export Mapping Tool is a powerful feature that allows you to export information into a file (Excel, CSV, or Tab Delimited) using customized column headers — different from the standard Sellercloud field names. It works by collecting and organizing preselected data, which can then be exported using a custom template tailored to your specific needs.
To import data instead, refer to our Import Mapping Tool.
Access the Export Mapping Tool
To access the Export Mapping Tool, go to Settings > Mapping Tools > Manage Export Mapping Profiles.

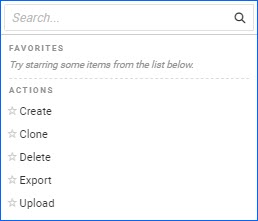
From the Export Mapping Profiles Manage Page, you can perform a few different actions:
- Create – To create a new Export Mapping Profile.
- Delete – permanently deletes the selected profiles.
- Clone – Creates a copy of the selected profile.
- Export – generates and downloads to your device an Excel sheet containing the selected profile’s details, including settings and mapped fields. This can later be used as a template to create a new file via file upload.
- Upload – allows you to create a new profile via file import.
Create a Mapping Profile
You can create multiple Mapping profiles based on your business requirements:
- Order profiles
- Purchase orders (PO) profiles
- Product profiles
After you create a new profile, you can visit the Mapping Profile Details Page to map your export columns.
Order Profiles
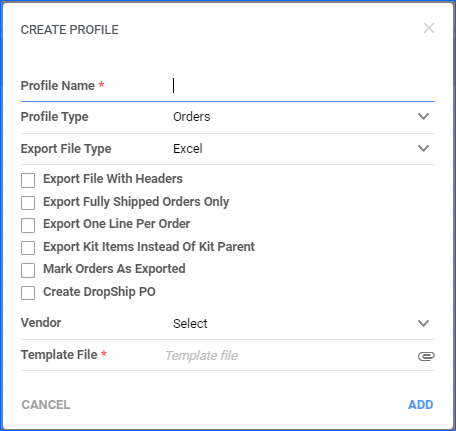
An Order Profile lets you export order-related information from Sellercloud. To create an Order Profile:
- Go to Settings > Mapping Tools > Manage Export Mapping Profiles.
- Click the Action icon > Create.
- Enter Profile Name.
- Select Orders from the Profile Type dropdown menu.
- Select your Export File Type from the dropdown menu. You can select Excel, CSV, or Tab Delimited.
- If applicable, check:
- Export File With Headers – Will export with file headers.
- Export Fully Shipped Orders Only – Only export information related to fully shipped orders.
- Export One Line Per Order – Consolidated each order into a single line.
- Export Kit Items Instead Of Kit Parent – Only export the Kit Components rather than the Kit Parents.
- Mark Orders As Exported – Will mark orders as exported.
- Create DropShip PO – Will create a dropship PO for the processed orders.
- Vendor – Select a Vendor from the dropdown menu.
- Upload your Template File.
- Click Add. An Export Mapping Profile Details page will be created for you. From there, you can map your columns.
PO Profiles
A Purchase Order (PO) Profile lets you export PO-related information from Sellercloud. To create a PO Profile:
- Go to Settings > Mapping Tools > Manage Export Mapping Profiles.
- Click the Action icon > Create.
- Enter Profile Name.
- Select PO from the Profile Type dropdown menu.
- Select your Export File Type from the dropdown menu. You can select Excel, CSV, or Tab Delimited.
- If applicable, check:
- Export File With Headers – Will export with file headers.
- Export Fully Shipped Orders Only – Only export information related to fully shipped orders.
- Export One Line Per Order – Consolidates each PO into a single line.
- Export Kit Items Instead Of Kit Parent – Only export Kit Components rather than Kit Parents.
- Mark Orders As Exported – Will mark orders as exported.
- Create DropShip PO – Will create a dropship PO for the exported orders.
- Vendor – Select a Vendor from the dropdown menu.
- Upload your Template File.
- Click Add.
- An Export Mapping Profile Details Page will be created for you. From there, you can map your columns.

Product Profiles
A Product Profile lets you export product-related information from Sellercloud. To create a Product Profile:
- Go to Settings > Mapping Tools > Manage Export Mapping Profiles.
- Click the Action icon > Create.
- Enter Profile Name.
- Select Product from the Profile Type dropdown menu.
- Select your Export File Type from the dropdown menu. You can select Excel, CSV, or Tab Delimited.
- If applicable, check Export File With Headers.
- Upload your Template File.
- Click Add. An Export Mapping Profile Details page will be created for you. From there, you can map your columns.

Map Profile Fields
After you create a profile, you can go to the Mapping Profile Details Page. Here, you can view information and perform actions related to a specific profile. Some actions and information on the Mapping Profile Details Page overlap, but there are a few differences between the profile types.

To access the Mapping Profile Details page:
- Go to Settings > Export Mapping Tool.
- Search for your profile > Click Profile ID.
Similar to the Shipping Method Mapping of core integrations, you can also configure your Orders’ Shipping Method Mapping from the Toolbox on the Mapping Profile Details Page for Order profiles.
The Mapping Profile Details Page also offers a Previewing the Export feature. You can enter the ID of an Order, SKU, or PO and download an Excel file to review a sample of how the mapped information will appear when downloaded.
Column Mapping
The Mapping Profile Details Page is where you can map your columns. To map columns means selecting Sellercloud headers and referring them to the headers from your file.
When you access the Mapping Profile Details Page, you will see three columns:
- Export Column Name – The column headers from your file.
- Sellercloud Field – The column in Sellercloud.
- Custom Value – If you want a static value to be imported for one of the fields (for example, if the Order_Email will always be the same), choose _CUSTOM_VALUE_REQUIRED_ from the Customer Column dropdown, and then enter your static data into the Custom Value column. You can also use placeholders in this field, such as #?CurrentTimeStamp?# and #?CurrentTimeStampDateOnly?#.

Some examples of order-related mapped fields and their respective outputs can be found below:
| FIELD | OUTPUT |
| bvc_Order.PaymentStatus |
|
| bvc_Order.StatusCode |
|
| bvc_Order.PickingStatus |
|
| bvc_Order.PaymentStatus |
|
If you are unsure how to map your columns, the below tips may help you:
- To find any Order-Related Column, check the Order Change Log.
- To find any Product-Related Column, alter the product information you want to know the column name for and then view the column associated with that change in the Change Log (known as History in Sellercloud’s original interface). To access your Product Change Log – Go to Product Details Page > Toolbox > Change Log.

To map your columns:
- Go to the Mapping Profile Details page > Click Edit.
- Go to the Column Mapping panel > Input your information > Save.
You can reference a product field using a placeholder. For example, although the UPC is not part of the order table, you can export the UPC of the ordered item if you choose Custom_Value_Required and select a Custom Value placeholder #?product.UPC?#.
With a multi-item order, you can map all items in the order by using placeholders. Choose Custom_Value_Required, and in Custom Value, enter placeholder #?ROW_COUNTER?#.
Export Data via a Profile
After you’ve created your profile and mapped your columns, you can export information into your defined format at any time. The steps to export information vary, depending on the profile type.
Export Order Profiles
To export Order Profiles:
- On the Manage Orders Page, search and select the orders.
- Go to the Actions icon > Export Order…
- From the Format dropdown, select the created mapping profile.
- If applicable, check Mark orders As Exported.
- Click Export.
Export PO Profiles
To export PO Profiles:
- Go to Purchasing > Manage POs > Select the POs.
- Go to the Actions icon > Export > in the Export Using dropdown menu, select the Mapping Profile > Export.
Export Product Profiles
To export Product Profiles:
- On the Manage Catalog Page, select the products.
- Go to the Actions icon > Export Products (Catalog)…
- Select Mapping Profile > Choose the required Export Mapping Profile from the dropdown.
- Click Export.
- A Queued job will be created. The exported file can be found in the completed Queued job.
Export via Scheduled Tasks
In addition to manual exports, you can also set up a Scheduled task to export information via a Mapping profile. This is particularly useful for integrations that are not supported in the core software.
Overview
The Export Mapping Tool is a powerful feature that allows you to export information into a file (Excel, CSV, or Tab Delimited) using customized column headers — different from the standard Sellercloud field names. It works by collecting and organizing preselected data, which can then be exported using a custom template tailored to your specific needs.
To import data instead, refer to our Import Mapping Tool.
Access the Export Mapping Tool
To access the Export Mapping Tool go to Settings > Export Mapping Tool.

From the Export Mapping Tool Manage Page, you can perform a few different actions, including bulk actions:
- Create new Mapping – Click on the hyperlink to create a new Export Mapping Profile.
- Delete – To delete an existing profile. Select the profile you want to delete > Go to the Action menu > Select Delete > Confirm you want to delete by clicking Continue Delete Export Mapping Profile(s).
- Clone – To clone a profile. Select the profile you want to clone > Go to the Action menu > Select Clone > Enter new Profile Name > Clone Profile.
Create a Mapping Profile
You can create multiple Mapping profiles based on your business requirements:
- Orders profiles
- Purchase orders (PO) profiles
- Product profiles
After you create a new profile, you can visit the Mapping Profile Details page to map your export columns.
Order Profiles
An Order Profile lets you export order-related information from Sellercloud. To create an Order Profile:
- Go to Settings > Export Mapping Tool > Create new Mapping.
- Enter Profile Name.
- Select Orders from the Profile Type dropdown menu.
- Choose an Export Type based on your mapping criteria – Invoice, Acknowledgement, Functional Acknowledgement, or Tracking.
- Select your Export File Type from the dropdown menu. You can select Excel, CSV, or Tab Delimited.
- If applicable, check:
- Export File With Headers (CSV/TXT only) – Will export with file headers.
- Export Fully Shipped Orders Only – Only export information related to fully shipped orders.
- Export One Line Per Order – Consolidates each order to a single line.
- Export Kit Items Instead Of Kit Parent – Only export Kit Components rather than Kit Parents.
- Mark Orders as Exported – Will mark orders as exported.
- Create DropShip PO – Will create a dropship PO for the processed orders.
- Vendor – Select a Vendor from the dropdown menu.
- Upload your Template File.
- Click Save Profile. The page will automatically refresh to your Mapping Profile Details page, where you can begin to map your columns.

PO Profiles
A Purchase Order (PO) profile lets you export PO-related information from Sellercloud. To create a PO Profile:
- Go to Settings > Export Mapping Tool > Create new Mapping.
- Enter Profile Name.
- Select PO from the Profile Type dropdown menu.
- Select your Export File Type from the dropdown menu. You can select Excel, CSV, or Tab Delimited.
- If applicable, check:
- Export File With Headers (CSV/TXT only) – Will export with file headers.
- Export Fully Shipped Orders Only – Only export information related to fully shipped orders.
- Export One Line Per Order – Consolidates each PO into a single line.
- Export Kit Items Instead Of Kit Parent – Only export Kit Components rather than Kit Parents.
- Mark Orders As Exported – Will mark orders as exported.
- Create DropShip PO – Will create a dropship PO for the exported orders.
- Vendor – Select a Vendor from the dropdown menu.
- Upload your Template File.
- Click Save Profile. The page will automatically refresh to your Mapping Profile Details page, where you can begin to map your columns.

Product Profiles
A Product Profile lets you export product-related information from Sellercloud. To create a Product Profile:
- Go to Settings > Export Mapping Tool > Create new Mapping.
- Enter Profile Name.
- Select Product from the Profile Type dropdown menu.
- Select your Export File Type from the dropdown menu. You can select Excel, CSV, or Tab Delimited.
- If applicable, check Export File With Headers(CSV/TXT only).
- Upload your Template File.
- Click Save Profile. The page will automatically refresh to your Mapping Profile Details page, where you can map your columns.

Map Profile Fields
After you create a profile, you can go to the Mapping Profile Details Page. Here, you can view information and perform actions related to a specific profile. Some actions and information on the Mapping Profile Details Page overlap, but there are a few differences between the profile types.

To access the Mapping Profile Details page:
- Go to Settings > Export Mapping Tool.
- Search for your profile > Click Profile ID.
Similar to the Shipping Method Mapping of core integrations, you can also configure your Orders’ Shipping Method Mapping on the Mapping Profile Details pages for Profile Type: Orders and Profile Type: PO.
The Details page also offers a Preview feature. You can enter the ID of an Order, SKU, or PO and generate an Excel file to review a sample of how the mapped information will appear when downloaded.
Column Mapping
The Mapping Profile Details page is where you can map your columns. To map columns means selecting Sellercloud headers and referring them to the headers from your file.
When you access the Mapping Profile Details page, you will see three columns:
- Export Column Name – The column headers from your file.
- Sellercloud Field – The column in Sellercloud.
- Custom Value – If you want a static value to be imported for one of the fields (for example, the Order_Email should always be the same here), choose _CUSTOM_VALUE_REQUIRED_ from the Customer Column dropdown, and then enter your static data into the Custom Value column. You can also use placeholders in this field, as per the screenshot below.

Some examples of order-related mapped fields and their respective outputs can be found below:
| FIELD | OUTPUT |
| bvc_Order.PaymentStatus |
|
| bvc_Order.StatusCode |
|
| bvc_Order.PickingStatus |
|
| bvc_Order.PaymentStatus |
|
If you are unsure how to map your columns, the below tips may help you:
- To find any Order-Related Field, review the Order Change History.
- To find any Product-Related Field, alter the product information you want to know the column name for and then view the column associated with that change in the History. Go to the Product Details page > Toolbox > History > Show Full History.
After you configure the mapping, scroll down to the bottom of the page and click Save Mapping.
You can reference a product field using a placeholder. For example, although the UPC is not part of the order table, you can export the UPC of the ordered item if you choose Custom_Value_Required and select a Custom Value placeholder #?product.UPC?#.
With a multi-item order, you can map all items in the order by using placeholders. Choose Custom_Value_Required, and in Custom Value, enter placeholder #?ROW_COUNTER?#.
Export Data via a Profile
After you’ve created your profile and mapped your columns, you can export information into your defined format at any time. The steps to export information vary, depending on the profile type.
Export Order Profiles
To export Order Profiles:
- On the Manage Orders page, select the orders.
- Action menu > Select Export Orders > Go, or press on the export icon above the grid.
- From the Format dropdown, select the newly created mapping profile.
- If applicable, check Also mark orders as exported to mark the orders as exported.
- Click Export Orders.
Export PO Profiles
To export PO Profiles:
- Go to Inventory > Purchasing > Select your PO #.
- Action menu > Select Export > Go.
- From the Export Using the dropdown, select the newly created mapping profile.
- Click Export POs.
Export Product Profiles
To export Product Profiles:
- On the Manage Inventory page, search for and select the products.
- Action menu > Select Export Products > Go, or press on the export icon above the grid.
- From the Export Type dropdown, select the created mapping profile.
- Export Products.
- A Queued job will be created. The exported file can be found in the completed Queued job.
Export via Scheduled Tasks
In addition to manual exports, you can also set up a Scheduled task to export information via a Mapping profile. This is particularly useful for integrations that are not supported in the core software.