Overview
The Manage Employees page in Sellercloud gives you quick and easy access to all your employees. On this page, you can:
- View all employees (user accounts)
- Use search filters to show only specific employees
- Save your filters to effortlessly repeat searches
- Sort the list of employees based on different columns
- Show or hide data columns from the list
- Perform individual and bulk actions related to employee accounts
Page Overview
To access your employees, go to Settings > Employees > Manage Employees.
There are three components to this page:
- Search Filters – Search criteria used to get specific results. You can save searches for repeat use.
- Search Results – A list of employees matching your search filters. You can sort it differently and show or hide data columns.
- Actions – Actions related to employee accounts.
Search Filters
Filters offer multiple-choice selection lists or allow you to enter specific values. Your choices build on each other. Each subsequent choice narrows the scope of your search results further and affects what the page displays. You can add as many filters as you like or none at all.
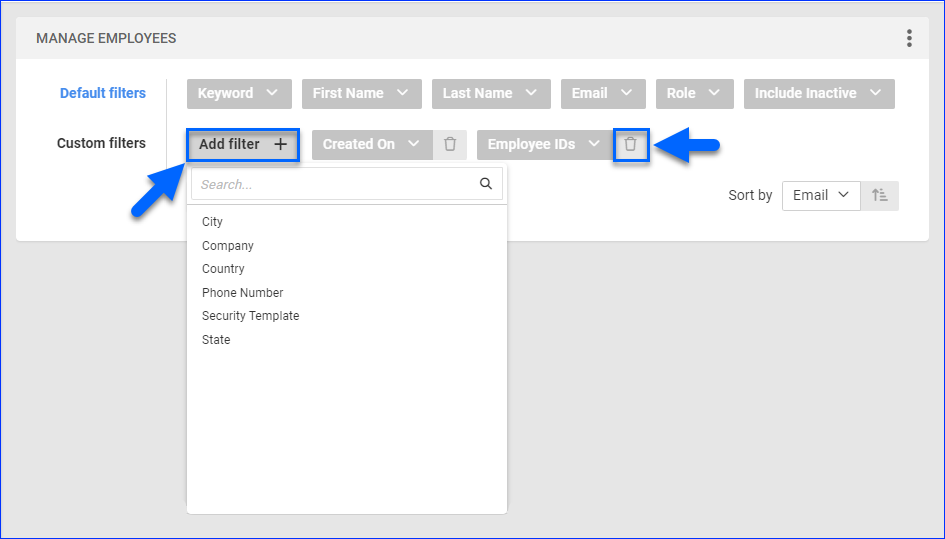
There are Default filters that are always displayed and Custom filters that you can display manually by clicking the Add filter button and selecting a filter from the list. To remove a custom filter from the page, click the Trash icon next to it.
After you click Search, each filter you apply gets highlighted in orange or green. If a filter is gray or not displayed at all, it’s not active. You can add or remove filters and search again at any time.
Once you have set up your filters, you can click Save View to save the search. Then, you can repeat the same search by selecting it from the Saved Views menu on the top right.
Search Results
The search results display a list of employees matching your search criteria, with data columns showing various employee details.
You can add, remove, and even reorder data columns. To do so, click the three dots icon at the top right and select Customize Columns.
Now you can:
- Reorder columns by dragging them up or down in the list
- Hide columns by clicking the Trash icons
- Add columns by clicking Add column
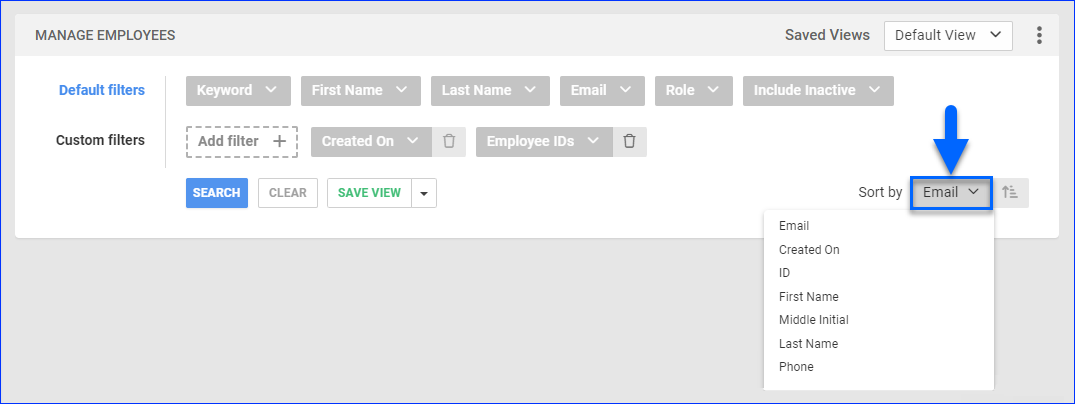
You can also sort the employees list in a different order based on a specific column using the Sort by drop-down menu.
Actions
The Manage Employees page also has actions for employee management.
The Actions icon is located on the bottom right of the page. By default, it is a green plus icon that allows you to create a new employee. When you select employees from the search results by checking the boxes to their left, the icon turns blue. Once it’s blue, you can click it to manage all selected employees.
You can use the search to find a specific action quickly. Click the Star icon next to any frequently used action to pin it to the top of the actions list for quick access.
Most of these actions will display a notification at the bottom of the screen when used, telling you that a Queued Job has been created. You can click the link to the queued job to view it. Make sure to refresh the page to update the job’s Status.
Descriptions
This section lists and defines all available elements on the Manage Employees page. This includes the search filters, the columns that display employee data and sort results, and the actions you can perform on selected employees.
Filter Descriptions
See the following lists for all Default/Custom filters and their descriptions.
Default Filters
| Filter | Description |
| Keyword | Search by alphanumeric text in the ID, Names, and Email. |
| First Name | Show only employees with one or more specific first names. |
| Last Name | Show only employees with one or more specific last names. |
| Show only employees with a specific email address. | |
| Role | Show only employees a specific Role. |
| Include Inactive | Show or hide inactive employees. |
Custom Filters
| Filter | Description |
| City | Show only employees working in a specific city. |
| State | Show only employees working in a specific state. |
| Country | Show only employees working in a specific country. |
| Phone Number | Show only employees with a specific phone number. |
| Company | Show only employees from a specific Company. |
| Created On | Show only employees created within a specific time range. |
| Employee IDs | Show only employees with one or more specific IDs. |
| Security Template | Show only employees with a specific Security Template. |
Column Descriptions
See the following list for all data columns and their descriptions.
| Column | Description |
| ID | The employee’s unique identification number. Click it to go to the Employee Properties Page. |
| Name | The employee’s name. |
| Role | The employee’s Role within Sellercloud. |
| The employee’s email address. Click it to go to the Employee Properties page. | |
| Phone | The employee’s phone number. |
| City | The employee’s city. |
| State | The employee’s state. |
| Country | The employee’s country. |
| Created On | The employee account’s creation date. |
| Template Name | The name of the employee’s assigned Security Template. |
You can show or hide these columns by clicking the three dots in the top right and selecting Customize Columns. To sort results based on these columns, use the Sort by menu.
Action Descriptions
See the following list for all actions and their descriptions.
| Action | Description |
| Add New Employee | Create a New Employee account. |
| Delete | Delete the selected employees. This action is not reversible. |
| Apply Security Template | Apply a Security Template to the selected employees. |
| Update Per-Company Permissions | Add or remove companies for which the selected employees have been granted permissions based on their assigned Security Template. |


