Overview
OJCommerce is an online retailer offering a diverse range of products across several categories, including furniture, home goods, appliances, athletic gear, toys, and more. They focus on providing quality products at competitive prices.
Sellercloud integrates with OJCommerce through plugins that transmit EDI documents between the two services. The following plugins are currently available:
- Order Import – Imports order info from OJCommerce in EDI 850 format.
- Order Acknowledgement – Order acknowledgment to OJCommerce in EDI 855 format.
- Tracking Export – Exports tracking information to OJCommerce in EDI 856 format.
- Invoice Export – Exports invoices to OJCommerce in EDI 810 format.
- Inventory Export – Exports inventory to OJCommerce in EDI 846 file format.
Prerequisites
OJCommerce Support
Before you can integrate OJCommerce with Sellercloud, contact them to obtain your FTP details: server name, username, and password.
Custom Company Settings
Create the following Custom Company Settings:
- OJC_ISAControlNumber
- OJC_STControlNumber
- OJC_GSControlNumber
- OJC_IDRecieverQualifier – Set to 12
- OJC_ReceiverID – Set to OJCOMMERCE
- OJC_IDInterchangeQualifier – Set to ZZ
- OJC_SenderID – enter a unique phone number.
- ImportOJCommerceOrdersPaid – defaults to False. If set to True, orders will be imported as paid. If this setting is False or does not exist, orders will be imported as Unpaid.
- OJCommerce_ShippingRequiresThirdPartyBilling – defaults to False. Set to True if you use third-party shipping for OJCommerce orders.
Sellercloud Support
Contact Sellercloud Support to:
- Request that the OJCommerce plugins be installed on your server.
- Request the custom product columns shown below:
- OJC_Enabled: Set to True to enable the product on OJCommerce.
- OJC_SAFETYQTY (optional) – A Safety Quantity for products on OJCommerce.
Order Import
This plugin imports order data such as contact information and ship-to details, carrier details, and line item information from OJCommerce to Sellercloud in EDI 850 format.
Automate Order Import
To create a Scheduled Task that regularly imports orders:
- Navigate to Settings > Scheduled Tasks > Manage Scheduled Tasks.
- Click the green + icon: Create New Scheduled Task.
- Complete as follows:
- Click Task Type and select Import Orders.
- Set the Task Name to OJC Order Import.
- Select the Company.
- Select the Start Time.
- Click CREATE.
- The following message appears at the bottom of your screen: “Scheduled task created successfully. Click Here to configure the task details.” – click the link.
- Click the Edit button on the top right.
- In the Details section:
- Click the Create Orders For Company menu and select the company you designated for this integration.
- Click the Plugin menu and select OJC EDI 850 OrderImport.
- In the Import Options section, set Import From to FTP and enter your credentials.
- In the Frequency section, specify the task frequency. For optimal performance, select a range between thirty minutes and one hour.
- In the General section, click the Enable button.
- Click Save on the top right.

Order Acknowledgement
This plugin exports order acknowledgment from Sellercloud to OJCommerce in EDI 855 format and marks orders as channel acknowledged after export.
Before you move on, create a Saved Search for orders filtered by:
- Company: Company where you set up Custom Settings
- Order Status: InProcess Or Completed
- Order Ack (Accept): No

Automate Order Acknowledgement
To create a Scheduled Task that regularly exports orders:
- Navigate to Settings > Scheduled Tasks > Manage Scheduled Tasks.
- Click the green + icon: Create New Scheduled Task.
- Complete as follows:
- Click Task Type and select Export Orders.
- Set the Task Name to OJC Order Acknowledgement.
- Select the Company.
- Select the Start Time.
- Click CREATE.
- The following message appears at the bottom of your screen: “Scheduled task created successfully. Click Here to configure the task details.” – click the link.
- Click the Edit button on the top right.
- In the Details section:
- Click the User ID menu and select your ID.
- Click the Saved Search menu and select the saved search you created earlier.
- Click the Import Via menu and select OJC 855 EDI OrderExport.
- Check This Is Order Ack (Accept).
- In the Export Options section, set Export To to FTP and enter your credentials.
- In the Frequency section, specify the task frequency. For optimal performance, select a range between thirty minutes and one hour.
- In the General section, click the Enable button.
- Click Save on the top right.

Tracking Export
This plugin exports tracking details such as shipment, order, and item-level information from Sellercloud to OJCommerce in EDI 856 format.
Before you move on, create a Saved Search for orders filtered by:
- Company: Company where you set up Custom Settings
- Order Status: InProcess Or Completed
- Shipping Status: FullyShipped
- Tracking Uploaded: No
- Exported: Not Exported
![]()
Automate Tracking Export
To create a Scheduled Task that regularly exports tracking:
- Navigate to Settings > Scheduled Tasks > Manage Scheduled Tasks.
- Click the green + icon: Create New Scheduled Task.
- Complete as follows:
- Click Task Type and select Export Orders.
- Set the Task Name to OJC Tracking Export.
- Select the Company.
- Select the Start Time.
- Click CREATE.
- The following message appears at the bottom of your screen: “Scheduled task created successfully. Click Here to configure the task details.” – click the link.
- Click the Edit button on the top right.
- In the Details section:
- Click the User ID menu and select your ID.
- Click the Saved Search menu and select the saved search you created earlier.
- Click the Export Via menu and select OJC EDI 856 Tracking Export.
- Check This Is Tracking Export.
- In the Export Options section, set Export To to FTP and enter your credentials.
- In the Frequency section, specify the task frequency. For optimal performance, select a range between thirty minutes and one hour.
- In the General section, click the Enable button.
- Click Save on the top right.
![]()
Invoice Export
This plugin creates invoices with information about orders and products and exports them to OJCommerce in EDI 810 format.
Before you move on, create a Saved Search for orders filtered by:
- Company: Company where you set up Custom Settings
- Order Status: InProcess Or Completed
- Shipping Status: FullyShipped
- Invoice Uploaded: No
- Order Ack (Accept): No
- Tracking Uploaded: Yes

Automate Invoice Export
To create a Scheduled Task that regularly exports orders:
- Navigate to Settings > Scheduled Tasks > Manage Scheduled Tasks.
- Click the green + icon: Create New Scheduled Task.
- Complete as follows:
- Click Task Type and select Export Orders.
- Set the Task Name to OJC Invoice Export.
- Select the Company.
- Select the Start Time.
- Click CREATE.
- The following message appears at the bottom of your screen: “Scheduled task created successfully. Click Here to configure the task details.” – click the link.
- Click the Edit button on the top right.
- In the Details section:
- Click the User ID menu and select your ID.
- Click the Saved Search menu and select the saved search you created earlier.
- Click the Import Via menu and select Invoice for OJCommerce EDI 810 OrderExport.
- Check This Is Invoice Export.
- In the Export Options section, set Export To to FTP and enter your credentials.
- In the Frequency section, specify the task frequency. For optimal performance, select a range between thirty minutes and one hour.
- In the General section, click the Enable button.
- Click Save on the top right.

Inventory Export
This plugin exports inventory information, such as identification numbers and quantities, from Sellercloud to OJCommerce in EDI 846 format.
You can add Safety Quantities with the optional custom product column OJC_SAFETYQTY.
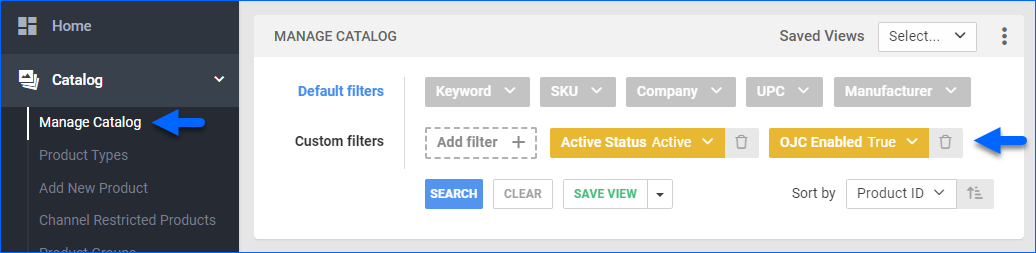
Make sure to enable your products for OJCommerce by setting their OJC_Enabled custom column to True:
- For one product at a time: go to the Product Details Page > click Toolbox and select Custom Columns > click Edit, update the OJC_Enabled column, and Save.
- For multiple products in bulk: follow the steps to Bulk Update Products and use the OJC_Enabled column – set it to True for all products you want to enable.

Before you move on, create a Saved Search for products filtered by:
- OJ_ENABLED: True
Automate Inventory Export
To create a Scheduled Task that regularly exports inventory:
- Navigate to Settings > Scheduled Tasks > Manage Scheduled Tasks.
- Click the green + icon: Create New Scheduled Task.
- Complete as follows:
- Click Task Type and select Export Products.
- Set the Task Name to OJC Inventory Export.
- Select the Company.
- Select the Start Time.
- Click CREATE.
- The following message appears at the bottom of your screen: “Scheduled task created successfully. Click Here to configure the task details.” – click the link.
- Click the Edit button on the top right.
- In the Details section:
- Click the User ID menu and select your ID.
- Click the Saved Search menu and select the saved search you created earlier.
- Click the Export Via menu and select OJC EDI 845 Inventory Export.
- In the Export Options section, set Export To to FTP and enter your credentials.
- In the Frequency section, specify the task frequency. For optimal performance, select a range between thirty minutes and one hour.
- In the General section, click the Enable button.
- Click Save on the top right.
