Overview
A bin-to-bin transfer refers to the movement of inventory items from one bin to another within the same warehouse. This type of transfer is typically used to optimize your warehouse space, allowing you to allocate certain inventory items which are more in demand in one area of the warehouse than in others. For example, if a particular product is selling quickly, it may be beneficial to move it to a bin closer to the shipping area for faster processing.
Before you transfer bin inventory, consider all options and choose the one that best fits your goal. Instead of transferring inventory between bins, you could also make an Inventory Adjustment or perform a SKU to SKU Transfer.
To learn how to transfer inventory between warehouses, see Warehouse Inventory Transfer (WITR).
Transfer Inventory Between Warehouse Bins
In this section, you will learn how to transfer an individual product’s inventory between bins from the Product Details page or the Bin Details page. To review bin inventory transfers, refer to the Inventory Movement History page.
Product Details Page
To transfer inventory from the Product Details page:
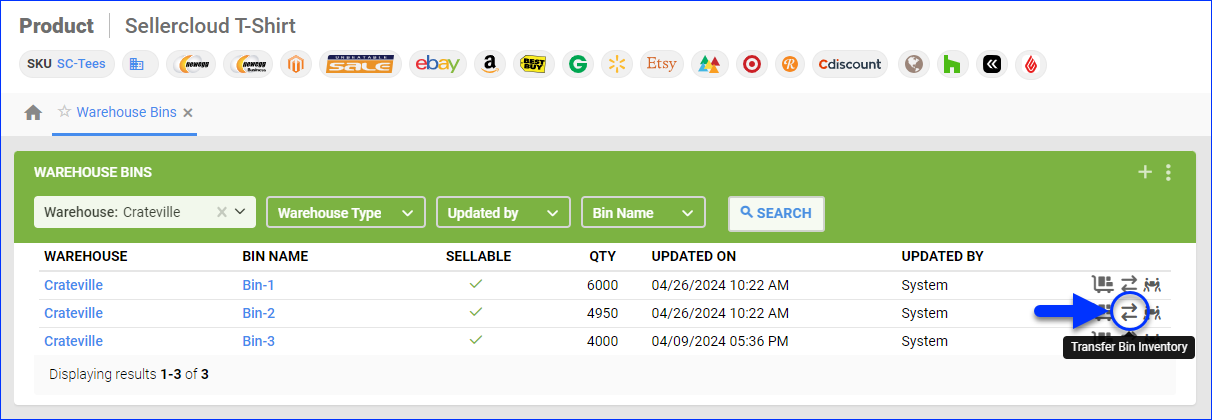
- Go to a Product Details Page.
- Click Toolbox and select Warehouse Bins. Use the filters at the top to find specific bins. Here you can:
- Adjust Inventory
- Transfer Bin Inventory
- View Movements
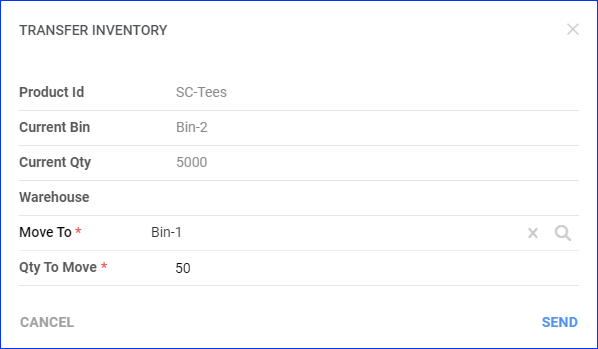
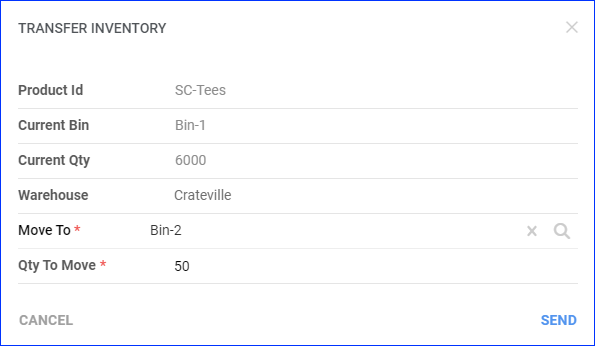
- Click the Transfer Bin Inventory icon next to the bin you want to adjust.
- Click the Move To dropdown and select the warehouse bin you want to transfer inventory to.
- Enter the Qty To Move.
- Click Send. The transfer will occur immediately.
Bin Details Page
To transfer inventory from the Bin Details page:
- Go to Inventory > Warehouses > Manage Warehouse Bins.
- Search for bins and click the bin with inventory to adjust.
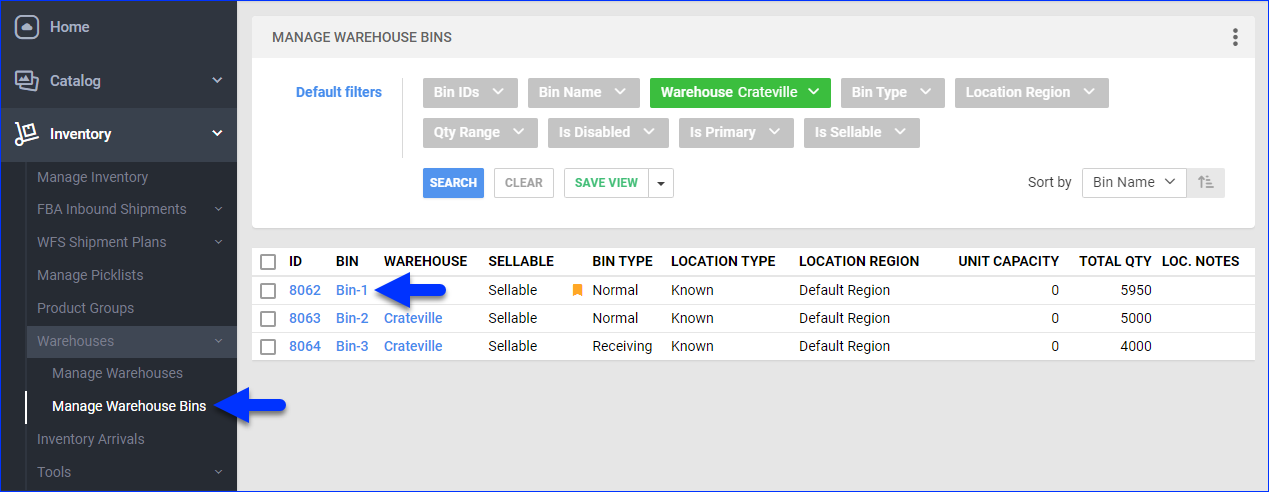
- Click the Transfer icon next to a product in the Items panel.
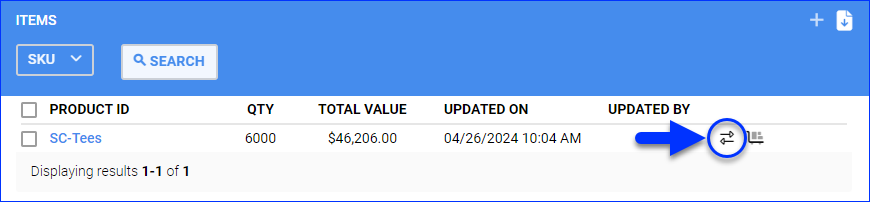
- Click the Move To dropdown and select the warehouse bin you want to transfer inventory to.
- Enter the Qty To Move.
- Click Send. The transfer will occur immediately.
Overview
A bin-to-bin transfer refers to the movement of inventory items from one bin to another within the same warehouse. This type of transfer is typically used to optimize your warehouse space, allowing you to allocate certain inventory items which are more in demand in one area of the warehouse than in others. For example, if a particular product is selling quickly, it may be beneficial to move it to a bin closer to the shipping area for faster processing.
Before you transfer bin inventory, consider all options and choose the one that best fits your goal. Instead of transferring inventory between bins, you could also make an Inventory Adjustment or perform a SKU to SKU Transfer.
To learn how to transfer inventory between warehouses, see Warehouse Inventory Transfer (WITR).
Steps to transfer inventory between bins and adjust quantities
- Go to the Inventory tab, search for a SKU, click on it.
- Click Bin Details to display the Warehouse Bins page.

- Here you can:
- Do bin transfers by selecting the bin and selecting Transfer from the Select Action drop-down,
- Adjust Inventory or Set Physical Inventory.
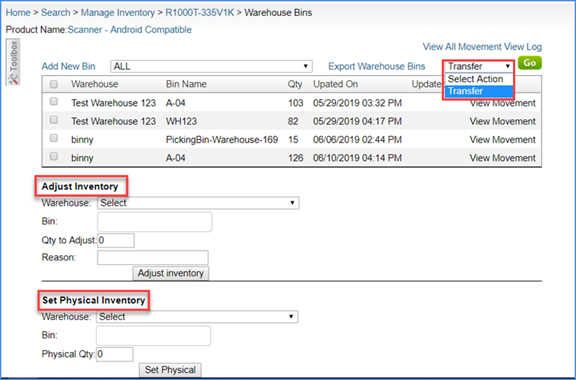
Transfer
- Click the checkbox next to a warehouse and press GO. The Transfer Bin page is displayed..
- Enter a Bin Name in Move To Bin.
- Enter a quantity in QTY to Move.
- Click Transfer Now. The bins reflect their new quantities.
Adjust Inventory (increases/decreases bin quantity)
- Select Warehouse.
- Enter Bin Name.
- Enter Qty to Adjust.
- Enter Reason.
- Click Adjust Inventory.
Set Physical Inventory (overrides bin quantity)
- Select Warehouse.
- Enter Bin Name.
- Click Set Physical.
- Warehouse
- BinName
- ProductID
- QtyToAdjust (can be positive or negative)
- Reason
Accessing the import template and import function Home > Search > Manage Inventory > Import Product Info > Import Product Warehouse BIN Info. 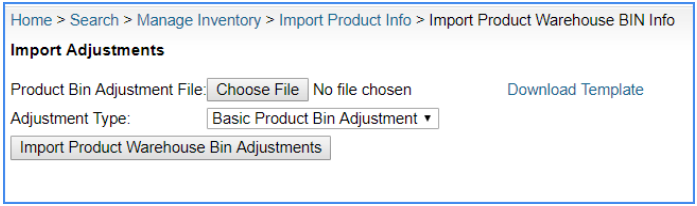
Basic Product Bin Adjustment A simple positive/negative value in the bin qty you are setting. Example: If you have 5 qty in the bin and want to only have 3, you would adjust -2.
- Complete the ProductWarehouseBinAdjustment.xls template and save it to your local machine.
- Click Choose File and locate the file saved in step 1.
- Ensure that the Adjustment Type is Basic Product Bin Adjustment.
- Click Import Product Warehouse Bin Adjustment.
Initial Product Bin Adjustment
- Complete the ProductWarehouseBinAdjustment.xls template > Save your file.
- Click Choose File > Select the saved file.
- Select Adjustment Type > Initial Product Bin Adjustment.
- Click Import Product Warehouse Bin Adjustment.