Overview
Sellercloud lets you make manual product inventory adjustments to increase or decrease your products’ Physical Inventory count at any time. The steps to adjust product inventory differ depending on whether the Warehouses where your products are stored are Bin-Enabled or not.
You can use the Inventory Movement History and the Inventory Adjustment Audit report to review adjustments made to product inventory.
Adjust Inventory in Regular Warehouses
You can adjust the inventory of products in regular warehouses individually or in bulk.
Individually
There are two tabs on the product-level Warehouse page where you can adjust product inventory individually:
- The Warehouse Inventory tab, where you can see a list of all warehouses and the product’s currently available inventory in each one.
- The Adjustments tab, where you can also see a list of previous product inventory adjustments across all regular warehouses.
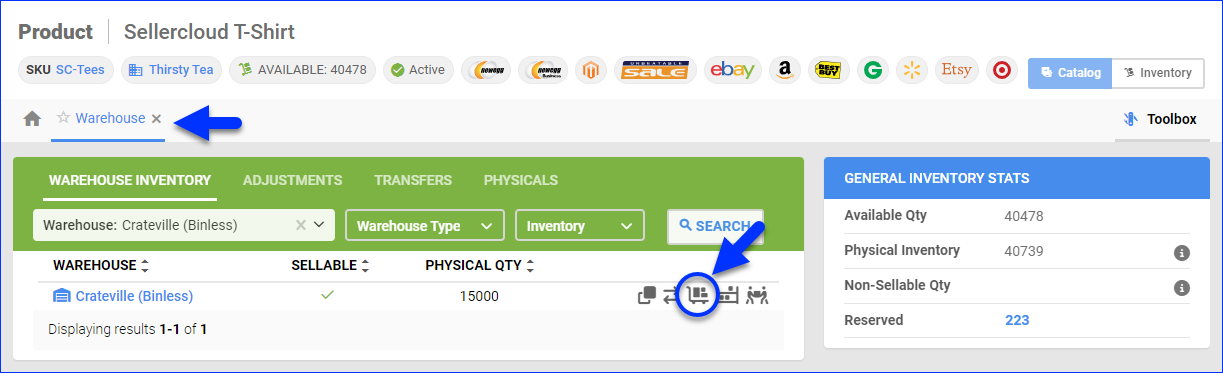
To adjust a single product’s inventory from the Warehouse Inventory tab:
- Go to a Product Details Page.
- Click Toolbox and select Warehouse.
- All warehouses are displayed along with the available product inventory. You can use the filters at the top to search for specific warehouses.
- Click the Adjust icon.
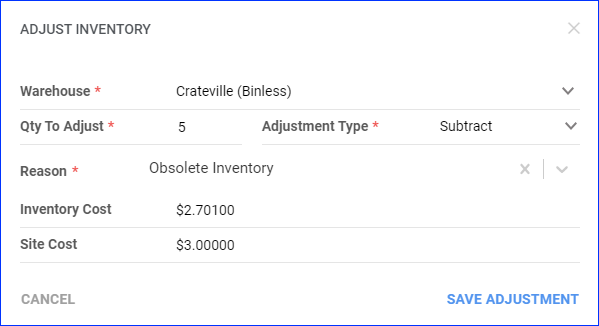
- Enter the Qty to Adjust.
- Use the Adjustment Type options to select if you want to Add or Subtract the Qty to Adjust you entered from the current Physical Qty.
- In the Reason field, enter your reason for the inventory adjustment. If you have configured adjustment reasons, you can select them now. Otherwise, type a new reason and then click the Add Reason button.
The client setting Always Require Inventory Adjustment Reason controls if the Reason is a mandatory field or not. - If these fields are enabled, you can also enter the Inventory Cost and Site Cost.
The client settings Allow Entering Inventory Cost When Adjusting Inventory and Enable Update SiteCost When Adjusting Inventory control if the Inventory Cost and Site Cost fields appear during inventory adjustments or not. - Click Save Adjustment. The adjustment will be applied immediately.
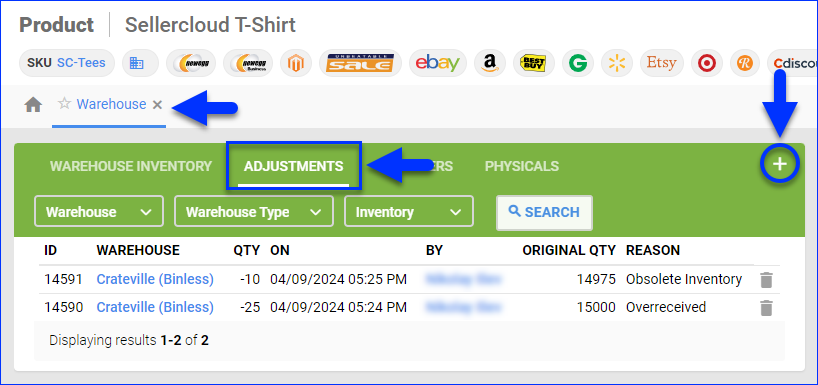
To adjust a single product’s inventory from the Adjustments tab:
- Go to a Product Details Page.
- Click Toolbox and select Warehouse.
- Select the Adjustments tab.
- Click the Plus icon.
- Select the Warehouse.
- Enter the Qty to Adjust.
- Use the Adjustment Type options to select if you want to Add or Subtract the Qty to Adjust you entered from the current Physical Qty.
- In the Reason field, enter your reason for the inventory adjustment. If you have configured adjustment reasons, you can select them now. Otherwise, type a new reason and then click the Add Reason button.
- Click Save Adjustment. The adjustment will be applied immediately.
In Bulk
To adjust multiple products’ inventory:
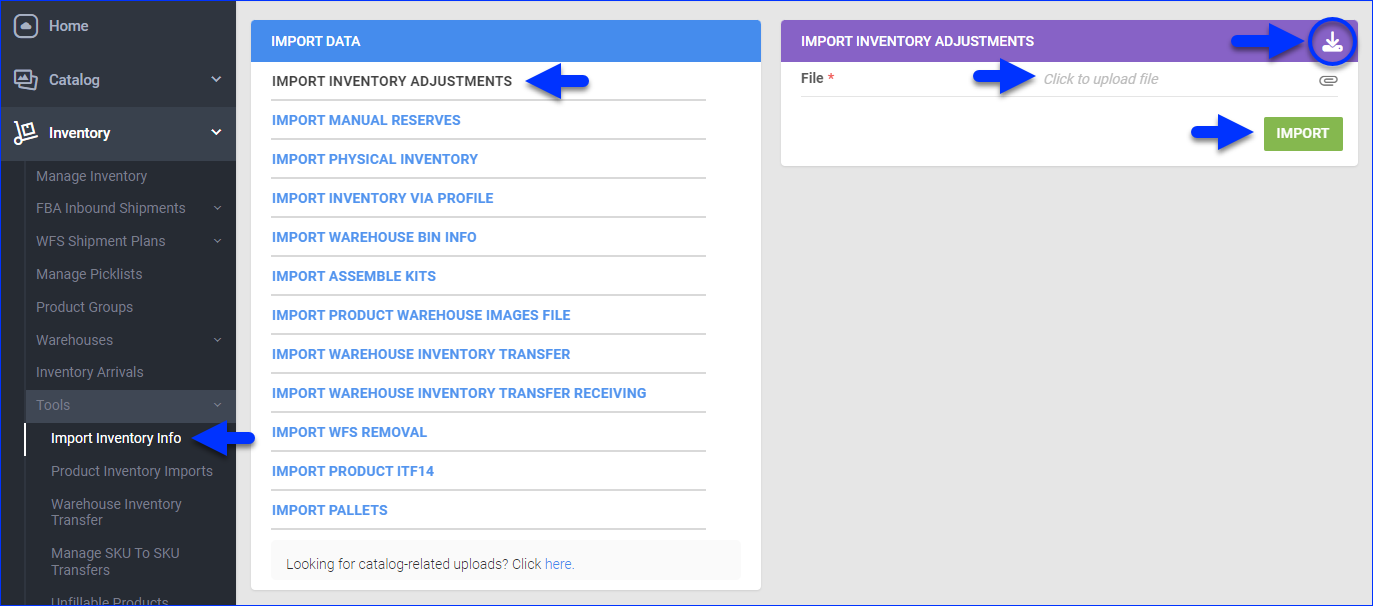
- Go to Inventory > Tools > Import Inventory Info.
- Select Import Inventory Adjustments.
- Click the Download icon at the top right of the Import Inventory Adjustments panel to download a spreadsheet template to your device.
- Populate the columns in the downloaded template and save.
- ID – The adjustment’s unique identifier. This is not required when you create new adjustments; you only need to enter it when updating an existing adjustment.
- ProductID – The SKU of the product being adjusted.
- WarehouseName – The name of the warehouse where the SKU is stored.
- AdjustmentQty – The adjustment quantity.
- AdjustmentReason – The adjustment reason.
- LocationNotes – Notes related to the product’s storage location within your warehouse.
- _ACTION_ – To delete existing adjustments, use the column header _ACTION_ and populate it with _DELETE_ in your template.
- Click File and select the updated file.
- Click Import. Click the link to view it and then refresh the page to update the Status. You will receive a Notification once it is Completed.
Adjust Inventory in Bin-Enabled Warehouses
You can adjust the inventory of products in bin-enabled warehouses individually or in bulk from either Sellercloud or Skustack. For more information on adjusting inventory in Skustack, see Adjusting Bin Quantities in Skustack.
Individually
There are two pages where you can adjust product inventory individually:
- The Product Details page.
- The Bin Details page.
To adjust a single product’s inventory on the Product Details page:
- Go to a Product Details Page.
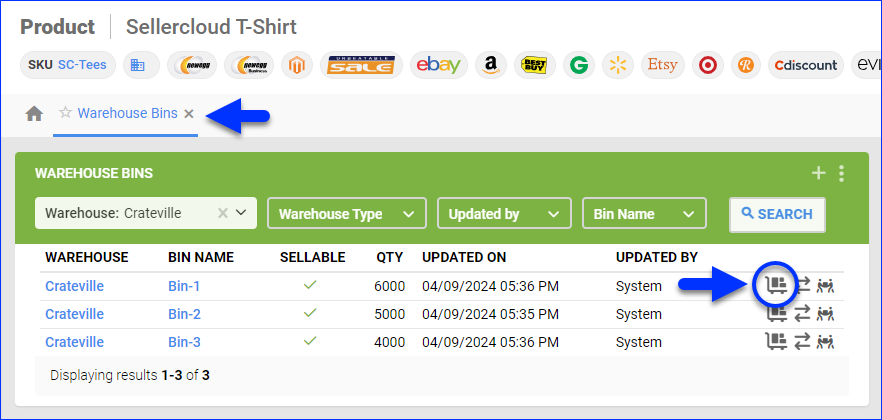
- Click Toolbox and select Warehouse Bins.
- Optionally, you can narrow down the bins list using the filters at the top of the page.
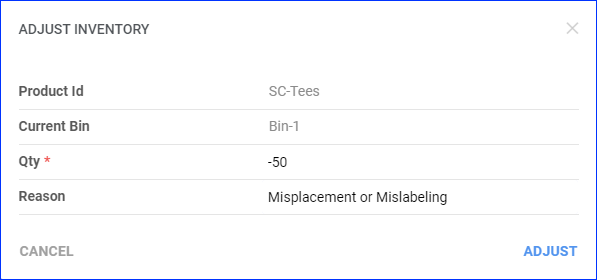
- Click the Adjust Inventory icon next to the bin you want to adjust.
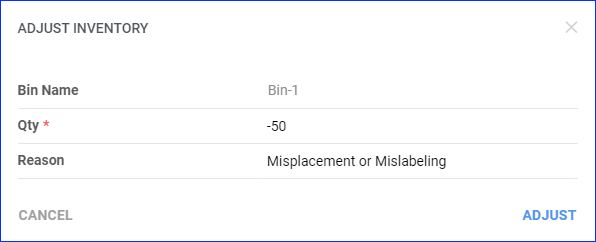
- Enter the Qty you want to increase or decrease the inventory by. To reduce inventory, enter a negative number with a minus.
- In the Reason field, enter your reason for the inventory adjustment.
- Click Adjust. The adjustment will be applied immediately.
To adjust a single product’s inventory on the Bin Details page:
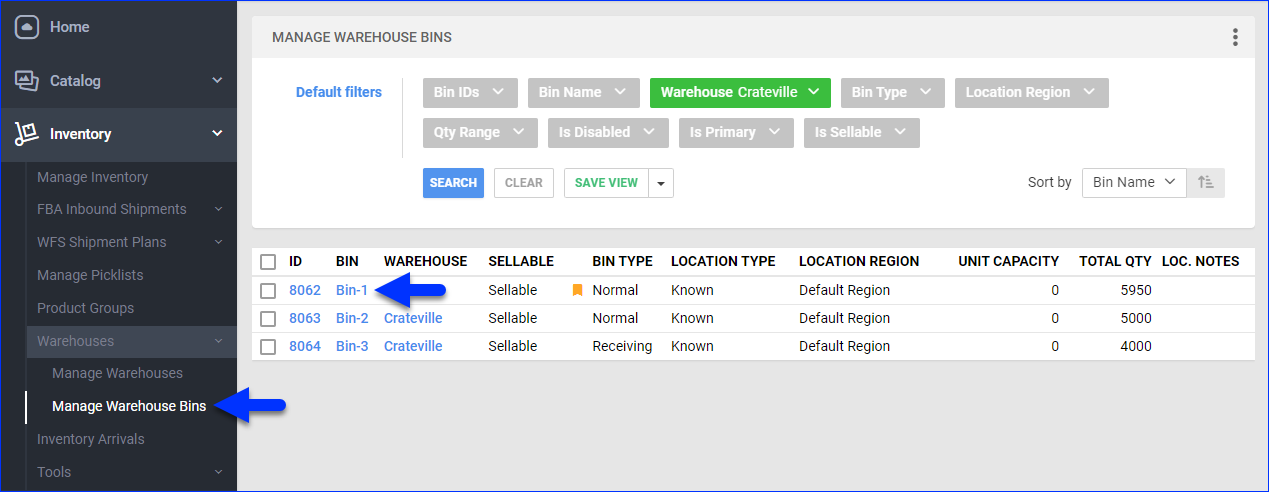
- Go to Inventory > Warehouses > Manage Warehouse Bins.
- Search for bins and click the bin with inventory to adjust.
- Click the Adjust icon next to a product in the Items panel.
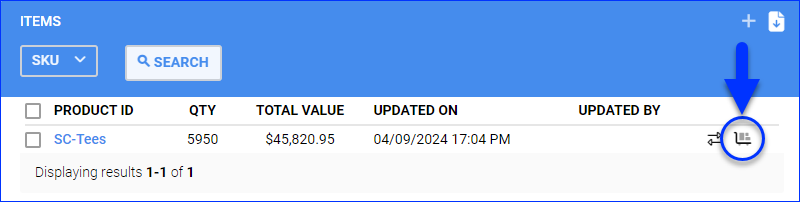
- Enter the Qty you want to increase or decrease the inventory by. To reduce inventory, enter a negative number with a minus.
- In the Reason field, enter your reason for the inventory adjustment.
- Click Adjust. The adjustment will be applied immediately.
In Bulk
To adjust product inventory in bulk:
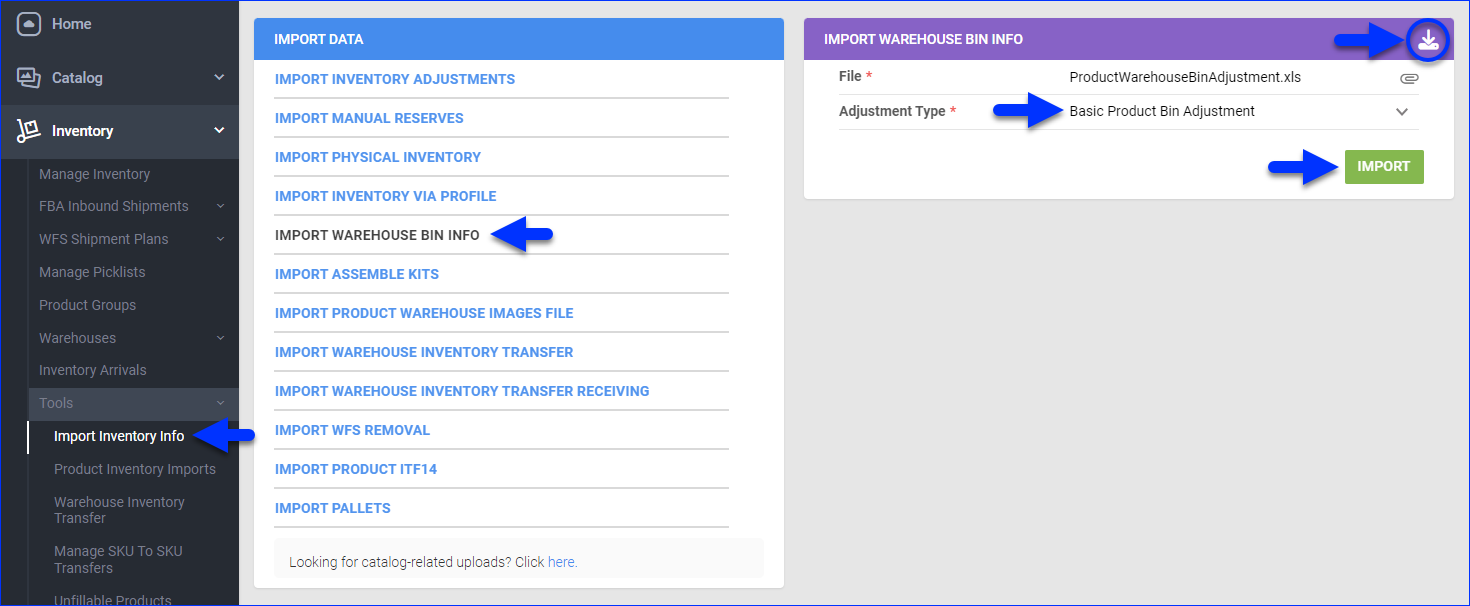
- Go to Inventory > Tools > Import Inventory Info.
- Select Import Warehouse Bin Info.
- To download a sample template, click the Download icon.
- Populate the following columns in the template and save the file:
- WarehouseName – The name of the warehouse storing the SKU.
- BinName – The bin where the SKU is being adjusted.
- ProductID – The SKU of the product being adjusted.
- QtyToAdjust – The adjustment quantity you want to increase or decrease the inventory by. To reduce inventory, enter a negative number with a minus.
- Reason – The adjustment reason.
If the Lot Number workflow is enabled, you must also populate the LotNumber and ExpiryDate columns for any products set as Expirable.
- Click File and select the updated file.
- Specify the Adjustment Type:
- Initial Product Bin Import – Select this option to import inventory to a warehouse that has no existing bin quantities.
You should only use this adjustment type the first time you import bin quantities because the import will set the quantity of any SKU not included in the file to 0 across all bins. Use this option only if you are confident that the counted inventory accurately represents the complete inventory in your warehouse bins. Contact your onboarding representative or Sellercloud Support for assistance.
- Initial Product Bin Import – Select this option to import inventory to a warehouse that has no existing bin quantities.
- Basic Product Bin Adjustment – Select this option for all bin quantity updates following the Initial Product Bin Import. Enter a simple positive/negative value in the QtyToAdjust column. Example: If you have a qty of 5 in the bin and want to reduce it to 3, you would adjust -2.

- Click Import, and a Queued Job will be scheduled. Click the link to view it and then refresh the page to update the Status. You will receive a Notification once it is Completed.
Configure Adjustment Reasons
You can adjust your inventory in regular warehouses faster by configuring a predefined list of reasons beforehand and then selecting the Adjustment Reason from it later on.
To manage adjustment reasons:
- Go to Settings.
- Select Inventory > Adjustment Reasons.
- Click the Add New Inventory Adjustment Reason plus icon.
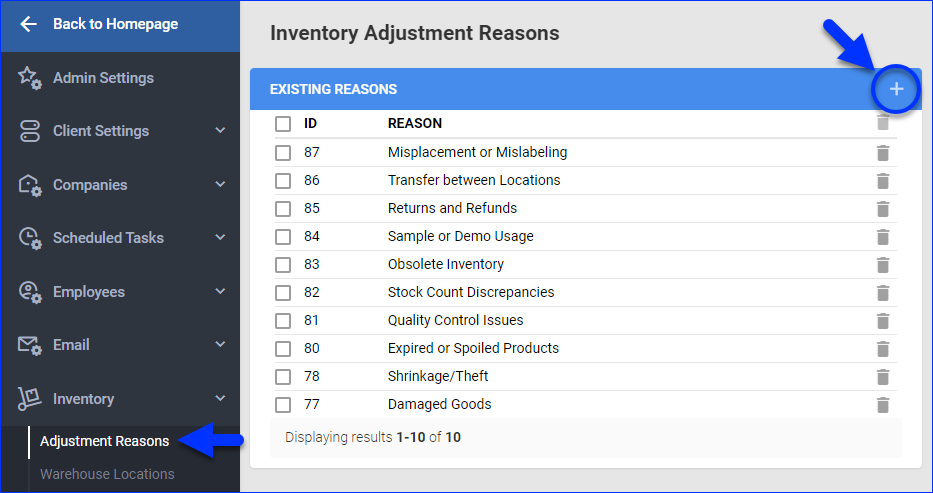
- Enter the Reason and click Save.
Related Client Settings
These Client Settings affect product inventory adjustments:
- Enable Update SiteCost When Adjusting Inventory – When this setting is enabled, a field called Site Cost appears in the Adjust Inventory pop-up window when updating a regular warehouse. This field allows you to manually change a product’s site cost during inventory adjustments.
- Allow Entering Inventory Cost When Adjusting Inventory – When this setting is enabled, a field called Inventory Cost appears in the Adjust Inventory pop-up window when updating a regular warehouse. Additionally, a column header called Cost will appear in the Excel file template for bulk inventory adjustments.
- Always Require Inventory Adjustment Reason – When this setting is enabled, the Adjustment Reason will become a required field that can’t be bypassed when creating adjustments.
Overview
Sellercloud lets you make manual product inventory adjustments to increase or decrease your products’ Physical Inventory count at any time. The steps to adjust product inventory differ depending on whether the Warehouses where your products are stored are Bin-Enabled or not.
You can use the Inventory Movement History and the Inventory Adjustment Audit report to review adjustments made to product inventory.
Adjust Product Inventory
You can adjust product inventory individually or in bulk.
Individually
To adjust inventory:
- On the Product Details Page, click on the Product Warehouse link.
- Open the Adjust Inventory tab.
- Select a warehouse and enter an adjustment quantity. To make an adjustment, you must choose an adjustment reason. Adjustment reasons can be saved under the Settings tab by clicking Inventory Adjustment Reasons. All adjustments will be saved in the grid below and will include the quantity of the adjustment, when it was adjusted, and who made the adjustment.
In Bulk
To adjust inventory in bulk:
- Click Warehouse Inventory Adjustment on the Inventory menu and download the template. Then, import the file on this page.
- Under the reports tab, you can generate an inventory adjustment audit to track all quantity adjustments made to any product in your system.
- Refer to Bin Inventory Movements to see the inventory adjustments across bins. To access it, go to Inventory > Manage Inventory > Product. Click the Bin Movement Details option (see figure below).
