Overview
Real-Time Connect (RTC) helps you track and troubleshoot your Employees’ connected installations: Skustack, Shipbridge, Receivebridge, and Imagebridge. RTC shows you details about each installation and allows you to perform various actions, such as downloading product settings and log files, sending announcement messages, viewing the physical location of each installation on a world map, and even shipping orders and printing documents.
To access RTC, go to https://app.rts.sellercloud.com/ and sign in with a Sellercloud Client Admin account. Once you sign in to RTC, you will see three tabs available to you in the menu: Installations, Announcements, and Map. Refer to the sections below to learn more about each one.
Prerequisites
To use RTC, complete the following requirements:
- If you use Skustack, open a ticket with Sellercloud Support to enable the App Setting EnableRealTimeConnect.
- Log in with a Sellercloud Client Admin account.
Installations
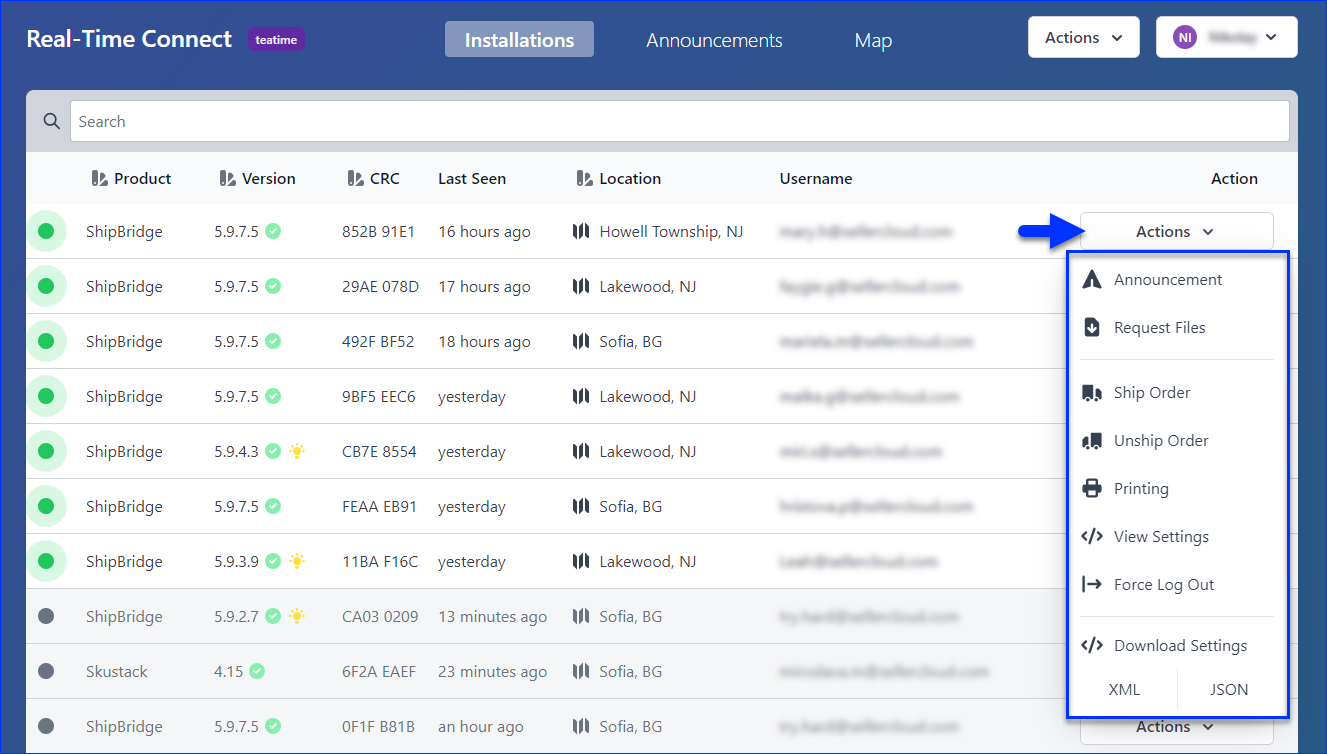
The Installations tab provides detailed information about each connected device and the associated user. It also allows you to execute various actions to troubleshoot issues.
View Details
You can see the following details:
- Product – The product that has been installed: Skustack, Shipbridge, Receivebridge, or Imagebridge.
- Version – The version of the product installation.
- CRC – A hash of the device’s installation identifier. Hover over to display the complete installation identifier.
- Last Seen – The last time the user has connected to the installed product.
- Location – The location from which the last connection was established.
- Username – The user’s Sellercloud or Skustack login email address.
Actions
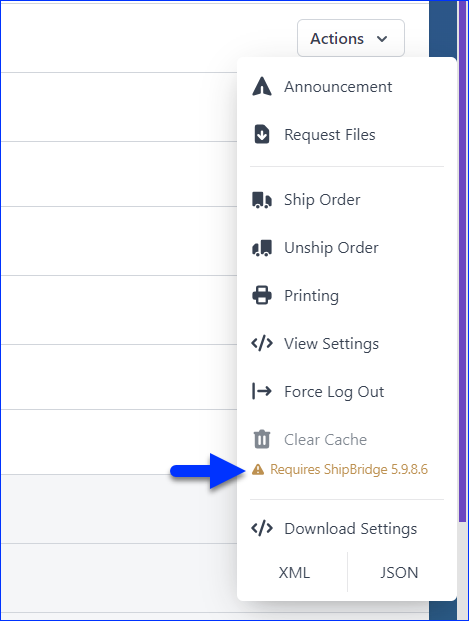
You can click the Actions icon to the right to execute these actions on each installation:
- Announcement – Create and send an announcement to the connected user installations.
- Request Files – Get service files related to specific orders and time ranges. You can get the Error log, Postage log, Timing log, and Settings.
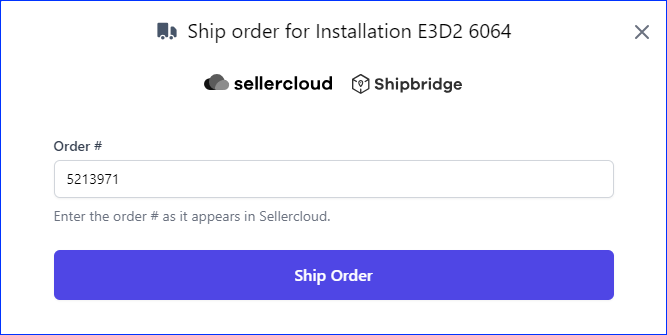
- Ship Order – Enter an Order # to ship an order from the installation.
- Unship Order – Enter an Order # to unship an order.
- Printing – Print a document from a specific printer connected to the installation.
- View Settings – View the installation’s settings and download them in JSON.
- Force Log Out – Log out the user from the installation.
- Download Settings – Download the installation’s settings in XML or JSON format.
Ship Orders via RTC
RTC allows you to ship orders using the currently assigned shipping carrier and method.
Individually
When shipping individual orders from RTC:
- You must select an active Shipbridge installation that is running and is connected to the internet.
- Settings such as carrier credentials must be configured locally in Shipbridge.
To ship an order:
- Log in to https://app.rts.sellercloud.com/ with your Sellercloud Client Admin account.
- Under the Installations tab, locate the Shipbridge installation.
- Click Actions to the right and select Ship Order.

- Enter the Order # and click Ship Order.
In Bulk
You can use an Order Export plugin to ship orders through Sellercloud via the RTC API. Orders will be shipped using the currently assigned shipping carrier and method.
First, open a ticket with Sellercloud Support and request that the Ship Orders With RTC – Order Export plugin be installed on your server.
Next, create the following Custom Company Settings:
- Rtc_Username – Enter the Client Admin account with which you use RTC.
- Rtc_Password – Enter your password.
- Rtc_Team – Enter your Sellercloud team name.
- Rtc_MarkerId – Enter the Marker ID of your Shipbridge installation. To find it, hover the CRC column under the Installations tab in RTC.
- (Optional) Rtc_TokenUrl – Defaults to https://gateway.api.sellercloud.com.
- (Optional) Rtc_TokenEndpoint – Defaults to /token.
- (Optional) Rtc_ShippingUrl – Defaults to https://rtc.sellercloud.com.
In addition, create a Custom Order Column IsOrderShippedThroughRTC. This column will automatically be set to True for all orders you ship this way.
Manually
To execute the plugin manually:
- Go to Orders > Manage Orders.
- Set up your filters, and then Search. You can also use a Saved Search.
- Select the orders you want to ship.
- Access the Actions menu at the bottom right and select Export > More Options…

- From the Plugin dropdown list, select Ship Orders With RTC – Order Export.
- Click Export.
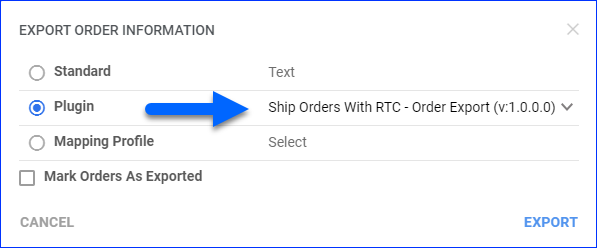
- This action creates a Queued Job. You can click the link at the bottom to access it. A Notification will appear when the job is finished.
Automatically
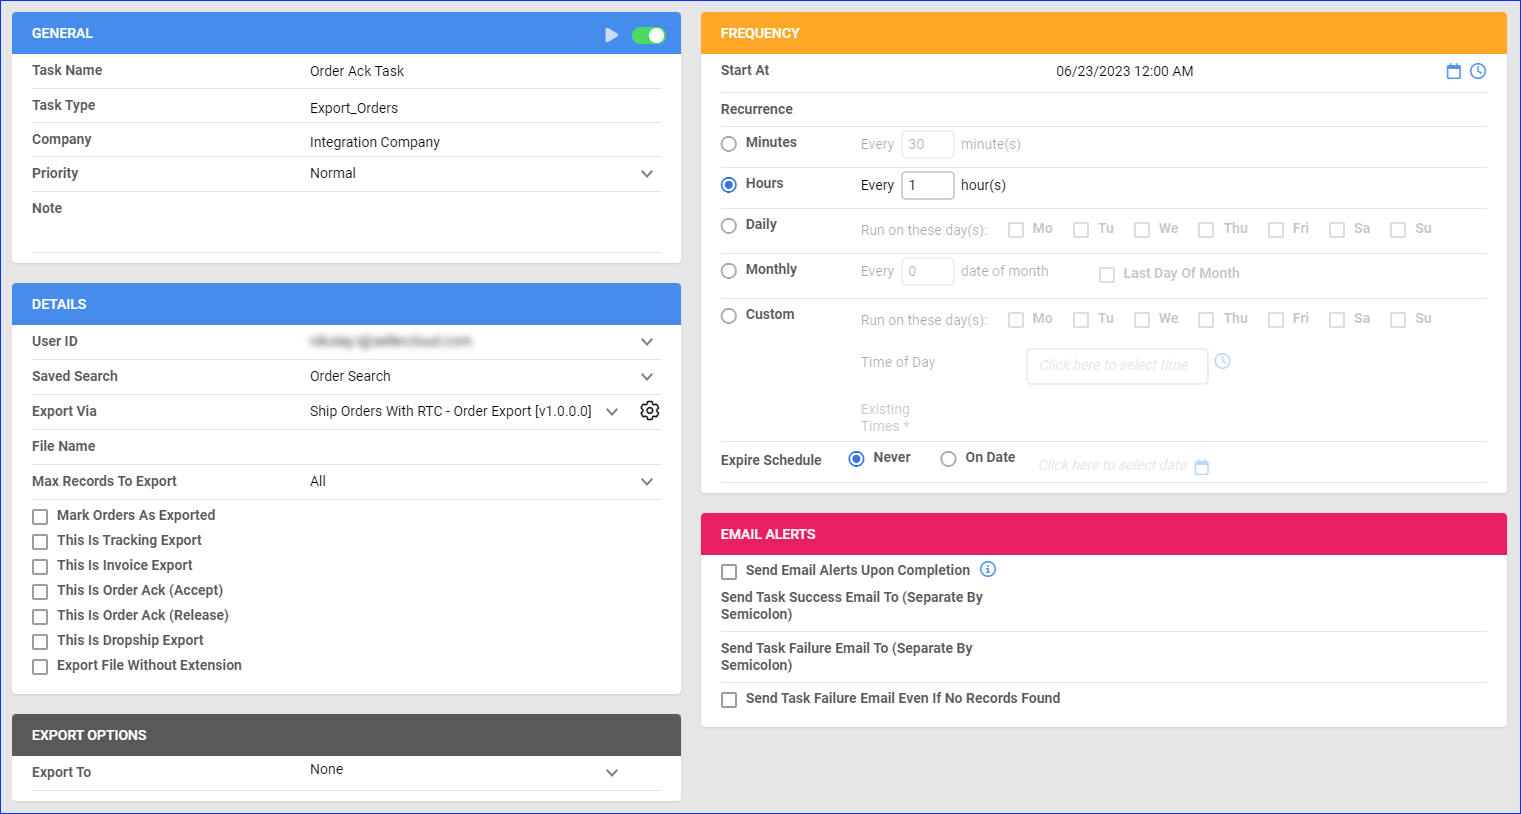
With this method, you can automate shipping by creating a Scheduled Task to execute the plugin on a regular basis.
First, create a Saved Search to filter the orders you want to ship with the RTC plugin based on your preference. For example, you can filter by IsOrderShippedThroughRTC – False to target only orders that have not been shipped with the plugin.
Next, create the Scheduled Task:
- Navigate to Settings > Scheduled Tasks > Manage Scheduled Tasks.
- Click the green + icon: Create New Scheduled Task.
- Complete as follows:
- Click Task Type and select Export Orders.
- Set the Task Name.
- Select the Company.
- Select the Start Time.
- Click CREATE.
- On the Scheduled Task page, click the Edit button at the top right corner.
- In the Details panel:
- Click the User ID menu and select your email.
- Click the Saved Search menu and select the saved search you created earlier.
- Click the Export Via menu and select Ship Orders With RTC – Order Export.
- In the Export Options section, set Export To to None.
- In the Frequency section, specify the task frequency. For optimal performance, select a range between thirty minutes and one hour.
- In the General section, click the Enable button.
- Click Save.
Announcements
RTC allows you to create announcements that appear on users’ connected installations. Announcements have priority levels and can appear differently depending on their type – whether they simply provide information or are meant to tell the user about a warning or an error.
Create Announcements
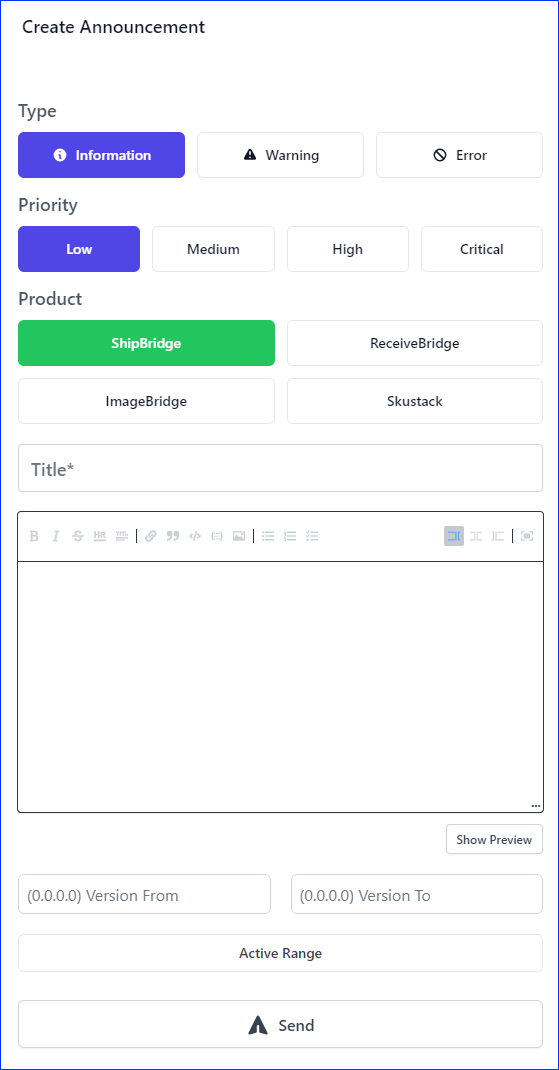
To create a global announcement for all employees:
- Access the Installations or Announcements tab.
- Click the Actions menu at the top right corner and select Send Announcement.

- Select the Type of the announcement: Information, Warning, or Error.
- Select the Priority of the announcement: Low, Medium, High, or Critical.
- Select the Product where the announcement will appear: Shipbridge, Receivebridge, Imagebridge, or Skustack.
- Enter a Title.
- Enter the actual announcement in the text field. You can click Show Preview for a quick preview.
- In the Version From and Version To fields, enter the earliest and latest versions on which the announcement will appear.
- Click Active Range and select the time range during which the announcement will be active.
- Click Send.
Manage Announcements
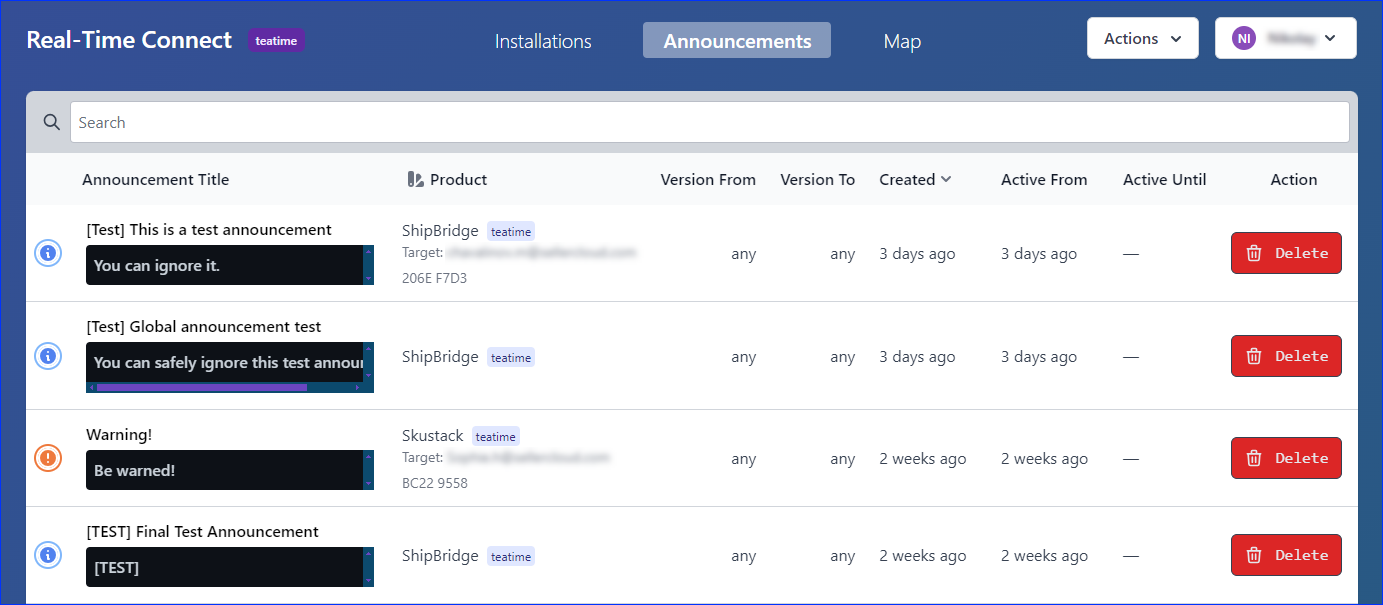
The Announcements tab shows all announcements created on RTC:
- Announcement Title – The title of the announcement.
- Product – The product where the announcement will appear.
- Version From – The earliest product version on which the announcement will appear.
- Version To – The latest product version on which the announcement will appear.
- Created – Shows how long ago the announcement was created.
- Active From – Shows for how long the announcement has been active.
- Active Until – Shows for how long the announcement will remain active.
- Action – Click the Delete button to permanently remove the announcement.
Map
The Map tab shows a world map, visually pinpointing all the locations from which installations have been set up and detailing the number of installations in each location. You can also see the installed product, version, and CRC code.
- Yellow and blue circles represent installations. Click them to zoom in and view more details about the installations at the selected location.
- Use the left-side panel to search for installations or find them by team name.

