Overview
A Saved View in Sellercloud allows you to store and preserve specific search criteria for future use. Instead of repeatedly inputting the same search parameters, you can save them, making it easier to access the desired information in the future.
You can edit or delete existing saved searches, ensuring that your search preferences stay up-to-date. By tailoring the searches to your specific requirements, you can efficiently find and organize data, such as products, orders, or customer information.
You can save filtered searches as Saved Views in Delta or Saved Searches in Alpha. The difference is that in Delta, you can also customize the grid columns.
Configure Saved Views
You can filter and save views on the Catalog, Inventory, FBA Shipments, Orders, and Purchasing pages.
Create a Saved View
To create a Saved View, navigate to the appropriate page, for example, Manage Catalog:
- Catalog > Manage Catalog > Choose default or custom filters.
- Let’s say you want to search for only Shadow Products > Click Add filter > Choose Shadows.
- Click on Save view > Type a name for it > Click Save.

Access your Saved Views from the Saved Views dropdown. Summarized data of your saved views are also available on the Home page under the Saved Views panel.
You can also override an existing Saved View and change its search parameters. Simply load it, edit the filters, and click Save View. То create a new one, click on the arrow, and press Save view as..
Copy Saved Views
To copy a saved view, navigate to the appropriate page:
- After you create a Saved View, click the vertical ellipsis and select Manage Saved Views.
- Click Copy Saved View to Another User. You must be either a Client Admin or be assigned to the role of Copy Saved Views.
- Select one or multiple users and click Copy.

Manage Saved Views
You can also delete, edit, and change the sort order of saved views.
- After you create a Saved View, click the vertical ellipsis and select Manage Saved Views.
- You can perform the following actions:
- Delete Saved Views
- Copy Saved Views
- Change the order they appear
- Display on Dashboard – Once you select that checkbox, the Saved View will be visible on the Home Page. If you do not see Saved views on the Home Page, you can enable them by clicking the Gear Icon on the Home page and checking the box.
- Mark a Saved View as Default. – Once you set a saved search as a default one, then the system will instantly show search results based on the chosen criteria of that default search.

Customize Grid Columns
To organize your saved views more efficiently, you have the option to customize the columns in the grid either before or after customizing your search filters.
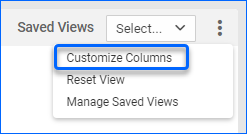
- Click the vertical ellipsis in the upper-right corner > Customize Column.
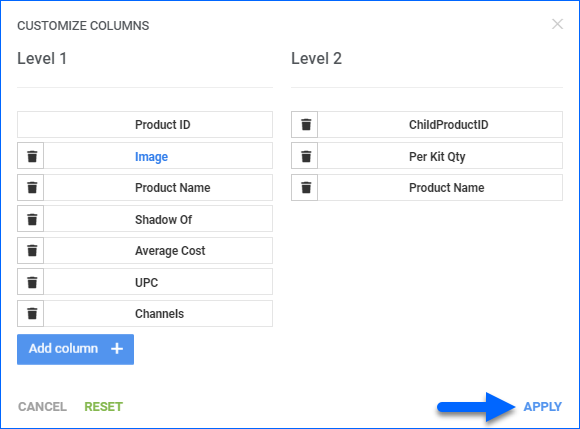
- Rearrange or add columns in the grid > Apply.
Overview
A Saved Search in Sellercloud allows you to store and preserve specific search criteria for future use. Instead of repeatedly inputting the same search parameters, you can save them, making it easier to access the desired information in the future.
You can edit or delete existing saved searches, ensuring that your search preferences stay up-to-date. By tailoring the searches to your specific requirements, you can efficiently find and organize data, such as product listings, orders, or customer information.
You can save filtered searches as Saved Views in Delta or Saved Searches in Alpha. The difference is that in Delta, you can also customize the grid columns.
Configure Saved Search
You can filter and save searches on the Inventory, FBA Shipments, Orders, and Purchasing pages.
Create a Saved Search
To create a Saved Seach, navigate to the page you want to manage, for example, if you want to look for Products:
- Go to Inventory > Choose default filters or select filters from the Advanced Search
- Let’s say you want to search for only Shadow Products > Click Advanced Search > Choose Shadows > Click Search.
- Then, go to Action Menu > Save Search As > Go
- Type down a name for your Search > Click on Save Search.
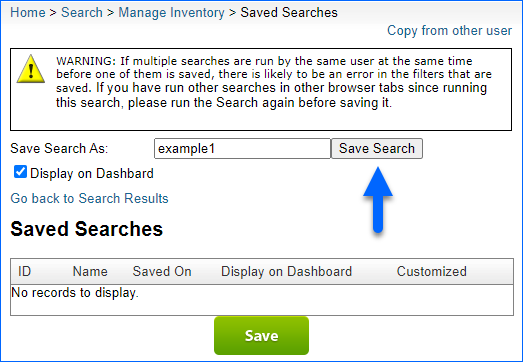
- Access your Saved Search from the Saved Search dropdown.

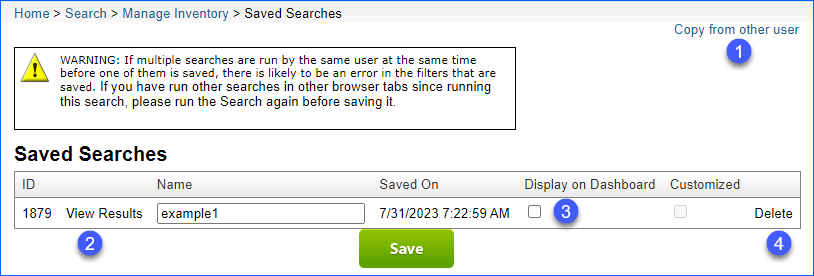
Summarized data of your saved search is also available on the Home page under the Saved Search panel. Enable Show saved searches on the dashboard Client Setting and make sure to check Display on Dashboard for the searches you want to see on the Home Page.
Copy Saved Searches
To copy a saved search navigate to:
- Click on the Action Menu > Save Search As.
- Click Copy From Other User. You must be either a Client Admin or be assigned to the role of Copy Saved Searches.
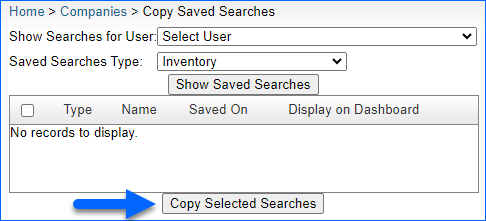
- You will be redirected to a new window > Select the following:
- Show Searches for User
- Saved Searches Type
- Click on Show Saved Searches.
- Choose the search you want to copy and click on Copy Selected Searches.
Manage Saved Search
You can also delete, edit, view results, and display the Saved Search on the dashboard.
