Overview
ShipStation is a shipping and e-commerce solution designed to help businesses streamline their order fulfillment processes. It provides a centralized platform for managing online orders and automating shipping processes across various sales channels.
In addition to the standard ShipStation API integration, Sellercloud also offers the integration outlined in this article. The workflow consists of importing orders from ShipStation’s integrated channels into Sellercloud for in-house management.
Prerequisites
To use ShipStation’s API, you’ll first need to generate a ShipStation API key and API secret that will be included in Sellercloud’s API calls.
Sellercloud Support
Open a ticket with Sellercloud Support and request the following plugins be installed on your server:
- ShipStation Order Import – Imports orders from ShipStation into Sellercloud.
- ShipStation Tracking Export – Exports order tracking information from Sellercloud to ShipStation. This plugin is typically used if you prefer to manage the shipping aspects of your order fulfillment operations through Sellercloud.
- ShipStation Tracking Import – Imports tracking information for orders that originated from and are shipped via ShipStation into Sellercloud. If you use Skustack, tthe plugin also checks the warehouse of the first item in the order and deducts the quantity from the respective warehouse Picking Bin.
- ShipStation Order Cancelled Import – The plugin imports cancelled order information from ShipStation into Sellercloud.
If necessary, you can request additional customizations or other plugins for this integration. Any such modifications will be billable.
Custom Company Settings
Create the following Custom Company Settings on the company created for the integration:
- ShipStation_API_Key – Your ShipStation API key. This is used as the username for the API authentication.
- ShipStation_API_Secret – Your ShipStation API secret. This is used as the password for the API authentication.
- (Optional) ShipStation_API_URL – You can use this setting to override the default API endpoint URL. If the setting does not exist or is empty, it defaults to https://ssapi.shipstation.com/orders for the order imports and https://ssapi.shipstation.com/orders/markasshipped for the tracking export.
- ShipStation_LastSuccessfulExecution – This setting is automatically updated each time the Order Import plugin runs successfully. The same plugin then uses this date as a filter when requesting the next batch of orders. This ensures that only new orders are requested and prevents throttling.
- (Optional) ShipStation_TimeToFilterOrdersBeforeLastExec – This setting enables you to modify the date-time filter when requesting new orders and allows you to import orders into Sellercloud that initially did not meet the import criteria (i.e., unpaid orders) but now meet the requirements. By default, the Order Import plugin uses the date in the ShipStation_LastSuccessfulExecution. Enter ‘-01:00:00’ to force the request to also include orders created one hour before the last successful execution. The expected format is -hours:minutes:seconds. If you fill in “-2”, it will be considered as days-to-go-back.
- (Optional) ShipStation_TrackingImport_API_URL – You can use this setting to override the API endpoint URL used to import tracking for orders shipped via ShipStation. The default is https://ssapi.shipstation.com/shipments.
- (Optional) ShipStation_Fulfillments_API_URL – the value should be https://ssapi.shipstation.com/fulfillments. This setting allows us to pull tracking information for orders that were manually marked as Shipped on ShipStation and change their status to Fully Shipped in Sellercloud. If your workflow doesn’t include manually shipping orders, do not create this setting.
- ShipStation_TrackingImport_LastSuccessfulExecution – This setting is automatically updated each time the Tracking Import plugin runs successfully. The same plugin then uses this date as a filter when requesting the next batch of shipped orders. This ensures that only newly shipped orders are requested and prevents throttling. Clear the setting if you want to get all available shipments.
- (Optional) ShipStation_TrackingImport_TimeToFilterOrdersBeforeLastExec – This setting enables you to modify the date-time filter when requesting tracking and allows you to import shipping information into Sellercloud for orders that initially did not meet the import criteria but now meet the requirements. By default, the Tracking Import plugin uses the date in the ShipStation_TrackingImport_LastSuccessfulExecution. Enter ‘-01:00:00’ to force the request to also include orders shipped one hour before the last successful execution. The expected format is -hours:minutes:seconds. If you fill in “-2”, it will be considered as days-to-go-back.
- ShipStation_CancelledOrdersLastExecution – This setting is automatically updated each time the Order Cancellation Import plugin runs successfully. The same plugin then uses this date as a filter when requesting the next batch of cancelled orders. This ensures that only newly cancelled orders are requested and prevents throttling. Clear the setting if you want to get all available cancellations.
- (Optional) ShipStation_CancelledOrdersTimeToFilterOrdersBeforeLastExec – This setting enables you to modify the date-time filter when requesting cancelled orders and allows you to import cancellations into Sellercloud for orders that initially did not meet the import criteria but now meet the requirements. By default, the Cancellation Import plugin uses the date in the ShipStation_CancelledOrdersLastExecution. Enter ‘-01:00:00’ to force the request to also include orders cancelled one hour before the last successful execution. The expected format is -hours:minutes:seconds. If you fill in “-2”, it will be considered as days-to-go-back.
- (Optional) ShipStation_API_TrackingExport_NotifyCustomer – Set to True or False. This will be the default value for all orders. When Sellercloud sends tracking to ShipStation, this setting will determine whether the customer will receive a notification that their order has been shipped.
- (Optional) ShipStation_API_TrackingExport_NotifyChannel – Set to True or False. This will be the default value for all orders. When Sellercloud sends tracking to ShipStation, this setting will determine whether the channel the order was placed on will receive a notification that the order has been shipped.
- ShipStation_ImportOrdersAsUnpaid – When set to True, all imported orders will have Payment Status: Unpaid in Sellercloud.
- (Optional) ShipStation_SkipUnchargedOrders – Default value is False. When this setting is set to True, the plugin will not import orders if they are not charged on ShipStation.
Custom Order Columns
Create the following Custom Order Columns:
- SHIPSTATION_CUSTOM_FIELD1
- SHIPSTATION_CUSTOM_FIELD2
- SHIPSTATION_CUSTOM_FIELD3
Order Import
The ShipStation Order Import plugin pulls orders from your ShipStation account based on their status and creation date. It creates new orders in Sellercloud with Unshipped and Paid statuses. You can override this by configuring the ShipStation_ImportOrdersAsUnpaid custom company setting.
The ShipStation Channel Order ID is saved as the OrderSourceOrderID in Sellercloud, while the ShipStation Order Number is stored internally. All orders are imported under the channel Website.
If a ShipStation order contains a line item with a negative price, the plugin will not create the item in the Sellercoud order. Instead, the negative value will be added as a discount.
Automate Order Import
To create a Scheduled Task that imports orders:
- Navigate to Settings > Scheduled Tasks > Manage Scheduled Tasks.
- Click the green + icon: Create New Scheduled Task.
- Complete as follows:
- Click Task Type and select Import Orders.
- Set the Task Name.
- Select the Company.
- Select the Start Time.
- Click CREATE.
- The newly created Scheduled Task Details page will open automatically. Click the Edit button on the top right.
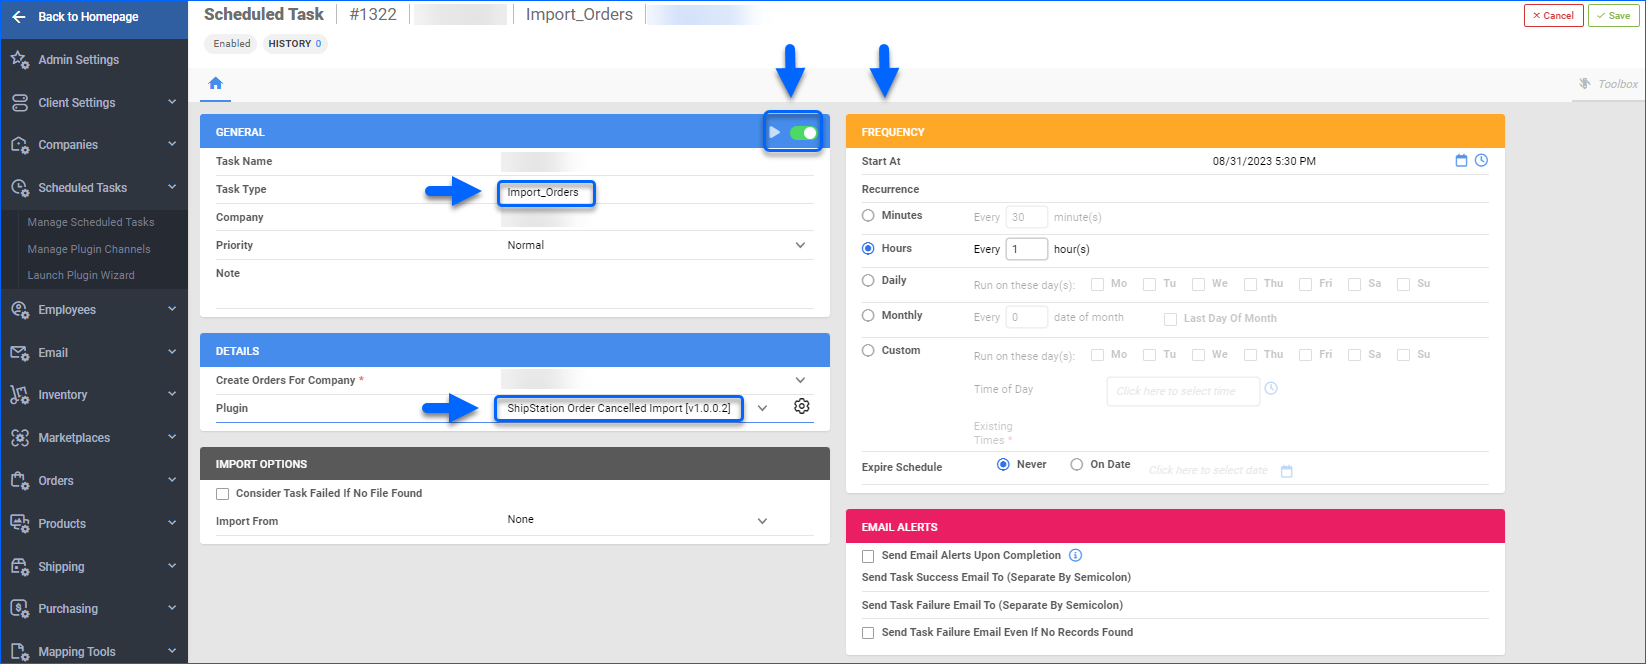
- In the Details section:
- Click Create Orders For Company and select the company designated for this integration.
- Click the Plugin menu and select ShipStation Order Import.
- In the Import Options section, set Import From to None.
- In the Frequency section, specify the task frequency. For optimal performance, select a range between thirty minutes and one hour.
- In the General section, click the Enable button.
- Click Save on the top right.

Tracking Export
The ShipStation Tracking Export plugin sends tracking information from Sellercloud to ShipStation, matching the orders by their ShipStation Order ID. This plugin is only required if you manage order fulfillment within Sellercloud.
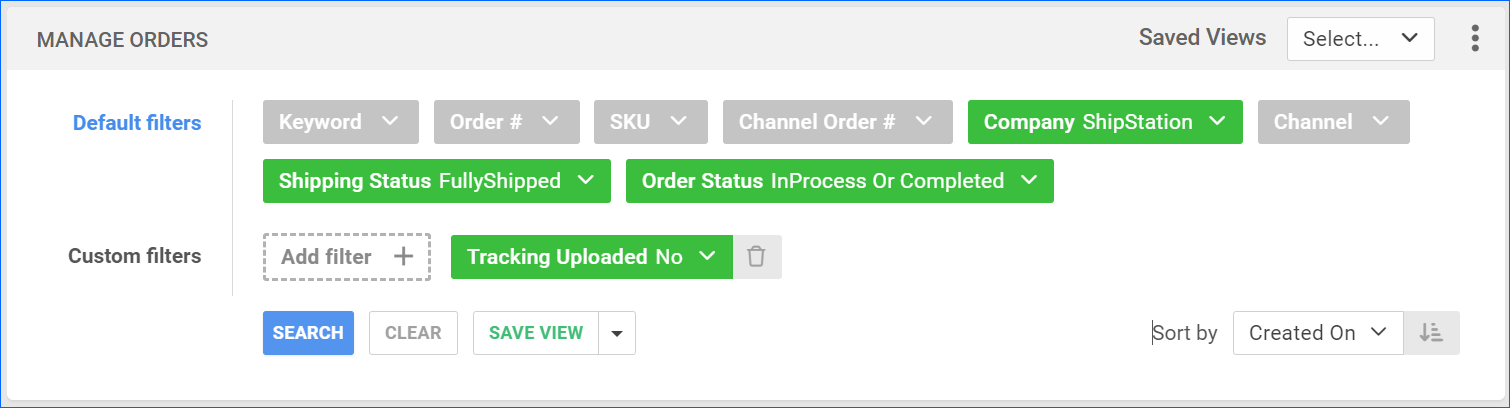
Before you move on, create a Saved Search for orders filtered by:
- Company – The company you created for the integration.
- Order Status – InProcess or Completed
- Shipping Status – Fully Shipped
- Tracking Uploaded – No
Automate Tracking Export
To create a Scheduled Task that exports order tracking:
- Navigate to Settings > Scheduled Tasks > Manage Scheduled Tasks.
- Click the green + icon: Create New Scheduled Task.
- Complete as follows:
- Click Task Type and select Export Orders.
- Set the Task Name.
- Select the Company.
- Select the Start Time.
- Click CREATE.
- The newly created Scheduled Task Details page will open automatically. Click the Edit button on the top right.
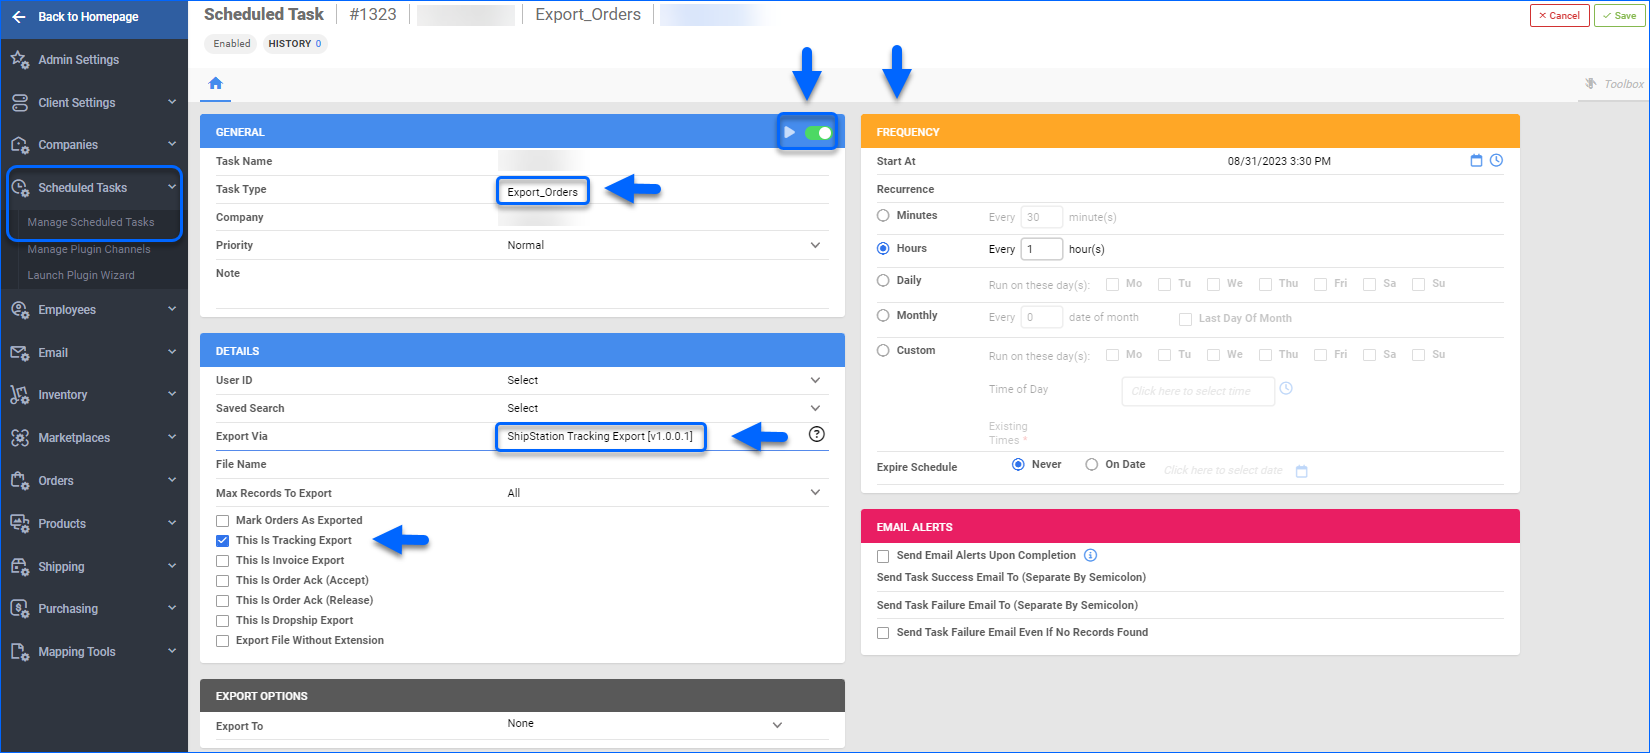
- In the Details panel:
- Click the User ID menu and select your email.
- Click the Saved Search menu and select the saved search you created earlier.
- Click the Export Via menu and select ShipStation Tracking Export.
- Check This Is Tracking Export.
- In the Export Options section, set Export To to None.
- In the Frequency section, specify the task frequency. For optimal performance, select a range between thirty minutes and one hour.
- In the General section, click the Enable toggle button.
- Click Save on the top right.
Tracking Import
The ShipStation Tracking Import plugin imports tracking information from ShipStation for orders imported by the Order Import plugin.
By default, this plugin can only access orders that were shipped via ShipStation. If your workflow includes marking orders as Shipped manually within ShipStation or via their API, you must configure the ShipStation_Fulfillments_API_URL Custom Company Setting to ensure they are also retrieved and updated in Sellercloud.
If an order is shipped in multiple packages, the plugin will retrieve all tracking numbers and save them to your Sellercloud Order.
Orders set to ship from a bin-enabled warehouse are also considered in this workflow. The plugin checks the warehouse of the first item in the order and deducts the quantity from the respective warehouse Picking Bin.
Automate Tracking Import
To create a Scheduled Task that imports tracking information from ShipStation:
- Navigate to Settings > Scheduled Tasks > Manage Scheduled Tasks.
- Click the green + icon: Create New Scheduled Task.
- Complete as follows:
- Click Task Type and select Import Orders.
- Set the Task Name.
- Select the Company.
- Select the Start Time.
- Click CREATE.
- The newly created Scheduled Task Details page will open automatically. Click the Edit button on the top right.
- In the Details section:
- Click Create Orders For Company and select the company designated for this integration.
- Click the Plugin menu and select ShipStation Tracking Import.
- In the Import Options section, set Import From to None.
- In the Frequency section, specify the task frequency. For optimal performance, select a range between thirty minutes and one hour.
- In the General section, click the Enable button.
- Click Save on the top right.

Cancelled Orders Import
The ShipStation Order Cancelled Import plugin imports cancellations into Sellercloud and sets the local orders to Cancelled.
Automate Cancelled Orders Import
To create a Scheduled Task that imports cancellations:
- Navigate to Settings > Scheduled Tasks > Manage Scheduled Tasks.
- Click the green + icon: Create New Scheduled Task.
- Complete as follows:
- Click Task Type and select Import Orders.
- Set the Task Name.
- Select the Company.
- Select the Start Time.
- Click CREATE.
- The newly created Scheduled Task Details page will open automatically. Click the Edit button on the top right.
- In the Details section:
- Click Create Orders For Company and select the company designated for this integration.
- Click the Plugin menu and select ShipStation Order Cancelled Import.
- In the Import Options section, set Import From to None.
- In the Frequency section, specify the task frequency. For optimal performance, select a range between thirty minutes and one hour.
- In the General section, click the Enable button.
- Click Save on the top right.