Overview
Wish Express is an expedited shipping program offered by Wish.com that guarantees fast delivery times for select items, often within 5 business days or less. This service provides transparency in shipping and ensures the timely arrival of products.
Prerequisites
Before you can enable Wish Express for your account, complete the following requirements:
- If you don’t have a seller account yet, you must register on the Wish Merchant Portal.
- Complete your Wish Account Integration in Sellercloud.
Enable Wish Express
To enable Wish Express in Sellercloud, navigate to:
- Settings > Manage Companies > Select a company.
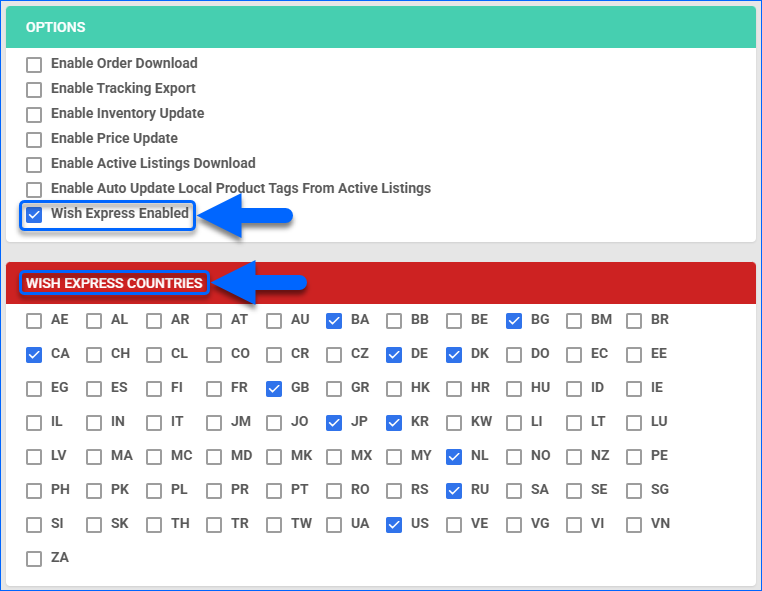
- Go to Toolbox > Wish > General Settings
- Click Edit.
- Check the Wish Express Enabled box.
- Select the desired Wish Express Countries.
- Click Save.

Configure Wish Express Products
Once a product is marked as Wish Express, you’re responsible for meeting the shipping deadlines for every order in your selected countries. You can configure your products individually or in bulk.
Individually
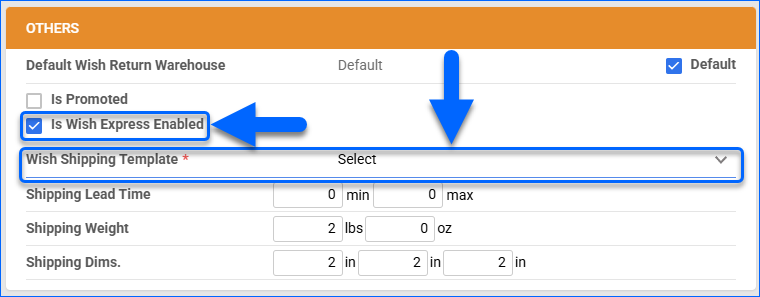
- Go to Catalog > Manage Catalog > Select a product > Toolbox > Wish Properties.
- Click Edit.
- In the Others panel, check the Is Wish Express Enabled box and select the Wish Shipping Template.
- Click Save.
In Bulk
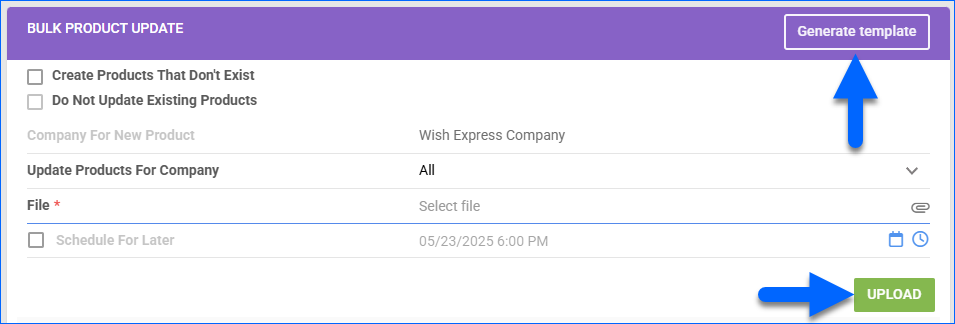
- Go to Catalog > Tools > Import Product Info > Bulk Product Update.
- Click Generate Template > Choose Create New Template > Select File Format from the dropdown menu. You need three column headers for this import:
- ProductID — This column is required for any bulk update to identify the products in the system.
- WishExpressEnabled — This value must be set to True.
- WishShippingTemplateID — The Shipping Template ID can be found in Company Settings under Wish.
- Select the columns from Add Columns To Template > Next > Check Save Template > Download.
- Populate the columns in your template > Go back to Bulk Product Update > Select your file > Upload.

Update Wish Express Listings
To ensure that any Express configurations made in Sellercloud are also reflected on Wish, you must update your Wish Listings. The process is identical to updating your standard listings and can be completed either automatically or manually.
To update your products automatically:
- Go to Settings > Manage Companies > Select a company.
- In Toolbox, select Wish > General Settings.
- Click Edit.
- In the Controls panel, check the Enable Inventory Update box.
- Click Save.

To update your products manually, use the Update Shipping Info action instead.
