Overview
Essendant Inc., previously operating under the name United Stationers, is recognized as a leading national wholesale distributor of office supplies. Their product range includes traditional office supplies, furniture, janitorial and breakroom essentials, and technology products.
Integrating Essendant allows you to export your orders and import acknowledgment and tracking information. The integration works through EDI documents, transmitting information between the two services via plugins and Scheduled Tasks.
Prerequisites
Before you can integrate Essendant into Sellercloud, complete the following requirements.
Essendant Support
You must contact Essendant for your FTP details: Server Name, Username, and Password. You will need them when setting up the scheduled tasks to automate the plugins.
Sellercloud Support
Open a ticket with Sellercloud Support and request the following plugins to be installed on your server:
- Essendant Order Export EDI 850 – Exports orders from Sellercloud to Essendant in EDI 850 format.
- Essendant Order Import EDI 855 – Imports order acknowledgment from Essendant in EDI 855 format.
- Essendant Tracking Import EDI 856 – Imports tracking information from Essendant in EDI 856 format.
If necessary, you can request additional customizations or other plugins for this integration. Any such modifications will be billable.
Custom Company Settings
Create the following Custom Company Settings.
On your default company:
- STControlNumber
- GSControlNumber
- ISAControlNumber
On the company created for the integration:
- Essendant_CustomerISAID – Your ISA ID. Typically, this is your phone number but it can be anything you set up with Essendant.
- Essendant_CustomerQualifier – Your Qualifier. Set to ZZ.
- Essendant_ISAID – Essendant’s ISA ID. This is provided by Essendant.
- Essendant_Qualifier – Essendant’ qualifier. Set to 01.
- Essendant_VendorID – The ID of the Vendor you created for this integration.
- Essendant_BuyerStoreNumber – Provided by Essendant.
- Essendant_IsInProduction – The value should be set to False during the EDI testing process. Once you have completed it, set it to True to move into Production.
- (Optional) Essendant_UseOrderSourceOrderID – The default value is False. When set to True, the plugins will use the Order Source Order ID instead of the Sellercloud Order ID as the order identifier.
Custom Product Columns
Create the following Custom Product Columns:
- (Optional) Essendant_Enabled – This column enables only specific products for Essendant. Set it to True for any products you want to send with the Inventory Export plugin. The data type is Boolean.
- Essendant_SKU – If the Essendant product ID differs from the Sellercloud SKU, enter it here. The data type is String.
- (Optional) Essendant_SafetyQty – A Safety Quantity for products on Essendant. The data type is Integer.
Custom Order Columns
Create the following Custom Order Columns:
- BOL – This is for the Bill of Lading document issued to a shipper by the transportation company. The Tracking Import plugin will automatically fill this in for each order after processing. The Data Type should be string, and the String Length should be set to 50.
Order Export
The Essendant Order Export EDI 850 plugin exports order data to Essendant in EDI 850 format and sets the order’s Dropship Status to Requested. The plugin also creates and links a Purchase Order.
Orders will be skipped if they contain unsupported characters within the Shipping Address and Customr Name.
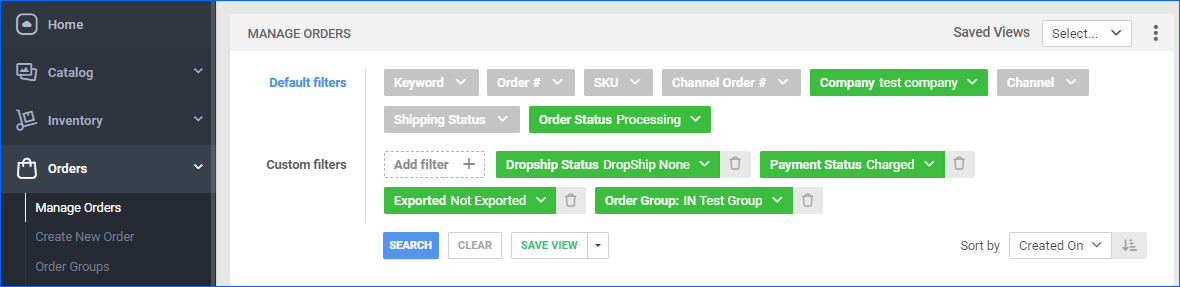
Before you move on, create a Saved Search for orders filtered by:
- Company – The company designated for the integration
- Order Status – Processing
- Dropship Status – DropShip None
- Payment Status – Charged
- Exported – Not Exported
You can add other filters to narrow down the list of orders further. For example, you can create an Order Group specifically for Essendant to ensure only the correct orders are sent.
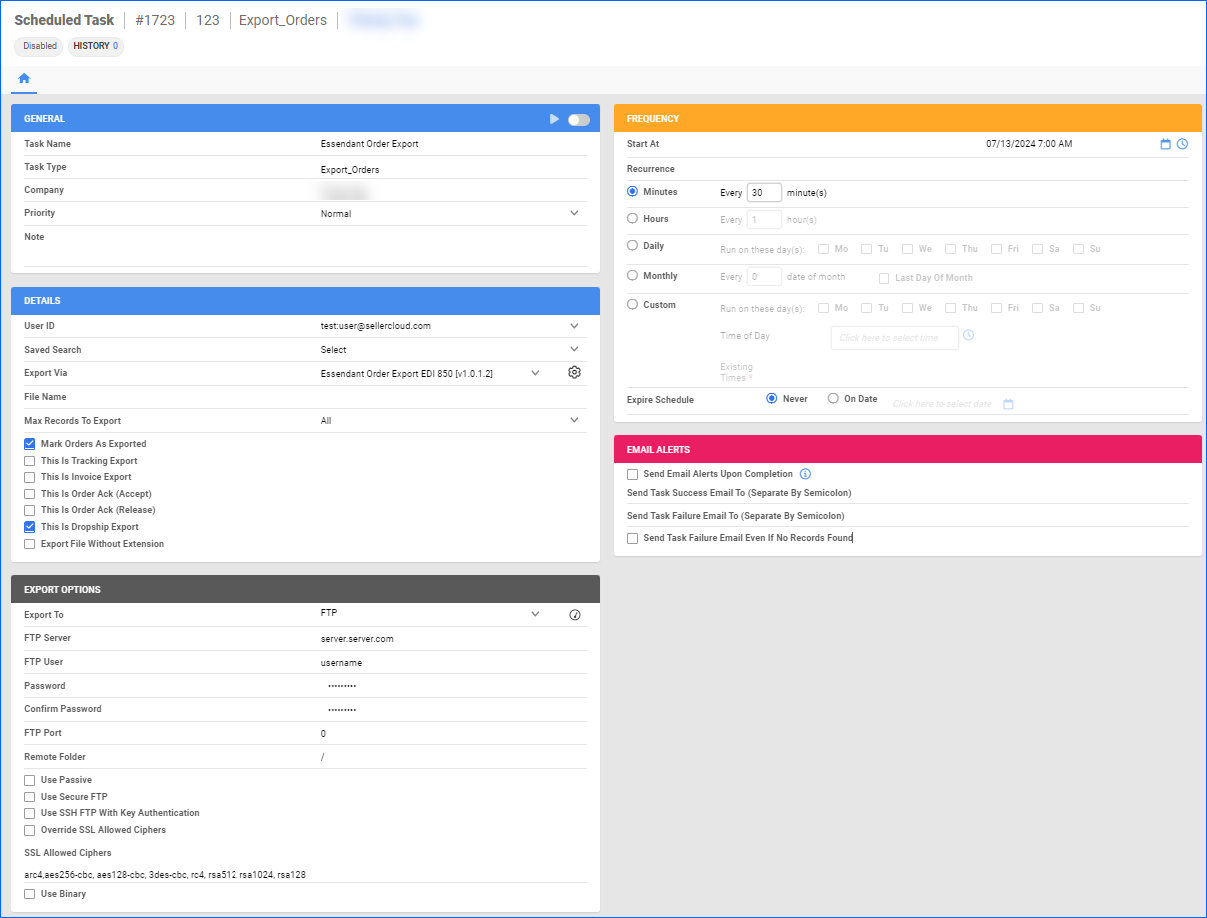
Automate Order Export
To create a Scheduled Task that exports orders:
- Navigate to Settings > Scheduled Tasks > Manage Scheduled Tasks.
- Click the green + icon: Create New Scheduled Task.
- Complete as follows:
- Click Task Type and select Export Orders.
- Set the Task Name.
- Select the Company.
- Select the Start Time.
- Click CREATE.
- The Scheduled Task Details page will open automatically. Click the Edit button on the top right.
- In the Details panel:
- Click the User ID menu and select your email.
- Click the Saved Search menu and select the saved search you created earlier.
- Click the Plugin menu and select Essendant Order Export EDI 850.
- Check Mark Orders as Exported.
- In the Export Options panel, set Export To to FTP and fill out the FTP fields.
- In the Frequency panel, specify the task frequency. For optimal performance, select a range between thirty minutes and one hour.
- In the General panel, click the Enable button.
- Click Save.
Order Acknowledgment
The Essendant Order Import EDI 855 plugin imports order acknowledgment to Sellercloud following the 855 EDI format and sets the order’s Dropship Status to Acknowledged. If the order cannot be fulfilled, the Dropship Status will be set back to None, and the order will be placed On Hold.
The plugin updates the Item Cost on the order based on the information in the acknowledgment file. Additionally, the Vendor Price of the product is also updated to reflect the correct Essendant price.
Automate Order Acknowledgment
To create a Scheduled Task that imports order acknowledgment:
- Navigate to Settings > Scheduled Tasks > Manage Scheduled Tasks.
- Click the green + icon: Create New Scheduled Task.
- Complete as follows:
- Click Task Type and select Import Orders.
- Set the Task Name.
- Select the Company.
- Select the Start Time.
- Click CREATE.
- The Scheduled Task Details page will open automatically. Click the Edit button at the top right corner.
- In the Details panel:
- Click the Import Via menu and select Essendant Order Import EDI 855.
- In the Import Options panel, set Import From to FTP and fill out the FTP fields.
- In the Frequency panel, specify the task frequency. For optimal performance, select a range between thirty minutes and one hour.
- In the General panel, click the Enable toggle button.
- Click Save.

Tracking Import
The Essendant Tracking Import EDI 856 plugin imports tracking information from Essendant to Sellercloud following the 856 EDI format. It sets the order Dropship Status to Processed and receives the linked PO. The order’s Ship Date is set to the time of import rather than the actual shipping date received in the file.
If an order was originally acknowledged but an issue during picking prevents fulfillment, the plugin will place it On Hold in Sellercloud.
The plugin supports importing multiple tracking numbers for multi-package shipping.
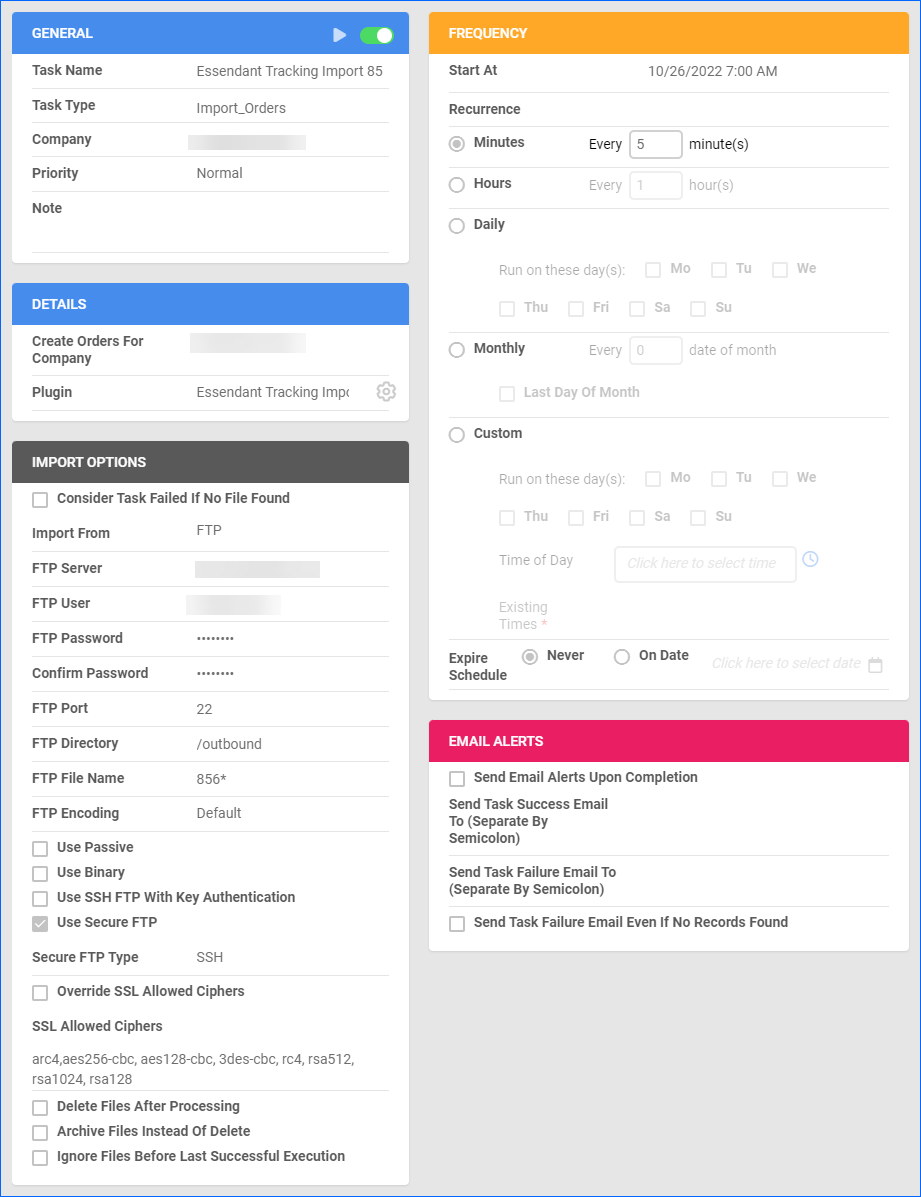
Automate Tracking Import
To create a Scheduled Task that imports order tracking:
- Navigate to Settings > Scheduled Tasks > Manage Scheduled Tasks.
- Click the green + icon: Create New Scheduled Task.
- Complete as follows:
-
- Click Task Type and select Import Orders.
- Set the Task Name.
- Select the Company.
- Select the Start Time.
- Click CREATE.
-
- The Scheduled Task Details page will open automatically. Click the Edit button at the top right corner.
- In the Details panel:
- Click the Import Via menu and select Essendant Tracking Import EDI 856.
- In the Import Options panel, set Import From to FTP and fill out the FTP fields.
- In the Frequency panel, specify the task frequency. For optimal performance, select a range between thirty minutes and one hour.
- In the General panel, click the Enable toggle button.
- Click Save.