Overview
The Vendor Invoices Workflow helps you organize and track payments and invoices at the vendor level, facilitating the reconciliation of bills against received inventory for precise financial management. The Manage Vendor Invoices page in Sellercloud provides quick and easy access to them, allowing you to perform bulk actions and create new invoices.
Manage Vendor Invoices Page
To access the Manage Vendor Invoices page, go to Purchasing > Vendors > Manage Vendor Invoices. It consists of three key components:
- Search Filters – A wide range of search options that let you narrow down the results and show only the invoices you are interested in. You can Save the View for repeat use.
- Results Grid – A list of invoices that match your search criteria. You can change the criteria by which it is sorted and control the visibility of data columns.
- Actions – You can perform these on one invoice at a time or in bulk.
Search Filters
Some filters allow inputting multiple values, while others offer a specific set of choices from a dropdown. Each subsequent choice narrows down the scope of your search results. You can apply several search criteria or none at all to see all existing invoices.
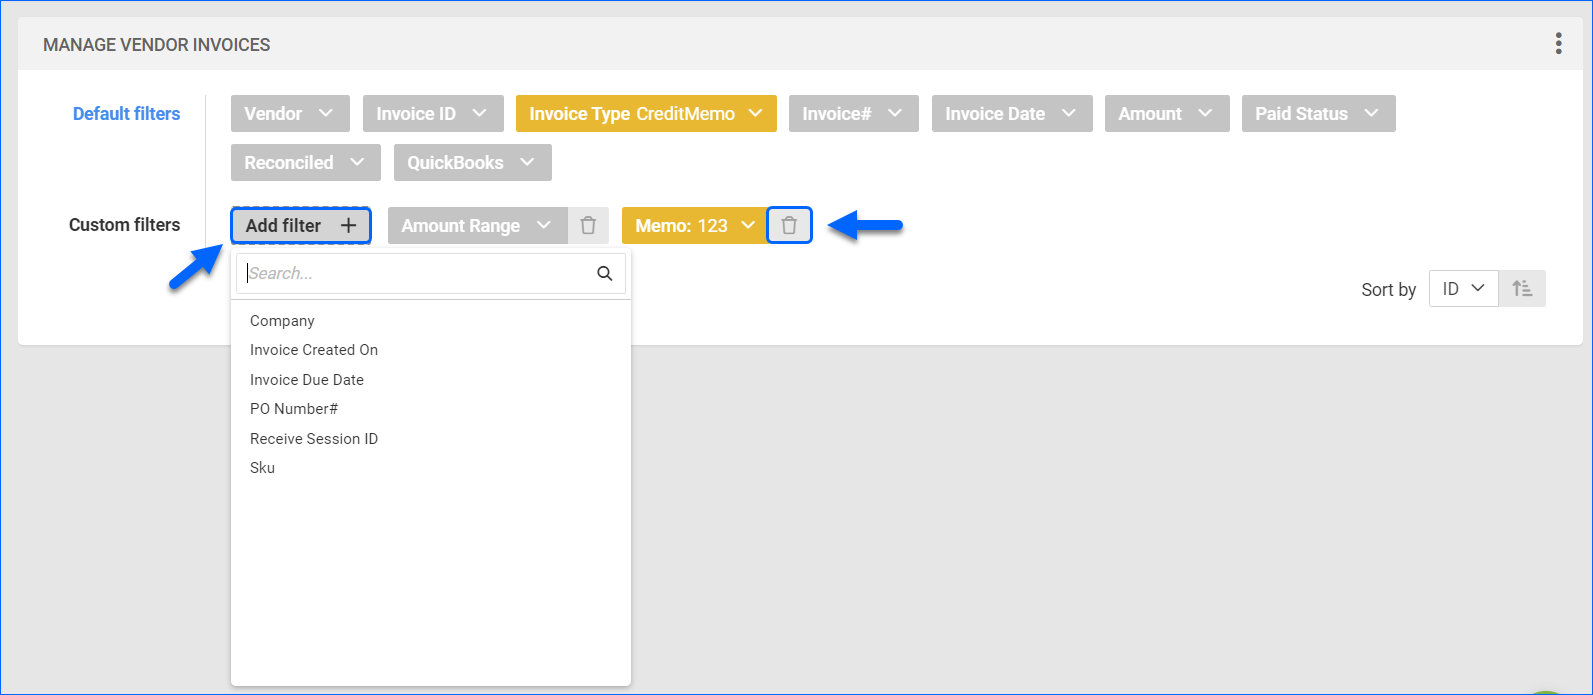
There are Default filters that are always displayed and Custom filters that you can select manually by clicking the Add filter button and choosing from the list. To remove a custom filter from the page, click the Trash icon next to it.
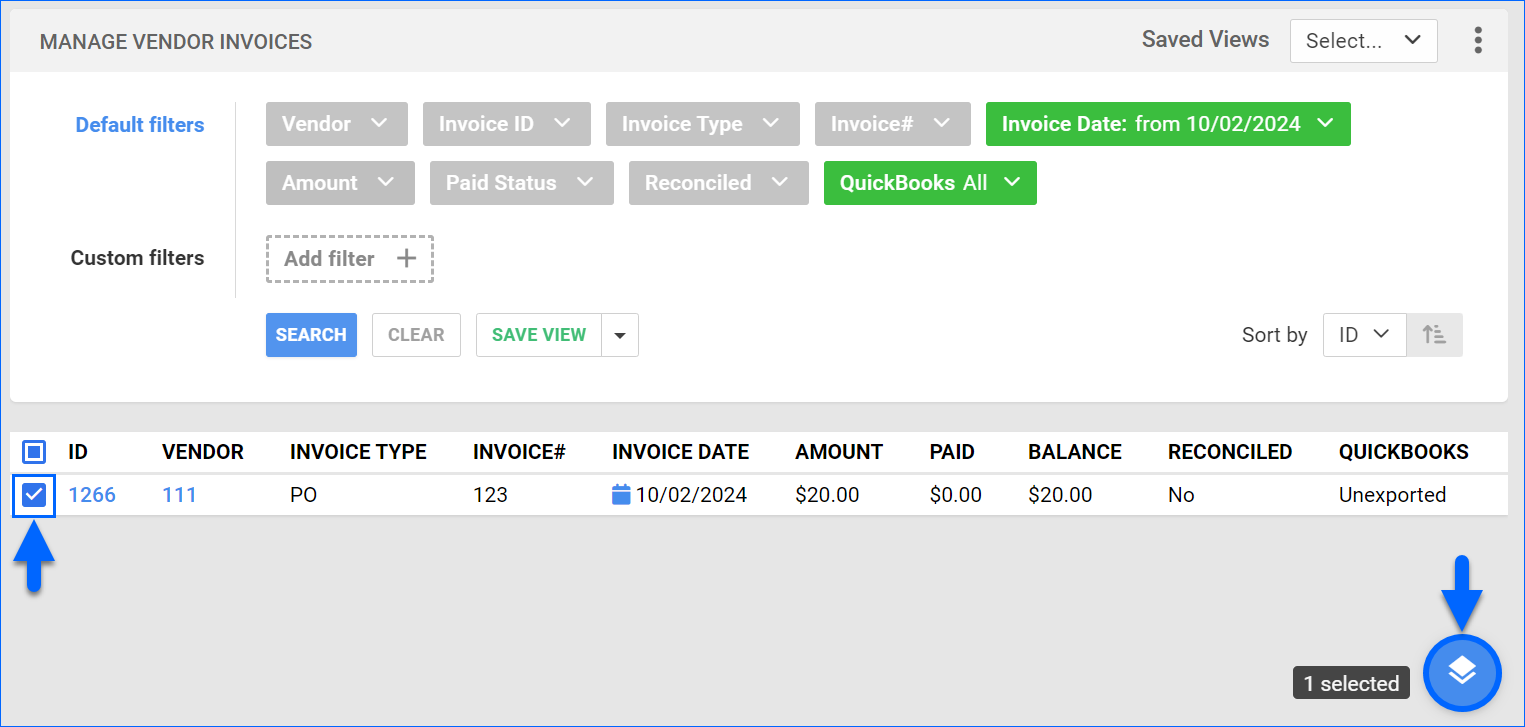
After you click Search, each filter you applied gets highlighted in green. If a filter is gray or not displayed at all, it’s not active. You can add or remove filters and search again at any time.
Once you have set up your filters, you can click Save View to save the search. Then, you can repeat the same search by selecting it from the Saved Views menu on the top right. This action also includes any customization made on the Grid Columns and the Sort by selection.
For a list of all filters and their descriptions, see the Filter Descriptions section of this article.
Results Grid
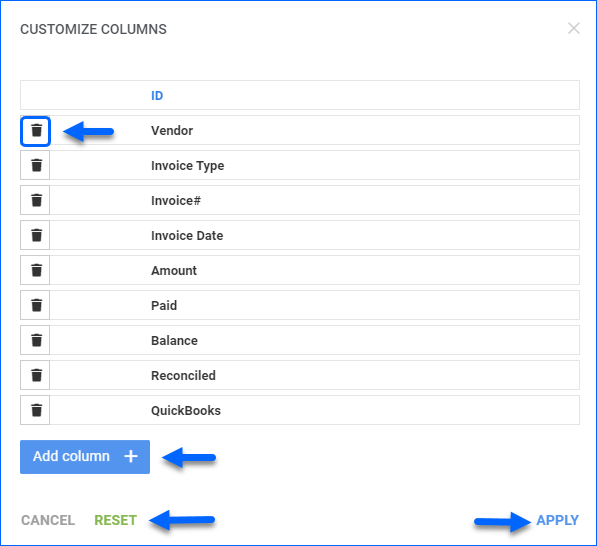
The results grid shows a list of invoices matching your search criteria. This list is comprised of various data columns showing invoice information. You can add, remove, and re-order data columns. Click the three dots icon on the top right and select Customize Columns.
Here you can:
- Reorder columns by dragging them up or down in the list.
- Hide columns by clicking the Trash icons.
- Add columns by clicking Add column.
Any modifications you make are automatically saved for the logged-in user. To restore the default configuration, go to Customize Columns > Reset View.

You can also sort the invoices differently based on a specific column using the Sort by drop-down menu.
For a list of all data columns and their descriptions, see the Column Descriptions section of this article.
Actions
The Manage Vendor Invoices page also offers a wide range of actions you can perform on one invoice at a time or in bulk.
The Actions icon is located on the bottom right of the page. By default, it is a green + icon that allows you to create a new invoice. When you select orders from the grid by checking the boxes to their left, the icon turns blue. Once it’s blue, you can click it to view the available actions.
Use the search bar to find a specific action quickly. Click the Star icon next to any frequently used action to pin it to the top of the list for quick access.
Performing most of these actions will display a notification at the bottom of the screen when used, indicating that a Queued Job has been created. You can click the link to the queued job to view it. Make sure to refresh the page to update the job’s Status.
For a list of all actions and their descriptions, see the Action Descriptions section in this article.
Descriptions
This section lists and defines all available elements on the Manage Vendor Invoices page. This includes the search filters, the grid columns that display invoice data and sort results, and the actions you can perform on selected invoices.
Filters
Refer to the table below for all available and their descriptions.
Default Filters:
| Filter | Description |
| Vendor | The Vendor associated with the invoice. |
| Invoice ID | The unique Sellercloud IDs of your invoices. This filter accepts multiple values. |
| Invoice Type | Pick between Purchase Order or Credit Memo. |
| Invoice # | The external Invoice Number. |
| Invoice Date | Filter by the date when you were invoiced. |
| Amount | Search for invoices with specific total Invoice Amount to be paid. |
| Paid Status | Filter by whether the Invoice is Paid or still Open. |
| Reconciled | Filter by whether the Invoice has been Reconiled. |
| QuickBooks | Filter by QB Exported status. |
Custom Filters:
| Filter | Description |
| Amount Range | Filter within specific Invoice Amount range. |
| Company | Filter by Company associated with the Vendor. |
| Invoice Created On | Filter by date when the Vendor Invoice was created in Sellercloud. |
| Invoice Due Date | Filter your invoices by the payment deadline. |
| Memo | Specific reference Credit Memo ID. |
| PO Number# | Specific reference Purchase Order ID. |
| Receive Session ID | Filter by added Receiving Session IDs. |
| SKU | Filter by specific Product IDs. |
Grid Columns
Refer to the table below for all data columns and their descriptions. You can show or hide these columns by clicking the three dots in the top right and selecting Customize Columns. You can also sort your results based on these columns with the Sort by menu.
| Column | Description |
| ID | The ID of the specific Vendor Invoice. Click on it to open the Vendor Invoice Details Page. This is the only non-optional column. |
| Vendor | The Vendor associated with the invoice. |
| Invoice Type | Indicates whether the invoice is related to a Purchase Order or a Credit Memo. |
| Invoice # | Displays the Invoice Number. |
| Invoice Date | Date when you were invoiced. |
| Amount | The Invoice Amount relating to the total amount the Vendor is billing you for with the specific Invoice. |
| Paid | Payment amounts already applied to the invoice. |
| Balance | The amount remaining to be paid. |
| Reconciled | Indicates whether the invoice has been Reconiled. |
| QuickBooks | Indicates whether the invoice has been Exported to QB. |
| Difference | The difference between the total Invoice Amount and the Receiving Session costs that have already been added. |
| Due Date | The payment deadline. |
| Memo | Displays the reference Credit Memo ID configured on the Vendor Invoice Details page. |
| PO Number | Displays the reference Purchase Order ID configured on the Vendor Invoice Details page. |
Actions
Refer to the table below for all actions and their descriptions.
| Action | Description |
| Add Vendor Invoice… | You can access this action if no rows are selected in the grid. Click on the + icon in the bottom right corner of the page to open the Add New Invoice pop-up modal. It is also available in the list of actions when invoices are selected. |
| Mark QuickBooks Exported | Change the QuickBooks status to Exported. |
| Mark QuickBooks Unexported | Change the QuickBooks status to Unexported. |
| Export to Excel | Perform this action to export the selected Vendor Invoices in Excel format. |
| Export to PDF | Perform this action to export the selected Vendor Invoices in PDF format. |
| Delete | Click to permanently delete a Vendor Invoice. This action is not reversible. |
| Add Payment | Click to open the Add Vendor Payment pop-up modal. There, you can add the Amount Paid, Payment Date, Payment Method, and Reference Number. |
| Add All Receivings from Related PO | This action is intended for a Vendor Invoice that covers only one PO in full. It allows you to add all of the PO’s Receiving Sessions to the Invoice instead of manually adding them individually. |


