Overview
An ASIN (Amazon Standard Identification Number) is a unique identifier assigned to products listed on Amazon. It is a 10-character alphanumeric code you can find in the product detail page URL on Seller Central or in the product detail section. The ASIN is used to identify and track products in the Amazon catalog.
Once your product has an ASIN, Sellercloud can use it to match your SKUs with your Amazon listings to send accurate information such as inventory and pricing. You will also be able to use the Get Info from Amazon functionality to avoid manual data entry.
Assign ASINs to Products
You can add ASINs to products individually or in bulk. To bulk-assign ASINs to products, follow the steps to Bulk Update Products and fill out the ASIN column in the template you upload.
To manually assign an ASIN to a single product:
- Go to a Product Details page.
- Click Toolbox and select Amazon Properties.
- Click Edit.
- Update the ASIN field in the General section.
- Click Save.
Get ASIN
There are a couple of ways to get ASINs from Amazon.
Find ASIN
To get the ASIN for a single product:
- Go to a Product Details page.
- Click Toolbox and select Amazon Properties.
- Click Actions and select Find Asin…
Get ASINs From UPCs
A single UPC can be assigned to multiple products. You may receive multiple ASINs for a single UPC following the steps below. In this case, you must manually check the ASINs to see which ASIN corresponds to the right product.
To get ASINs from UPCs in bulk:
- Go to Catalog > Manage Catalog.
- Find and select products.
- Click the Actions menu.
- Click Get ASIN From UPC.
- Click the notification to access the Queued Job.
To get ASINs from UPCs via file upload:
- Go to Catalog > Tools > Find ASIN from UPC.
- Click the Download Template icon.
- Fill the template with a list of UPCs under the UPC column.
- Upload the file and click Find ASIN.
Create a New ASIN
While the Amazon catalog is expansive, there may be some products you want to post that are new to the channel and require a new ASIN to be created. This happens often for private label items that are not sold by other merchants. In order to create a new ASIN through Sellercloud, you must configure your product’s categories and attributes. Once they are configured and you post the item on Amazon, a new ASIN will be generated. The ASIN will automatically be updated in Sellercloud as well.
To create a new ASIN:
- Enable the following Client Settings:
- Enable Amazon SP Listings API
- Enable Amazon SP API Product Attributes
- Enable Country Of Origin On Product Home Page
- Go to the Product Details Page.
- Click Toolbox and select Amazon Properties.
- Click Edit to prepare the product for posting on Amazon. Amazon requires products to be listed with either a UPC or ASIN. In this case, you will have to enter the UPC.
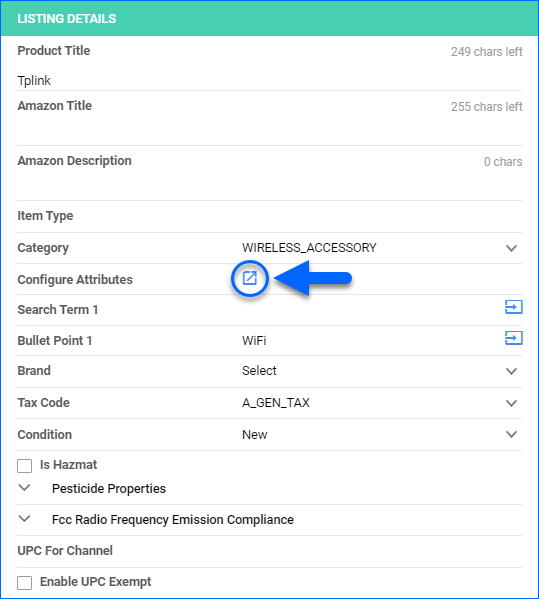
- In the Listing Details panel, click the icon to the right of Configure Attributes.
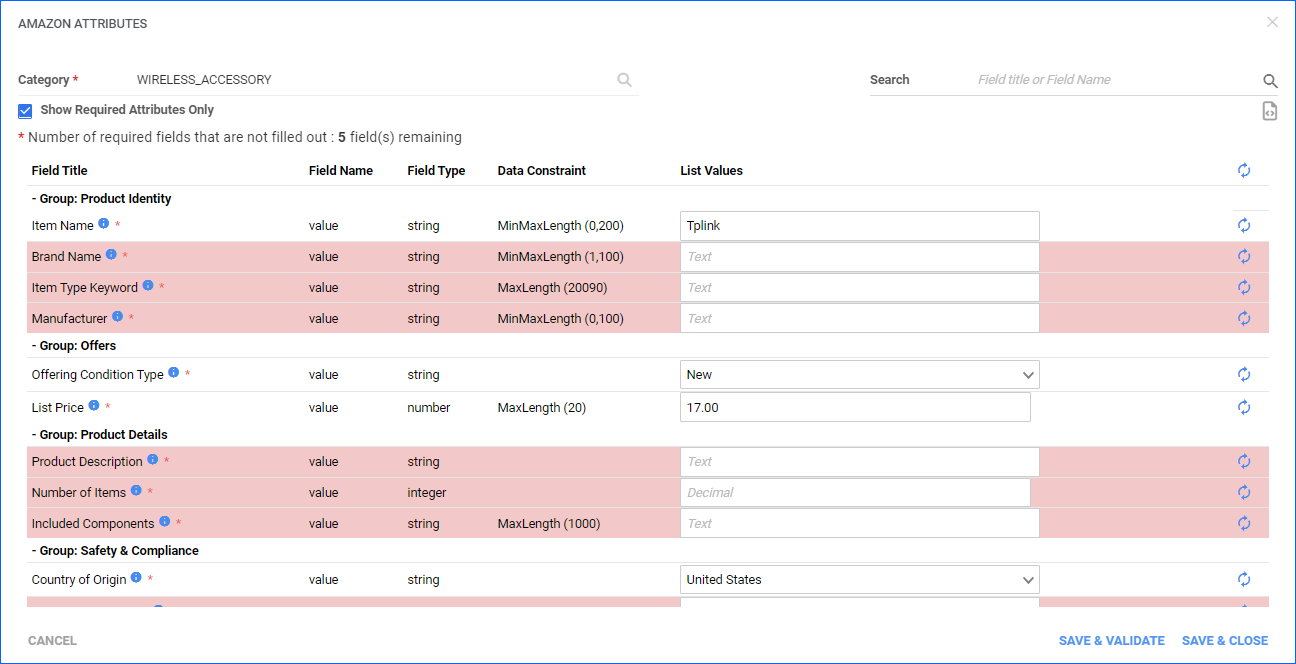
- Select the product’s Category. If the category list is empty, or if you receive an error when you attempt to list your product, it might mean that the Amazon Product Types must be re-downloaded on your server. In such cases, open a ticket to Sellercloud Support to import the latest category list from Amazon.
- Optionally, you can check Show Required Attributes Only to display only the attributes without which you are unable to post the product and hide all other attributes.
- Populate the List Values fields for each attribute. Alternatively, you can configure pre-defined Attribute Defaults. Additionally, you can:
- Hover over the blue information icons under the Field Title column to display tooltips with attribute descriptions.
- Click the Reload Default Value icon to the right to load the attribute’s default value from the Product Details Page. This may be helpful in case you’ve changed any of the product properties after saving the attributes.
Changes to the Product Details Page after attributes have already been configured are not automatically reflected on the Amazon Attributes page. You must use the Reload Default Value action instead.
- Use the search on the top right to look for specific attributes.
- Click the Download JSON icon on the top right to download a .json file with the product’s attributes.
- After completing the required attributes, click Save & Validate to validate your entries and check if any new fields are required.
- If new fields are required, complete them and click Save & Validate.
- If no new required fields are returned, click Save and Close.
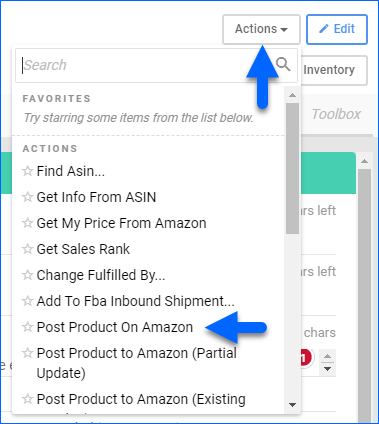
- Click Actions and select Post Product On Amazon.
Block an ASIN
Amazon may limit listing certain products to approved merchants. To ensure compliance, you can prevent the accidental posting of restricted products with the Blocked ASINs feature in Sellercloud.
To block an ASIN:
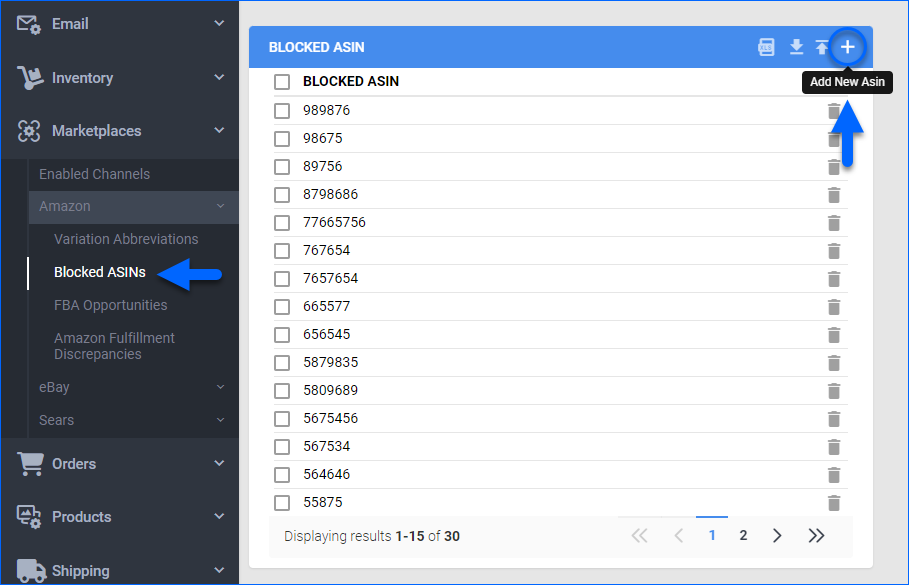
- Click Settings > Marketplaces > Amazon > Block ASINs.
- On this page, you can see all your blocked ASINs. Using the icons in the top right corner, you’ll be able to add, import, export, and download templates for ASINs you want to be blocked.
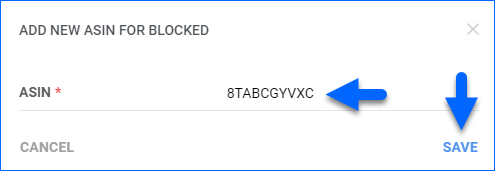
- To block a new ASIN, use the Add New ASIN plus icon.
- Enter the ASIN (not the ProductID) and click Save.
ASIN Merge Audit
Sometimes, Amazon merges two ASINs when there are identical products on separate ASINs. The merge results in a deleted ASIN, which can cause multiple problems. Amazon notifies sellers when their listings have been merged. The Amazon ASIN Merge Audit allows you to apply a new ASIN on the product in Sellercloud.
To perform an Amazon ASIN merge audit:
- Go to Catalog > Amazon ASIN Merge Audit.
- Select a company. The grid will show all products with an ASIN that has since changed on Amazon.
- Select the products to change and press the Update Product ASIN to Match Amazon icon. The product’s ASIN field will be updated to match the value under the Amazon ASIN column.
Note: Alternatively, you can disable them for Amazon by pressing the Disable Selected Items icon.

- The new ASIN will populate in the ASIN field in the product’s Amazon Properties > General panel and on the Product Details Page.
- The product will be removed from the Amazon ASIN Merge Audit page.
Overview
An ASIN (Amazon Standard Identification Number) is a unique identifier assigned to products listed on Amazon. It is a 10-character alphanumeric code you can find in the product detail page URL on Seller Central or in the product detail section. The ASIN is used to identify and track products in the Amazon catalog.
Once your product has an ASIN, Sellercloud can use it to match your SKUs with your Amazon listings to send accurate information such as inventory and pricing. You will also be able to use the Get Info from Amazon functionality to avoid manual data entry.
Assign ASINs to Products
You can add ASINs to products individually or in bulk. To bulk-assign ASINs to products, follow the steps to Bulk Update Products and fill out the ASIN column in the template you upload.
To manually assign an ASIN to a single product:
- Go to a Product Details page.
- Click Toolbox and select Amazon Properties.
- Update the ASIN field.
- Click Save.
Get ASIN
There are a couple of ways to get ASINs from Amazon.
Find ASIN
To get the ASIN for a single product:
- Go to a Product Details page.
- Click Toolbox and select Amazon Properties.
- Click Select Action and select Find ASIN, then click Go.
- Sellercloud searches Amazon and returns listings based on matching keywords. Results appear in a window where you can choose the appropriate listing. Click on an ASIN to open the actual Amazon listing.
Get ASINs From UPCs
On Amazon, the UPC is not always unique for each product. A single UPC can be assigned to multiple products. You may receive multiple ASINs for a single UPC following the steps below. In this case, you must manually check the ASINs to see which ASIN corresponds to the right product.
To get ASINs based on UPC and MPN (Manufacturer SKU) separately and Brand and MPN combined:
- Go to Inventory > Manage Inventory.
- Select products.
- Click Select Action, select Find ASIN, and click Go.
- The Grid will display the ProductID, Amazon Merchant SKU, The keyword search type used (UPC, MPN, Brand, and MPN), the actual keyword used, and the matching ASIN.
- After review, check the row with the desired ASIN, click Select Actions, select Use ASIN, and click Go.
- You can delete the rest of the ASINs from the Select Actions menu.
To get ASINS from UPCs in bulk:
- Go to Inventory > Manage Inventory.
- Select products.
- Click Select Action, select Get ASIN from UPC, and click Go.
- Click the notification to access the Queued Job.
To get ASINS from UPCs via file upload:
- Go to Inventory > Find ASIN From UPC.
- Click Download Template.
- Fill the template with a list of UPCs under the UPC column.
- Upload the file and click Find ASIN.
Create a New ASIN
While the Amazon catalog is expansive, there may be some products you want to post that are new to the channel and require a new ASIN to be created. This happens often for private label items that are not sold by other merchants. In order to create a new ASIN through Sellercloud, you must configure your product’s categories and attributes. Once they are configured and you post the item on Amazon, a new ASIN will be generated. The ASIN will automatically be updated in Sellercloud as well.
To create a new ASIN:
- Enable the following Client Settings:
- Enable Amazon SP Listings API
- Enable Amazon SP API Product Attributes
- Enable Country Of Origin On Product Home Page
- A Manage Attributes link will appear on the Amazon Properties page. Click the link to select the appropriate parent category and subcategory.

- Once a category is selected, various category-dependent attributes will need to be filled out. The required attributes are highlighted in red.

- Amazon requires products to be listed with either a UPC or ASIN. In this case, you will have to enter the UPC.
- Once all required attributes are populated, the item can be posted. Go to Amazon Properties > Action Menu. Or, you can do it in bulk from Manage Inventory > Action Menu > Launch on Channel.
Tips
There is a lot of information that needs to be added before Amazon accepts your product successfully. They will generate an error that will describe the issue most of the time.
- Enter the correct Master SKU. This is also referred to as MPN ( Manufacturer Part Number).
- Item Type— This field is required. You can check your item type here. Get the value from the BTG files.
- Set the product as FBM (Fulfilled by Merchant).
- Select the correct Top and Sub Categories.
- All categories contain the attributes for batteries. Set AreBatteriesRequired, AreBatteriesIncluded to False if your product does not require or contain those.
- After you posted your product successfully, you can search it by UPC on Amazon to confirm it was listed.
Block an ASIN
Amazon may limit listing certain products to approved merchants. To ensure compliance, you can prevent the accidental posting of restricted products with the Blocked ASINs feature.
To block an ASIN:
- Navigate Settings > Blocked ASINs. This is a client-wide setting across all companies.
- Enter the ASIN (not the ProductID) > Block ASIN.
- Download the template, populate and import to bulk add multiple blocked ASINs.

- When attempting to post a blocked ASIN, the following error message will display and the item will not list:

- To remove an ASIN from the block list, select the ASIN on the grid and select Remove From List (Аction Мenu). Press Go.
ASIN Merge Audit
Sometimes, Amazon merges two ASINs when there are identical products on separate ASINs. The merge results in a deleted ASIN, which can cause multiple problems. Amazon notifies sellers when their listings have been merged. The Amazon ASIN Merge Audit allows you to apply a new ASIN on the product in Sellercloud.
To perform an Amazon ASIN merge audit:
- Click Inventory > Amazon ASIN Merge Audit.
- Select a company. The grid will show all products with an ASIN that has since changed on Amazon.
- Select the products to change.
- Click Select Actions, select Dismiss Selected, and click Go. The new ASIN will populate in the ASIN field on the product’s Amazon Properties page, and the product will be removed from the grid.
- Alternatively, you can disable products for Amazon by selecting the products and selecting Disable Selected in the Action Menu.


