Overview
Along with common purchasing management operations, Sellercloud supports advanced functionalities that allow you to monitor each individual aspect of your purchases. To learn more about how to create, import, or receive POs, refer to Managing Purchase Orders.
Modify a PO
If you need to correct general information for a Purchase Order, open it from the Manage POs page and click the Edit option in the upper-righthand corner of the selected PO. When modified, click the Save option, which appears instead of the Edit one.

To modify product information for a Purchase Order, open the PO, select Items from the Toolbox, press Edit, make the appropriate changes, and press Save.
Delete a PO
If created in error, you can delete a single Purchase Order or bulk select several POs for deletion.
To remove a single Purchase Order, select the Delete PO option from the Actions menu on the PO details page.
 To remove multiple Purchase Orders, select all the requested POs in the Manage POs grid, and then select the Delete option, from the Actions menu in the bottom-right corner of the Manage POs page.

Discontinue a Product
Products that are no longer available from the vendor, or products that you no longer want to order can be discontinued in Sellercloud.
Neither Discontinued, nor Inactive products can be added to Purchase Orders. These products will not display results in Predictive Purchasing.
To mark a product as discontinued, follow the steps below.
- Go to Inventory > Manage Inventory.
- Open the appropriate product.
- From the Toolbox, select Purchasing.
- Go to the General panel and select the Discontinued checkbox.
- Save the changes.

- To discontinue products in bulk, use the column IsEndOfLife when updating product info via file import. Use the True and False values.
PO Defaults
You can set default information, statuses, and actions to be applied to purchase orders. These settings are available under Purchasing > PO Defaults > Select Company.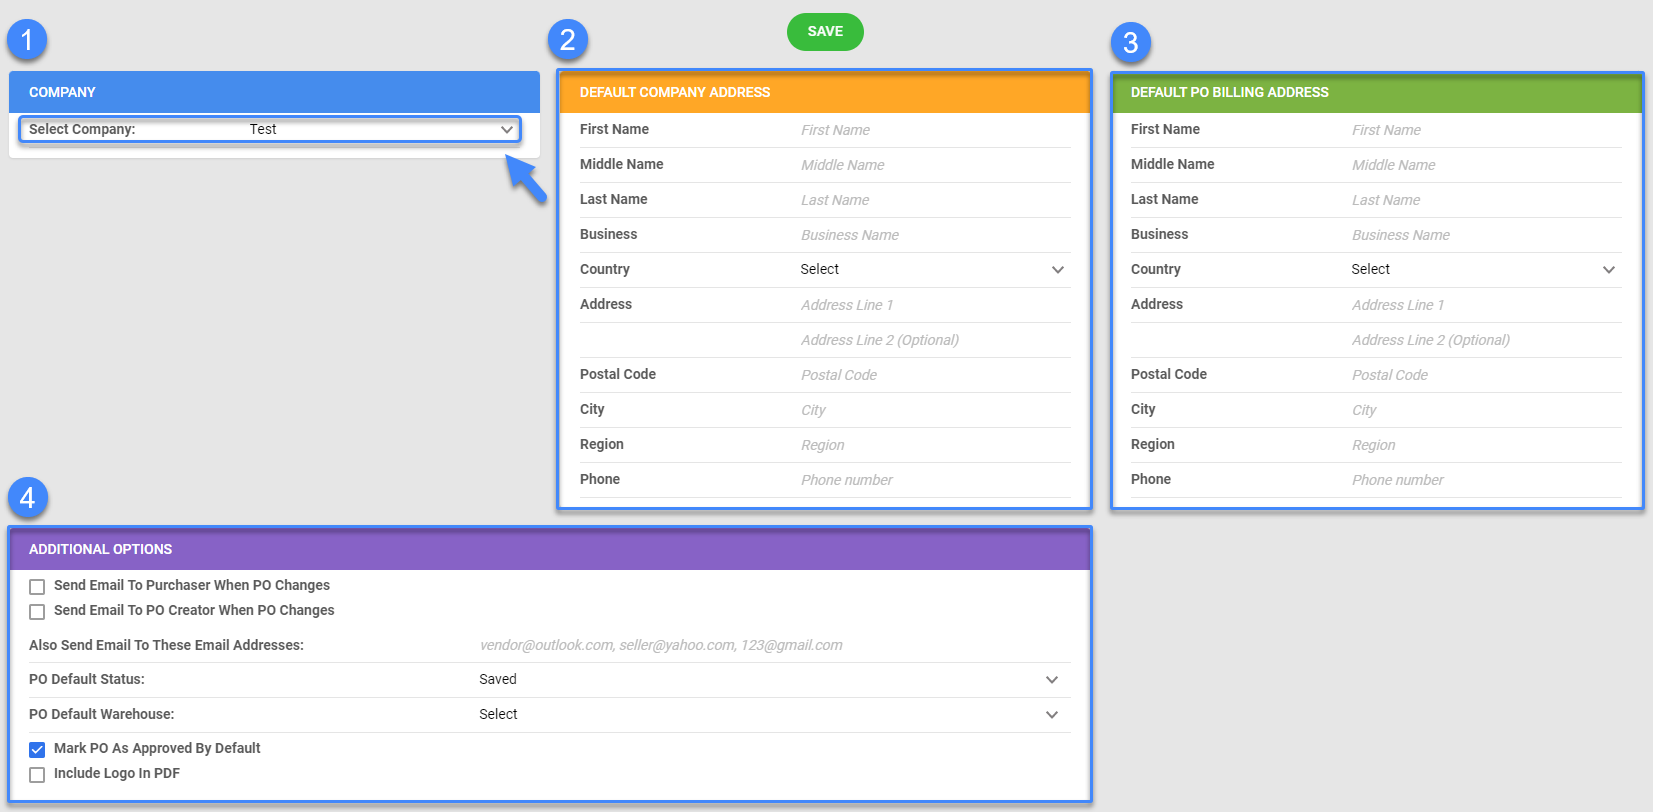
- Company — Selected company.
- Default Company Address — The default contact profile that appears in the PO PDF. If left blank, the regular company profile is used.
- Default Billing Address — The default billing profile that appears in the PO PDF. If left blank, the regular company profile is used.
- Additional Options — Emails can be auto-sent when a PO is changed. For example, it gets received. An email template must be created and selected on the PO Received and/or PO Changed template assignment. Choose from the following settings and refer to their definitions below:
- Send email to purchaser when PO changes
- Send email to PO Creator when PO changes
- Also send email to these email addresses
- PO Default Status— The status of a PO when it is created: Saved, Ordered, Pending.
- Mark PO as Approved by Default— For clients who require POs to be approved before emailing, this setting sets the default to approved. Manually unapproving can be done from the PO action menu.
- Include Logo in PDF— Will include the logo of the company on the PDF.
Add Custom Columns to PO
You can customize more columns for your Purchase Orders by submitting a request to the Sellercloud Support Team. Once approved, you can adjust the columns as follows.
- Go to Purchasing > Manage POs.
- Select the appropriate Purchase Order.
- From the Actions menu, select Manage Custom Columns.

Each column is defined as a specific data type. Default value can be set for each column.
| DATA TYPE | DEFINITION |
| String | String is the most common, since it can handle any sort of text |
| Integer | Will only accept a numerical value |
| Decimal | Accepts decimal values |
| DateTime | Provides a calendar for date selection |
| Boolean | Adds a checkbox to mark value as True/False |
Add a Note to PO
You can place any additional information related to a Purchase Order into a Note which can be added at different levels: for each PO item line, on the product level, and on the PO level. To add a PO-level note, follow the steps described below.
- Go to Purchasing > Manage POs.
- Select the appropriate Purchase Order.
- In the upper right, click the Notes button.

- Specify whether you want to add a vendor or PO-related note. Once selected, the previously added notes will be filtered accordingly.

- In the Add a note text box, enter a new message, and click the arrow icon.
- Vendor-related notes will appear for both the Vendor and the Purchase Order you have add that note to.
- The note lets you know a note has been left on the PO and the time it was saved.

Split a PO
Splitting a PO is helpful if you receive an order with a large number of items. To activate the Split PO option, you have to configure the following Client Settings first:
- Breakup kit components when adding Kit Parent to PO
- Breakup independent kit when adding Kit Parent to PO
To split a particular Purchase Order, follow the steps below.
- Go to Purchasing > Manage POs.
- Select the appropriate Purchase Order.
- In the upper right, click Actions, and select Split PO.

- Select the SKUs to split.
- Enter the quantities to split or click the rotating arrows icon to automatically fill in the quantities that have not been received yet.
- Click Split Purchase Order.
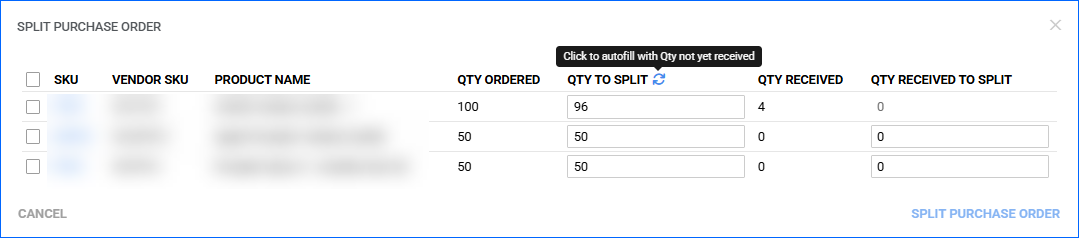
- Once processed, the new PO Details page will open.
Add Products from Another PO
In Sellercloud, you can move products to different Purchase Orders.
- Access Purchasing > Manage POs.
- Open the PO you want to move the products from.
- From the Toolbox, select Items.
- Select the products to be moved.
- Click on the three dots and select the Transfer to other PO option.
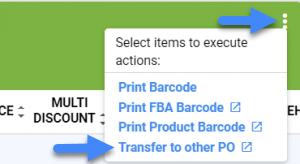
- Indicate whether you want to transfer items to a new Purchase Order or to an existing one.
- Click Transfer.
Related Client Settings
The following client settings allow you to customize some PO functionalities:
| Setting | Description |
| Enable Notes For Purchase Items | Makes the Notes field appear for each item line on the Purchase Order. |
| Require PO To Be Approved Before It Can Be Emailed | Enable to set a requirement for PO approval before mailing it to a vendor. |
| Do not allow to make product inactive or discontinued if has inventory | Prevents products with existing inventory in Sellercloud from being marked as discontinued. |
| Consider Kit parent Discontinued if Kit child is discontinued, in ManageInventory Grid | Shows the Kit parent in pink if any of the Kit’s children are discontinued. |
| Allow To Over Receive PO | Enable to receive more items than was ordered within a Purchase Order. |
| Allow To Ignore Inventory In Purchase Order | Lets you receive a PO without updating the inventory on the SKUs. When enabled, you can select Disable Inventory Count from the Actions menu on the PO. |
| Stop Printing Splitted From PO Numbers In PO PDF Prints | This setting allows you to control which PO numbers are shown on a PDF printout of a purchase order. For example, you can choose to only print the PO number on the PDF printout, rather than splitting it into multiple numbers. (This setting will be set as False by default). |
| PO PDF Date Format | Allows you to select the date format in the file you generate when performing the Print to PDF actions on the PO Details Page. |