Overview
NetSuite is an Enterprise Resource Planning (ERP) software offering a cloud-based solution for businesses of any size and in any industry.
Integrating NetSuite into your Sellercloud account allows you to seamlessly export orders, upload and download tracking information, and ensure your products are always up-to-date with the latest inventory data. The integration works through API, transmitting information between the two services via plugins and Scheduled Tasks.
If necessary, you can open a ticket with Sellercloud Support to request additional customizations or other plugins for this integration. Any such modifications will be billable.
Prerequisites
Before you can integrate NetSuite with Sellercloud, complete the following requirements.
NetSuite Support
Complete the following steps in NetSuite:
- Log into NetSuite as an admin user.
- Go to Setup > Company > Enable Features.
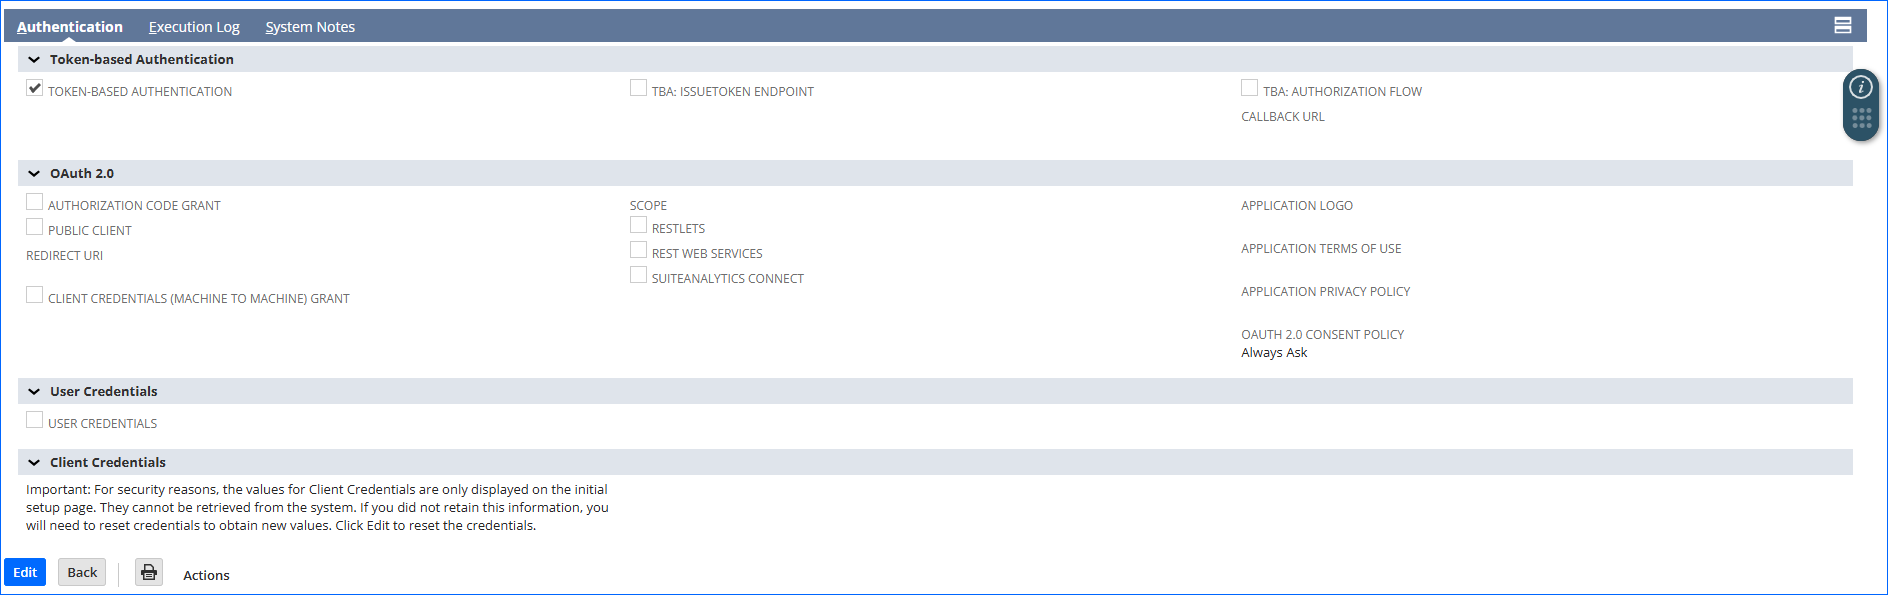
- Switch to the SuiteCloud tab and scroll down to Manage Authentication. Enable Token-based Authentication.
- Go back to Setup > Company > Enable Features.
- Navigate to the Items & Inventory tab. Locate Advanced Item Location Configuration under the Inventory section and make sure it’s unchecked.
- Click Save.
- Go to Setup > Integration and select the Sellercloud integration.
- Set the Authentication to Token-based Authentication (TBA).
- The Status must be Enabled.
Refer to the following NetSuite article for additional information.
Consumer Key and Consumer Secret
To generate a Consumer Key and Secret:
- Go to Setup > Integration > Manage Integrations.
- Select the record for which you want to generate a new consumer key and secret. The record opens in view mode.
- Click the Edit button.
- Click the Reset Credentials button.
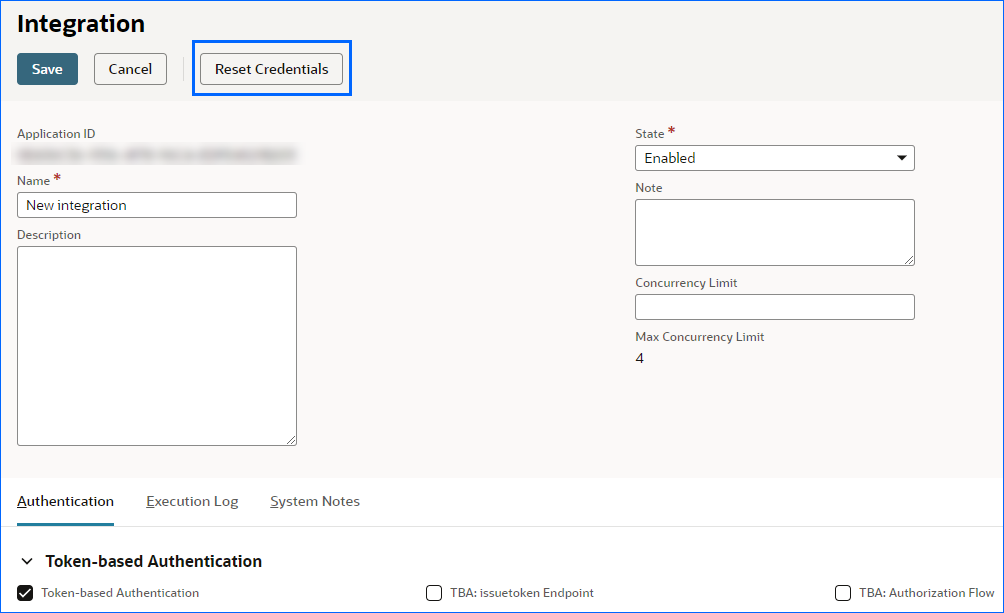 The Reset Credentials button is only displayed if the integration is using Token-based Authentication (TBA).
 - Click OK.
The system resets the credentials. The record is again shown in view mode, with the new consumer key and secret displayed.
Refer to the following guide for more information.
API Key and API Secret
To generate an API Key and Secret:
- Log in using a role with the User Access Token permission.
- In the Settings portlet, click the Manage Access Tokens link. The My Access Tokens page appears, listing all the tokens for the current user in the current role.
- Click New My Access Token. The Access Token page appears.
- On the Access Token page:
- Select the Application Name.
- The Token Name is already populated by default with a concatenation of Application Name, User, and Role. Enter your own name for this token, if preferred.
- Click Save.
The confirmation page displays the Token ID and Token Secret. TBA tokens do not expire. However, it is a good practice to revoke a token after some time, and create a new one.
Refer to the following guide for more information.
Sellercloud Support
To integrate your NetSuite account with Sellercloud:
Open a ticket with Sellercloud Support and request that the NetSuite plugins be installed on your server:
- NetSuite Inventory Import – Imports inventory from NetSuite to Sellercloud.
- NetSuite Order Export – Exports orders from Sellercloud to NetSuite.
- NetSuite Tracking Export – Exports tracking information from Sellercloud to NetSuite.
- (Optional) NetSuite Tracking Import – Imports and updates tracking information from NetSuite to Sellercloud.
Custom Company Settings
Create the following Custom Company Settings.
On your default company:
- NetSuiteService_AccountID – The NetSuite account ID from Setup > Integration > Web Services Preferences in NetSuite.
- NetSuiteService_ConsumerKey – Your NetSuite API consumer key.
- NetSuiteService_ConsumerSecret – Your NetSuite API consumer secret.
- NetSuiteService_TokenID – Your NetSuite API Token ID.
- NetSuiteService_TokenSecret – Your NetSuite API Token Secret.
- NetsuiteLocation_SCWarehouse*WHID* – The NetSuite location ID that corresponds and is mapped to an existing Sellercloud warehouse. Replace *WHID* with the actual ID of the warehouse in Sellercloud. The value of the setting should be the location ID of the NetSuite warehouse. Create a separate company setting for each Sellercloud warehouse you intend to map. Example: “NetsuiteLocation_SCWarehouse123, NetsuiteLocation_SCWarehouse234, NetsuiteLocation_SCWarehouse345”.
- NetSuiteWarehousesToImport – Enter the Sellercloud warehouse IDs to be considered by the NetSuite Inventory Import plugin. If a warehouse ID is present in this setting, the plugin then checks NetsuiteLocation_SCWarehouse*WHID* for a mapping. When listing more than one WarehouseID, separate the IDs with semi-colons. Example: “123;234;345”.
- (Optional) NetSuite_ShippingItemID – This adds an order line item for shipping costs. The ID would be the actual shipping item ID in NetSuite.
- (Optional) NetSuite_PromotionItemID – This adds an order line item for discount. The ID would be the actual promotion item ID in NetSuite. Discounts will be added to NetSuite as negative numbers. For example, if the discount is $10, the discount item in NetSuite will be -$10.
On the company created for the integration:
- For each company that is integrated with NetSuite, create a custom setting for each channel in the following format: NetSuiteCustomer_ChannelName.
- When exporting an order to NetSuite, the plugin looks for the NetSuite customer that corresponds to the channel of the order and sets it as the customer on order in NetSuite.
- To map Sellercloud channels to NetSuite customers, you must set up a custom setting for each company/channel that must be exported into NetSuite, such as NetSuiteCustomer_Target.
- The value should be the corresponding CustomerID in NetSuite.
- The channel name is case-sensitive and must be spelled correctly. Check the spelling of the channel from the Channel filter on the Manage Orders page.
- For each company, create a custom setting for each channel in the following format: NetSuiteService_ChannelMapping: [channelID]-[name].
- When you have multiple website channels in Sellercloud, this setting lets you customize the channel name sent to NetSuite.
- Substitute channelID-name with the channel name. Note that it is case-sensitive and must be spelled correctly. Check the spelling of the channel from the Channel filter on the Manage Orders page.
- The value should be the channel name to send to NetSuite.
- For each company, create the following custom setting for each channel: NetSuite_SavedSearchID.
Custom Order Columns
Create the following Custom Order Columns:
- NSExported – Automatically populated by the NetSuite Order Export plugin once an order is processed. Shows if the order has been exported to NetSuite. Set the Data Type to Boolean.
- NetSuiteOrderID – Stores the TranID of the NetSuite order in NetSuite. Set the Data Type to String.
Inventory Import
The NetSuite Inventory Import plugin imports inventory from NetSuite to Sellercloud. See the following details about the import:
Items:
- The plugin searches for these item types in NetSuite with OnHandQty: Inventory Item, Assembly Item, and Serialized Item (however, it doesn’t pull serial numbers).
- Item names in NetSuite need to match Sellercloud SKUs exactly because the plugin will try to update Sellercloud products after searching for their SKUs.
- You must create the scheduled task for Inventory Import under the default company where the custom settings are defined. However, this setup doesn’t limit products updated in Sellercloud to the selected company. The plugin will update any product that matches the NetSuite product ID.
Inventory:
- If a Sellercloud product is not found in the results from NetSuite, it will update the Physical Qty in the Sellercloud warehouse to 0.
- The plugin uses ranges to update inventory and will set all items within each range to the lower end of the range. For example, an item with an inventory of 5 will be set to 4 in Sellercloud because the plugin currently uses the inventory ranges below (although it can be customized to use other ranges if needed):
| Range | Imported Value |
| 0 – 2 | 0 |
| 2 – 4 | 2 |
| 4 – 6 | 4 |
| 6 – 8 | 6 |
| 8 – 10 | 8 |
| 10 – 15 | 10 |
| 15 – 20 | 15 |
| 20 – 25 | 20 |
| 25 – 30 | 25 |
| 30 – 40 | 30 |
| 40 – 50 | 40 |
| 50 – 75 | 50 |
| 75 – 100 | 75 |
| 100 – 150 | 100 |
| 150 – 200 | 150 |
| 200 – 250 | 200 |
| 250 – 500 | 250 |
| 500 – 10000000 | 500 |
Warehouses:
- If a product is found in Sellercloud, the plugin will first check the value of the custom setting NetSuiteWarehousesToImport. Next, it will check for a mapping in NetsuiteLocation_SCWarehouse*WHID* and set its Physical Qty in that warehouse.
- The plugin can also support multiple warehouses, checking warehouses in Sellercloud, and sending product quantities to the corresponding NetSuite locations. Ask Sellercloud support for more information.
Automate Inventory Import
To create a Scheduled Task that regularly imports inventory:
- Navigate to Settings > Scheduled Tasks > Manage Scheduled Tasks.
- Click the green + icon: Create New Scheduled Task.
- Complete as follows:
- Click Task Type and select Import Product Inventory.
- Set the Task Name.
- Select the Company.
- Select the Start Time.
- Click CREATE.
- On the Scheduled Task page, click the Edit button at the top right corner.
- In the Details section:
- Click the Import Via menu and select NetSuite Inventory Import.
- Select a Warehouse.
- In the Import Options section, set Import From to None.
- In the Frequency section, specify the task frequency. NetSuite scheduled tasks must never run simultaneously. Schedule each task 20 minutes apart from the others.
- For example, you can select Custom, check all days, and then add times so that it runs at 1:00, 2:00, 3:00, etc.
- In the General section, click the Enable button.
- Click Save.

Order Export
The NetSuite Order Export plugin exports Sellercloud orders with the following information in NetSuite:
- Customer based on the channel and company.
- TimeOfOrder as the transaction date.
- OrderSourceOrderID as the reference number in NetSuite.
- OrderID as the external ID.
- Status as pending fulfillment.
- Billing address of the NetSuite customer, or if not found, the billing address on order.
- Shipping address of the NetSuite customer.
- Username as email.
- Each item with quantity. If a product is not found in NetSuite, the order will not be created.
- Shipping Total as an order item if there is a custom setting defined for this.
- Discount Total as an order item if there is a custom setting defined for this.
When an order gets exported successfully, an order note with the internal order ID gets added to NetSuite.
If there is a shipping charge or a discount on an order, this is recorded on the NetSuite order by adding an “item” that reflects this, with the amount being the corresponding charge/discount.
Automate Order Export
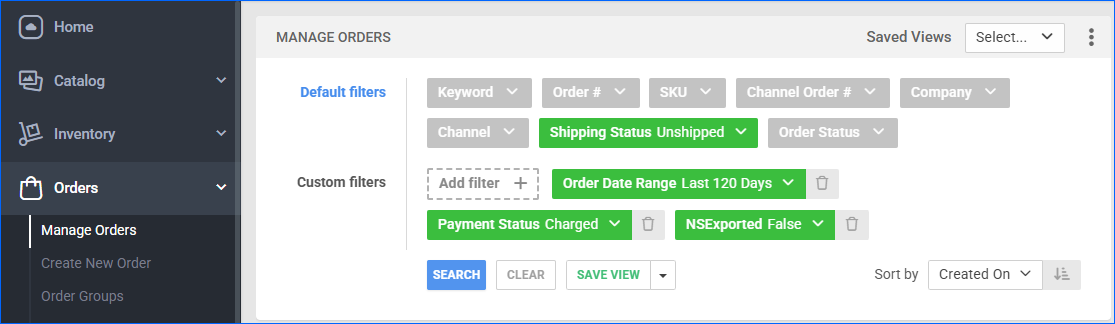
Before you move on, create a Saved Search for orders filtered by:
- Shipping Status – Unshipped
- Payment Status – Charged
- NSExported – False
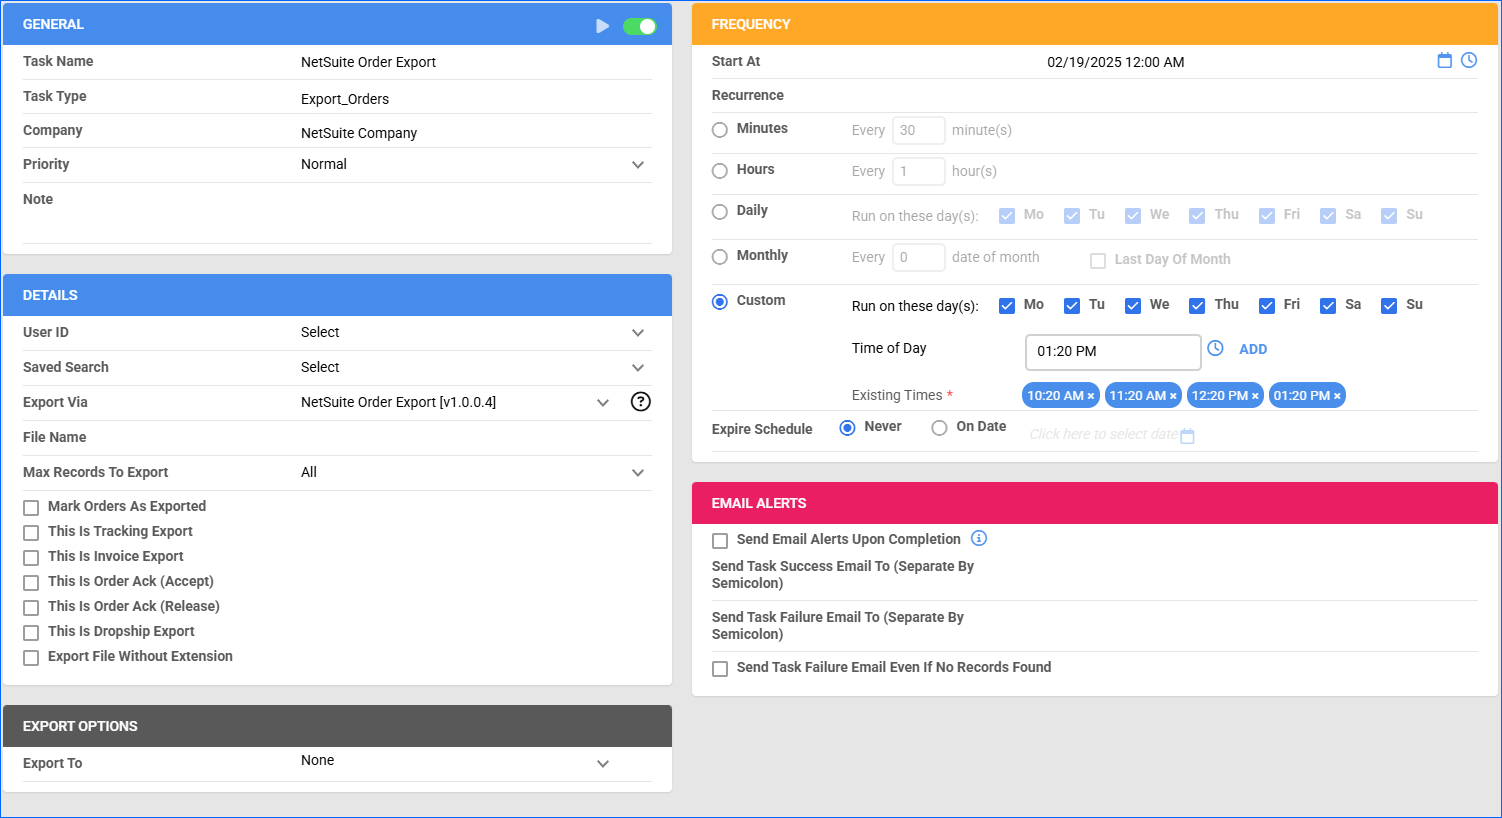
To create a Scheduled Task that regularly exports orders:
- Navigate to Settings > Scheduled Tasks > Manage Scheduled Tasks.
- Click the green + icon: Create New Scheduled Task.
- Complete as follows:
- Click Task Type and select Export Orders.
- Set the Task Name.
- Select the Company.
- Select the Start Time.
- Click CREATE.
- On the Scheduled Task page, click the Edit button at the top right corner.
- In the Details section:
- Click the User ID menu and select your email.
- Click the Saved Search menu and select your saved search.
- Click the Export Via menu and select NetSuite Order Export.
- In the Export Options section, leave Export To on None.
- In the Frequency section, specify the task frequency. NetSuite scheduled tasks must never run simultaneously. Run this task 20 minutes after the previous one.
- For example, you can select Custom, check all days, and then add times so that it runs at 1:20, 2:20, 3:20, etc.
- In the General section, click the Enable button.
- Click Save.
Tracking Export
The NetSuite Tracking Export plugin exports the tracking information of shipped orders from Sellercloud to NetSuite, including shipping details.
Automate Tracking Export
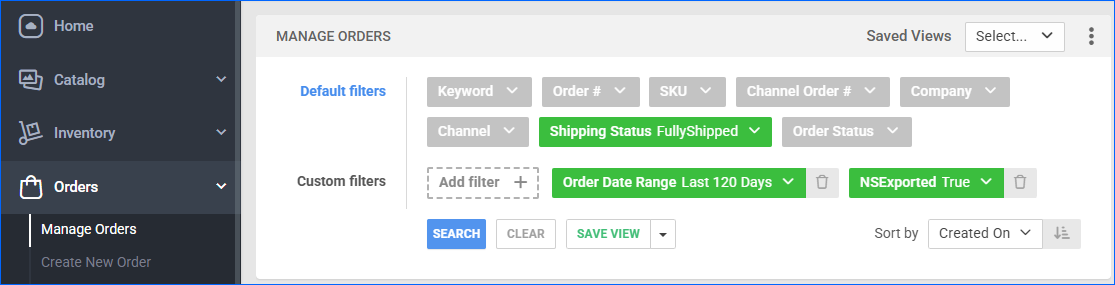
Before you move on, create a Saved Search for orders filtered by:
- ShippingStatus -FullyShipped
- NSExported – True
![]()
To create a Scheduled Task that regularly exports order tracking:
- Navigate to Settings > Scheduled Tasks > Manage Scheduled Tasks.
- Click the green plus icon: Create New Scheduled Task.
- Complete as follows:
- Click Task Type and select Export Orders.
- Set the Task Name.
- Select the Company.
- Select the Start Time.
- Click CREATE.
- On the Scheduled Task page, click the Edit button at the top right corner.
- In the Details section:
- Click the User ID menu and select your email.
- Click the Saved Search menu and select the saved search you created earlier.
- Click the Export Via menu and select NetSuite Tracking Export.
- Check the This Is Tracking Export.
- In the Export Options section, set Export To to None.
- In the Frequency section, specify the task frequency. NetSuite scheduled tasks must never run simultaneously. Run this task 20 minutes after the previous one.
- For example, you can select Custom, check all days, and then add times so that it runs at 1:40, 2:40, 3:40, etc.
- In the General section, click the Enable toggle button.
- Click Save.
![]()
Tracking Import
The NetSuite Tracking Import plugin imports tracking from third-party providers into Sellercloud. This is an alternative workflow regarding fulfilled orders. For example, if you have integrated NetSuite with a third-party software you use to ship your orders, we offer a Tracking Import plugin that can pull the Shipping information into Sellercloud.
This is an Order Import type plugin that runs a custom search on NetSuite and updates each order’s tracking number into Sellercloud. Once the tracking is updated, the Tracking Uploaded to Sellercloud column in NetSuite is populated with the current date and time of the update. Make sure to note the NetSuite custom saved search ID.
Automate Tracking Import
Before you move on, create a Saved Search for orders filtered by:
- ShippingStatus -Unshipped
- NSExported – True
To create a Scheduled Task that regularly updates order tracking:
- Navigate to Settings > Scheduled Tasks > Manage Scheduled Tasks.
- Click the green plus icon: Create New Scheduled Task.
- Complete as follows:
- Click Task Type and select Import Orders.
- Set the Task Name.
- Select the Company.
- Select the Start Time.
- Click CREATE.
- On the Scheduled Task page, click the Edit button at the top right corner.
- In the Details panel:
- Select the Create Orders for Company.
- Click the Plugin menu and select NetSuite Tracking Update Order Import.
- In the Import Options panel, set Import From to None.
- In the Frequency panel, specify the task frequency. NetSuite scheduled tasks must never run simultaneously. Run this task 10 minutes after the previous one.
- For example, you can select Custom, check all days, and then add times so that it runs at 1:50, 2:50, 3:50, etc.
- In the General panel, click the Enable toggle button.
- Click Save.