Overview
Net32 is an online dental and medical supply marketplace that connects medical professionals with suppliers. The platform offers a variety of items, including dental instruments, disposables, pharmaceuticals, office supplies, and more.
Integrating Net32 into your Sellercloud account allows you to seamlessly import orders, upload tracking information, and ensure your Net32 store is always up-to-date with the latest inventory data. The integration works through API, transmitting information between the two services via plugins and Scheduled Tasks.
If necessary, you can open a ticket with Sellercloud Support to request additional customizations or other plugins for this integration. Any such modifications will be billable.
Prerequisites
Before you can integrate Net32 with Sellercloud, complete the following requirements.
Net32 Support
Contact Net32 Support and request the following:
-
- Net32 API Key
-
- Net32_ShipFromAddress_ID
Sellercloud Support
Open a ticket with Sellercloud Support and request that the Net32 plugins be installed on your server:
- Net32 API Order Import – Imports orders from Net32 to Sellercloud.
- Net32 Tracking Order Export – Exports tracking information from Sellercloud to Net32.
- Net32 Get Charge Status Order Export – Imports payment status updates from Net32 to Sellercloud.
- Net32 Inventory Product Export – Exports inventory from Sellercloud to Net 32.
Additionally, Sellercloud Support must also run the SQL script necessary for the Order Import plugin on your server.
Custom Company Settings
Create the following Custom Company Settings on the company created for the integration:
-
- Net32APIKey – The API key for the integration.
-
- Net32_ShipFromAddress_ID – Obtained from Net32. Set the Data Type to Integer.
-
- (Optional) Net32APITimeout – The timeout (in seconds) used after each fifth call to Net32. Defaults to 5. Set the Data Type to Integer.
- (Optional) Net32LastPulledOrder – Defaults to 0 if not populated. Determines the order number from which we will begin downloading orders. It should be set to the order ID immediately preceding the desired order ID (e.g., to start at order ID 20333, set it to 20332). If populated, we will download both Viewed and Not Viewed orders. If empty or not created, we will only pull the last 100 Not Viewed orders. Upon import, this setting retains the value of the last successfully downloaded order. Set the Data Type to Integer.
Custom Product Columns
Create the following Custom Product Columns:
-
- Net32MerchantSKU – The product’s SKU at Net32. Set the Data Type to String.
- (Optional) Net32_Enabled – Enable only specific products for Net32. Set to True for any products you want to send with the Inventory Export. Set the Data Type to Boolean.
- (Optional) Net32SafetyQty – Set a Safety Quantity to subtract from the actual available quantity when sending inventory to Net32. Set the Data Type to Integer.
Custom Order Columns
Create the following Custom Order Columns:
-
- ChargeRequestId – A unique identifier associated with a specific transaction or charge request within the Net32 platform. It is used to track and manage payment activities for orders. The value is populated by Net32 Tracking Order Export and used by the Net32 Get Charge Status Order Export to query the orders’ payment status. Set the Data Type to String.
-
- Net32_PaymentCaptured – If a payment is successfully captured, the value will be updated to True after the API call. Set the Data Type to Boolean.
-
- Net32_PaymentMessage – If applicable, any Net32 payment messages (including error messages) will be populated. Set the Data Type to String.
Order Import
The Net32 API Order Import plugin downloads pending orders from Net32 to Sellercloud and attempts to pre-authorize the payment:
- If the pre-authorization is successful, the orders are imported as Fully Paid.
- If not, it will retry capturing the payment the next time the plugin runs and import the order only when the authorization is successful.
The plugin matches products in the two services as follows:
- First, it matches Net32’s order item ID to Sellercloud’s Net32MerchantSKU.
- If the above values don’t match, the plugin matches by VP Code.
- If the above values don’t match, a product with an unknown SKU is created.
Automate Order Import
To create a Scheduled Task that imports orders:
- Navigate to Settings > Scheduled Tasks > Manage Scheduled Tasks.
- Click the green + icon: Create New Scheduled Task.
- Complete as follows:
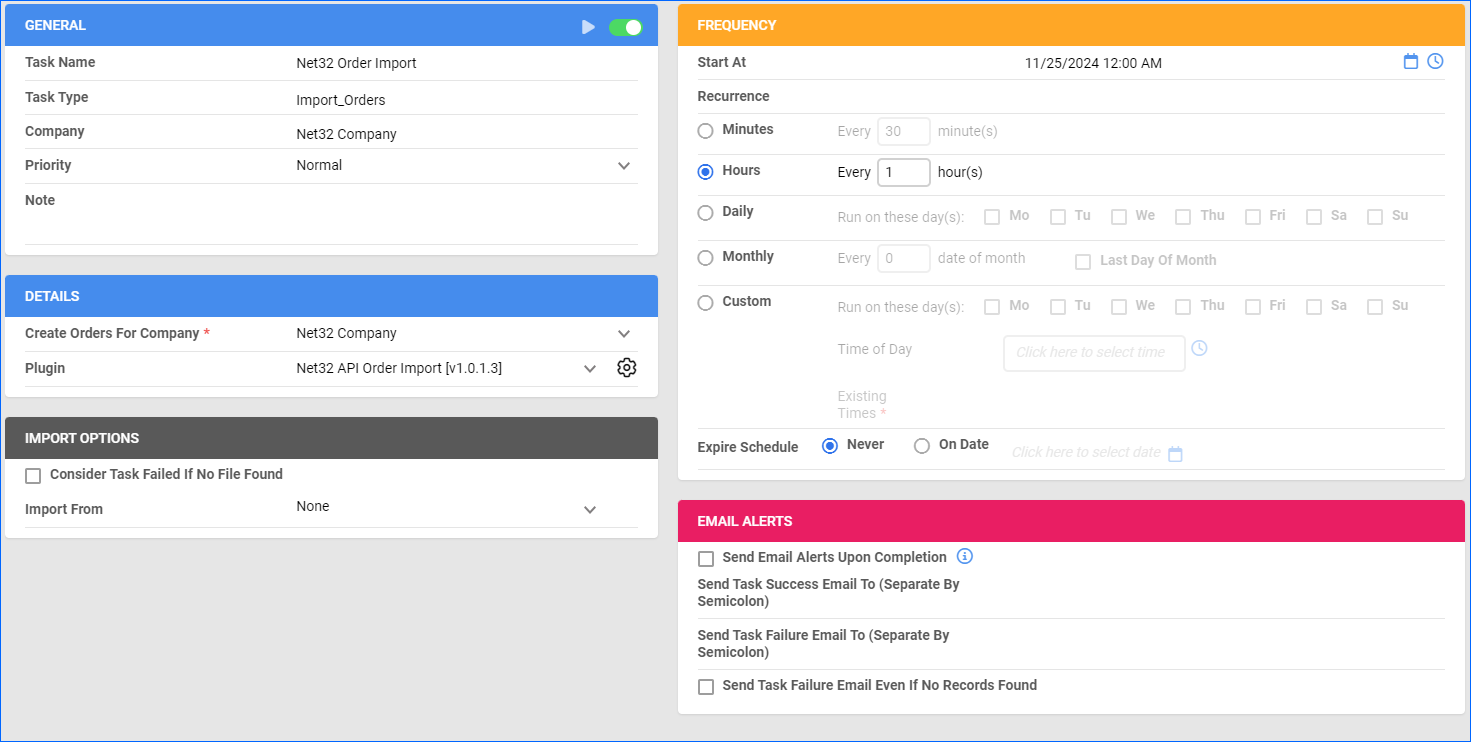
- Click Task Type and select Import Orders.
- Set the Task Name.
- Select the Company.
- Select the Start Time.
- Click CREATE.
- On the Scheduled Task page, click the Edit button at the top right corner.
- In the Details panel:
- Click Create Orders For Company and select the company designated for this integration.
- Click the Plugin menu and select Net32 API Order Import.
- In the Import Options panel, set Import From to None.
- In the Frequency panel, specify the task frequency. For optimal performance, select a range between thirty minutes and one hour.
- In the General panel, click the Enable button.
- Click Save.
Tracking Export
The Net32 Tracking Order Export plugin exports tracking information from Sellercloud to Net32 and saves the charge request ID for each payment in the custom column ChargeRequestId.
Before you move on, create a Saved Search for orders filtered by:
-
- Company – The company you created for the integration.
- Channel – Website
- Shipping Status – FullyShipped
- Tracking Uploaded – No
![]()
Automate Tracking Export
To create a Scheduled Task that exports order tracking:
- Navigate to Settings > Scheduled Tasks > Manage Scheduled Tasks.
- Click the green + icon: Create New Scheduled Task.
- Complete as follows:
- Click Task Type and select Export Orders.
- Set the Task Name.
- Select the Company.
- Select the Start Time.
- Click CREATE.
- On the Scheduled Task page, click the Edit button at the top right corner.
- In the Details panel:
- Click the User ID menu and select your email.
- Click the Saved Search menu and select the saved search you created earlier.
- Click the Export Via menu and select Net32 Tracking Order Export.
- Check This Is Tracking Export.
- In the Export Options panel, set Export To to None.
- In the Frequency panel, specify the task frequency. For optimal performance, select a range between thirty minutes and one hour.
- In the General panel, click the Enable toggle button.
- Click Save.
![]()
Payment Status Update
The NET32 Get Charge Status Order Export plugin retrieves order payment statuses from Net32 to Sellercloud and lists the output in 2 columns:
-
- Net32_PaymentCaptured – Indicates if the payment is captured successfully.
- Net32_PaymentMessage – Displays payment messages (including error messages), if applicable.
Before you move on, create a Saved Search for orders filtered by:
-
- Company – The company you created for the integration.
- Shipping Status – FullyShipped
- Channel – Website
- ChargeRequestId – Select Is Not Null to only include orders with a unique identifier associated with the charge request.
- NET32_PaymentCaptured – Select False to export only unpaid orders.
Automate Payment Status Update
To create a Scheduled Task that exports orders charged statuses:
- Navigate to Settings > Scheduled Tasks > Manage Scheduled Tasks.
- Click the green + icon: Create New Scheduled Task.
- Complete as follows:
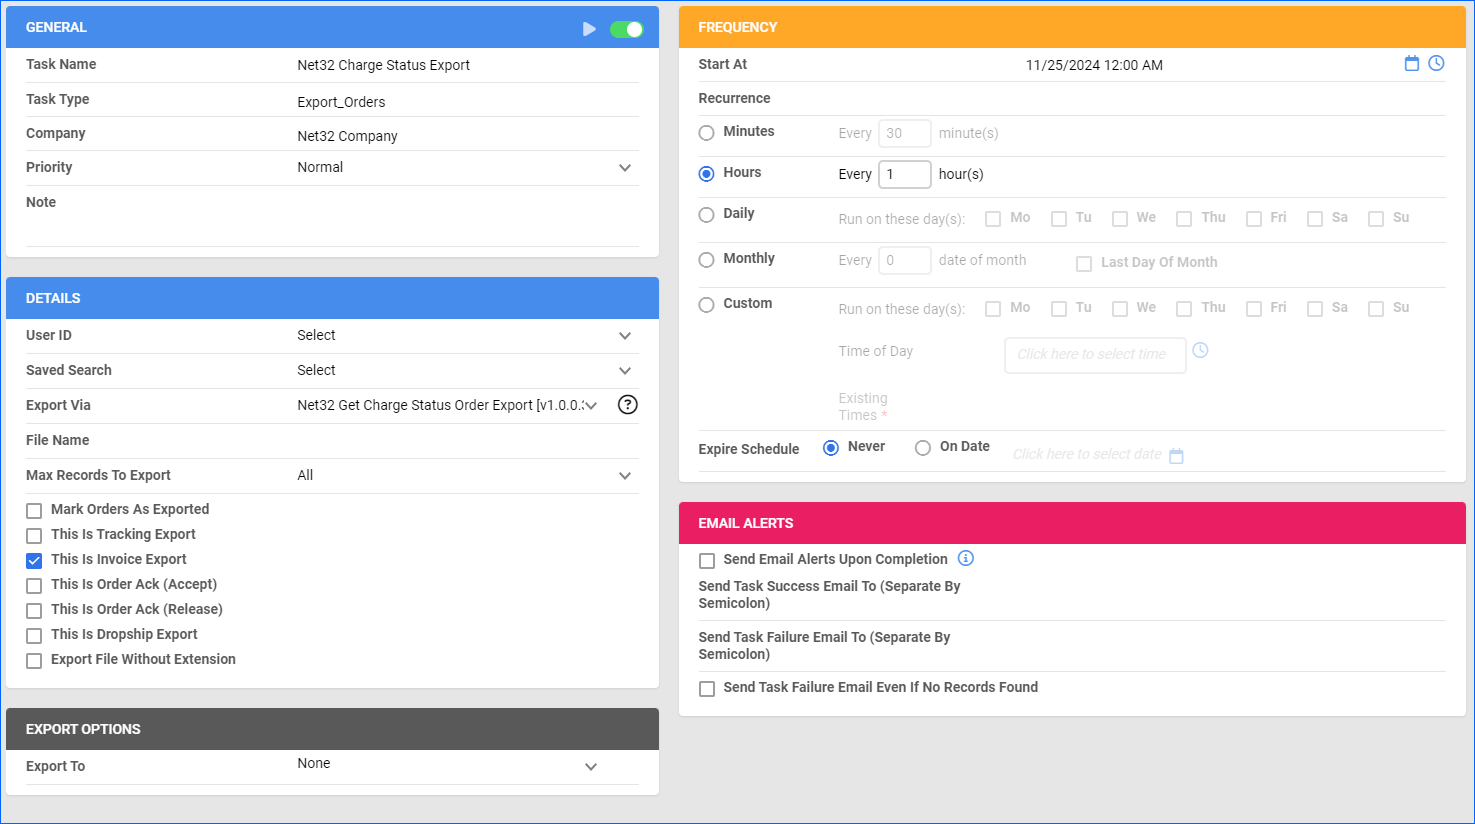
- Click Task Type and select Export Orders.
- Set the Task Name.
- Select the Company.
- Select the Start Time.
- Click CREATE.
- On the Scheduled Task page, click the Edit button at the top right corner.
- In the Details panel:
- Click the User ID menu and select your email.
- Click the Saved Search menu and select the saved search you created earlier.
- Click the Export Via menu and select NET32 Get Charge Status Order Export.
- Check This Is Invoice Export.
- In the Export Options panel, set Export To to None.
- In the Frequency panel, specify the task frequency. For optimal performance, select a range between thirty minutes and one hour.
- In the General panel, click the Enable toggle button.
- Click Save.
Inventory Export
The Net32 Inventory Product Export plugin exports inventory from Sellercloud to Net32.
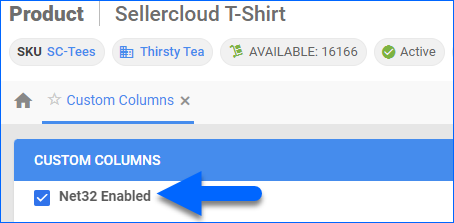
Optionally, you can enable only specific products for Net32 by setting their Net32_Enabled Custom Product Column to True:
-
- For one product at a time: go to the Product Details Page > click Toolbox and select Custom Columns > click Edit, update the Net32_Enabled column, and Save.
- For multiple products in bulk: follow the steps to Bulk Update Products and use the Net32_Enabled column – set it to True for all products you want to enable.
Unlike core integrations, plugin integrations don’t require products to be in the company with the scheduled tasks. The export will include the products you select with your Saved Search.
Next, create a Saved Search for products filtered by Net32_Enabled – True. Optionally, you can add more filters to the search to narrow down the export further.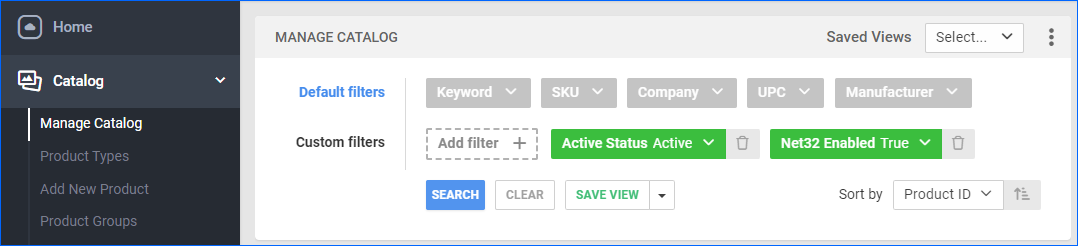
Automate Inventory Export
To create a Scheduled Task that exports inventory:
- Navigate to Settings > Scheduled Tasks > Manage Scheduled Tasks.
- Click the green + icon: Create New Scheduled Task.
- Complete as follows:
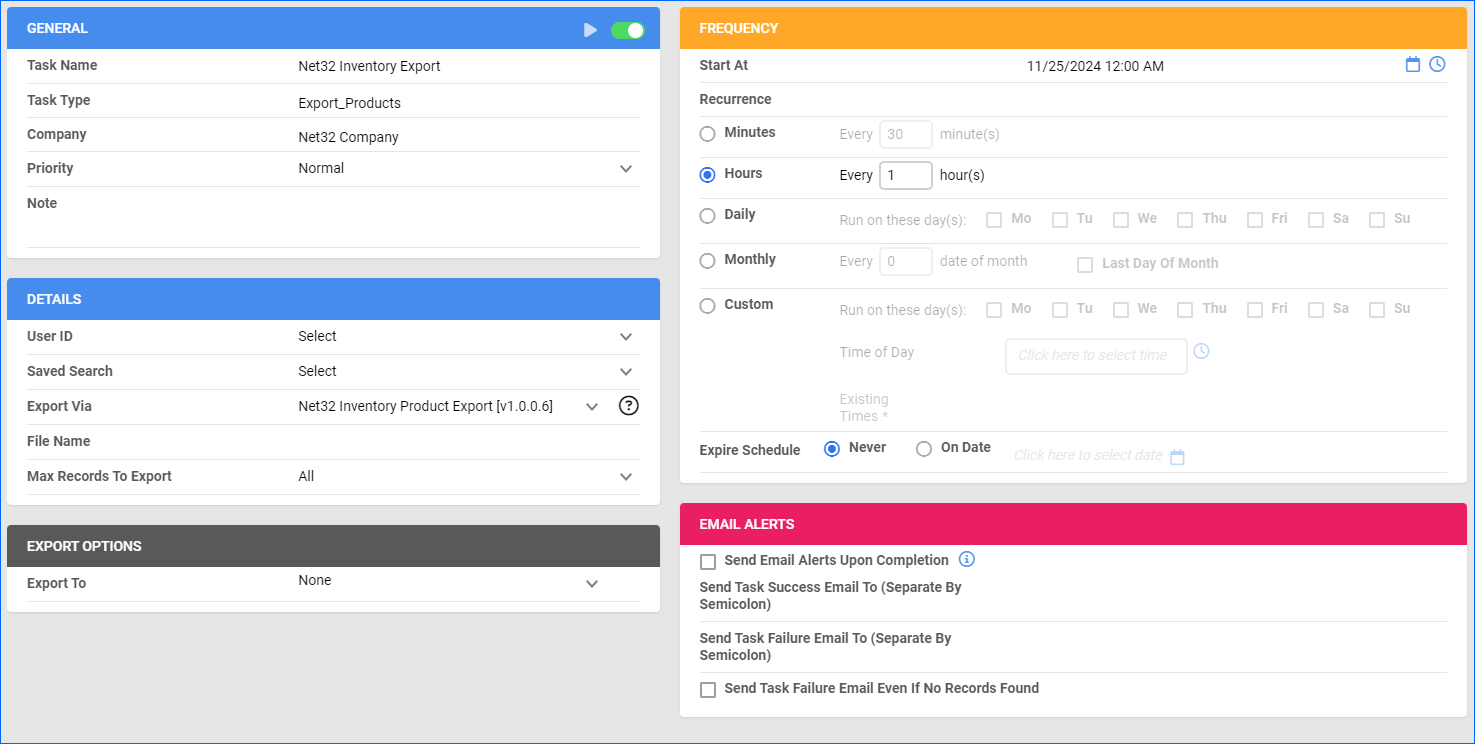
- Click Task Type and select Export Products.
- Set the Task Name.
- Select the Company.
- Select the Start Time.
- Click CREATE.
- On the Scheduled Task page, click the Edit button at the top right corner.
- In the Details panel:
- Click the User ID menu and select your email.
- Click the Saved Search menu and select the saved search you created earlier.
- Click the Export Via menu and select Net32 Inventory Product Export.
- In the Export Options panel, set Export To to None.
- In the Frequency panel, specify the task frequency. For optimal performance, select a range between thirty minutes and one hour.
- In the General panel, click the Enable toggle button.
- Click Save.