Overview
Overstock recently purchased Bed Bath & Beyond and rebranded it to Beyond. To integrate your Sellercloud account with Beyond, you must use the Overstock General Settings page and the Overstock Product Properties page to manage your listings. All orders will be imported with Order Source: Overstock.
Overstock.com is a well-known marketplace that attracts customers looking for discounts and affordable shipping. Learn how to integrate your Overstock account within Sellecloud in order to post products, manage listings, and enable automatic updates.
Integrate with Overstock
Sellercloud exchanges documents with Supplier Oasis via an FTP supplied by Overstock. As with most fulfillment channels, you must create your listings directly on their platform and negotiate pricing with an Overstock representative.
Follow the steps below to integrate your account:
- Apply to sell on Overstock here.
- Contact Overstock to create an FTP. They will require the following information:
- Customer ISA Qualifier – ZZ.
- Customer ISA ID – Typically your phone number.
- Overstock will email the credentials to you, along with their Qualifier and ID for the transactions. You will need them when setting up the integration.
- In Sellercloud, go to Settings > Companies > Manage Companies > Select a company > Toolbox > Overstock > General Settings.
- If the page is set to the old API integration settings, go to Actions > Switch to EDI Settings.
- Click Edit.
- In the Credentials panel, check Overstock Enabled and enter the respective qualifiers and IDs.
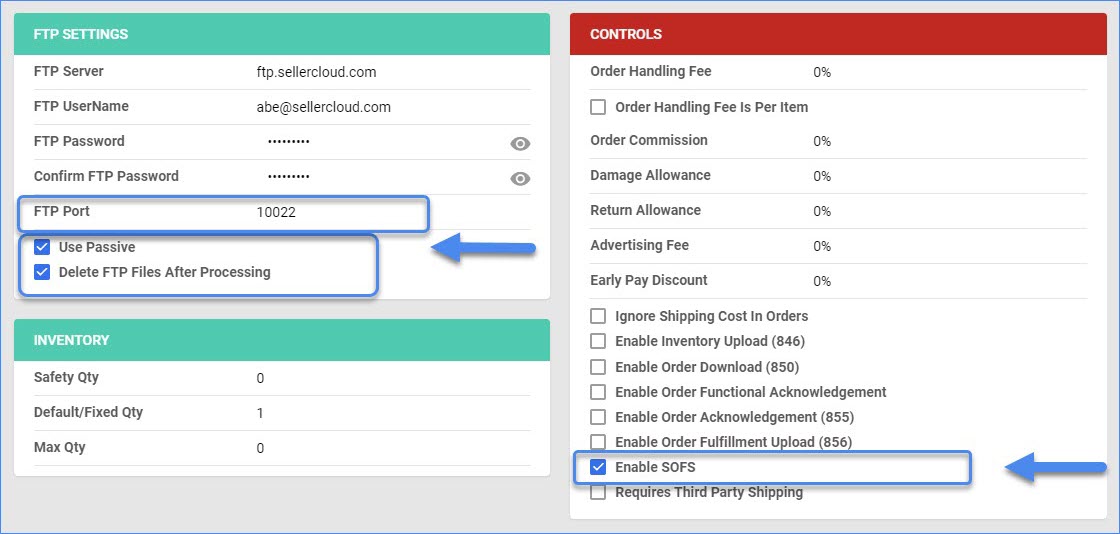
- In the FTP Settings panel, fill out the credentials you obtained earlier.
- Set the port to 10022 and enable Use Passive.
- In the Controls panel, check the Enable SOFS setting.
- (Optional) Check Delete Files after Processing. If incoming files are not cleared on the FTP server, retrieval timeouts may occur. To avoid FTP clutter, enable this option. We strongly recommend checking this box only after testing the order download.
- Click Save.
- Go to Actions > Test FTP credentials.

Overstock General Settings
You can configure the following settings on the Overstock General Settings page:

| SETTING | DESCRIPTION |
| CREDENTIALS | |
| Overstock Enabled | Indicates if a company is live on Overstock. When enabled, Sellercloud will start sending and receiving automatic updates from and to Overstock. |
| Customer ISA Qualifier | Set to ZZ. |
| Customer ISA ID | Typically your phone number. |
| OverStock ISA Qualifier | Obtained from Overstock. |
| OverStock ISA ID | Obtained from Overstock. |
| OverStock Seller ID | Obtained from Overstock. |
| Supplier ID | Obtained from Overstock. |
| Supplier Warehouse ID | ID of the warehouse in Sellercloud. |
| Overstock Warehouse Name | Name of the warehouse on Overstock’s side. |
| Partner Name | Your login email. |
| API CREDENTIALS | |
| Merchant Key | Provided when you register for API settings. |
| Authentication Key | Provided when you register for API settings. |
| FTP SETTINGS | |
| FTP Server | Address of the FTP server. Provided by Overstock. |
| FTP Username |
Provided by Overstock. Customer Mailbox ID. |
| FTP Password |
Provided by Overstock. Customer Mailbox password. |
| Confirm FTP Password |
Reenter password. |
| FTP Port |
The port of the FTP server. Provided by Overstock. |
| Use Passive | Check this option to connect to the server in passive mode. |
| Delete FTP Files After Processing | Check this option to delete FTP files after processing. |
| INVENTORY | |
| Safety Qty |
A buffer between the amount of inventory you have and the amount Sellercloud is sending to the channel to prevent overselling of items in high demand. This will be the Safety Quantity used for your products where Use Default is checked on their Overstock Properties page. |
| Default/Fixed Qty | This setting only applies to Replenishable Products. For these products, the Default Fixed Quantity is the amount that will always be sent to Overstock for inventory updates instead of the available inventory. This will be the Default Fixed Quantity used for your products where Use Default is checked on their Overstock Properties page. |
| Max Qty | A default Maximum Inventory Quantity that limits the inventory available for products on Overstock. This will be the Max Qty used for your products where Enable Max Qty is checked on their Overstock Properties page. |
| CONTROLS | |
| Order Handling Fee | Set a fee for handling. |
| Order Handling Fee Is Per Item | Enable this setting if you want the fee to be per item. |
| Order Commission | Set an order commission. |
| Damage Allowance | Set a damage allowance. |
| Return Allowance | Set a return allowance. |
| Advertising Fee | Set a fee for advertising. |
| Early Pay Discount | Set a discount for early payment. |
| Ignore Shipping Cost In Orders | Enable this to ignore the cost of shipping when importing orders. |
| Enable Inventory Upload | Enable Sellercloud to send automatic inventory updates to Overstock regularly. Only enable this setting once you are ready to have Sellercloud control your inventory on Overstock.
Products that are not Overstock Enabled will be updated with a quantity of zero. To Bulk Update them, use the column header OverstockEnabled and set it to True.
|
| Enable Order Download | Enable automatic order download from Overstock to Sellercloud. |
| Enable Order Functional Acknowledgement | Informs Overstock that the order file has been received. |
| Enable Order Acknowledgement | Informs Overstock that the order file has been accepted and is being processed. |
| Enable Order Fulfillment Upload | Enable Sellercloud to send automatic tracking updates for shipped orders to Overstock. |
| Enable SOFS | Enable file server settings. |
| Requires Third Party Shipping |
Choose this option to have your Overstock orders shipped using a third-party account. |