Overview
Pitney Bowes is a shipping and logistics company that helps businesses optimize their fulfillment processes by leveraging partnerships with traditional carriers and providing discounted rates. The integration between Sellercloud and Pitney Bowes enables you to generate shipping labels for both domestic and international orders, including returns, directly from the Sellercloud interface. Once generated, the label files are automatically saved in the Order Documents and can also be printed from Shipbridge.
If necessary, you can contact Sellercloud Support to request additional customizations or other plugins for this integration. Any such modifications will be billable.
Prerequisites
Open a ticket with Sellercloud Support and request that the following plugins be installed on your server:
- Pitney Bowes Create Domestic Label Order Export
- Pitney Bowes Create Domestic Return Label RMA Export
- Pitney Bowes Create International Label Order Export
- Pitney Bowes Create International Return Label RMA Export
Additionally, contact Pitney Bowes for your API Key, API Secret, and the IDs required for the Custom Company Settings below.
Custom Company Settings
Create the following Custom Company Settings on the company where you will set up the Scheduled Tasks.
For order shipping labels:
- Pitney Bowes API Key
- Pitney Bowes API Secret
- Pitney Bowes Shipper Id
- Pitney Bowes Client Id
- Pitney Bowes Client Facility Id
- Pitney Bowes Carrier Facility Id
- (Optional) Pitney Bowes is test environment – Defaults to False. Set to True during testing and switch to False when ready to go live.
- (Optional) Pitney Bowes Multi Warehouse File ID – Allows you to use different shipping account credentials per warehouse. Enter your multi-warehouse mapping File ID. See Integrate Multiple Accounts for more information.
For return labels:
- Pitney Bowes RMA API Key
- Pitney Bowes RMA API Secret
- Pitney Bowes RMA Shipper Id
- Pitney Bowes RMA Client Id
- Pitney Bowes RMA Disposition Ruleset Id
- Pitney Bowes RMA Client Facility Id
- Pitney Bowes RMA Carrier Facility Id
- (Optional) Pitney Bowes RMA is test environment – Set to True during testing. Switch to False when ready to go live. Defaults to False.
- (Optional) Pitney Bowes RMA Multi Warehouse File ID – Allows you to use different shipping account credentials per warehouse. Enter your multi-warehouse mapping File ID. See Integrate Multiple Accounts for more information.
- (Optional) Pitney Bowes RMA HS Tariff Code – Enter an hSTariffCode for your Pitney Customs items.
Custom Order Columns
Create the following Custom Order Columns:
- PitneyBowes_IsExported – Defaults to False. The plugins will skip creating labels for orders if this column is set to True.
- PitneyBowes_RMAIsExported – Defaults to False. The plugins will skip creating labels for orders if this column is set to True.
Integrate Multiple Accounts
The Custom Company Settings Pitney Bowes Multi Warehouse File ID and Pitney Bowes RMA Multi Warehouse File ID allow you to map each of your warehouses to a different Pitney Bowes shipping account. You do this by creating a spreadsheet with warehouse mappings which the plugins will check to determine the proper credentials to use based on the ID of the Shipping Warehouse.
Your warehouse mapping file must contain the following columns:
- Warehouse ID
- Client ID
- Client Facility ID
- Carrier Facility ID
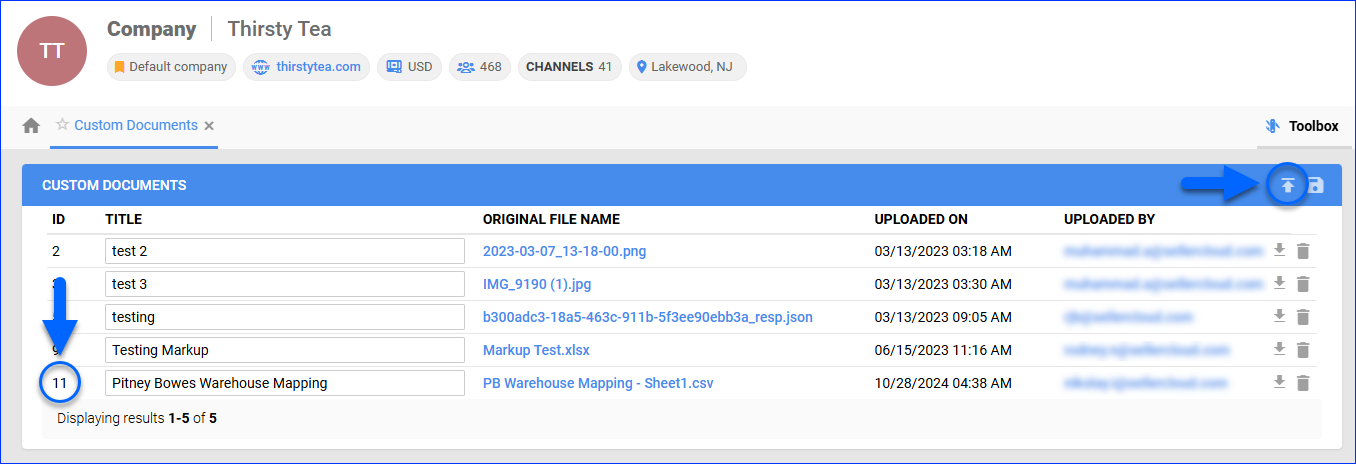
To upload the file:
- Go to Company Settings.
- Click Toolbox and select Custom Documents.
- Click Upload Custom Document.
- Select the file and click Upload.
- Enter the file’s ID into the Pitney Bowes Multi Warehouse File ID and Pitney Bowes RMA Multi Warehouse File ID Custom Company Settings.
Generate Labels
When processing domestic orders, the Pitney Bowes Create Domestic Label Order Export plugin sets the Shipping Carrier to USPS and the Shipping Service to USPS Ground Advantage. When processing international orders, the Pitney Bowes Create International Label Order Export plugin sets the Shipping Carrier to PitneyBowes and the Shipping Service to PitneyBowes Standard DDP.
The plugins set the Tracking Number for each package in your orders. If a package in the order doesn’t have Package Dimensions and Weight, then the product’s Shipping Dimensions and Shipping Weight will be used instead.
The labels you generate are automatically saved to each order. To view them, go to the Order Details Page, then click Toolbox and select Documents.
Automate Shipping Label Generation
Before you move on, create a Saved Search for orders filtered by:
- Order Status – Processing
- Shipping Status – Unshipped
- Payment Status – Charged
- PitneyBowes_IsExported – False
Next, create a Scheduled Task that generates labels:
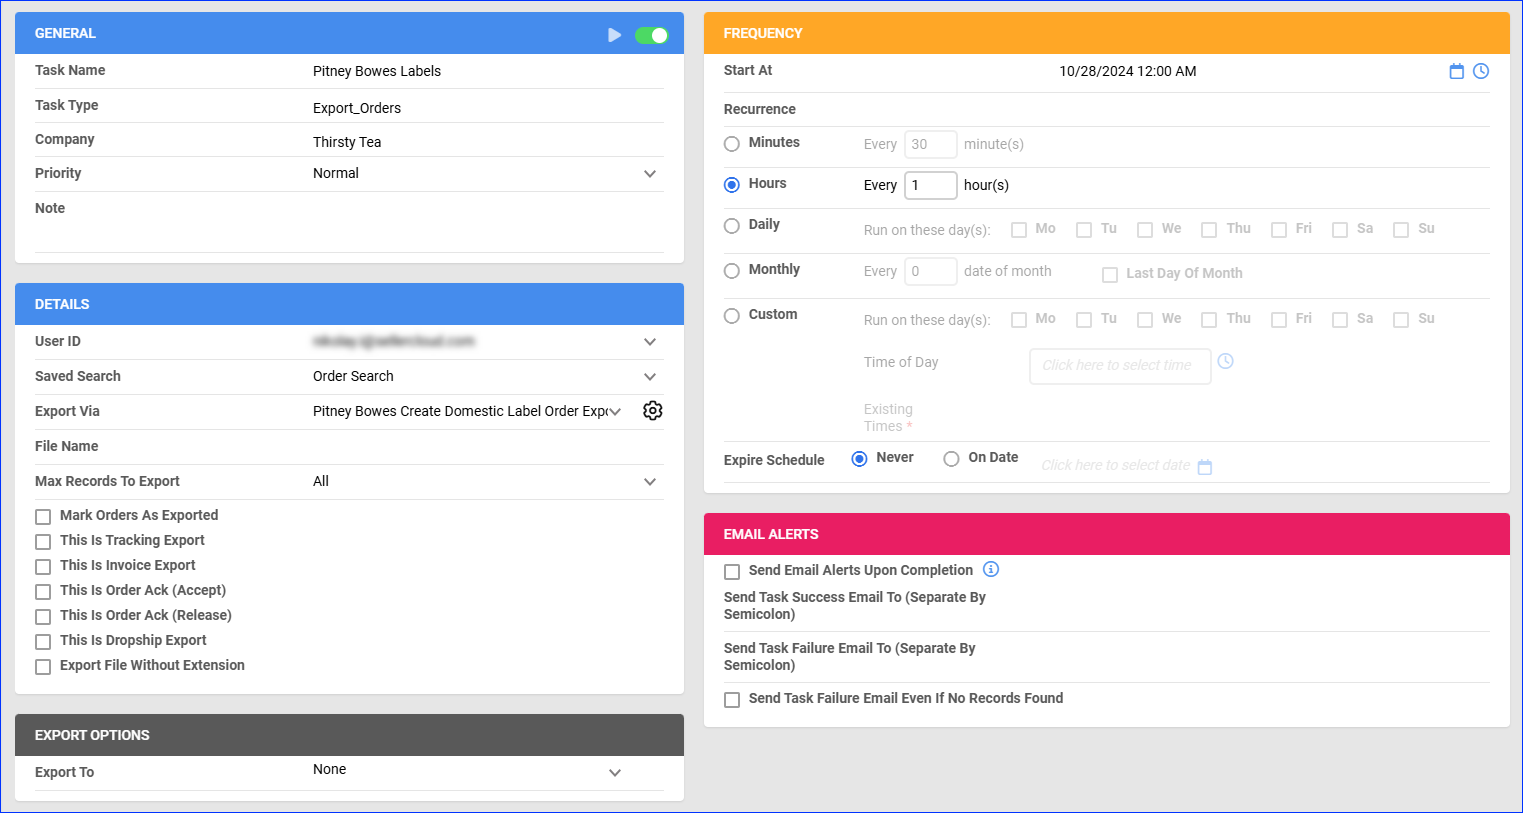
- Navigate to Settings > Scheduled Tasks > Manage Scheduled Tasks.
- Click the green + icon: Create New Scheduled Task.
- Complete as follows:
- Click Task Type and select Export Orders.
- Set the Task Name.
- Select the Company.
- Select the Start Time.
- Click CREATE.
- On the Scheduled Task page, click the Edit button at the top right.
- In the Details panel:
- Click the User ID menu and select your email.
- Click the Saved Search menu and select the saved search you created earlier.
- Click the Export Via menu and select Pitney Bowes Create Domestic Label Order Export or Pitney Bowes Create International Label Order Export.
- In the Export Options section, set Export To to None.
- In the Frequency section, specify the task frequency. For optimal performance, select a range between thirty minutes and one hour.
- In the General section, click the Enable toggle button.
- Click Save on the top right.
Automate Return Label Generation
Before you move on, create a Saved Search for orders filtered by:
- Shipping Status – Fully Shipped
- Payment Status – Charged
- Has RMA – Yes
- PitneyBowes_RMAIsExported – False
Next, create a Scheduled Task that generates labels:
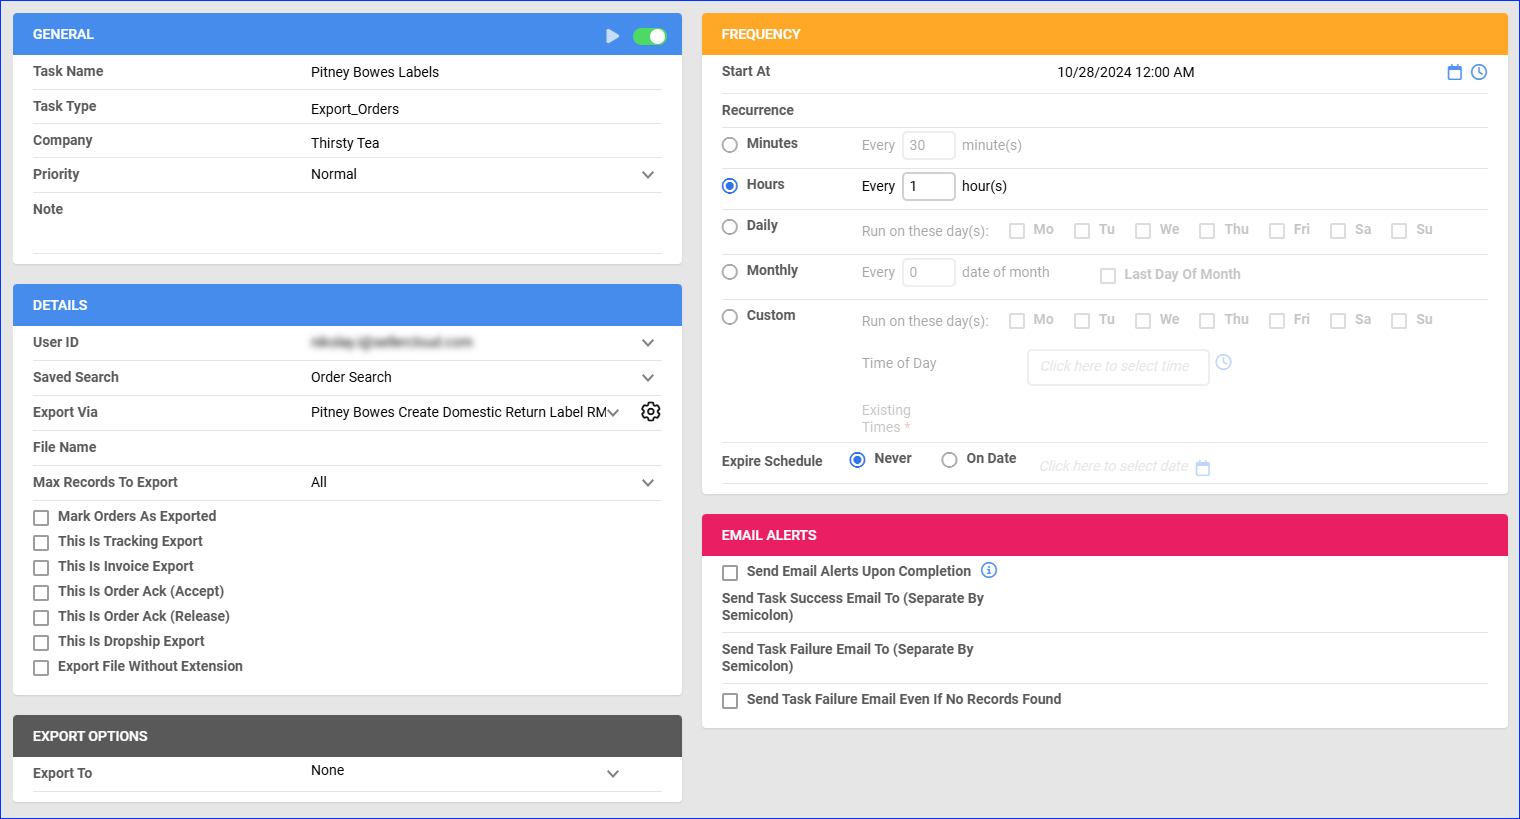
- Navigate to Settings > Scheduled Tasks > Manage Scheduled Tasks.
- Click the green + icon: Create New Scheduled Task.
- Complete as follows:
- Click Task Type and select Export Orders.
- Set the Task Name.
- Select the Company.
- Select the Start Time.
- Click CREATE.
- On the Scheduled Task page, click the Edit button at the top right.
- In the Details panel:
- Click the User ID menu and select your email.
- Click the Saved Search menu and select the saved search you created earlier.
- Click the Export Via menu and select Pitney Bowes Create Domestic Return Label RMA Export or Pitney Bowes Create International Return Label RMA Export.
- In the Export Options section, set Export To to None.
- In the Frequency section, specify the task frequency. For optimal performance, select a range between thirty minutes and one hour.
- In the General section, click the Enable toggle button.
- Click Save on the top right.
Ship and Print From Shipbridge
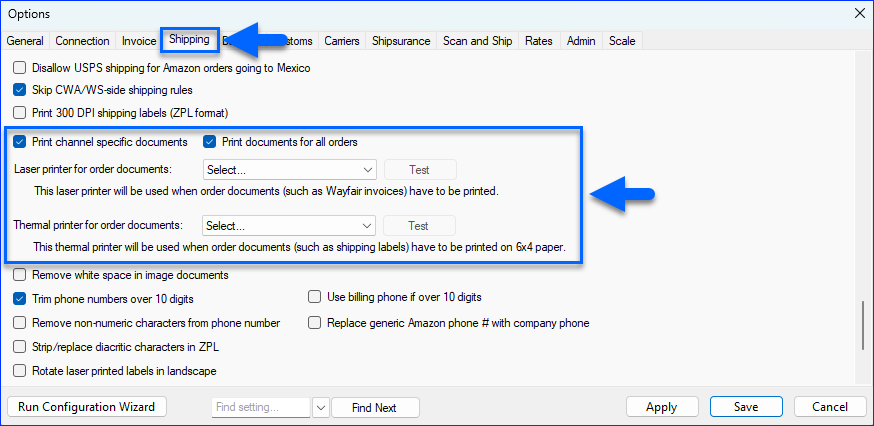
Before you can print Pitney Bowes labels, you must enable the following settings:
- Go to Menu > Options.
- Select the Shipping tab.
- Enable Print channel specific documents and Print documents for all orders.
- Select a Laser printer for order documents or a Thermal printer for order documents.
- Click Test to ensure the setup works correctly. If the test is successful, a Printer Test page will be generated.
- Click Save.
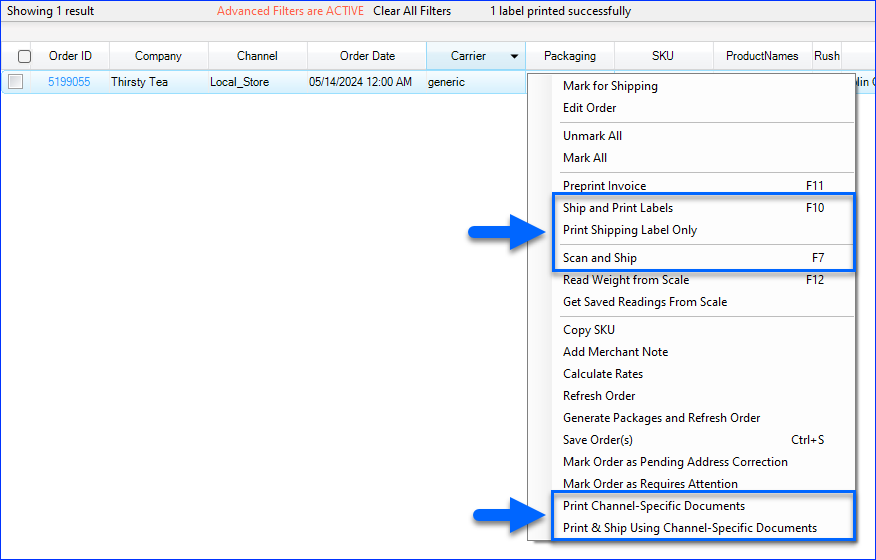
Next, to ship orders and print a physical copy of the labels:
- Use the Scan and Ship action.
- Use the Ship and Print Labels or Print & Ship Using Channel-Specific Documents action to print the labels and ship without scanning items.
- Use the Print Shipping Label Only or Print Channel-Specific Documents action to print labels without marking orders as shipped.
When using any of the above actions, Shipbridge will automatically detect the channel documents to print and use the Generic Shipping Service to ship the order.

