Overview
Feedvisor is an online platform that provides algorithmic repricing and business intelligence solutions for large sellers and brands on Amazon. Their primary goal is to empower online retailers by leveraging AI technology to automate and optimize their pricing and selling strategies. The integration between Sellercloud and Feedvisor is established via FTP and allows you to schedule automatic product exports. This can be achieved via our generic Feedvisor Product Export Plugin or via a profile created with our Export Mapping Tool. This article outlines both Feedvisor integration methods and their respective prerequisites.
Prerequisites
To integrate your Feedvisor account, you must be an active Feedvisor user, obtain your FTP credentials, and prepare the required Product Fields.
Plugin
For this integration method, you should submit a Customer Support ticket to request the installation of our generic Feedvisor Product Export plugin on your server.
Mapping Profile
Alternatively, you can integrate via a profile created with our Export Mapping Tool. To do this, you would also need a template file for the export provided by Feedvisor.
Additionally, you will have to create a Product Export Mapping Profile and a Saved View that will be set on a Scheduled Task.
Custom Product Columns
Create the following Custom product columns in Sellercloud:
- FLOOR_PRICE – Decimal data type. Indicates the lowest price at which you are willing to sell your product:
- If the product isn’t a Shadow, the exported value will be from the custom column FLOOR_PRICE.
- If the product is a Shadow, the pulled value would be from the Parent’s product custom field FLOOR_PRICE and if:
- The product’s country code is not US, and it differs from the parent’s; a 20% markup will apply. The result will be multiplied by the company’s conversion rate in Sellercloud, and the end value will be displayed.
- The country code is US, or the currency code of the shadow and parent products match, no additional calculations will apply.
- CEILING_PRICE – Decimal data type. Indicates the maximum price at which you want to sell your product.
- If the product isn’t a shadow, the exported value will be from the custom column CEILING_PRICE.
- If the product is a shadow, the used value would be from the Parent custom column CEILING_PRICE and if:
- The country code of the product is not US, and it differs from the parent’s, a 15% markup will apply. The result will be multiplied by the company’s conversion rate in Sellercloud, and the end value will be displayed.
- The country code is US, or the currency code of the shadow and parent products match, no additional calculations will apply.
- REPRICE – Boolean data type. Indicates if the product should be repriced or not. If the Floor or Ceiling price is 0, the Reprice field will export as FALSE, regardless of the custom column value. In case the product is a Shadow, the value will be pulled from the Parent SKU.
Integrate with Feedvisor
The integration between Sellercloud and Feedvisor could be established via our generic Feedvisor Product Export Plugin or via a Profile created with our Export Mapping Tool.
Via Plugin
When utilized, the Feedvisor Product Export plugin matches the criteria for Feedvisor’s format and exports the following data:
- SKU – ProductID in Sellercloud.
- Amazon Seller SKU – Amazon Merchant SKU in Sellercloud.
- ASIN – ASIN in Sellercloud.
- Cost ($) – SiteCost in Sellercloud.
- Amazon Fee (%) – Commission Percentage in Sellercloud.
- Shipping Cost ($) – ShippingCost in Sellercloud.
- Floor Price – A custom column (see Prerequisites).
- Ceiling Price – A custom column (see Prerequisites).
- Reprice – A custom column (see Prerequisites).
- Map Masking – Product’s Map Price.
- Is Map Masking Active – Indicates if the product’s Map Masking is active.
- Sale Price – Product’s sale price.
- Start Date (yyyy-mm-dd) – Sale’s Start date.
- End Date (yyyy-mm-dd) – Sale’s End date
- Is Sale Price Active – Indicates if the sale price is active.
- Buy Box Share – Product’s Buy Box price.
- Available Quantity – Inventory Available Qty in Sellercloud.
- Listed Price on Amazon – Amazon Price in Sellercloud.
- Shipping Price on Amazon – Shipping expenses listed on Amazon.
- Product Name – The product’s name.
Once the plugin is installed on your server and the required custom columns are created, you can automate the data transfer by creating a Scheduled Task for the plugin.
Create a Saved View
A Saved View allows you to specify the list of exported products. You can create such a view with custom filters, such as Amazon Statuses: Enabled. Optionally, you can add any other filters to further customize the export list.
Create a Scheduled Task
In order to automatically export data of selected products and send it regularly to Feedvisor, you can create a scheduled task:
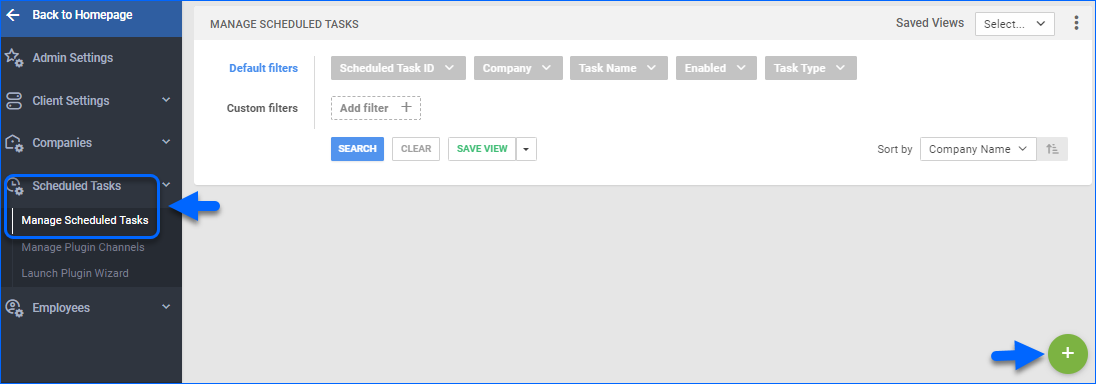
- Navigate to Settings > Scheduled Tasks > Manage Scheduled Tasks.
- Click the green + icon: Create New Scheduled Task.

- Complete as follows:
- Click Task Type and select Export Products.
- Set the Task Name.
- Select the Company.
- Select the Start Time Date.
- Click Create.
- A success message will appear and the new Schedule task will load on your screen.
- Click the Edit button on the top right to configure it.
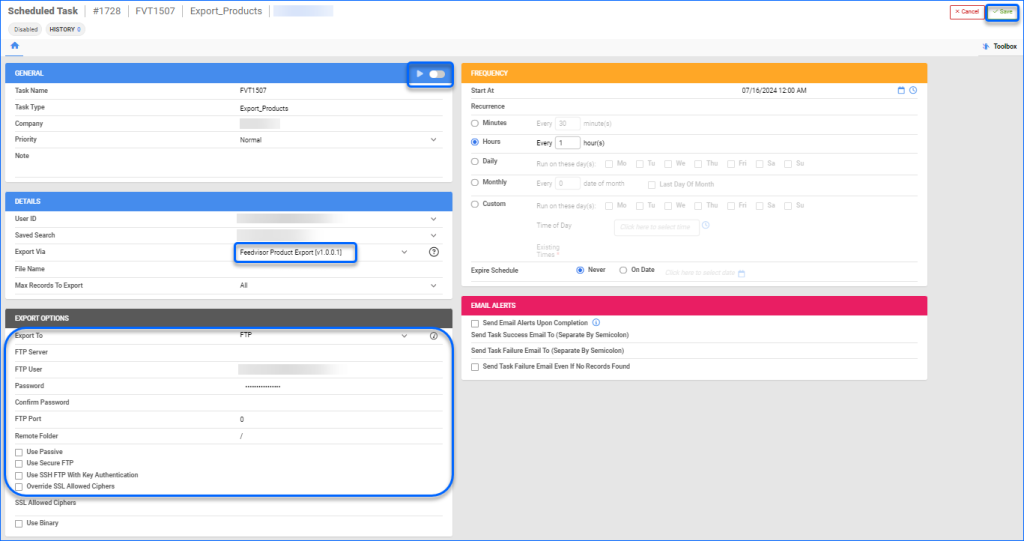
- In the Details panel:
- Select your User Id and the respective Saved Search.
- Click the Export Via menu and select the Feedvisor Product Export plugin.
- In the Export Options panel:
- Set Export To to FTP.
- Fill in the FTP credentials provided by Feedvisor.
- Enable Use Secure FTP.
- Specify the task Frequency. Schedule the task to recur at your desired intervals.
The frequency of the tasks should range between thirty minutes to an hour to ensure optimal performance. - In the General section, click the Enable button.
- Click Save on the top right.
Via Profile
To integrate via our Export Mapping Tool, you would need a Product Export Mapping Profile and a Saved View that will be set on a Scheduled Task, which automates the product export. You would also need a Feedvisor template file for the export.
Create a Mapping Profile
Sellecloud will automatically send regular product and cost feeds to Feedvisor through your Mapping Profile.
- Navigate to Settings > Mapping Tools > Manage Export Mapping Profiles.
- Click the blue Actions icon in the bottom right corner > Create.
- On the creation wizard pop-up, fill in the required fields:
- Profile Name – Select a name for the Product Export profile.
- Profile type – Set it to Product.
- Export File Type – set to Excel.
- Click Template File. Find and select the downloaded template from your device.
- Click Add.
Open the Mapping Profile Details Page to map the export’s product columns. This means selecting specific Sellercloud fields and mapping them to the headers from your Feedvisor file.
- Navigate to Settings > Mapping Tools > Manage Export Mapping Profiles.
- Open the Feedvisor Product Export Profile.
- Click Edit.
- Map the required product columns with their respective file headers.
Create a Saved View
A Saved View allows you to specify the list of exported products. Create such a view with custom filters, such as Amazon Statuses: Enabled. Optionally, you can add any other filters to customize the export list further.
Create a Scheduled Task
In order to export data of selected products and send it regularly to Feedvisor, create a scheduled task:
- Navigate to Settings > Scheduled Tasks > Manage Scheduled Tasks.
- Click the green + icon: Create New Scheduled Task.

- Complete as follows:
- Click Task Type and select Export Products.
- Set the Task Name.
- Select the Company.
- Select the Start Time Date.
- Click Create.
- A success message will appear, and the new Schedule task will load on your screen.
- Click the Edit button on the top right to configure it.
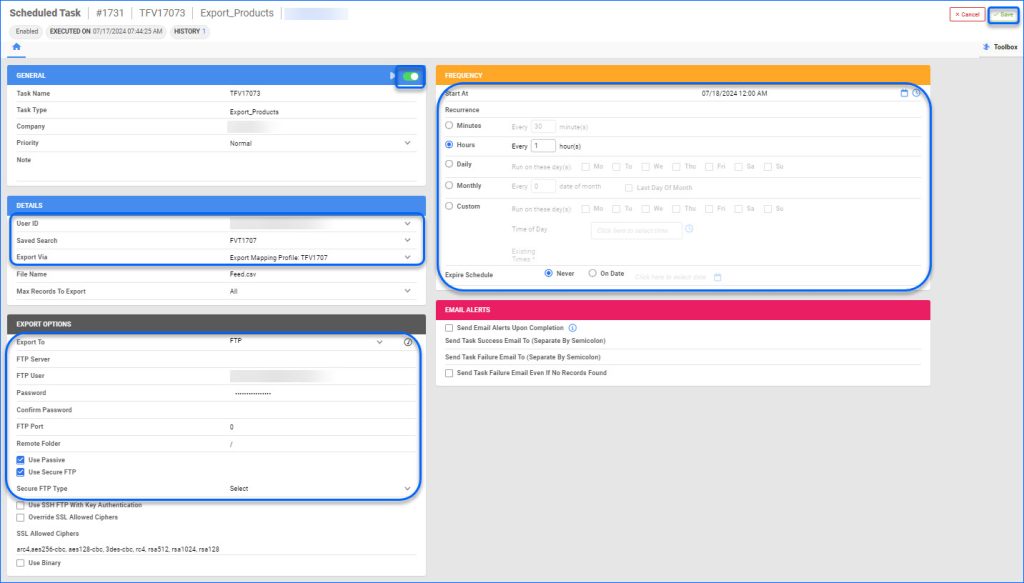
- In the Details panel:
- Select your User Id and the respective Saved Search.
- Click the Export Via menu and select your Mapping Profile.
- In the Export Options panel:
- Set Export To to FTP.
- Fill in the FTP credentials provided by Feedvisor.
- Enable Use Secure FTP.
- Specify the task Frequency. Schedule the task to recur at your desired intervals.
The frequency of the tasks should range between thirty minutes to an hour to ensure optimal performance. - In the General section, click the Enable button.
- Click Save on the top right.

